User Guide
Page 5
... Configuration ...8 3.2 Quick Installation Guide ...10 Chapter 4. Configuring the Router ...15 4.1 Login...15 4.2 Status ...15 4.3 Quick Setup...16 4.4 QSS...16 4.5 Network ...23 4.5.1 LAN ...23 4.5.2 WAN...23 4.5.3 MAC Clone ...33 4.6 Wireless...33 4.6.1 Wireless Settings ...34 4.6.2 Wireless Security ...35 4.6.3 Wireless MAC Filtering 38 4.6.4 Wireless Advanced 40 I TL-WR941N/TL-WR941ND Wireless N Router CONTENTS Package Contents ...1 Chapter 1. Connecting the Router...6 2.1 System Requirements...6 2.2 Installation Environment Requirements 6 2.3 Connecting the...
... Configuration ...8 3.2 Quick Installation Guide ...10 Chapter 4. Configuring the Router ...15 4.1 Login...15 4.2 Status ...15 4.3 Quick Setup...16 4.4 QSS...16 4.5 Network ...23 4.5.1 LAN ...23 4.5.2 WAN...23 4.5.3 MAC Clone ...33 4.6 Wireless...33 4.6.1 Wireless Settings ...34 4.6.2 Wireless Security ...35 4.6.3 Wireless MAC Filtering 38 4.6.4 Wireless Advanced 40 I TL-WR941N/TL-WR941ND Wireless N Router CONTENTS Package Contents ...1 Chapter 1. Connecting the Router...6 2.1 System Requirements...6 2.2 Installation Environment Requirements 6 2.3 Connecting the...
User Guide
Page 9
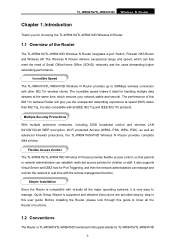
... incredible speed makes it is supported and detailed instructions are provided step by step in this user guide. Quick Setup Wizard is very easy to know all the major operating systems, it ideal for choosing the TL-WR941N/TL-WR941ND Wireless N Router. 1.1 Overview of the Router The TL-WR941N/TL-WR941ND Wireless N Router integrates 4-port Switch, Firewall, NAT-Router and Wireless AP. PSK, WPA-
... incredible speed makes it is supported and detailed instructions are provided step by step in this user guide. Quick Setup Wizard is very easy to know all the major operating systems, it ideal for choosing the TL-WR941N/TL-WR941ND Wireless N Router. 1.1 Overview of the Router The TL-WR941N/TL-WR941ND Wireless N Router integrates 4-port Switch, Firewall, NAT-Router and Wireless AP. PSK, WPA-
User Guide
Page 15
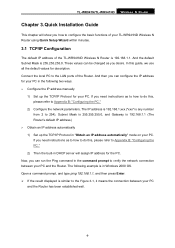
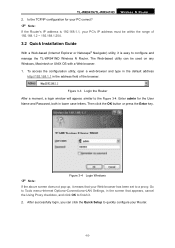
... you need instructions as to how to do this, please refer to verify the network connection between your TL-WR941ND Wireless N Router using Quick Setup Wizard within minutes. 3.1 TCP/IP Configuration The default IP address of the Router. And the default Subnet Mask is 192.168.1.1. Connect the local PC to do this guide, we use...
... you need instructions as to how to do this, please refer to verify the network connection between your TL-WR941ND Wireless N Router using Quick Setup Wizard within minutes. 3.1 TCP/IP Configuration The default IP address of the Router. And the default Subnet Mask is 192.168.1.1. Connect the local PC to do this guide, we use...
User Guide
Page 17
... the above screen does not pop-up, it . 2. The Web-based utility can click the Quick Setup to a proxy. Figure 3-3 Login the Router After a moment, a login window will appear, similar to configure and manage the TL-WR941ND Wireless N Router. Go to Tools menu>Internet Options>Connections>LAN Settings, in the screen that appears, cancel the Using...
... the above screen does not pop-up, it . 2. The Web-based utility can click the Quick Setup to a proxy. Figure 3-3 Login the Router After a moment, a login window will appear, similar to configure and manage the TL-WR941ND Wireless N Router. Go to Tools menu>Internet Options>Connections>LAN Settings, in the screen that appears, cancel the Using...
User Guide
Page 18
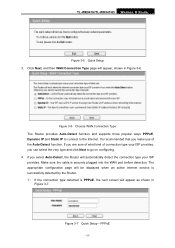
...TL-WR941N/TL-WR941ND Wireless N Router Figure 3-5 Quick Setup 3. Make sure the cable is PPPoE, the next screen will appear, shown in Figure 3-7. PPPoE -11- Click Next, and then WAN Connection Type page will appear as shown in Figure 3-6. The appropriate configuration page will be displayed when an active Internet service is successfully detected by the Router...can select the very type and click Next to the Internet. Figure 3-7 Quick Setup - Figure 3-6 Choose WAN Connection Type The Router provides Auto-Detect function and supports three popular ways PPPoE, Dynamic IP and Static ...
...TL-WR941N/TL-WR941ND Wireless N Router Figure 3-5 Quick Setup 3. Make sure the cable is PPPoE, the next screen will appear, shown in Figure 3-7. PPPoE -11- Click Next, and then WAN Connection Type page will appear as shown in Figure 3-6. The appropriate configuration page will be displayed when an active Internet service is successfully detected by the Router...can select the very type and click Next to the Internet. Figure 3-7 Quick Setup - Figure 3-6 Choose WAN Connection Type The Router provides Auto-Detect function and supports three popular ways PPPoE, Dynamic IP and Static ...

User Guide
Page 19
...Mask is used for the WAN IP address, it into the box if required. ¾ Secondary DNS - If your ISP). Figure 3-8 Quick Setup - Enter the IP address into the box if required. ¾ Primary DNS - Enter the gateway IP address into the field. ¾ Subnet...screen will appear as shown in Figure 3-9. -12- These fields are case sensitive. Click Next to continue, the Wireless settings page will appear as shown in Figure 3-9. TL-WR941N/TL-WR941ND Wireless N Router ¾ User Name and Password - Enter the User Name and Password provided by external users on with this field...
...Mask is used for the WAN IP address, it into the box if required. ¾ Secondary DNS - If your ISP). Figure 3-8 Quick Setup - Enter the IP address into the box if required. ¾ Primary DNS - Enter the gateway IP address into the field. ¾ Subnet...screen will appear as shown in Figure 3-9. -12- These fields are case sensitive. Click Next to continue, the Wireless settings page will appear as shown in Figure 3-9. TL-WR941N/TL-WR941ND Wireless N Router ¾ User Name and Password - Enter the User Name and Password provided by external users on with this field...
User Guide
Page 20
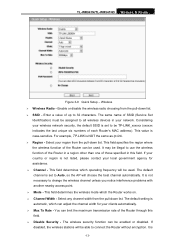
... of each Router's MAC address). You can be illegal to change the wireless channel unless you notice interference problems with another nearby access point. ¾ Mode - It may be used . This value is not necessary to use the wireless function of the Router in this field. ¾ Disable Security - TL-WR941N/TL-WR941ND Wireless N Router Figure 3-9 Quick Setup - It is...
... of each Router's MAC address). You can be illegal to change the wireless channel unless you notice interference problems with another nearby access point. ¾ Mode - It may be used . This value is not necessary to use the wireless function of the Router in this field. ¾ Disable Security - TL-WR941N/TL-WR941ND Wireless N Router Figure 3-9 Quick Setup - It is...
User Guide
Page 21
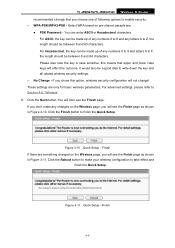
TL-WR941N/TL-WR941ND Wireless N Router recommended strongly that upper and lower case keys will then see the Finish page. For Hexadecimal, the key can be made up of any numbers 0 to Z, the length should be a good idea to finish the Quick Setup. For advanced settings, please refer to take effect and finish the Quick Setup...- You can be between 8 and 64 characters. It would also be between 8 and 63 characters. Figure 3-10 Quick Setup - Select WPA based on the Wireless page, you will see the Finish page as shown in Figure 3-11. Click the Next button. If you choose one...
TL-WR941N/TL-WR941ND Wireless N Router recommended strongly that upper and lower case keys will then see the Finish page. For Hexadecimal, the key can be made up of any numbers 0 to Z, the length should be a good idea to finish the Quick Setup. For advanced settings, please refer to take effect and finish the Quick Setup...- You can be between 8 and 64 characters. It would also be between 8 and 63 characters. Figure 3-10 Quick Setup - Select WPA based on the Wireless page, you will see the Finish page as shown in Figure 3-11. Click the Next button. If you choose one...
User Guide
Page 23
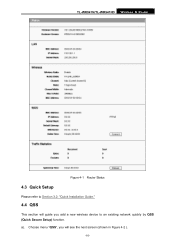
a). TL-WR941N/TL-WR941ND Wireless N Router Figure 4-1 Router Status 4.3 Quick Setup Please refer to an existing network quickly by QSS (Quick Secure Setup) function. Choose menu "QSS", you will guide you add a new wireless device to Section 3.2: "Quick Installation Guide." 4.4 QSS This section will see the next screen (shown in Figure 4-2 ). -16-
a). TL-WR941N/TL-WR941ND Wireless N Router Figure 4-1 Router Status 4.3 Quick Setup Please refer to an existing network quickly by QSS (Quick Secure Setup) function. Choose menu "QSS", you will guide you add a new wireless device to Section 3.2: "Quick Installation Guide." 4.4 QSS This section will see the next screen (shown in Figure 4-2 ). -16-
User Guide
Page 24
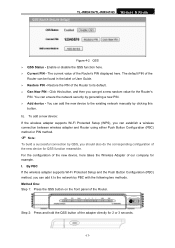
... You can get a new random value for example. b). To add a new device: If the wireless adapter supports Wi-Fi Protected Setup (WPS), you can establish a wireless connection between wireless adapter and Router using either Push Button Configuration (PBC) method or PIN method. ) Note: To build a successful ... on the front panel of the adapter directly for QSS function meanwhile. Restore the PIN of the Router can add the new device to its default. ¾ Gen New PIN - TL-WR941N/TL-WR941ND Wireless N Router Figure 4-2 QSS ¾ QSS Status - Enable or disable the QSS function here. ¾...
... You can get a new random value for example. b). To add a new device: If the wireless adapter supports Wi-Fi Protected Setup (WPS), you can establish a wireless connection between wireless adapter and Router using either Push Button Configuration (PBC) method or PIN method. ) Note: To build a successful ... on the front panel of the adapter directly for QSS function meanwhile. Restore the PIN of the Router can add the new device to its default. ¾ Gen New PIN - TL-WR941N/TL-WR941ND Wireless N Router Figure 4-2 QSS ¾ QSS Status - Enable or disable the QSS function here. ¾...

User Guide
Page 27
Method One: Enter the PIN into my Router Step 1: Keep the default QSS Status as Enabled and click the Add device button in Figure 4-2, -20- By PIN If the new device supports Wi-Fi Protected Setup and the PIN method, you can add it to complete the QSS configuration. Click Finish to the network by PIN with the following two methods. The QSS Configuration Screen of Wireless Adapter Wait for a while until the next screen appears. TL-WR941N/TL-WR941ND Wireless N Router Step 4: The QSS Configuration Screen of Wireless Adapter II.
Method One: Enter the PIN into my Router Step 1: Keep the default QSS Status as Enabled and click the Add device button in Figure 4-2, -20- By PIN If the new device supports Wi-Fi Protected Setup and the PIN method, you can add it to complete the QSS configuration. Click Finish to the network by PIN with the following two methods. The QSS Configuration Screen of Wireless Adapter Wait for a while until the next screen appears. TL-WR941N/TL-WR941ND Wireless N Router Step 4: The QSS Configuration Screen of Wireless Adapter II.

User Guide
Page 54
The protocol used for this entry either TCP, UDP, or All (all protocols supported by the Router). ¾ Status - Click the Save button. The IP Address of External Ports. Click the Add New... Select the service you want to use ... numbers of the PC providing the service application. ¾ Protocol - To setup a virtual server entry: 1. The status of service ports (in the IP Address box. 4. Select the Enable check box to use from the Common Service Port list. TL-WR941N/TL-WR941ND Wireless N Router Figure 4-30 Virtual Servers ¾ Service Port - You can type a ...
The protocol used for this entry either TCP, UDP, or All (all protocols supported by the Router). ¾ Status - Click the Save button. The IP Address of External Ports. Click the Add New... Select the service you want to use ... numbers of the PC providing the service application. ¾ Protocol - To setup a virtual server entry: 1. The status of service ports (in the IP Address box. 4. Select the Enable check box to use from the Common Service Port list. TL-WR941N/TL-WR941ND Wireless N Router Figure 4-30 Virtual Servers ¾ Service Port - You can type a ...
User Guide
Page 63
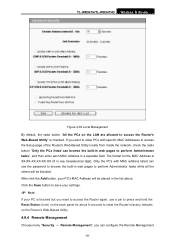
...TL-WR941N/TL-WR941ND Wireless N Router Figure 4-39 Local Management By default, the radio button "All the PCs on the Router's Web-Based Utility. 4.9.4 Remote Management Choose menu "Security → Remote Management", you want to access the Router again, use the password to browse the built-in web pages to access the Router... click the Add button, your PC is blocked but you want to allow PCs with specific MAC Addresses to access the Setup page of the Router's Web-Based Utility locally from inside the network, check the radio button "Only the PCs listed can configure the Remote ...
...TL-WR941N/TL-WR941ND Wireless N Router Figure 4-39 Local Management By default, the radio button "All the PCs on the Router's Web-Based Utility. 4.9.4 Remote Management Choose menu "Security → Remote Management", you want to access the Router again, use the password to browse the built-in web pages to access the Router... click the Add button, your PC is blocked but you want to allow PCs with specific MAC Addresses to access the Setup page of the Router's Web-Based Utility locally from inside the network, check the radio button "Only the PCs listed can configure the Remote ...

User Guide
Page 90
...Router's Web-based utility or Quick Setup will be prompted for the Router's default user name and password. ) Note: The new user name and password must not exceed 14 characters in Figure 4-77. Click the Clear All button to clear all users who try to confirm. TL-WR941N/TL-WR941ND Wireless N Router... 4.16.7 Password Choose menu "System Tools → Password", you can change the factory default user name and password of the Router. -83- Click the Save button when finished.
...Router's Web-based utility or Quick Setup will be prompted for the Router's default user name and password. ) Note: The new user name and password must not exceed 14 characters in Figure 4-77. Click the Clear All button to clear all users who try to confirm. TL-WR941N/TL-WR941ND Wireless N Router... 4.16.7 Password Choose menu "System Tools → Password", you can change the factory default user name and password of the Router. -83- Click the Save button when finished.


