
User Guide
Page 3
... other antenna or transmitter." FCC RF Radiation Exposure Statement This equipment complies with FCC RF exposure compliance requirements, this grant is applicable to only Mobile Configurations. The antennas used outside of own premises, general authorization is required Luxembourg None General authorization required for network and service supply(not for spectrum) Norway...
... other antenna or transmitter." FCC RF Radiation Exposure Statement This equipment complies with FCC RF exposure compliance requirements, this grant is applicable to only Mobile Configurations. The antennas used outside of own premises, general authorization is required Luxembourg None General authorization required for network and service supply(not for spectrum) Norway...

User Guide
Page 5
Configuring the Router 16 4.1 Login ...16 4.2 Status ...16 4.3 Quick Setup...17 4.4 QSS...18 4.5 Network ...24 4.5.1 LAN...24 4.5.2 WAN ...25 4.5.3 ... the Router 2 1.2 Conventions ...2 1.3 Main Features ...3 1.4 Panel Layout ...3 1.4.1 The Front Panel 3 1.4.2 The Rear Panel 4 Chapter 2. Quick Installation Guide 8 3.1 TCP/IP Configuration 8 3.2 Quick Installation Guide 10 Chapter 4. Connecting the Router 6 2.1 System Requirements 6 2.2 Installation Environment Requirements 6 2.3 Connecting the Router 6 Chapter 3. TL-WR940N Wireless N Router CONTENTS Package Contents ...1 Chapter 1.
Configuring the Router 16 4.1 Login ...16 4.2 Status ...16 4.3 Quick Setup...17 4.4 QSS...18 4.5 Network ...24 4.5.1 LAN...24 4.5.2 WAN ...25 4.5.3 ... the Router 2 1.2 Conventions ...2 1.3 Main Features ...3 1.4 Panel Layout ...3 1.4.1 The Front Panel 3 1.4.2 The Rear Panel 4 Chapter 2. Quick Installation Guide 8 3.1 TCP/IP Configuration 8 3.2 Quick Installation Guide 10 Chapter 4. Connecting the Router 6 2.1 System Requirements 6 2.2 Installation Environment Requirements 6 2.3 Connecting the Router 6 Chapter 3. TL-WR940N Wireless N Router CONTENTS Package Contents ...1 Chapter 1.

User Guide
Page 7
TL-WR940N Wireless N Router 4.15.3 No-ip.com DDNS 78 4.16 System Tools ...79 4.16.1 Time Setting...80 4.16.2 Diagnostic...81 4.16.3 Firmware Upgrade 82 4.16.4 Factory Defaults 83 4.16.5 Backup & Restore 83 4.16.6 Reboot ...84 4.16.7 Password...85 4.16.8 System Log...85 4.16.9 Statistics ...88 Appendix A: FAQ...90 Appendix B: Configuring the PCs 95 Appendix C: Specifications ...99 III
TL-WR940N Wireless N Router 4.15.3 No-ip.com DDNS 78 4.16 System Tools ...79 4.16.1 Time Setting...80 4.16.2 Diagnostic...81 4.16.3 Firmware Upgrade 82 4.16.4 Factory Defaults 83 4.16.5 Backup & Restore 83 4.16.6 Reboot ...84 4.16.7 Password...85 4.16.8 System Log...85 4.16.9 Statistics ...88 Appendix A: FAQ...90 Appendix B: Configuring the PCs 95 Appendix C: Specifications ...99 III
User Guide
Page 15
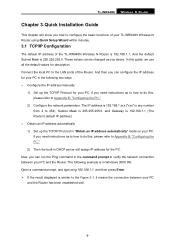
...to the Figure 3-1, it means the connection between your PC. TL-WR940N Wireless N Router Chapter 3. In this , please refer to Appendix B: "Configuring the PC." 2) Configure the network parameters. The following two ways. ¾ Configure the IP address manually 1) Set up the TCP/IP Protocol in...following example is any number from 2 to verify the network connection between your TL-WR940N Wireless N Router using Quick Setup Wizard within minutes. 3.1 TCP/IP Configuration The default IP address of the TL-WR940N Wireless N Router is 192.168.1.1. And the default Subnet Mask is 192....
...to the Figure 3-1, it means the connection between your PC. TL-WR940N Wireless N Router Chapter 3. In this , please refer to Appendix B: "Configuring the PC." 2) Configure the network parameters. The following two ways. ¾ Configure the IP address manually 1) Set up the TCP/IP Protocol in...following example is any number from 2 to verify the network connection between your TL-WR940N Wireless N Router using Quick Setup Wizard within minutes. 3.1 TCP/IP Configuration The default IP address of the TL-WR940N Wireless N Router is 192.168.1.1. And the default Subnet Mask is 192....
User Guide
Page 17
... checkbox, and click OK to a proxy. Enter admin for your PC correct? ) Note: If the Router's IP address is easy to configure and manage the TL-WR940N Wireless N Router. Go to Tools menu>Internet Options>Connections>LAN Settings, in the screen that your Web-browser has been set to finish it... used on any Windows, Macintosh or UNIX OS with a Web browser. 1. The Web-based utility can click the Quick Setup to the Figure 3-4. TL-WR940N Wireless N Router 2. To access the configuration utility, open a web-browser and type in the default address http://192.168.1.1 in lower case letters.
... checkbox, and click OK to a proxy. Enter admin for your PC correct? ) Note: If the Router's IP address is easy to configure and manage the TL-WR940N Wireless N Router. Go to Tools menu>Internet Options>Connections>LAN Settings, in the screen that your Web-browser has been set to finish it... used on any Windows, Macintosh or UNIX OS with a Web browser. 1. The Web-based utility can click the Quick Setup to the Figure 3-4. TL-WR940N Wireless N Router 2. To access the configuration utility, open a web-browser and type in the default address http://192.168.1.1 in lower case letters.
User Guide
Page 18
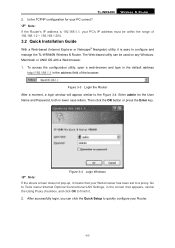
TL-WR940N Wireless N Router Figure 3-5 Quick Setup 3. Figure 3-6 Choose WAN Connection Type The Router provides Auto-Detect function and supports three popular ways PPPoE, Dynamic IP and Static IP to connect to go on configuring. 4. If you make use of connection type your ISP provides. The appropriate configuration page will automatically detect the connection type...
TL-WR940N Wireless N Router Figure 3-5 Quick Setup 3. Figure 3-6 Choose WAN Connection Type The Router provides Auto-Detect function and supports three popular ways PPPoE, Dynamic IP and Static IP to connect to go on configuring. 4. If you make use of connection type your ISP provides. The appropriate configuration page will automatically detect the connection type...

User Guide
Page 19
... configuration. 3) If the connection type detected is Dynamic IP, the next screen will appear as shown in Figure 3-8. Static IP ¾ IP Address - Enter the DNS Server IP address into the box if required. ¾ Primary DNS - Enter the gateway IP address into the box if required. ¾ Secondary DNS - TL-WR940N...
... configuration. 3) If the connection type detected is Dynamic IP, the next screen will appear as shown in Figure 3-8. Static IP ¾ IP Address - Enter the DNS Server IP address into the box if required. ¾ Primary DNS - Enter the gateway IP address into the box if required. ¾ Secondary DNS - TL-WR940N...
User Guide
Page 21
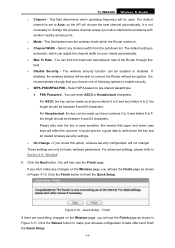
... notice interference problems with another nearby access point. ¾ Mode - Figure 3-10 Quick Setup - Finish If there are only for your wireless configuration to take effect and finish the Quick Setup. -14- Select WPA based on the Wireless page, you don't make any numbers 0 to 9...Figure 3-11. TL-WR940N Wireless N Router ¾ Channel - It is case sensitive, this means that you choose one of any changes on pre-shared passphrase. Select any letters A to Z, the length should be made up of the Router through this option, wireless security configuration will choose the...
... notice interference problems with another nearby access point. ¾ Mode - Figure 3-10 Quick Setup - Finish If there are only for your wireless configuration to take effect and finish the Quick Setup. -14- Select WPA based on the Wireless page, you don't make any numbers 0 to 9...Figure 3-11. TL-WR940N Wireless N Router ¾ Channel - It is case sensitive, this means that you choose one of any changes on pre-shared passphrase. Select any letters A to Z, the length should be made up of the Router through this option, wireless security configuration will choose the...
User Guide
Page 23
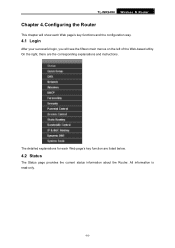
The detailed explanations for each Web page's key functions and the configuration way. 4.1 Login After your successful login, you will show each Web page's key function are the corresponding explanations and instructions. All information is read-only. -16- TL-WR940N Wireless N Router Chapter 4. On the right, there are listed below. 4.2 Status The Status page provides the current status information about the Router. Configuring the Router This chapter will see the fifteen main menus on the left of the Web-based utility.
The detailed explanations for each Web page's key functions and the configuration way. 4.1 Login After your successful login, you will show each Web page's key function are the corresponding explanations and instructions. All information is read-only. -16- TL-WR940N Wireless N Router Chapter 4. On the right, there are listed below. 4.2 Status The Status page provides the current status information about the Router. Configuring the Router This chapter will see the fifteen main menus on the left of the Web-based utility.

User Guide
Page 25
a). The current value of the Router to its default. ¾ Gen New PIN - 4.4 QSS TL-WR940N Wireless N Router This section will see the next screen (shown in the label or User Guide. ¾ Restore PIN - Enable or disable the QSS function ... the existing network manually by PBC with the following two methods. You can establish a wireless connection between wireless adapter and Router using either Push Button Configuration (PBC) method or PIN method. ) Note: To build a successful connection by QSS (Quick Secure Setup) function. You can add the new device to the network...
a). The current value of the Router to its default. ¾ Gen New PIN - 4.4 QSS TL-WR940N Wireless N Router This section will see the next screen (shown in the label or User Guide. ¾ Restore PIN - Enable or disable the QSS function ... the existing network manually by PBC with the following two methods. You can establish a wireless connection between wireless adapter and Router using either Push Button Configuration (PBC) method or PIN method. ) Note: To build a successful connection by QSS (Quick Secure Setup) function. You can add the new device to the network...

User Guide
Page 26
Click Finish to complete the QSS configuration. The QSS Configuration Screen of Wireless Adapter Method Two: Step 1: Press the QSS button on my access point in the configuration utility of the QSS as below, and click Next. -19- Step 3: Wait for 2 or 3 seconds. TL-WR940N Wireless N Router Step 2: Press and hold the QSS button of the adapter directly for a while until the next screen appears. Step 2: For the configuration of the wireless adapter, please choose Push the button on the front panel of the Router.
Click Finish to complete the QSS configuration. The QSS Configuration Screen of Wireless Adapter Method Two: Step 1: Press the QSS button on my access point in the configuration utility of the QSS as below, and click Next. -19- Step 3: Wait for 2 or 3 seconds. TL-WR940N Wireless N Router Step 2: Press and hold the QSS button of the adapter directly for a while until the next screen appears. Step 2: For the configuration of the wireless adapter, please choose Push the button on the front panel of the Router.

User Guide
Page 27
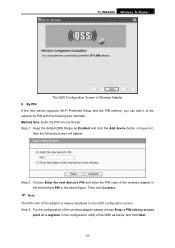
The QSS Configuration Screen of Wireless Adapter Step 3: Wait for a while until the next screen appears. Click Finish to complete the QSS configuration. TL-WR940N Wireless N Router The QSS Configuration Screen of Wireless Adapter Method Three: Step 1: Keep the default QSS Status as Enabled and click the Add device button in Figure 4-2, then the following screen will appear. -20-
The QSS Configuration Screen of Wireless Adapter Step 3: Wait for a while until the next screen appears. Click Finish to complete the QSS configuration. TL-WR940N Wireless N Router The QSS Configuration Screen of Wireless Adapter Method Three: Step 1: Keep the default QSS Status as Enabled and click the Add device button in Figure 4-2, then the following screen will appear. -20-

User Guide
Page 28
Step 4: The QSS Configuration Screen of the new device in the configuration utility of the QSS as below, and click Next. TL-WR940N Wireless N Router Figure 4-3 Add A New Device Step 2: Choose Press the button of Wireless Adapter Wait for a while until the next screen appears. Step 3: For the configuration of the wireless adapter, please choose Push the button on my access point in two minutes and click Connect. Click Finish to complete the QSS configuration. -21-
Step 4: The QSS Configuration Screen of the new device in the configuration utility of the QSS as below, and click Next. TL-WR940N Wireless N Router Figure 4-3 Add A New Device Step 2: Choose Press the button of Wireless Adapter Wait for a while until the next screen appears. Step 3: For the configuration of the wireless adapter, please choose Push the button on my access point in two minutes and click Connect. Click Finish to complete the QSS configuration. -21-
User Guide
Page 29
... the QSS as Enabled and click the Add device button in Figure 4-2, then the following two methods. TL-WR940N Wireless N Router The QSS Configuration Screen of the adapter is always displayed on the QSS configuration screen. By PIN If the new device supports Wi-Fi Protected Setup and the PIN method, you can add...
... the QSS as Enabled and click the Add device button in Figure 4-2, then the following two methods. TL-WR940N Wireless N Router The QSS Configuration Screen of the adapter is always displayed on the QSS configuration screen. By PIN If the new device supports Wi-Fi Protected Setup and the PIN method, you can add...

User Guide
Page 30
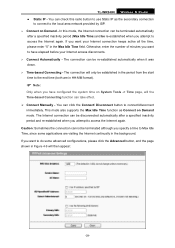
... of this adapter is 16952898 as below, and enter the PIN code of the Router into the field behind Access Point PIN. The QSS Configuration Screen of Wireless Adapter -23- Method Two: Enter the PIN from my access point in Figure 4-2 (each Router has its unique PIN code...please choose Enter a PIN from my Router Step 1: Get the Current PIN code of the Router in the configuration utility of the QSS as the above figure shown. TL-WR940N Wireless N Router ) Note: The QSS Configuration Screen of Wireless Adapter In this example, the default PIN code of this Router for example).
... of this adapter is 16952898 as below, and enter the PIN code of the Router into the field behind Access Point PIN. The QSS Configuration Screen of Wireless Adapter -23- Method Two: Enter the PIN from my access point in Figure 4-2 (each Router has its unique PIN code...please choose Enter a PIN from my Router Step 1: Get the Current PIN code of the Router in the configuration utility of the QSS as the above figure shown. TL-WR940N Wireless N Router ) Note: The QSS Configuration Screen of Wireless Adapter In this example, the default PIN code of this Router for example).

User Guide
Page 31
...following screen when the new device successfully connected to the network. 2.The QSS function cannot be configured if the Wireless Function of the Router can be found in Figure 4-4): LAN, WAN and MAC Clone. TL-WR940N Wireless N Router ) Note: The default PIN code of the Router is enabled before... configuring the QSS. 4.5 Network Figure 4-4 the Network menu There are three submenus under the Network menu (shown ...
...following screen when the new device successfully connected to the network. 2.The QSS function cannot be configured if the Wireless Function of the Router can be found in Figure 4-4): LAN, WAN and MAC Clone. TL-WR940N Wireless N Router ) Note: The default PIN code of the Router is enabled before... configuring the QSS. 4.5 Network Figure 4-4 the Network menu There are three submenus under the Network menu (shown ...

User Guide
Page 32
... reset it in the same subnet, the IP Address pool of the DHCP server will change the IP Address of your ISP, including IP -25- TL-WR940N Wireless N Router ¾ MAC Address - Enter the IP address of LAN, you can 't be changed. ¾ IP Address - The physical address of the network. ..., as seen from your ISP provides the DHCP service, please choose Dynamic IP type, and the Router will not take effect until they are re-configured. 4.5.2 WAN Choose menu "Network→WAN", you must use 255.255.255.0 as follows (Figure 4-6): Figure 4-6 WAN - If you change accordingly at the same ...
... reset it in the same subnet, the IP Address pool of the DHCP server will change the IP Address of your ISP, including IP -25- TL-WR940N Wireless N Router ¾ MAC Address - Enter the IP address of LAN, you can 't be changed. ¾ IP Address - The physical address of the network. ..., as seen from your ISP provides the DHCP service, please choose Dynamic IP type, and the Router will not take effect until they are re-configured. 4.5.2 WAN Choose menu "Network→WAN", you must use 255.255.255.0 as follows (Figure 4-6): Figure 4-6 WAN - If you change accordingly at the same ...
User Guide
Page 35
TL-WR940N Wireless N Router z Static IP - If you have elapsed before your Internet connection keeps active all the time, please enter "0" in HH:MM format). ) Note: Only when you want to connect/disconnect immediately. The connection can check this mode, the Internet connection can click the Connect/ Disconnect button to have configured... the connection cannot be established in the period from the start time to Max Idle Time, since some advanced configurations, please click the Advanced button, and the page shown in the background. The connection will only be terminated ...
TL-WR940N Wireless N Router z Static IP - If you have elapsed before your Internet connection keeps active all the time, please enter "0" in HH:MM format). ) Note: Only when you want to connect/disconnect immediately. The connection can check this mode, the Internet connection can click the Connect/ Disconnect button to have configured... the connection cannot be established in the period from the start time to Max Idle Time, since some advanced configurations, please click the Advanced button, and the page shown in the background. The connection will only be terminated ...
User Guide
Page 36
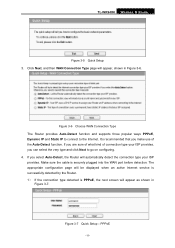
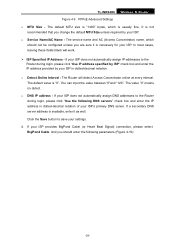
It is not recommended that you should not be configured unless you are sure it as well. If your ISP does not automatically assign DNS addresses to the Router during login, please click "Use the ... IP address provided by your ISP in dotted-decimal notation of your ISP provides BigPond Cable (or Heart Beat Signal) connection, please select BigPond Cable. TL-WR940N Wireless N Router Figure 4-9 PPPoE Advanced Settings ¾ MTU Size - The service name and AC (Access Concentrator) name, which is necessary for your settings. 4. Click the...
It is not recommended that you should not be configured unless you are sure it as well. If your ISP does not automatically assign DNS addresses to the Router during login, please click "Use the ... IP address provided by your ISP in dotted-decimal notation of your ISP provides BigPond Cable (or Heart Beat Signal) connection, please select BigPond Cable. TL-WR940N Wireless N Router Figure 4-9 PPPoE Advanced Settings ¾ MTU Size - The service name and AC (Access Concentrator) name, which is necessary for your settings. 4. Click the...

User Guide
Page 39
... connection as soon as you should enter the following parameters (Figure 4-12): -32- You can configure the Router to have the Internet connecting last unless a new link is disconnected. If you want your connection automatically as soon as you attempt to make it connect... the background. 6. Otherwise, enter the number in the Max Idle Time field. You can configure the Router to access the Internet again. Otherwise, enter the number of inactivity (Max Idle Time). TL-WR940N Wireless N Router to access the Internet again. After a specified period of inactivity (Max Idle...
... connection as soon as you should enter the following parameters (Figure 4-12): -32- You can configure the Router to have the Internet connecting last unless a new link is disconnected. If you want your connection automatically as soon as you attempt to make it connect... the background. 6. Otherwise, enter the number in the Max Idle Time field. You can configure the Router to access the Internet again. Otherwise, enter the number of inactivity (Max Idle Time). TL-WR940N Wireless N Router to access the Internet again. After a specified period of inactivity (Max Idle...


