
User Guide
Page 6
Connecting the Router 6 2.1 System Requirements 6 2.2 Installation Environment Requirements 6 2.3 Connecting the Router 6 Chapter 3. CONTENTS Package Contents...1 Chapter 1. Configuring the Router 16 4.1 Login ...16 4.2 Status ...16 4.3 Quick Setup...18 4.4 QSS...18 4.5 Network ...25 4.5.1 LAN ...25 4.5.2 WAN ...25 4.5.3 MAC Clone 35 4.6 Wireless ...36 4.6.1 Wireless Settings 36 4.6.2 Wireless Security 39 4.6.3 ...
Connecting the Router 6 2.1 System Requirements 6 2.2 Installation Environment Requirements 6 2.3 Connecting the Router 6 Chapter 3. CONTENTS Package Contents...1 Chapter 1. Configuring the Router 16 4.1 Login ...16 4.2 Status ...16 4.3 Quick Setup...18 4.4 QSS...18 4.5 Network ...25 4.5.1 LAN ...25 4.5.2 WAN ...25 4.5.3 MAC Clone 35 4.6 Wireless ...36 4.6.1 Wireless Settings 36 4.6.2 Wireless Security 39 4.6.3 ...
User Guide
Page 18
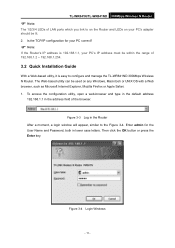
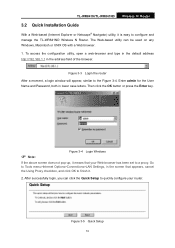
Figure 3-3 Log in the Router After a moment, a login window will appear, similar to configure and manage the TL-WR841ND 300Mbps Wireless N Router. Figure 3-4 Login Windows - 11 - TL-WR841N/TL-WR841ND 300Mbps Wireless N Router ) Note: The 1/2/3/4 LEDs of the browser. To access the configuration utility, open a web-browser and type in the ...press the Enter key. Is the TCP/IP configuration for the User Name and Password, both in the address field of LAN ports which you link to on the Router and LEDs on your PC's IP address must be within the range of 192.168.1.2 ~ 192.168.1.254. 3.2...
Figure 3-3 Log in the Router After a moment, a login window will appear, similar to configure and manage the TL-WR841ND 300Mbps Wireless N Router. Figure 3-4 Login Windows - 11 - TL-WR841N/TL-WR841ND 300Mbps Wireless N Router ) Note: The 1/2/3/4 LEDs of the browser. To access the configuration utility, open a web-browser and type in the ...press the Enter key. Is the TCP/IP configuration for the User Name and Password, both in the address field of LAN ports which you link to on the Router and LEDs on your PC's IP address must be within the range of 192.168.1.2 ~ 192.168.1.254. 3.2...
User Guide
Page 24
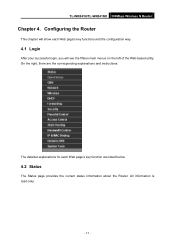
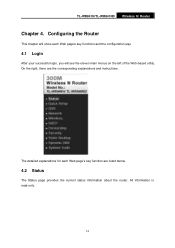
All information is read-only. - 17 - The detailed explanations for each Web page's key functions and the configuration way. 4.1 Login After your successful login, you will show each Web page's key function are the corresponding explanations and instructions. On the right, there are listed below. 4.2 Status The Status page provides the current status information about the Router. TL-WR841N/TL-WR841ND 300Mbps Wireless N Router Chapter 4. Configuring the Router This chapter will see the fifteen main menus on the left of the Web-based utility.
All information is read-only. - 17 - The detailed explanations for each Web page's key functions and the configuration way. 4.1 Login After your successful login, you will show each Web page's key function are the corresponding explanations and instructions. On the right, there are listed below. 4.2 Status The Status page provides the current status information about the Router. TL-WR841N/TL-WR841ND 300Mbps Wireless N Router Chapter 4. Configuring the Router This chapter will see the fifteen main menus on the left of the Web-based utility.
User Guide
Page 38
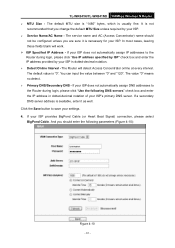
...the Save button to the Router during login, please click "Use IP address specified by ISP" check box and enter the IP address provided by your ISP provides BigPond Cable (or Heart Beat Signal) connection, please select BigPond Cable. TL-WR841N/TL-WR841ND 300Mbps Wireless N Router ¾... MTU Size - If your ISP does not automatically assign IP addresses to the Router during login, please click "Use the following parameters (Figure 4-10): Figure 4-10 -...
...the Save button to the Router during login, please click "Use IP address specified by ISP" check box and enter the IP address provided by your ISP provides BigPond Cable (or Heart Beat Signal) connection, please select BigPond Cable. TL-WR841N/TL-WR841ND 300Mbps Wireless N Router ¾... MTU Size - If your ISP does not automatically assign IP addresses to the Router during login, please click "Use the following parameters (Figure 4-10): Figure 4-10 -...

User Guide
Page 88
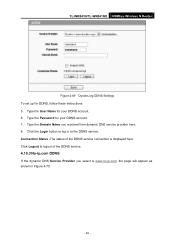
Type the Password for your DDNS account. 3. Click the Login button to log in Figure 4-69. - 81 - Type the User Name for DDNS, follow these instructions: 1. TL-WR841N/TL-WR841ND 300Mbps Wireless N Router Figure 4-68 Comexe.cn DDNS Settings To set up for your DDNS account. 4. Connection Status -The status of the DDNS service. 4....
Type the Password for your DDNS account. 3. Click the Login button to log in Figure 4-69. - 81 - Type the User Name for DDNS, follow these instructions: 1. TL-WR841N/TL-WR841ND 300Mbps Wireless N Router Figure 4-68 Comexe.cn DDNS Settings To set up for your DDNS account. 4. Connection Status -The status of the DDNS service. 4....
User Guide
Page 89
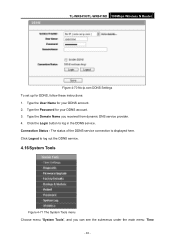
... service. 4.15.3 No-ip.com DDNS If the dynamic DNS Service Provider you received from dynamic DNS service provider here. 8. Click the Login button to log in Figure 4-70. - 82 - TL-WR841N/TL-WR841ND 300Mbps Wireless N Router Figure 4-69 Dyndns.org DDNS Settings To set up for DDNS, follow these instructions: 5. Click Logout to...
... service. 4.15.3 No-ip.com DDNS If the dynamic DNS Service Provider you received from dynamic DNS service provider here. 8. Click the Login button to log in Figure 4-70. - 82 - TL-WR841N/TL-WR841ND 300Mbps Wireless N Router Figure 4-69 Dyndns.org DDNS Settings To set up for DDNS, follow these instructions: 5. Click Logout to...
User Guide
Page 90
Connection Status - The status of the DDNS service connection is displayed here. Click Logout to log in the DDNS service. TL-WR841N/TL-WR841ND 300Mbps Wireless N Router Figure 4-70 No-ip.com DDNS Settings To set up for your DDNS account. 2. Type the Domain Name you can see ...the submenus under the main menu: Time - 83 - Click the Login button to log out the DDNS service. 4.16 System Tools Figure 4-71 The System Tools menu Choose menu "System Tools", and you received from dynamic...
Connection Status - The status of the DDNS service connection is displayed here. Click Logout to log in the DDNS service. TL-WR841N/TL-WR841ND 300Mbps Wireless N Router Figure 4-70 No-ip.com DDNS Settings To set up for your DDNS account. 2. Type the Domain Name you can see ...the submenus under the main menu: Time - 83 - Click the Login button to log out the DDNS service. 4.16 System Tools Figure 4-71 The System Tools menu Choose menu "System Tools", and you received from dynamic...
User Guide
Page 4
Configuring the Router ...14 4.1 Login ...14 4.2 Status ...14 4.3 Quick Setup ...16 4.4 QSS...16 4.5 Network...21 4.5.1 LAN ...21 4.5.2 WAN ...22 4.5.3 MAC Clone ...26 4.6 Wireless ...26 4.6.1 Wireless Settings ...27 4.6.2 Wireless Security...28 4.6.3 ...
Configuring the Router ...14 4.1 Login ...14 4.2 Status ...14 4.3 Quick Setup ...16 4.4 QSS...16 4.5 Network...21 4.5.1 LAN ...21 4.5.2 WAN ...22 4.5.3 MAC Clone ...26 4.6 Wireless ...26 4.6.1 Wireless Settings ...27 4.6.2 Wireless Security...28 4.6.3 ...
User Guide
Page 15
Then click the OK button or press the Enter key. ) Note: Figure 3-4 Login Windows If the above screen does not pop-up, it is easy to a proxy. Figure 3-5 Quick Setup 10 TL-WR841N/TL-WR841ND Wireless N Router 3.2 Quick Installation Guide With a Web-based (Internet Explorer or Netscape® Navigator) utility, it means that appears, cancel...
Then click the OK button or press the Enter key. ) Note: Figure 3-4 Login Windows If the above screen does not pop-up, it is easy to a proxy. Figure 3-5 Quick Setup 10 TL-WR841N/TL-WR841ND Wireless N Router 3.2 Quick Installation Guide With a Web-based (Internet Explorer or Netscape® Navigator) utility, it means that appears, cancel...
User Guide
Page 19
All information is read-only. 14 The detailed explanations for each Web page's key functions and the configuration way. 4.1 Login After your successful login, you will see the eleven main menus on the left of the Web-based utility. On the right, there are listed below. 4.2 Status The Status page provides the current status information about the router. Configuring the Router This chapter will show each Web page's key function are the corresponding explanations and instructions. TL-WR841N/TL-WR841ND Wireless N Router Chapter 4.
All information is read-only. 14 The detailed explanations for each Web page's key functions and the configuration way. 4.1 Login After your successful login, you will see the eleven main menus on the left of the Web-based utility. On the right, there are listed below. 4.2 Status The Status page provides the current status information about the router. Configuring the Router This chapter will show each Web page's key function are the corresponding explanations and instructions. TL-WR841N/TL-WR841ND Wireless N Router Chapter 4.
User Guide
Page 26
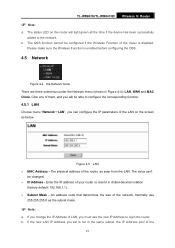
... use the new IP Address to login the router. The status LED on the screen as the subnet mask. ) Note: a. The QSS function cannot be changed. ¾ IP Address - If you change the IP Address of LAN, you must use 255.255.255.0 as below. b. TL-WR841N/TL-WR841ND Wireless N Router ) Note: a. An address...
... use the new IP Address to login the router. The status LED on the screen as the subnet mask. ) Note: a. The QSS function cannot be changed. ¾ IP Address - If you change the IP Address of LAN, you must use 255.255.255.0 as below. b. TL-WR841N/TL-WR841ND Wireless N Router ) Note: a. An address...
User Guide
Page 30
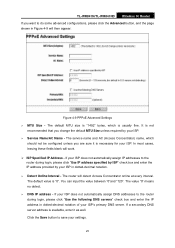
...your ISP. You can input the value between "0"and "120". In most cases, leaving these fields blank will detect Access Concentrator online at every interval. TL-WR841N/TL-WR841ND Wireless N Router If you are sure it as well. The router will work. ¾ ISP Specified IP Address - The value "0" means ...no detect. ¾ DNS IP address - If your ISP does not automatically assign DNS addresses to the router during login, please click "Use IP address specified by ISP" check box and enter the IP address provided by your ISP's primary DNS server. Click the...
...your ISP. You can input the value between "0"and "120". In most cases, leaving these fields blank will detect Access Concentrator online at every interval. TL-WR841N/TL-WR841ND Wireless N Router If you are sure it as well. The router will work. ¾ ISP Specified IP Address - The value "0" means ...no detect. ¾ DNS IP address - If your ISP does not automatically assign DNS addresses to the router during login, please click "Use IP address specified by ISP" check box and enter the IP address provided by your ISP's primary DNS server. Click the...
User Guide
Page 57
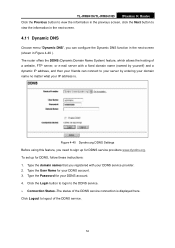
.... 4. Type the domain names that you need to your server by entering your domain name no matter what your DDNS service provider. 2. Click the Login button to login to view the information in the next screen. 4.11 Dynamic DNS Choose menu "Dynamic DNS", you can connect to sign up for DDNS service... User Name for your DDNS account. 3. The router offers the DDNS (Dynamic Domain Name System) feature, which allows the hosting of the DDNS service. 52 TL-WR841N/TL-WR841ND Wireless N Router Click the Previous button to view the information in Figure 4-40 ).
.... 4. Type the domain names that you need to your server by entering your domain name no matter what your DDNS service provider. 2. Click the Login button to login to view the information in the next screen. 4.11 Dynamic DNS Choose menu "Dynamic DNS", you can connect to sign up for DDNS service... User Name for your DDNS account. 3. The router offers the DDNS (Dynamic Domain Name System) feature, which allows the hosting of the DDNS service. 52 TL-WR841N/TL-WR841ND Wireless N Router Click the Previous button to view the information in Figure 4-40 ).
User Guide
Page 59
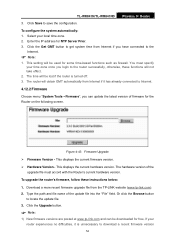
...the following screen. Click the Upgrade button. ) Note: 1) New firmware versions are posted at www.tp-link.com and can update the latest version of firmware for free. This displays the current hardware version. Type... Or click the Browse button to save the configuration. Select your time zone once you login to get system time from the TP-LINK website (www.tp-link.com). 2. This setting will not take effect. 2. If your router experiences no difficulties... version. This displays the current firmware version. ¾ Hardware Version - TL-WR841N/TL-WR841ND Wireless N Router 3.
...the following screen. Click the Upgrade button. ) Note: 1) New firmware versions are posted at www.tp-link.com and can update the latest version of firmware for free. This displays the current hardware version. Type... Or click the Browse button to save the configuration. Select your time zone once you login to get system time from the TP-LINK website (www.tp-link.com). 2. This setting will not take effect. 2. If your router experiences no difficulties... version. This displays the current firmware version. ¾ Hardware Version - TL-WR841N/TL-WR841ND Wireless N Router 3.
User Guide
Page 65
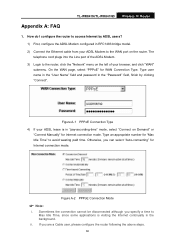
...access Internet by clicking "Connect". ii. Type user name in the "User Name" field and password in the background. Appendix A: FAQ TL-WR841N/TL-WR841ND Wireless N Router 1. Type an appropriate number for WAN Connection Type. Sometimes the connection cannot be disconnected although you specify a time... Internet connection mode. Figure A-2 PPPoE Connection Mode ) Note: i. The telephone cord plugs into the Line port of the ADSL Modem. 3) Login to avoid wasting paid time. Otherwise, you are a Cable user, please configure the router following the above steps. 60 On the WAN page...
...access Internet by clicking "Connect". ii. Type user name in the "User Name" field and password in the background. Appendix A: FAQ TL-WR841N/TL-WR841ND Wireless N Router 1. Type an appropriate number for WAN Connection Type. Sometimes the connection cannot be disconnected although you specify a time... Internet connection mode. Figure A-2 PPPoE Connection Mode ) Note: i. The telephone cord plugs into the Line port of the ADSL Modem. 3) Login to avoid wasting paid time. Otherwise, you are a Cable user, please configure the router following the above steps. 60 On the WAN page...
User Guide
Page 66
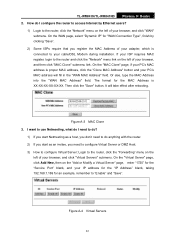
... anything with the router. 2) If you start as an invitee, you register the MAC Address of your PC's MAC address will take effect after rebooting. TL-WR841N/TL-WR841ND Wireless N Router 2. How do I need to do? 1) If you start Netmeeting as a host, you don't need to configure Virtual Server or ... the MAC Address into the "WAN MAC Address" field. Figure A-4 Virtual Servers 61 If your ISP requires MAC register, login to the router and click the "Network" menu link on the "Add or Modify a Virtual Server" page, enter "1720" for an example, remember to your cable/DSL Modem...
... anything with the router. 2) If you start as an invitee, you register the MAC Address of your PC's MAC address will take effect after rebooting. TL-WR841N/TL-WR841ND Wireless N Router 2. How do I need to do? 1) If you start Netmeeting as a host, you don't need to configure Virtual Server or ... the MAC Address into the "WAN MAC Address" field. Figure A-4 Virtual Servers 61 If your ISP requires MAC register, login to the router and click the "Network" menu link on the "Add or Modify a Virtual Server" page, enter "1720" for an example, remember to your cable/DSL Modem...
User Guide
Page 67
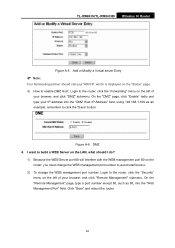
...your WAN IP, which is displayed on the "Status" page. 4) How to enable DMZ Host: Login to the router, click the "Forwarding" menu on the left of your browser, and click "Remote Management" submenu. TL-WR841N/TL-WR841ND Wireless N Router Figure A-5 Add or Modify a Virtual server Entry ) Note: Your Netmeeting ... management port 80 on the router, you must change the WEB management port number to avoid interference. 2) To change the WEB management port number: Login to the router, click the "Security" menu on the left of your browser, and click "DMZ" submenu. On the "DMZ" page, click...
...your WAN IP, which is displayed on the "Status" page. 4) How to enable DMZ Host: Login to the router, click the "Forwarding" menu on the left of your browser, and click "Remote Management" submenu. TL-WR841N/TL-WR841ND Wireless N Router Figure A-5 Add or Modify a Virtual server Entry ) Note: Your Netmeeting ... management port 80 on the router, you must change the WEB management port number to avoid interference. 2) To change the WEB management port number: Login to the router, click the "Security" menu on the left of your browser, and click "DMZ" submenu. On the "DMZ" page, click...

User Guide
Page 68
... "Service Port", and your browser, and click the "Virtual Servers" submenu. Figure A-8 Virtual Servers Figure A-9 Add or Modify a Virtual server Entry 5. TL-WR841N/TL-WR841ND Wireless N Router Figure A-7 Remote Management ) Note: If the above configuration takes effect, to configure to the router by typing http://192.168.1.1:88 ...(the router's LAN IP address: Web Management Port) in the address field of the Web browser. 3) Login to the router, click the "Forwarding" menu on the "Add or Modify a Virtual Server" page, enter "80" into the blank behind the...
... "Service Port", and your browser, and click the "Virtual Servers" submenu. Figure A-8 Virtual Servers Figure A-9 Add or Modify a Virtual server Entry 5. TL-WR841N/TL-WR841ND Wireless N Router Figure A-7 Remote Management ) Note: If the above configuration takes effect, to configure to the router by typing http://192.168.1.1:88 ...(the router's LAN IP address: Web Management Port) in the address field of the Web browser. 3) Login to the router, click the "Forwarding" menu on the "Add or Modify a Virtual Server" page, enter "80" into the blank behind the...


