
User Guide
Page 1
TL-WR841N TL-WR841ND Wireless N Router Rev: 1.0.1 1910010029
TL-WR841N TL-WR841ND Wireless N Router Rev: 1.0.1 1910010029

User Guide
Page 6
TL-WR841N/TL-WR841ND Wireless N Router Package Contents The following items should be found in your package: ¾ TL-WR841N/TL-WR841ND Wireless N Router ¾ DC Power Adapter for TL-WR841N/TL-WR841ND Wireless N Router ¾ Quick Installation Guide ¾ Resource CD for TL-WR841N/TL-WR841ND Wireless N Router, including: • This Guide • Other Helpful Information ) Note: Make sure that the package contains the above items. If any of the listed items are damaged or missing, please contact with your distributor. 1
TL-WR841N/TL-WR841ND Wireless N Router Package Contents The following items should be found in your package: ¾ TL-WR841N/TL-WR841ND Wireless N Router ¾ DC Power Adapter for TL-WR841N/TL-WR841ND Wireless N Router ¾ Quick Installation Guide ¾ Resource CD for TL-WR841N/TL-WR841ND Wireless N Router, including: • This Guide • Other Helpful Information ) Note: Make sure that the package contains the above items. If any of the listed items are damaged or missing, please contact with your distributor. 1
User Guide
Page 7
... of the Router The TL-WR841N/TL-WR841ND Wireless N Router integrates 4-port Switch, Firewall, NAT-router and Wireless AP. PSK), as well as advanced Firewall protections, the TL-WR841N/841ND Wireless N Router provides complete data privacy. Multiple Security Protections With multiple protection measures, including SSID broadcast control and wireless LAN 64/128/152-bit WEP encryption, WiFi protected Access (WPA2- Incredible Speed The TL-WR841N/TL-WR841ND Wireless N Router provides...
... of the Router The TL-WR841N/TL-WR841ND Wireless N Router integrates 4-port Switch, Firewall, NAT-router and Wireless AP. PSK), as well as advanced Firewall protections, the TL-WR841N/841ND Wireless N Router provides complete data privacy. Multiple Security Protections With multiple protection measures, including SSID broadcast control and wireless LAN 64/128/152-bit WEP encryption, WiFi protected Access (WPA2- Incredible Speed The TL-WR841N/TL-WR841ND Wireless N Router provides...
User Guide
Page 8
1.2 Conventions TL-WR841N/TL-WR841ND Wireless N Router The router or TL-WR841N/TL-WR841ND mentioned in firewall supporting IP address filtering, Domain Name filtering, and MAC address filtering. ¾ Connecting Internet on demand and disconnecting from the Internet when idle for TL-WR841N/TL-WR841ND Wireless N Router without any explanation. ) Note: The two devices of TL-WR841N and TL-WR841ND are : ¾ TL-WR841N router with 2 fixed antennas. ¾ TL-WR841ND router with 2 detachable antennas. 1.3 Main Features ¾...
1.2 Conventions TL-WR841N/TL-WR841ND Wireless N Router The router or TL-WR841N/TL-WR841ND mentioned in firewall supporting IP address filtering, Domain Name filtering, and MAC address filtering. ¾ Connecting Internet on demand and disconnecting from the Internet when idle for TL-WR841N/TL-WR841ND Wireless N Router without any explanation. ) Note: The two devices of TL-WR841N and TL-WR841ND are : ¾ TL-WR841N router with 2 fixed antennas. ¾ TL-WR841ND router with 2 detachable antennas. 1.3 Main Features ¾...
User Guide
Page 9
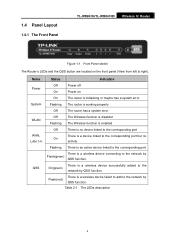
... Front Panel TL-WR841N/TL-WR841ND Wireless N Router Figure 1-1 Front Panel sketch The Router's LEDs and the QSS button are located on On The router is initializing or maybe has a system error Flashing The router is working properly Off The router has a system error Off The Wireless function is disabled Flashing The Wireless function is enabled Off There is no device linked to...
... Front Panel TL-WR841N/TL-WR841ND Wireless N Router Figure 1-1 Front Panel sketch The Router's LEDs and the QSS button are located on On The router is initializing or maybe has a system error Flashing The router is working properly Off The router has a system error Off The Wireless function is disabled Flashing The Wireless function is enabled Off There is no device linked to...
User Guide
Page 10
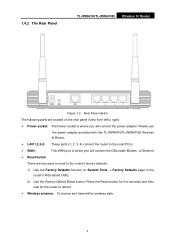
Please use the power adapter provided with this TL-WR841N/TL-WR841ND Wireless N Router. ¾ LAN 1,2,3,4: These ports (1, 2, 3, 4) connect the router to reboot. ¾ Wireless antenna: To receive and transmit the wireless data. 5 1.4.2 The Rear Panel TL-WR841N/TL-WR841ND Wireless N Router Figure 1-2 Rear Panel sketch The following parts are located on the rear panel (View from left to right). ¾ Power socket: The Power socket...
Please use the power adapter provided with this TL-WR841N/TL-WR841ND Wireless N Router. ¾ LAN 1,2,3,4: These ports (1, 2, 3, 4) connect the router to reboot. ¾ Wireless antenna: To receive and transmit the wireless data. 5 1.4.2 The Rear Panel TL-WR841N/TL-WR841ND Wireless N Router Figure 1-2 Rear Panel sketch The following parts are located on the rear panel (View from left to right). ¾ Power socket: The Power socket...
User Guide
Page 11
... the antenna. Power off your hands dry. 1. Locate an optimum location for the router. Connect the PC(s) and each PC ¾ Web browser, such as sunlight) ¾ Keep at the center of any problem, please contact your ISP. TL-WR841N/TL-WR841ND Wireless N Router Chapter 2. The best place is any strong light (such as Microsoft Internet Explorer...
... the antenna. Power off your hands dry. 1. Locate an optimum location for the router. Connect the PC(s) and each PC ¾ Web browser, such as sunlight) ¾ Keep at the center of any problem, please contact your ISP. TL-WR841N/TL-WR841ND Wireless N Router Chapter 2. The best place is any strong light (such as Microsoft Internet Explorer...
User Guide
Page 12
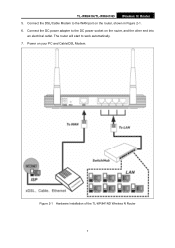
Connect the DC power adapter to the DC power socket on your PC and Cable/DSL Modem. The router will start to the WAN port on the router, shown in Figure 2-1. 6. Power on the router, and the other end into an electrical outlet. Connect the DSL/Cable Modem to work automatically. 7. Figure 2-1 Hardware Installation of the TL-WR841ND Wireless N Router 7 TL-WR841N/TL-WR841ND Wireless N Router 5.
Connect the DC power adapter to the DC power socket on your PC and Cable/DSL Modem. The router will start to the WAN port on the router, shown in Figure 2-1. 6. Power on the router, and the other end into an electrical outlet. Connect the DSL/Cable Modem to work automatically. 7. Figure 2-1 Hardware Installation of the TL-WR841ND Wireless N Router 7 TL-WR841N/TL-WR841ND Wireless N Router 5.
User Guide
Page 13
... number from 2 to 254), Subnet Mask is 255.255.255.0, and Gateway is 192.168.1.1 (The router's default IP address) ¾ Obtain an IP address automatically 1) Set up the TCP/IP Protocol for description. TL-WR841N/TL-WR841ND Wireless N Router Chapter 3. In this guide, we use all the default values for your PC. If you can run...
... number from 2 to 254), Subnet Mask is 255.255.255.0, and Gateway is 192.168.1.1 (The router's default IP address) ¾ Obtain an IP address automatically 1) Set up the TCP/IP Protocol for description. TL-WR841N/TL-WR841ND Wireless N Router Chapter 3. In this guide, we use all the default values for your PC. If you can run...
User Guide
Page 14
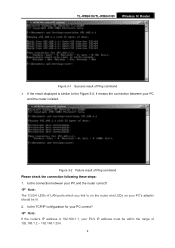
TL-WR841N/TL-WR841ND Wireless N Router Figure 3-1 Success result of LAN ports which you link to the Figure 3-2, it means the connection between your PC and the router is 192.168.1.1, your PC's IP address must be lit. 2. Is the connection between your PC and the router correct? ) Note: The 1/2/3/4 LEDs of Ping command ¾ If the result displayed is...
TL-WR841N/TL-WR841ND Wireless N Router Figure 3-1 Success result of LAN ports which you link to the Figure 3-2, it means the connection between your PC and the router is 192.168.1.1, your PC's IP address must be lit. 2. Is the connection between your PC and the router correct? ) Note: The 1/2/3/4 LEDs of Ping command ¾ If the result displayed is...
User Guide
Page 15
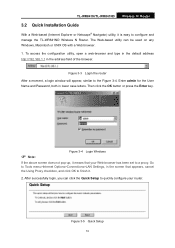
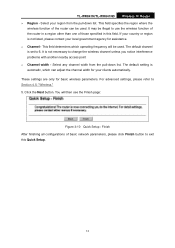
Enter admin for the User Name and Password, both in the screen that your router. Go to Tools menu>Internet Options>Connections>LAN Settings, in lower case letters. TL-WR841N/TL-WR841ND Wireless N Router 3.2 Quick Installation Guide With a Web-based (Internet Explorer or Netscape® Navigator) utility, it means that .... ) Note: Figure 3-4 Login Windows If the above screen does not pop-up, it is easy to configure and manage the TL-WR841ND Wireless N Router. To access the configuration utility, open a web-browser and type in the default address http://192.168.1.1 in the address field ...
Enter admin for the User Name and Password, both in the screen that your router. Go to Tools menu>Internet Options>Connections>LAN Settings, in lower case letters. TL-WR841N/TL-WR841ND Wireless N Router 3.2 Quick Installation Guide With a Web-based (Internet Explorer or Netscape® Navigator) utility, it means that .... ) Note: Figure 3-4 Login Windows If the above screen does not pop-up, it is easy to configure and manage the TL-WR841ND Wireless N Router. To access the configuration utility, open a web-browser and type in the default address http://192.168.1.1 in the address field ...
User Guide
Page 16
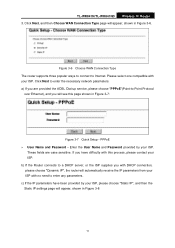
...3-7 Quick Setup - Enter the User Name and Password provided by your ISP. c) If the IP parameters have difficulty with your ISP. TL-WR841N/TL-WR841ND Wireless N Router 3. If you with no need to -Point Protocol over Ethernet), and you are case sensitive. a) If you will automatically receive the ... User Name and Password - Please select one compatible with this page shown in Figure 3-6. Figure 3-6 Choose WAN Connection Type The router supports three popular ways to connect to enter the necessary network parameters. Click Next, and then Choose WAN Connection Type page will ...
...3-7 Quick Setup - Enter the User Name and Password provided by your ISP. c) If the IP parameters have difficulty with your ISP. TL-WR841N/TL-WR841ND Wireless N Router 3. If you with no need to -Point Protocol over Ethernet), and you are case sensitive. a) If you will automatically receive the ... User Name and Password - Please select one compatible with this page shown in Figure 3-6. Figure 3-6 Choose WAN Connection Type The router supports three popular ways to connect to enter the necessary network parameters. Click Next, and then Choose WAN Connection Type page will ...
User Guide
Page 17
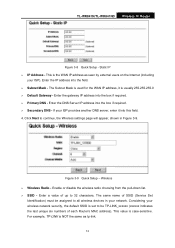
... your network. For example, TP-LINK is the WAN IP address as tp-link. 12 Enter the IP address into the box if required. ¾ Secondary DNS - Wireless ¾ Wireless Radio - Enter a value of each Router's MAC address). The Subnet ...TP-LINK_xxxxxx (xxxxxx indicates the last unique six numbers of up to all wireless devices in Figure 3-9. Enable or disable the wireless radio choosing from the pull-down list. ¾ SSID - This value is usually 255.255.255.0 ¾ Default Gateway - Enter the gateway IP address into this field. 4. TL-WR841N/TL-WR841ND Wireless N Router...
... your network. For example, TP-LINK is the WAN IP address as tp-link. 12 Enter the IP address into the box if required. ¾ Secondary DNS - Wireless ¾ Wireless Radio - Enter a value of each Router's MAC address). The Subnet ...TP-LINK_xxxxxx (xxxxxx indicates the last unique six numbers of up to all wireless devices in Figure 3-9. Enable or disable the wireless radio choosing from the pull-down list. ¾ SSID - This value is usually 255.255.255.0 ¾ Default Gateway - Enter the gateway IP address into this field. 4. TL-WR841N/TL-WR841ND Wireless N Router...
User Guide
Page 18
... your clients automatically. This field specifies the region where the wireless function of the router can adjust the channel width for basic wireless parameters. It is set to use the wireless function of the router in a region other than one of basic network parameters, please...width - This field determines which can be used . Select any channel width from the pull-down list. You will be used . TL-WR841N/TL-WR841ND Wireless N Router ¾ Region - The default setting is not listed, please contact your region from the pull-down list. Select your local government ...
... your clients automatically. This field specifies the region where the wireless function of the router can adjust the channel width for basic wireless parameters. It is set to use the wireless function of the router in a region other than one of basic network parameters, please...width - This field determines which can be used . Select any channel width from the pull-down list. You will be used . TL-WR841N/TL-WR841ND Wireless N Router ¾ Region - The default setting is not listed, please contact your region from the pull-down list. Select your local government ...
User Guide
Page 19
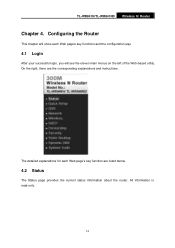
All information is read-only. 14 The detailed explanations for each Web page's key functions and the configuration way. 4.1 Login After your successful login, you will see the eleven main menus on the left of the Web-based utility. TL-WR841N/TL-WR841ND Wireless N Router Chapter 4. Configuring the Router This chapter will show each Web page's key function are the corresponding explanations and instructions. On the right, there are listed below. 4.2 Status The Status page provides the current status information about the router.
All information is read-only. 14 The detailed explanations for each Web page's key functions and the configuration way. 4.1 Login After your successful login, you will see the eleven main menus on the left of the Web-based utility. TL-WR841N/TL-WR841ND Wireless N Router Chapter 4. Configuring the Router This chapter will show each Web page's key function are the corresponding explanations and instructions. On the right, there are listed below. 4.2 Status The Status page provides the current status information about the router.
User Guide
Page 20
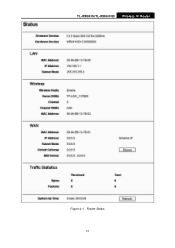
TL-WR841N/TL-WR841ND Wireless N Router Figure 4-1 Router Status 15
TL-WR841N/TL-WR841ND Wireless N Router Figure 4-1 Router Status 15
User Guide
Page 21
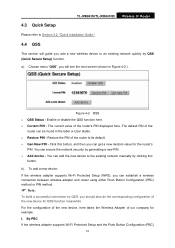
...network manually by generating a new PIN. ¾ Add device - By PBC If the wireless adapter supports Wi-Fi Protected Setup and the Push Button Configuration (PBC) 16 TL-WR841N/TL-WR841ND Wireless N Router 4.3 Quick Setup Please refer to Section 3.2: "Quick Installation Guide." 4.4 QSS This section ... menu "QSS", you will guide you should also do the corresponding configuration of the router's PIN displayed here. The default PIN of the router can establish a wireless connection between wireless adapter and router using either Push Button Configuration (PBC) method or PIN method. ) Note: To ...
...network manually by generating a new PIN. ¾ Add device - By PBC If the wireless adapter supports Wi-Fi Protected Setup and the Push Button Configuration (PBC) 16 TL-WR841N/TL-WR841ND Wireless N Router 4.3 Quick Setup Please refer to Section 3.2: "Quick Installation Guide." 4.4 QSS This section ... menu "QSS", you will guide you should also do the corresponding configuration of the router's PIN displayed here. The default PIN of the router can establish a wireless connection between wireless adapter and router using either Push Button Configuration (PBC) method or PIN method. ) Note: To ...
User Guide
Page 22
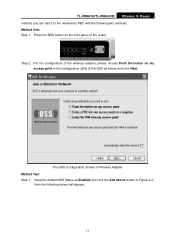
Step 2: For the configuration of the wireless adapter, please choose Push the button on the front panel of the router. The QSS Configuration Screen of the QSS as Enabled and click the Add device button in the configuration utility of Wireless Adapter Method Two: Step 1: Keep the default QSS Status as below, and click Next. Method One: Step 1: Press the QSS button on my access point in Figure 4-2, then the following two methods. TL-WR841N/TL-WR841ND Wireless N Router method, you can add it to the network by PBC with the following screen will appear. 17
Step 2: For the configuration of the wireless adapter, please choose Push the button on the front panel of the router. The QSS Configuration Screen of the QSS as Enabled and click the Add device button in the configuration utility of Wireless Adapter Method Two: Step 1: Keep the default QSS Status as below, and click Next. Method One: Step 1: Press the QSS button on my access point in Figure 4-2, then the following two methods. TL-WR841N/TL-WR841ND Wireless N Router method, you can add it to the network by PBC with the following screen will appear. 17
User Guide
Page 23
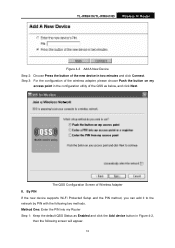
... Push the button on my access point in two minutes and click Connect. Method One: Enter the PIN into my Router Step 1: Keep the default QSS Status as below, and click Next. TL-WR841N/TL-WR841ND Wireless N Router Figure 4-3 Add A New Device Step 2: Choose Press the button of the new device in the configuration utility of the...
... Push the button on my access point in two minutes and click Connect. Method One: Enter the PIN into my Router Step 1: Keep the default QSS Status as below, and click Next. TL-WR841N/TL-WR841ND Wireless N Router Figure 4-3 Add A New Device Step 2: Choose Press the button of the new device in the configuration utility of the...
User Guide
Page 24
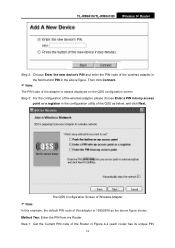
..., and click Next. Method Two: Enter the PIN from my Router Step 1: Get the Current PIN code of this example, the default PIN code of the Router in Figure 4-2 (each router has its unique PIN 19 TL-WR841N/TL-WR841ND Wireless N Router Step 2: Choose Enter the new device's PIN and enter the ...PIN code of the wireless adapter in the field behind PIN in the above figure shown. ...
..., and click Next. Method Two: Enter the PIN from my Router Step 1: Get the Current PIN code of this example, the default PIN code of the Router in Figure 4-2 (each router has its unique PIN 19 TL-WR841N/TL-WR841ND Wireless N Router Step 2: Choose Enter the new device's PIN and enter the ...PIN code of the wireless adapter in the field behind PIN in the above figure shown. ...


