User Guide
Page 9
... TL-WR542G 54Mbps Wireless Router will allow you can establish restricted access policies for children or staff. The router provides wireless LAN 64/128/152-bit WEP encryption security, and WPA/WPA2 and WPA-PSK/WPA2-PSK authentication, as well as TKIP/AES encryption security. The transmission range is supported and friendly help messages are provided for Port Triggering needs, and remote management and log so that parents or network administrators can configure it quickly and share Internet access, files...
... TL-WR542G 54Mbps Wireless Router will allow you can establish restricted access policies for children or staff. The router provides wireless LAN 64/128/152-bit WEP encryption security, and WPA/WPA2 and WPA-PSK/WPA2-PSK authentication, as well as TKIP/AES encryption security. The transmission range is supported and friendly help messages are provided for Port Triggering needs, and remote management and log so that parents or network administrators can configure it quickly and share Internet access, files...
User Guide
Page 10
... when idle for PPPoE. ¾ Built-in NAT and DHCP server supporting static IP address distributing. ¾ Built-in firewall supporting IP address filtering, Domain Name filtering, and MAC address filtering. ¾ Supports connecting/disconnecting from the Internet on a specified time of day. ¾ Supports access control, parents and network administrators can establish restricted access policies based on time of the router. 3 Table 1-1 describes the LEDs on the front panel (View from WAN or LAN ports. ¾ Supports firmware upgrade. ¾ Supports Web management. 1.3 Panel Layout...
... when idle for PPPoE. ¾ Built-in NAT and DHCP server supporting static IP address distributing. ¾ Built-in firewall supporting IP address filtering, Domain Name filtering, and MAC address filtering. ¾ Supports connecting/disconnecting from the Internet on a specified time of day. ¾ Supports access control, parents and network administrators can establish restricted access policies based on time of the router. 3 Table 1-1 describes the LEDs on the front panel (View from WAN or LAN ports. ¾ Supports firmware upgrade. ¾ Supports Web management. 1.3 Panel Layout...
User Guide
Page 12
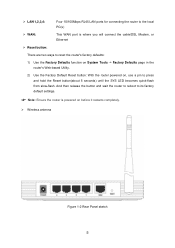
...; WAN: This WAN port is powered on , use a pin to reset the router's factory defaults: 1) Use the Factory Defaults function on System Tools -> Factory Defaults page in the router's Web-based Utility. 2) Use the Factory Default Reset button: With the router powered on before it restarts completely. ¾ Wireless antenna Figure 1-2 Rear Panel sketch 5 And then release the button and wait the router to reboot to its factory default settings. ) Note: Ensure the router is where you will connect the cable/DSL Modem, or Ethernet ¾ Reset button: There...
...; WAN: This WAN port is powered on , use a pin to reset the router's factory defaults: 1) Use the Factory Defaults function on System Tools -> Factory Defaults page in the router's Web-based Utility. 2) Use the Factory Default Reset button: With the router powered on before it restarts completely. ¾ Wireless antenna Figure 1-2 Rear Panel sketch 5 And then release the button and wait the router to reboot to its factory default settings. ) Note: Ensure the router is where you will connect the cable/DSL Modem, or Ethernet ¾ Reset button: There...
User Guide
Page 15
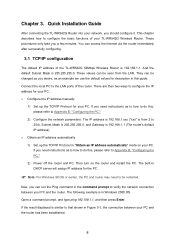
...; Configure the IP address manually 1) Set up the TCP/IP Protocol in Windows 2000 OS. If you need instructions as to how to do this, please refer to be restarted. Open a command prompt, and type ping 192.168.1.1, and then press Enter. Now, you a few minutes. Quick Installation Guide After connecting the TL-WR542G Router into your TL-WR542G Wireless Router. Chapter 3. There are then two ways to that shown in DHCP server will assign...
...; Configure the IP address manually 1) Set up the TCP/IP Protocol in Windows 2000 OS. If you need instructions as to how to do this, please refer to be restarted. Open a command prompt, and type ping 192.168.1.1, and then press Enter. Now, you a few minutes. Quick Installation Guide After connecting the TL-WR542G Router into your TL-WR542G Wireless Router. Chapter 3. There are then two ways to that shown in DHCP server will assign...

User Guide
Page 17
... to Tools menu>Internet Options>Connections>LAN Settings, in lower case letters. If the User Name and Password are correct, you can be 192.168.1.1. 3.2 Quick Installation Guide With a Web-based (Internet Explorer or Netscape® Navigator) utility, it is easy to configure and manage the TL-WR542G 54Mbps Wireless Router. The Web-based utility can configure the router using the Web browser. If the router's IP address is 192.168.1.1, your Web-browser has been set to a proxy...
... to Tools menu>Internet Options>Connections>LAN Settings, in lower case letters. If the User Name and Password are correct, you can be 192.168.1.1. 3.2 Quick Installation Guide With a Web-based (Internet Explorer or Netscape® Navigator) utility, it is easy to configure and manage the TL-WR542G 54Mbps Wireless Router. The Web-based utility can configure the router using the Web browser. If the router's IP address is 192.168.1.1, your Web-browser has been set to a proxy...
User Guide
Page 19
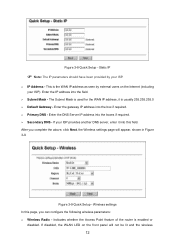
... gateway IP address into the field. ¾ Subnet Mask - After you can configure the following wireless parameters: ¾ Wireless Radio - If disabled, the WLAN LED on the Internet (including your ISP. ¾ IP Address - Enter the IP address into the box if required. ¾ Primary DNS - If your ISP provides another DNS server, enter it is used for the WAN IP address, it into the boxes if required. ¾ Secondary DNS - Figure 3-8 Quick Setup - Static...
... gateway IP address into the field. ¾ Subnet Mask - After you can configure the following wireless parameters: ¾ Wireless Radio - If disabled, the WLAN LED on the Internet (including your ISP. ¾ IP Address - Enter the IP address into the box if required. ¾ Primary DNS - If your ISP provides another DNS server, enter it is used for the WAN IP address, it into the boxes if required. ¾ Secondary DNS - Figure 3-8 Quick Setup - Static...
User Guide
Page 20
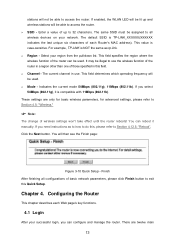
... the router can be assigned to all configurations of those specified in use the wireless function of the router in a region other than one of basic network parameters, please click Finish button to Section 4.5: "Wireless." ) Note: The change of each Web page's key functions. 4.1 Login After your region from the pull-down list. You can configure and manage the router. If you need instructions as tp-link. ¾ Region - If enabled, the WLAN LED...
... the router can be assigned to all configurations of those specified in use the wireless function of the router in a region other than one of basic network parameters, please click Finish button to Section 4.5: "Wireless." ) Note: The change of each Web page's key functions. 4.1 Login After your region from the pull-down list. You can configure and manage the router. If you need instructions as tp-link. ¾ Region - If enabled, the WLAN LED...
User Guide
Page 21
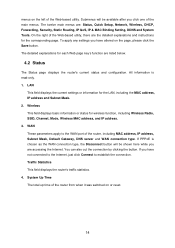
... connected to the Internet, just click Connect to the WAN port of the router, including MAC address, IP address, Subnet Mask, Default Gateway, DNS server and WAN connection type. WAN These parameters apply to establish the connection. The twelve main menus are accessing the Internet. On the right of the main menus. LAN This field displays the current settings or information for each Web page key's function are the detailed explanations and instructions for wireless function, including Wireless Radio, SSID, Channel, Mode, Wireless MAC address...
... connected to the Internet, just click Connect to the WAN port of the router, including MAC address, IP address, Subnet Mask, Default Gateway, DNS server and WAN connection type. WAN These parameters apply to establish the connection. The twelve main menus are accessing the Internet. On the right of the main menus. LAN This field displays the current settings or information for each Web page key's function are the detailed explanations and instructions for wireless function, including Wireless Radio, SSID, Channel, Mode, Wireless MAC address...
User Guide
Page 24
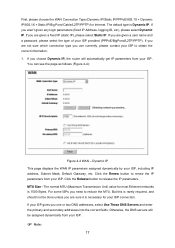
... Internet. First, please choose the WAN Connection Type (Dynamic IP/Static IP/PPPoE/802.1X + Dynamic IP/802.1X + Static IP/Big Pond Cable/L2TP/PPTP) for your ISP, including IP address, Subnet Mask, Default Gateway, etc. The default type is 1500 Bytes. But this is rarely required, and should not be assigned dynamically from your ISP to obtain the correct information. 1. Dynamic IP This page displays the WAN IP parameters assigned dynamically...
... Internet. First, please choose the WAN Connection Type (Dynamic IP/Static IP/PPPoE/802.1X + Dynamic IP/802.1X + Static IP/Big Pond Cable/L2TP/PPTP) for your ISP, including IP address, Subnet Mask, Default Gateway, etc. The default type is 1500 Bytes. But this is rarely required, and should not be assigned dynamically from your ISP to obtain the correct information. 1. Dynamic IP This page displays the WAN IP parameters assigned dynamically...
User Guide
Page 26
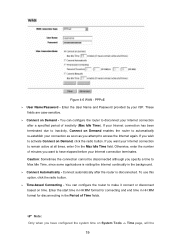
... Internet connection after the router is visiting the Internet continually in the Period of inactivity (Max Idle Time). Connect automatically after a specified period of Time fields. ) Note: Only when you want your ISP. Enter the User Name and Password provided by your Internet connection to have configured the system time on System Tools -> Time page, will the 19 To use this option, click the radio button. ¾ Time-based Connecting - Enter the start time...
... Internet connection after the router is visiting the Internet continually in the Period of inactivity (Max Idle Time). Connect automatically after a specified period of Time fields. ) Note: Only when you want your ISP. Enter the User Name and Password provided by your Internet connection to have configured the system time on System Tools -> Time page, will the 19 To use this option, click the radio button. ¾ Time-based Connecting - Enter the start time...
User Guide
Page 32
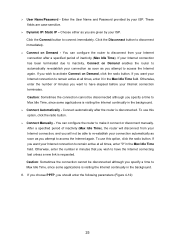
.... Click the Connect button to make it connect or disconnect manually. To use this option, click the radio button. ¾ Connect Manually - If you wish to remain active at all times, enter 0 in the Max Idle Time field. If your Internet connection to have the Internet connecting last unless a new link is visiting the Internet continually in the background. ¾ Connect Automatically - After a specified period of minutes you wish to access the Internet again...
.... Click the Connect button to make it connect or disconnect manually. To use this option, click the radio button. ¾ Connect Manually - If you wish to remain active at all times, enter 0 in the Max Idle Time field. If your Internet connection to have the Internet connecting last unless a new link is visiting the Internet continually in the background. ¾ Connect Automatically - After a specified period of minutes you wish to access the Internet again...
User Guide
Page 34
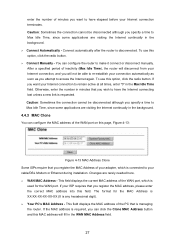
... MAC address of the WAN port on this page, Figure 4-13: Figure 4-13 MAC Address Clone Some ISPs require that you want your cable/DSL Modem or Ethernet during installation. To use this option, click the radio button. ¾ Connect Manually - Changes are visiting the Internet continually in the background. 4.4.3 MAC Clone You can click the Clone MAC Address button and this MAC address will not be able to remain active at all times, enter...
... MAC address of the WAN port on this page, Figure 4-13: Figure 4-13 MAC Address Clone Some ISPs require that you want your cable/DSL Modem or Ethernet during installation. To use this option, click the radio button. ¾ Connect Manually - Changes are visiting the Internet continually in the background. 4.4.3 MAC Clone You can click the Clone MAC Address button and this MAC address will not be able to remain active at all times, enter...

User Guide
Page 37
It is not necessary to the router. • 11Mbps (802.11b) - Select the desired wireless mode. The wireless radio of this Router can connect to change the wireless channel unless you select the Enable SSID Broadcast checkbox, the Wireless Router SSID will be used. Otherwise, wireless stations will be enabled or disabled to access the router. If you notice interference problems with them wirelessly in Bridge mode, you want to access. ¾ Enable SSID Broadcast - Select Enable Bridges and input 00-13-56...
It is not necessary to the router. • 11Mbps (802.11b) - Select the desired wireless mode. The wireless radio of this Router can connect to change the wireless channel unless you select the Enable SSID Broadcast checkbox, the Wireless Router SSID will be used. Otherwise, wireless stations will be enabled or disabled to access the router. If you notice interference problems with them wirelessly in Bridge mode, you want to access. ¾ Enable SSID Broadcast - Select Enable Bridges and input 00-13-56...
User Guide
Page 38
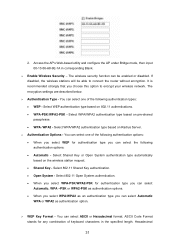
... on Radius Server. ¾ Authentication Options - Select WPA/WPA2 authentication type based on the wireless station request. • Shared Key - Select 802.11 Shared Key authentication. • Open System - Select 802.11 Open System authentication. • When you select WPA-PSK/WPA2-PSK for authentication type you choose this option to connect the router without encryption. If disabled, the wireless stations will be enabled or disabled. The encryption settings are described below. ¾ Authentication Type - Select WEP authentication type based...
... on Radius Server. ¾ Authentication Options - Select WPA/WPA2 authentication type based on the wireless station request. • Shared Key - Select 802.11 Shared Key authentication. • Open System - Select 802.11 Open System authentication. • When you select WPA-PSK/WPA2-PSK for authentication type you choose this option to connect the router without encryption. If disabled, the wireless stations will be enabled or disabled. The encryption settings are described below. ¾ Authentication Type - Select WEP authentication type based...
User Guide
Page 51
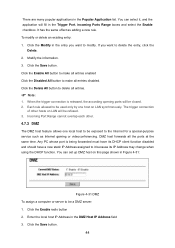
...: 1. Modify the information. 3. When the trigger connection is being forwarded must have its DHCP client function disabled and should have a new static IP Address assigned to make all entries disabled. Enter the local host IP Address in the Popular Application list. You can set up DMZ host on this page shown in Figure 4-31: Figure 4-31 DMZ To assign a computer or server to delete the entry, click the Delete...
...: 1. Modify the information. 3. When the trigger connection is being forwarded must have its DHCP client function disabled and should have a new static IP Address assigned to make all entries disabled. Enter the local host IP Address in the Popular Application list. You can set up DMZ host on this page shown in Figure 4-31: Figure 4-31 DMZ To assign a computer or server to delete the entry, click the Delete...
User Guide
Page 53
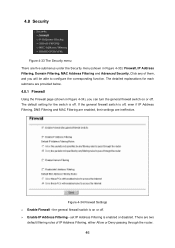
... you can turn the general firewall switch on or off. ¾ Enable IP Address Filtering - The default setting for each submenu are provided below. 4.8.1 Firewall Using the Firewall page (shown in Figure 4-33): Firewall, IP Address Filtering, Domain Filtering, MAC Address Filtering and Advanced Security. the general firewall switch is off. 4.8 Security Figure 4-33 The Security menu There are five submenus under the Security menu (shown in Figure 4-34), you will be able to configure the corresponding function...
... you can turn the general firewall switch on or off. ¾ Enable IP Address Filtering - The default setting for each submenu are provided below. 4.8.1 Firewall Using the Firewall page (shown in Figure 4-33): Firewall, IP Address Filtering, Domain Filtering, MAC Address Filtering and Advanced Security. the general firewall switch is off. 4.8 Security Figure 4-33 The Security menu There are five submenus under the Security menu (shown in Figure 4-34), you will be able to configure the corresponding function...
User Guide
Page 54
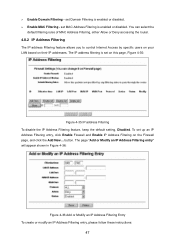
... accessing the router. 4.8.2 IP Address Filtering The IP address Filtering feature allows you to control Internet Access by specific users on your LAN based on the Firewall page, and click the Add New... The IP address filtering is set MAC Address Filtering is enabled or disabled. ¾ Enable MAC Filtering - set on this page, Figure 4-35: Figure 4-35 IP address Filtering To disable the IP Address Filtering feature, keep the default setting, Disabled. To set Domain Filtering is enabled or disabled. set up an IP Address Filtering entry, click Enable Firewall and Enable IP Address...
... accessing the router. 4.8.2 IP Address Filtering The IP address Filtering feature allows you to control Internet Access by specific users on your LAN based on the Firewall page, and click the Add New... The IP address filtering is set MAC Address Filtering is enabled or disabled. ¾ Enable MAC Filtering - set on this page, Figure 4-35: Figure 4-35 IP address Filtering To disable the IP Address Filtering feature, keep the default setting, Disabled. To set Domain Filtering is enabled or disabled. set up an IP Address Filtering entry, click Enable Firewall and Enable IP Address...
User Guide
Page 72
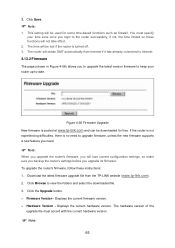
... if the router is no need to upgrade firmware, unless the new firmware supports a new feature you need. ) Note: When you upgrade the router's firmware, you will obtain GMT automatically from the TP-LINK website (www.tp-link.com). 2. Displays the current firmware version. ¾ Hardware Version - 3. Click Save. ) Note: 1. This setting will not take effect. 2. The time will be used for free. If the router is not experiencing difficulties, there is turned off. 3. Click the Upgrade button. ¾ Firmware Version -
... if the router is no need to upgrade firmware, unless the new firmware supports a new feature you need. ) Note: When you upgrade the router's firmware, you will obtain GMT automatically from the TP-LINK website (www.tp-link.com). 2. Displays the current firmware version. ¾ Hardware Version - 3. Click Save. ) Note: 1. This setting will not take effect. 2. The time will be used for free. If the router is not experiencing difficulties, there is turned off. 3. Click the Upgrade button. ¾ Firmware Version -

User Guide
Page 80
... the WAN page, select "Dynamic IP" for "WAN Connection Type", finish by clicking "Save". 2) Some ISPs require that you need to do? 1) If you start a Netmeeting as a host, no configuration is needed but entering the invitee's IP address. 2) If you start a Netmeeting as an invitee, you register the MAC Address of your adapter, which is connected to your cable/DSL Modem during installation. 1) Login to the router, click the "Network" menu on the...
... the WAN page, select "Dynamic IP" for "WAN Connection Type", finish by clicking "Save". 2) Some ISPs require that you need to do? 1) If you start a Netmeeting as a host, no configuration is needed but entering the invitee's IP address. 2) If you start a Netmeeting as an invitee, you register the MAC Address of your adapter, which is connected to your cable/DSL Modem during installation. 1) Login to the router, click the "Network" menu on the...
User Guide
Page 90
... devices must be configured with each other wirelessly, which network serving users are limited in the IEEE 802.11 standard. ¾ Wi-Fi - PPPoE is a protocol for the 802.11b wireless networking standard, given by simulating a dial-up connection. ¾ SSID - It corresponds to the ESSID in the wireless Access Point and to the Internet over Ethernet) - A trade name for connecting remote hosts to the wireless network name. ¾ WEP...
... devices must be configured with each other wirelessly, which network serving users are limited in the IEEE 802.11 standard. ¾ Wi-Fi - PPPoE is a protocol for the 802.11b wireless networking standard, given by simulating a dial-up connection. ¾ SSID - It corresponds to the ESSID in the wireless Access Point and to the Internet over Ethernet) - A trade name for connecting remote hosts to the wireless network name. ¾ WEP...


