User Guide
Page 6
... Web Management Page in Windows XP/Vista/7 16 3.2.1 Setting up a Print Server Network 16 3.2.2 Joining the Print Server Network 26 3.3 Using Web Management Page in MAC OS 27 3.3.1 3.3.2 3.3.3 Setting up a Print Server Network 27 Printer Installation in...
... Web Management Page in Windows XP/Vista/7 16 3.2.1 Setting up a Print Server Network 16 3.2.2 Joining the Print Server Network 26 3.3 Using Web Management Page in MAC OS 27 3.3.1 3.3.2 3.3.3 Setting up a Print Server Network 27 Printer Installation in...
User Guide
Page 34
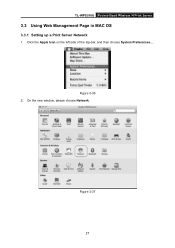
Figure 3-37 27 Click the Apple Icon on the left side of the top-bar, and then choose System Preferences.... Figure 3-36 2. TL-WPS510U Pocket-Sized Wireless N Print Server 3.3 Using Web Management Page in MAC OS 3.3.1 Setting up a Print Server Network 1. On the new window, please choose Network.
Figure 3-37 27 Click the Apple Icon on the left side of the top-bar, and then choose System Preferences.... Figure 3-36 2. TL-WPS510U Pocket-Sized Wireless N Print Server 3.3 Using Web Management Page in MAC OS 3.3.1 Setting up a Print Server Network 1. On the new window, please choose Network.

User Guide
Page 36
Figure 3-40 29 TL-WPS510U Pocket-Sized Wireless N Print Server 4. In default, the print server will work on Ad-Hoc mode with the SSID WLAN-PS, so please select the wireless network WLAN-PS to the TL-WPS510U. Connect your MAC computer to connect. If you need to reset the TL-WPS510U but don't know how to do, please refer to the Appendix A: How to Reset the Print Server.
Figure 3-40 29 TL-WPS510U Pocket-Sized Wireless N Print Server 4. In default, the print server will work on Ad-Hoc mode with the SSID WLAN-PS, so please select the wireless network WLAN-PS to the TL-WPS510U. Connect your MAC computer to connect. If you need to reset the TL-WPS510U but don't know how to do, please refer to the Appendix A: How to Reset the Print Server.
User Guide
Page 38
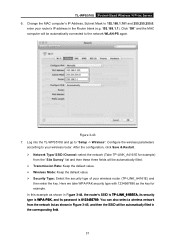
... the configuration, click Save & Restart. ¾ Network Type/ SSID /Channel: select the network (Take TP-LINK_A4161E for example. TL-WPS510U Pocket-Sized Wireless N Print Server 6. Click "OK" and the MAC computer will be automatically connected to your router's IP address in the corresponding field. 31 Log into the... TL-WPS510U and go to 192.168.1.101 and 255.255.255.0; You can also select a wireless network ...
... the configuration, click Save & Restart. ¾ Network Type/ SSID /Channel: select the network (Take TP-LINK_A4161E for example. TL-WPS510U Pocket-Sized Wireless N Print Server 6. Click "OK" and the MAC computer will be automatically connected to your router's IP address in the corresponding field. 31 Log into the... TL-WPS510U and go to 192.168.1.101 and 255.255.255.0; You can also select a wireless network ...

User Guide
Page 40
Figure 3-46 Figure 3-47 33 Connect your MAC computer to the wireless router. We take TP-LINK_61BB7A for example. The password is 0123456789. TL-WPS510U Pocket-Sized Wireless N Print Server 8.
Figure 3-46 Figure 3-47 33 Connect your MAC computer to the wireless router. We take TP-LINK_61BB7A for example. The password is 0123456789. TL-WPS510U Pocket-Sized Wireless N Print Server 8.
User Guide
Page 41
Figure 3-48 34 Try to access the TL-WPS510U and you can communicate with the wireless router and your MAC computer. The TL-WPS510U is working on Infrastructure mode and can see Wireless status. TL-WPS510U Pocket-Sized Wireless N Print Server 9.
Figure 3-48 34 Try to access the TL-WPS510U and you can communicate with the wireless router and your MAC computer. The TL-WPS510U is working on Infrastructure mode and can see Wireless status. TL-WPS510U Pocket-Sized Wireless N Print Server 9.
User Guide
Page 42
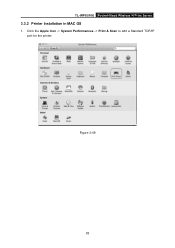
TL-WPS510U Pocket-Sized Wireless N Print Server 3.3.2 Printer Installation in MAC OS 1. Figure 3-49 35 Click the Apple icon -> System Performances -> Print & Scan to add a Standard TCP/IP port for the printer.
TL-WPS510U Pocket-Sized Wireless N Print Server 3.3.2 Printer Installation in MAC OS 1. Figure 3-49 35 Click the Apple icon -> System Performances -> Print & Scan to add a Standard TCP/IP port for the printer.
User Guide
Page 45
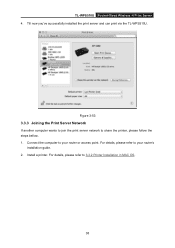
For details, please refer to share the printer, please follow the steps bellow. 1. For details, please refer to your router's installation guide. 2. TL-WPS510U Pocket-Sized Wireless N Print Server 4. Connect the computer to your router or access point. Install a printer. Till now you've successfully installed the print server and can print via the TL-WPS510U. Figure 3-53 3.3.3 Joining the Print Server Network If another computer wants to join the print server network to 3.3.2 Printer Installation in MAC OS. 38
For details, please refer to share the printer, please follow the steps bellow. 1. For details, please refer to your router's installation guide. 2. TL-WPS510U Pocket-Sized Wireless N Print Server 4. Connect the computer to your router or access point. Install a printer. Till now you've successfully installed the print server and can print via the TL-WPS510U. Figure 3-53 3.3.3 Joining the Print Server Network If another computer wants to join the print server network to 3.3.2 Printer Installation in MAC OS. 38
User Guide
Page 48
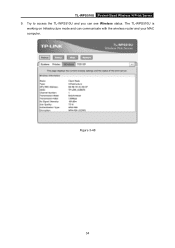
... server. 41 To correct the print server's device name. ¾ System Up Time: This option allows you to view device name of the print server. TL-WPS510U Pocket-Sized Wireless N Print Server 4.2 Status The Status page shows the current information about the print server as shown in this time. ¾...
... server. 41 To correct the print server's device name. ¾ System Up Time: This option allows you to view device name of the print server. TL-WPS510U Pocket-Sized Wireless N Print Server 4.2 Status The Status page shows the current information about the print server as shown in this time. ¾...