User Guide
Page 5
...., LTD DECLARATION OF CONFORMITY For the following equipment: Product Description: Pocket-Sized Wireless N Print Server Model No.: TL-WPS510U Trademark: TP-LINK We declare under our own responsibility that the above products satisfy all the technical regulations applicable to the product within the ... CE Mark: Person is responsible for marking this declaration: Yang Hongliang Product Manager of International Business Date of issue: 2012 TP-LINK TECHNOLOGIES CO., LTD. Building 24 (floors 1, 3, 4, 5), and 28 (floors 1-4) Central Science and Technology Park, Shennan Rd, Nanshan, Shenzhen, China...
...., LTD DECLARATION OF CONFORMITY For the following equipment: Product Description: Pocket-Sized Wireless N Print Server Model No.: TL-WPS510U Trademark: TP-LINK We declare under our own responsibility that the above products satisfy all the technical regulations applicable to the product within the ... CE Mark: Person is responsible for marking this declaration: Yang Hongliang Product Manager of International Business Date of issue: 2012 TP-LINK TECHNOLOGIES CO., LTD. Building 24 (floors 1, 3, 4, 5), and 28 (floors 1-4) Central Science and Technology Park, Shennan Rd, Nanshan, Shenzhen, China...
User Guide
Page 6
Hardware Installation 4 2.1 Preparation...4 2.2 Typology...4 2.3 Connection ...4 Chapter 3. More Configuration for the Print Server 39 4.1 Login...39 4.2 Status ...41 4.2.1 4.2.2 4.2.3 4.2.4 System ...41 Printer...42 Wireless...43 TCP/IP...43 4.3 Setup ...44 4.3.1 4.3.2 4.3.3 System Setup ...44 Wireless Setup ...46 TCP/IP Setup ...47 4.4 Misc ...48 I Introduction 2 1.1 Product Overview ...2 1.2 Features ...2 1.3 LED Indicator...2 1.4 Factory Defaults ...3 Chapter 2. How to Configure the...
Hardware Installation 4 2.1 Preparation...4 2.2 Typology...4 2.3 Connection ...4 Chapter 3. More Configuration for the Print Server 39 4.1 Login...39 4.2 Status ...41 4.2.1 4.2.2 4.2.3 4.2.4 System ...41 Printer...42 Wireless...43 TCP/IP...43 4.3 Setup ...44 4.3.1 4.3.2 4.3.3 System Setup ...44 Wireless Setup ...46 TCP/IP Setup ...47 4.4 Misc ...48 I Introduction 2 1.1 Product Overview ...2 1.2 Features ...2 1.3 LED Indicator...2 1.4 Factory Defaults ...3 Chapter 2. How to Configure the...

User Guide
Page 8
TL-WPS510U Pocket-Sized Wireless N Print Server Package Contents ¾ One TL-WPS510U Pocket-Sized Wireless N Print Server ¾ One external AC power adapter ¾ One USB cable ¾ One Quick Installation Guide ¾ One Resource CD containing Utility and User Guide 1
TL-WPS510U Pocket-Sized Wireless N Print Server Package Contents ¾ One TL-WPS510U Pocket-Sized Wireless N Print Server ¾ One external AC power adapter ¾ One USB cable ¾ One Quick Installation Guide ¾ One Resource CD containing Utility and User Guide 1

User Guide
Page 9
TL-WPS510U Pocket-Sized Wireless N Print Server Chapter 1. Introduction 1.1 Product Overview The external print servers enhance capability by letting you place your printers at convenient locations directly on the road ¾ Compatible with host-based printers, e.g. WLAN Blinking (Green) The Print Server is no data transmitted via wireless... power is off. Please note that the print server does not support printing with IEEE 802.11n/g/b ¾ Wireless N speed up to take on the Ethernet network, and by increasing network printer performance and management. The Print Server's power is...
TL-WPS510U Pocket-Sized Wireless N Print Server Chapter 1. Introduction 1.1 Product Overview The external print servers enhance capability by letting you place your printers at convenient locations directly on the road ¾ Compatible with host-based printers, e.g. WLAN Blinking (Green) The Print Server is no data transmitted via wireless... power is off. Please note that the print server does not support printing with IEEE 802.11n/g/b ¾ Wireless N speed up to take on the Ethernet network, and by increasing network printer performance and management. The Print Server's power is...
User Guide
Page 10
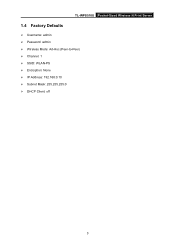
TL-WPS510U Pocket-Sized Wireless N Print Server 1.4 Factory Defaults ¾ Username: admin ¾ Password: admin ¾ Wireless Mode: Ad-Hoc (Peer-to-Peer) ¾ Channel: 1 ¾ SSID: WLAN-PS ¾ Encryption: None ¾ IP Address: 192.168.0.10 ¾ Subnet Mask: 255.255.255.0 ¾ DHCP Client: off 3
TL-WPS510U Pocket-Sized Wireless N Print Server 1.4 Factory Defaults ¾ Username: admin ¾ Password: admin ¾ Wireless Mode: Ad-Hoc (Peer-to-Peer) ¾ Channel: 1 ¾ SSID: WLAN-PS ¾ Encryption: None ¾ IP Address: 192.168.0.10 ¾ Subnet Mask: 255.255.255.0 ¾ DHCP Client: off 3
User Guide
Page 11
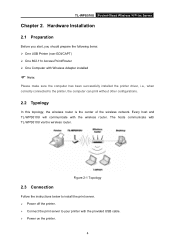
..., i.e., when correctly connected to the printer, the computer can print without other configurations. 2.2 Typology In this topology, the wireless router is the center of the wireless network. TL-WPS510U Pocket-Sized Wireless N Print Server Chapter 2. Hardware Installation 2.1 Preparation Before you start, you should prepare the following items: ¾ One ... Point/Router ¾ One Computer with the provided USB cable. ¾ Power on the printer. 4 The hosts communicate with the wireless router. Every host and TL-WPS510U will communicate with TL-WPS510U via the wireless router.
..., i.e., when correctly connected to the printer, the computer can print without other configurations. 2.2 Typology In this topology, the wireless router is the center of the wireless network. TL-WPS510U Pocket-Sized Wireless N Print Server Chapter 2. Hardware Installation 2.1 Preparation Before you start, you should prepare the following items: ¾ One ... Point/Router ¾ One Computer with the provided USB cable. ¾ Power on the printer. 4 The hosts communicate with the wireless router. Every host and TL-WPS510U will communicate with TL-WPS510U via the wireless router.

User Guide
Page 12
TL-WPS510U Pocket-Sized Wireless N Print Server ¾ Power on print server. ¾ Wait 40 seconds for the print server's Power On Self Test (POST). 5
TL-WPS510U Pocket-Sized Wireless N Print Server ¾ Power on print server. ¾ Wait 40 seconds for the print server's Power On Self Test (POST). 5
User Guide
Page 13
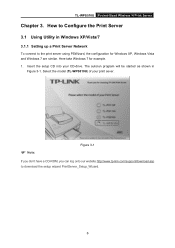
Here take Windows 7 for Windows XP, Windows Vista and Windows 7 are similar. TL-WPS510U Pocket-Sized Wireless N Print Server Chapter 3. Select the model (TL-WPS510U) of your CD-drive. The autorun program will be started as shown in Windows XP/Vista/7 3.1.1 Setting up a Print Server Network To...the setup CD into your print sever. ) Note: Figure 3-1 If you don't have a CD-ROM, you can log onto our website http://www.tp-link.com/support/download.asp to the print server using PSWizard, the configuration for example. 1. How to Configure the Print Server 3.1 Using Utility in Figure 3-1.
Here take Windows 7 for Windows XP, Windows Vista and Windows 7 are similar. TL-WPS510U Pocket-Sized Wireless N Print Server Chapter 3. Select the model (TL-WPS510U) of your CD-drive. The autorun program will be started as shown in Windows XP/Vista/7 3.1.1 Setting up a Print Server Network To...the setup CD into your print sever. ) Note: Figure 3-1 If you don't have a CD-ROM, you can log onto our website http://www.tp-link.com/support/download.asp to the print server using PSWizard, the configuration for example. 1. How to Configure the Print Server 3.1 Using Utility in Figure 3-1.
User Guide
Page 14
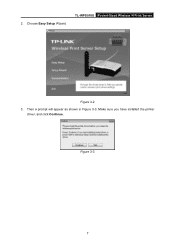
2. Figure 3-3 7 Make sure you have installed the printer driver, and click Continue. Choose Easy Setup Wizard. Then a prompt will appear as shown in Figure 3-3. TL-WPS510U Pocket-Sized Wireless N Print Server Figure 3-2 3.
2. Figure 3-3 7 Make sure you have installed the printer driver, and click Continue. Choose Easy Setup Wizard. Then a prompt will appear as shown in Figure 3-3. TL-WPS510U Pocket-Sized Wireless N Print Server Figure 3-2 3.
User Guide
Page 15
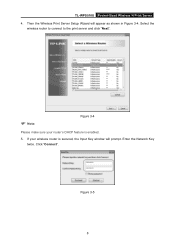
TL-WPS510U Pocket-Sized Wireless N Print Server 4. Then the Wireless Print Server Setup Wizard will prompt. Figure 3-5 8 Select the wireless router to connect to the print server and click "Next". ) Note: Figure 3-4 Please make sure your wireless router is enabled. 5. If your router's DHCP feature is secured, the Input Key window will appear as shown in Figure 3-4. Click "Connect". Enter the Network Key twice.
TL-WPS510U Pocket-Sized Wireless N Print Server 4. Then the Wireless Print Server Setup Wizard will prompt. Figure 3-5 8 Select the wireless router to connect to the print server and click "Next". ) Note: Figure 3-4 Please make sure your wireless router is enabled. 5. If your router's DHCP feature is secured, the Input Key window will appear as shown in Figure 3-4. Click "Connect". Enter the Network Key twice.

User Guide
Page 16
For the reset method, please refer to Appendix A: How to Reset the Print Server. 9 On the Select a Print Server screen as shown in Figure 3-6, select the print server and click "Next". ) Note: Figure 3-6 If you can't find the print server in the list, please check whether its power LED is on (red). If the power LED is on and the print server still doesn't appear, please reset it. TL-WPS510U Pocket-Sized Wireless N Print Server 6.
For the reset method, please refer to Appendix A: How to Reset the Print Server. 9 On the Select a Print Server screen as shown in Figure 3-6, select the print server and click "Next". ) Note: Figure 3-6 If you can't find the print server in the list, please check whether its power LED is on (red). If the power LED is on and the print server still doesn't appear, please reset it. TL-WPS510U Pocket-Sized Wireless N Print Server 6.
User Guide
Page 17
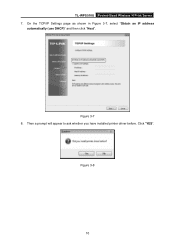
Click "YES". Then a prompt will appear to ask whether you have installed printer driver before. Figure 3-7 8. Figure 3-8 10 On the TCP/IP Settings page as shown in Figure 3-7, select "Obtain an IP address automatically (use DHCP)" and then click "Next". TL-WPS510U Pocket-Sized Wireless N Print Server 7.
Click "YES". Then a prompt will appear to ask whether you have installed printer driver before. Figure 3-7 8. Figure 3-8 10 On the TCP/IP Settings page as shown in Figure 3-7, select "Obtain an IP address automatically (use DHCP)" and then click "Next". TL-WPS510U Pocket-Sized Wireless N Print Server 7.
User Guide
Page 18
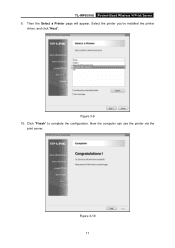
TL-WPS510U Pocket-Sized Wireless N Print Server 9. Figure 3-9 10. Click "Finish" to complete the configuration. Now the computer can use the printer via the print server. Select the printer you've installed the printer driver, and click "Next". Then the Select a Printer page will appear. Figure 3-10 11
TL-WPS510U Pocket-Sized Wireless N Print Server 9. Figure 3-9 10. Click "Finish" to complete the configuration. Now the computer can use the printer via the print server. Select the printer you've installed the printer driver, and click "Next". Then the Select a Printer page will appear. Figure 3-10 11
User Guide
Page 19
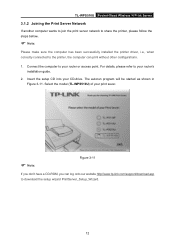
... other configurations. 1. The autorun program will be started as shown in Figure 3-11. Select the model (TL-WPS510U) of your router or access point. TL-WPS510U Pocket-Sized Wireless N Print Server 3.1.2 Joining the Print Server Network If another computer wants to join the print server network to... successfully installed the printer driver, i.e., when correctly connected to the printer, the computer can log onto our website http://www.tp-link.com/support/download.asp to download the setup wizard PrintServer_Setup_Wizard. 12 Connect the computer to your CD-drive. Insert the setup ...
... other configurations. 1. The autorun program will be started as shown in Figure 3-11. Select the model (TL-WPS510U) of your router or access point. TL-WPS510U Pocket-Sized Wireless N Print Server 3.1.2 Joining the Print Server Network If another computer wants to join the print server network to... successfully installed the printer driver, i.e., when correctly connected to the printer, the computer can log onto our website http://www.tp-link.com/support/download.asp to download the setup wizard PrintServer_Setup_Wizard. 12 Connect the computer to your CD-drive. Insert the setup ...
User Guide
Page 20
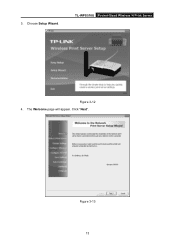
The Welcome page will appear. Figure 3-13 13 Click "Next". Choose Setup Wizard. 3. TL-WPS510U Pocket-Sized Wireless N Print Server Figure 3-12 4.
The Welcome page will appear. Figure 3-13 13 Click "Next". Choose Setup Wizard. 3. TL-WPS510U Pocket-Sized Wireless N Print Server Figure 3-12 4.
User Guide
Page 21
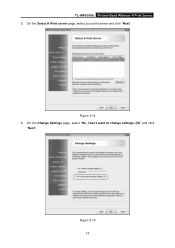
On the Change Settings page, select "No, I don't want to change settings. (O)" and click "Next". On the Select A Print server page, select your print server and click "Next". Figure 3-14 6. Figure 3-15 14 TL-WPS510U Pocket-Sized Wireless N Print Server 5.
On the Change Settings page, select "No, I don't want to change settings. (O)" and click "Next". On the Select A Print server page, select your print server and click "Next". Figure 3-14 6. Figure 3-15 14 TL-WPS510U Pocket-Sized Wireless N Print Server 5.
User Guide
Page 22
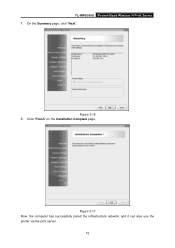
Figure 3-17 Now, the computer has successfully joined the infrastructure network, and it can also use the printer via the print server. 15 On the Summery page, click "Next". Figure 3-16 8. Click "Finish" on the Installation Complete page. TL-WPS510U Pocket-Sized Wireless N Print Server 7.
Figure 3-17 Now, the computer has successfully joined the infrastructure network, and it can also use the printer via the print server. 15 On the Summery page, click "Next". Figure 3-16 8. Click "Finish" on the Installation Complete page. TL-WPS510U Pocket-Sized Wireless N Print Server 7.
User Guide
Page 23
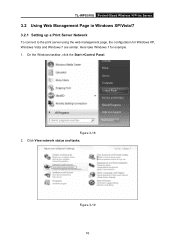
Click View network status and tasks. Here take Windows 7 for Windows XP, Windows Vista and Windows 7 are similar. Figure 3-18 2. TL-WPS510U Pocket-Sized Wireless N Print Server 3.2 Using Web Management Page in Windows XP/Vista/7 3.2.1 Setting up a Print Server Network To connect to the print server using the web management page, the configuration for example. 1. On the Windows taskbar, click the Start->Control Panel. Figure 3-19 16
Click View network status and tasks. Here take Windows 7 for Windows XP, Windows Vista and Windows 7 are similar. Figure 3-18 2. TL-WPS510U Pocket-Sized Wireless N Print Server 3.2 Using Web Management Page in Windows XP/Vista/7 3.2.1 Setting up a Print Server Network To connect to the print server using the web management page, the configuration for example. 1. On the Windows taskbar, click the Start->Control Panel. Figure 3-19 16
User Guide
Page 24
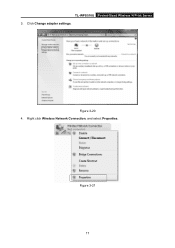
TL-WPS510U Pocket-Sized Wireless N Print Server 3. Click Change adapter settings. Figure 3-20 4. Figure 3-21 17 Right click Wireless Network Connection, and select Properties.
TL-WPS510U Pocket-Sized Wireless N Print Server 3. Click Change adapter settings. Figure 3-20 4. Figure 3-21 17 Right click Wireless Network Connection, and select Properties.
User Guide
Page 25
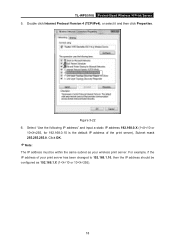
Figure 3-22 6. Select "Use the following IP address" and input a static IP address 192.168.0.X (1 TL-WPS510U Pocket-Sized Wireless N Print Server 5. Double click Internet Protocol Version 4 (TCP/IPv4), or select it and then click Properties.
Figure 3-22 6. Select "Use the following IP address" and input a static IP address 192.168.0.X (1 TL-WPS510U Pocket-Sized Wireless N Print Server 5. Double click Internet Protocol Version 4 (TCP/IPv4), or select it and then click Properties.

