User Guide
Page 3
...to provide a separation distance of the following two conditions: 1) This device may not cause harmful interference. 2) This device must not be installed to only Mobile Configurations. Any changes or modifications not expressly approved by one or more of at least 20 cm from that to radio ...communications. This device and its antenna must be co-located or operating in a particular installation. These limits are designed to operate the equipment. If this equipment does cause harmful interference to radio or television reception, which the...
...to provide a separation distance of the following two conditions: 1) This device may not cause harmful interference. 2) This device must not be installed to only Mobile Configurations. Any changes or modifications not expressly approved by one or more of at least 20 cm from that to radio ...communications. This device and its antenna must be co-located or operating in a particular installation. These limits are designed to operate the equipment. If this equipment does cause harmful interference to radio or television reception, which the...
User Guide
Page 6
... a Print Server Network 16 3.2.2 Joining the Print Server Network 26 3.3 Using Web Management Page in MAC OS 27 3.3.1 3.3.2 3.3.3 Setting up a Print Server Network 27 Printer Installation in MAC OS 35 Joining the Print Server Network 38 Chapter 4. More Configuration for the Print Server 39 4.1 Login...39 4.2 Status ...41 4.2.1 4.2.2 4.2.3 4.2.4 System ...41 Printer...
... a Print Server Network 16 3.2.2 Joining the Print Server Network 26 3.3 Using Web Management Page in MAC OS 27 3.3.1 3.3.2 3.3.3 Setting up a Print Server Network 27 Printer Installation in MAC OS 35 Joining the Print Server Network 38 Chapter 4. More Configuration for the Print Server 39 4.1 Login...39 4.2 Status ...41 4.2.1 4.2.2 4.2.3 4.2.4 System ...41 Printer...

User Guide
Page 7
4.4.1 Factory Default ...48 4.4.2 Firmware Upgrade...49 4.5 Restart...50 Appendix A: How to Reset the Print Server 51 Appendix B: Frequently Asked Questions 52 Appendix C: Printer Installation in Windows OS 54 C-1 If You Have Installed A Printer Before 54 C-2 If You Never Install A Printer Before 59 Appendix D: Additional Installation Instructions 65
4.4.1 Factory Default ...48 4.4.2 Firmware Upgrade...49 4.5 Restart...50 Appendix A: How to Reset the Print Server 51 Appendix B: Frequently Asked Questions 52 Appendix C: Printer Installation in Windows OS 54 C-1 If You Have Installed A Printer Before 54 C-2 If You Never Install A Printer Before 59 Appendix D: Additional Installation Instructions 65

User Guide
Page 8
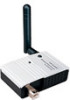
TL-WPS510U Pocket-Sized Wireless N Print Server Package Contents ¾ One TL-WPS510U Pocket-Sized Wireless N Print Server ¾ One external AC power adapter ¾ One USB cable ¾ One Quick Installation Guide ¾ One Resource CD containing Utility and User Guide 1
TL-WPS510U Pocket-Sized Wireless N Print Server Package Contents ¾ One TL-WPS510U Pocket-Sized Wireless N Print Server ¾ One external AC power adapter ¾ One USB cable ¾ One Quick Installation Guide ¾ One Resource CD containing Utility and User Guide 1
User Guide
Page 11
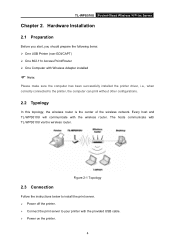
... the center of the wireless network. Every host and TL-WPS510U will communicate with the provided USB cable. ¾ Power on the printer. 4 TL-WPS510U Pocket-Sized Wireless N Print Server Chapter 2. The hosts communicate with Wireless Adapter installed ) Note: Please make sure the computer has been successfully installed the printer driver, i.e., when correctly connected to your...
... the center of the wireless network. Every host and TL-WPS510U will communicate with the provided USB cable. ¾ Power on the printer. 4 TL-WPS510U Pocket-Sized Wireless N Print Server Chapter 2. The hosts communicate with Wireless Adapter installed ) Note: Please make sure the computer has been successfully installed the printer driver, i.e., when correctly connected to your...
User Guide
Page 14
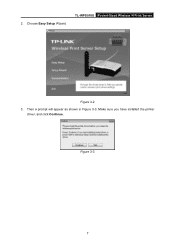
Make sure you have installed the printer driver, and click Continue. Figure 3-3 7 Choose Easy Setup Wizard. TL-WPS510U Pocket-Sized Wireless N Print Server Figure 3-2 3. 2. Then a prompt will appear as shown in Figure 3-3.
Make sure you have installed the printer driver, and click Continue. Figure 3-3 7 Choose Easy Setup Wizard. TL-WPS510U Pocket-Sized Wireless N Print Server Figure 3-2 3. 2. Then a prompt will appear as shown in Figure 3-3.
User Guide
Page 17
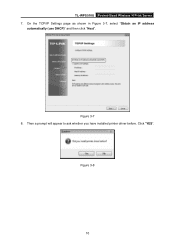
On the TCP/IP Settings page as shown in Figure 3-7, select "Obtain an IP address automatically (use DHCP)" and then click "Next". Click "YES". Figure 3-7 8. Figure 3-8 10 TL-WPS510U Pocket-Sized Wireless N Print Server 7. Then a prompt will appear to ask whether you have installed printer driver before.
On the TCP/IP Settings page as shown in Figure 3-7, select "Obtain an IP address automatically (use DHCP)" and then click "Next". Click "YES". Figure 3-7 8. Figure 3-8 10 TL-WPS510U Pocket-Sized Wireless N Print Server 7. Then a prompt will appear to ask whether you have installed printer driver before.
User Guide
Page 18
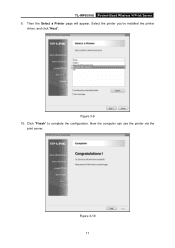
Figure 3-9 10. Now the computer can use the printer via the print server. Then the Select a Printer page will appear. Click "Finish" to complete the configuration. Figure 3-10 11 TL-WPS510U Pocket-Sized Wireless N Print Server 9. Select the printer you've installed the printer driver, and click "Next".
Figure 3-9 10. Now the computer can use the printer via the print server. Then the Select a Printer page will appear. Click "Finish" to complete the configuration. Figure 3-10 11 TL-WPS510U Pocket-Sized Wireless N Print Server 9. Select the printer you've installed the printer driver, and click "Next".
User Guide
Page 19
...For details, please refer to your router's installation guide. 2. Connect the computer to your router or access point. Insert the setup CD into your print sever. ) Note: Figure 3-11 If you don't have a CD-ROM, you can log onto our website http://www.tp-link.com/support/download.asp to the printer,... the computer can print without other configurations. 1. Select the model (TL-WPS510U) of your CD-drive.
...For details, please refer to your router's installation guide. 2. Connect the computer to your router or access point. Insert the setup CD into your print sever. ) Note: Figure 3-11 If you don't have a CD-ROM, you can log onto our website http://www.tp-link.com/support/download.asp to the printer,... the computer can print without other configurations. 1. Select the model (TL-WPS510U) of your CD-drive.
User Guide
Page 22
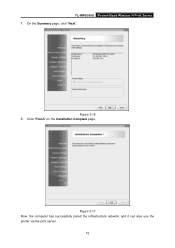
Click "Finish" on the Installation Complete page. Figure 3-17 Now, the computer has successfully joined the infrastructure network, and it can also use the printer via the print server. 15 Figure 3-16 8. TL-WPS510U Pocket-Sized Wireless N Print Server 7. On the Summery page, click "Next".
Click "Finish" on the Installation Complete page. Figure 3-17 Now, the computer has successfully joined the infrastructure network, and it can also use the printer via the print server. 15 Figure 3-16 8. TL-WPS510U Pocket-Sized Wireless N Print Server 7. On the Summery page, click "Next".

User Guide
Page 33
... print server network to your router's installation guide. 2. Connect the computer to share the printer, please follow the steps bellow. 1. TL-WPS510U Pocket-Sized Wireless N Print Server Figure 3-35 18. Install a printer. ¾ If you've already installed the printer on your computer, please ...refer to C-1 If You Have Installed A Printer Before to add a Standard TCP/IP port ...
... print server network to your router's installation guide. 2. Connect the computer to share the printer, please follow the steps bellow. 1. TL-WPS510U Pocket-Sized Wireless N Print Server Figure 3-35 18. Install a printer. ¾ If you've already installed the printer on your computer, please ...refer to C-1 If You Have Installed A Printer Before to add a Standard TCP/IP port ...
User Guide
Page 42
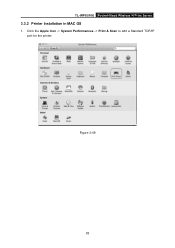
TL-WPS510U Pocket-Sized Wireless N Print Server 3.3.2 Printer Installation in MAC OS 1. Figure 3-49 35 Click the Apple icon -> System Performances -> Print & Scan to add a Standard TCP/IP port for the printer.
TL-WPS510U Pocket-Sized Wireless N Print Server 3.3.2 Printer Installation in MAC OS 1. Figure 3-49 35 Click the Apple icon -> System Performances -> Print & Scan to add a Standard TCP/IP port for the printer.
User Guide
Page 45
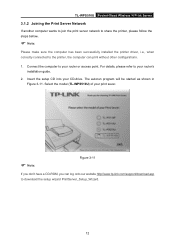
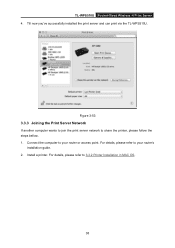
Connect the computer to your router or access point. For details, please refer to share the printer, please follow the steps bellow. 1. Figure 3-53 3.3.3 Joining the Print Server Network If another computer wants to join the print server network to 3.3.2 Printer Installation in MAC OS. 38 For details, please refer to your router's installation guide. 2. Install a printer. Till now you've successfully installed the print server and can print via the TL-WPS510U. TL-WPS510U Pocket-Sized Wireless N Print Server 4.
Connect the computer to your router or access point. For details, please refer to share the printer, please follow the steps bellow. 1. Figure 3-53 3.3.3 Joining the Print Server Network If another computer wants to join the print server network to 3.3.2 Printer Installation in MAC OS. 38 For details, please refer to your router's installation guide. 2. Install a printer. Till now you've successfully installed the print server and can print via the TL-WPS510U. TL-WPS510U Pocket-Sized Wireless N Print Server 4.
User Guide
Page 59
... pins are damaged, contact your country or area. A printer driver is missing or is not specific for a replacement connector. 52 Install the proper printer driver. The upgrading process indication bar stops and does not seem to proceed again while upgrading the print server. ...cord or its connectors are damaged. Power Related Problems The print server requires an external AC power adapter in print port setting. 2. TL-WPS510U Pocket-Sized Wireless N Print Server Appendix B: Frequently Asked Questions 1. Print jobs are properly connected. 3) Recheck the print server connection ...
... pins are damaged, contact your country or area. A printer driver is missing or is not specific for a replacement connector. 52 Install the proper printer driver. The upgrading process indication bar stops and does not seem to proceed again while upgrading the print server. ...cord or its connectors are damaged. Power Related Problems The print server requires an external AC power adapter in print port setting. 2. TL-WPS510U Pocket-Sized Wireless N Print Server Appendix B: Frequently Asked Questions 1. Print jobs are properly connected. 3) Recheck the print server connection ...
User Guide
Page 61
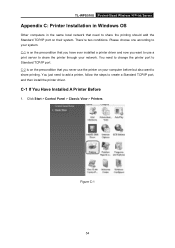
... through your network. You need to add a printer, follow the steps to create a Standard TCP/IP port, and then install the printer driver. C-1 If You Have Installed A Printer Before 1. Figure C-1 54 There're two conditions. C-1 is on the precondition that need to share the printing ... choose one according to your system. You just need to change the printer port to Standard TCP/IP port. TL-WPS510U Pocket-Sized Wireless N Print Server Appendix C: Printer Installation in Windows OS Other computers in the same local network that you want to share printing. Click Start > Control...
... through your network. You need to add a printer, follow the steps to create a Standard TCP/IP port, and then install the printer driver. C-1 If You Have Installed A Printer Before 1. Figure C-1 54 There're two conditions. C-1 is on the precondition that need to share the printing ... choose one according to your system. You just need to change the printer port to Standard TCP/IP port. TL-WPS510U Pocket-Sized Wireless N Print Server Appendix C: Printer Installation in Windows OS Other computers in the same local network that you want to share printing. Click Start > Control...

User Guide
Page 62
Find your installed printer icon, right-click on it, and select Properties. Figure C-3 55 Click Ports > Add Port > Standard TCP/IP Port > New Port > Next. Figure C-2 3. TL-WPS510U Pocket-Sized Wireless N Print Server 2.
Find your installed printer icon, right-click on it, and select Properties. Figure C-3 55 Click Ports > Add Port > Standard TCP/IP Port > New Port > Next. Figure C-2 3. TL-WPS510U Pocket-Sized Wireless N Print Server 2.

User Guide
Page 66
C-2 If You Never Install A Printer Before 1. Now, the printer port has been created. Click Star > Control Panel, and select Devices and Printers. TL-WPS510U Pocket-Sized Wireless N Print Server Figure C-10 9. Figure C-11 59
C-2 If You Never Install A Printer Before 1. Now, the printer port has been created. Click Star > Control Panel, and select Devices and Printers. TL-WPS510U Pocket-Sized Wireless N Print Server Figure C-10 9. Figure C-11 59
User Guide
Page 70
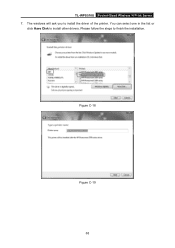
The windows will ask you to finish the installation. Figure C-18 Figure C-19 63 Please follow the steps to install the driver of the printer. TL-WPS510U Pocket-Sized Wireless N Print Server 7. You can select one in the list or click Have Disk to install other drivers.
The windows will ask you to finish the installation. Figure C-18 Figure C-19 63 Please follow the steps to install the driver of the printer. TL-WPS510U Pocket-Sized Wireless N Print Server 7. You can select one in the list or click Have Disk to install other drivers.
User Guide
Page 72
... KX-P6100 GDI", "Panasonic KX-P6300 GDI", or "Panasonic KX-P6500 GDI" to the print server through the Network Print Port. TL-WPS510U Pocket-Sized Wireless N Print Server Appendix D: Additional Installation Instructions Panasonic KX-P6100/6300/6500 If you are using a Panasonic KX-P6100/6300/6500 laser printer with host-based printers, e.g. In...
... KX-P6100 GDI", "Panasonic KX-P6300 GDI", or "Panasonic KX-P6500 GDI" to the print server through the Network Print Port. TL-WPS510U Pocket-Sized Wireless N Print Server Appendix D: Additional Installation Instructions Panasonic KX-P6100/6300/6500 If you are using a Panasonic KX-P6100/6300/6500 laser printer with host-based printers, e.g. In...
