
Easy Smart SwitchUN User Guide
Page 2
...Switch...5 Managing System System...8 Overview...8 Supported Features...8 Configuring System Info...9 Viewing the System Information...9 Specifying the Device Description...9 Configuring IP...10 Configuring LED (Only for Certain Devices)...12 Configuring User Account...13 Backing up and Restoring the Switch...14 Saving the Current......15 Rebooting the Switch...17 Resetting the Switch...18 Upgrading the Firmware...19 Appendix: Default Parameters...21 Switching Switching...23 Overview...23 Supported Features...23 Configuring Ports...25 Configuring IGMP Snooping...27 Configuring LAG...28
...Switch...5 Managing System System...8 Overview...8 Supported Features...8 Configuring System Info...9 Viewing the System Information...9 Specifying the Device Description...9 Configuring IP...10 Configuring LED (Only for Certain Devices)...12 Configuring User Account...13 Backing up and Restoring the Switch...14 Saving the Current......15 Rebooting the Switch...17 Resetting the Switch...18 Upgrading the Firmware...19 Appendix: Default Parameters...21 Switching Switching...23 Overview...23 Supported Features...23 Configuring Ports...25 Configuring IGMP Snooping...27 Configuring LAG...28
Easy Smart SwitchUN User Guide
Page 9
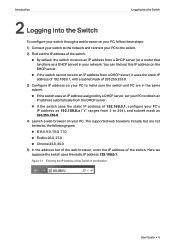
... from 2 to 254), and subnet mask as a DHCP server) in the Browser User Guide 5 Figure 2-1 Entering the IP Address of the Switch in your PC. Introduction Logging Into the Switch 2 Logging Into the Switch To configure your switch through a web browser on your ...PC, follow these steps: 1) Connect your switch to the network and connect your PC to the switch. 2) Find out the IP address of the switch. ■■ By default, the switch receives an IP address from a DHCP server (or a router that functions as 255.255.255.0. 4) Launch a web browser on your PC to...
... from 2 to 254), and subnet mask as a DHCP server) in the Browser User Guide 5 Figure 2-1 Entering the IP Address of the Switch in your PC. Introduction Logging Into the Switch 2 Logging Into the Switch To configure your switch through a web browser on your ...PC, follow these steps: 1) Connect your switch to the network and connect your PC to the switch. 2) Find out the IP address of the switch. ■■ By default, the switch receives an IP address from a DHCP server (or a router that functions as 255.255.255.0. 4) Launch a web browser on your PC to...

Easy Smart SwitchUN User Guide
Page 11
Configuring IP 4. Backing up and Restoring the Switch 7. Rebooting the Switch 8. Configuring LED (Only for Certain Devices) 5. Resetting the Switch 9. Configuring User Account 6. Upgrading the Firmware 10. Configuring System Info 3. System 2. Appendix: Default Parameters Part 2 Managing System CHAPTERS 1.
Configuring IP 4. Backing up and Restoring the Switch 7. Rebooting the Switch 8. Configuring LED (Only for Certain Devices) 5. Resetting the Switch 9. Configuring User Account 6. Upgrading the Firmware 10. Configuring System Info 3. System 2. Appendix: Default Parameters Part 2 Managing System CHAPTERS 1.
Easy Smart SwitchUN User Guide
Page 12
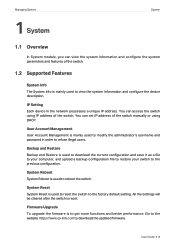
...is mainly used to the previous configuration. System Reboot System Reboot is used to refuse illegal users. Go to the website https://www.tp-link.com to get more functions and better performance. Backup and Restore Backup and Restore is used to download the current configuration and save ... using IP address of the switch. 1.2 Supported Features System Info The System Info is to download the updated firmware. You can access the switch using DHCP. System Reset System Reset is reset. All the settings will be cleared after the switch is used to the factory default setting....
...is mainly used to the previous configuration. System Reboot System Reboot is used to refuse illegal users. Go to the website https://www.tp-link.com to get more functions and better performance. Backup and Restore Backup and Restore is used to download the current configuration and save ... using IP address of the switch. 1.2 Supported Features System Info The System Info is to download the updated firmware. You can access the switch using DHCP. System Reset System Reset is reset. All the settings will be cleared after the switch is used to the factory default setting....
Easy Smart SwitchUN User Guide
Page 14
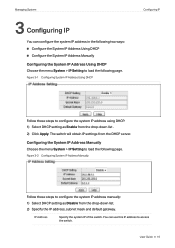
... Disable from the drop-down list. 2) Specify the IP address, subnet mask and default gateway. User Guide 10 Managing System 3 Configuring IP You can use this IP address to load the following page. IP Address Specify the system IP of the switch. You can configure the system IP address in the following two ways: ■■ Configure...
... Disable from the drop-down list. 2) Specify the IP address, subnet mask and default gateway. User Guide 10 Managing System 3 Configuring IP You can use this IP address to load the following page. IP Address Specify the system IP of the switch. You can configure the system IP address in the following two ways: ■■ Configure...

Easy Smart SwitchUN User Guide
Page 15
Configuring IP User Guide 11 Default Gateway Specify the default gateway of the switch.. Managing System Subnet Mask Specify the subnet mask of the switch. 3) Click Apply.
Configuring IP User Guide 11 Default Gateway Specify the default gateway of the switch.. Managing System Subnet Mask Specify the subnet mask of the switch. 3) Click Apply.
Easy Smart SwitchUN User Guide
Page 25
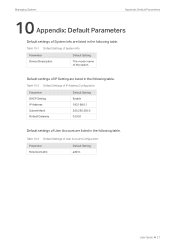
...-2 Default Settings of IP Address Configuration Parameter DHCP Setting IP Address Subnet Mask Default Gateway Default Setting Enable 192.168.0.1 255.255.255.0 0.0.0.0 Default settings of User Account are listed in the following table. Table 10-3 Default Settings of the switch. Default settings of IP Setting are listed in the following table. Managing System Appendix: Default Parameters 10 Appendix: Default Parameters Default...
...-2 Default Settings of IP Address Configuration Parameter DHCP Setting IP Address Subnet Mask Default Gateway Default Setting Enable 192.168.0.1 255.255.255.0 0.0.0.0 Default settings of User Account are listed in the following table. Table 10-3 Default Settings of the switch. Default settings of IP Setting are listed in the following table. Managing System Appendix: Default Parameters 10 Appendix: Default Parameters Default...
Easy Smart SwitchUN User Guide
Page 81
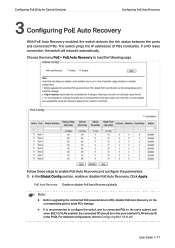
Follow these steps to the same subnet, and when 802.1Q VLAN enabled, the connected PD should be in the port's default VLAN (whose ID is recommended to configure the switch and its connected PDs to enable PoE Auto Recovery and configure the parameters: 1) In... PoE > PoE Auto Recovery to Configuring 802.1Q VLAN. Click Apply. For detailed configurations, refer to load the following page. The switch pings the IP addresses of PDs constantly. If a PD loses connection, the switch will reboot it automatically. Configuring PoE (Only for Certain Devices) Configuring PoE Auto Recovery...
Follow these steps to the same subnet, and when 802.1Q VLAN enabled, the connected PD should be in the port's default VLAN (whose ID is recommended to configure the switch and its connected PDs to enable PoE Auto Recovery and configure the parameters: 1) In... PoE > PoE Auto Recovery to Configuring 802.1Q VLAN. Click Apply. For detailed configurations, refer to load the following page. The switch pings the IP addresses of PDs constantly. If a PD loses connection, the switch will reboot it automatically. Configuring PoE (Only for Certain Devices) Configuring PoE Auto Recovery...

Easy Smart SwitchUN User Guide
Page 83
... Config System Power Limit Port Config PoE Status Startup Delay Interval Default Setting 150.0 W Enabled Low Class 4 Default settings of PoE Auto Recovery Parameter Global Config PoE Auto Recovery Port Config Ping IP Address Startup Delay Interval Failure Threshold Break Time Status Default Setting Disabled None 60 seconds 60 seconds 5 15 seconds Disabled User...
... Config System Power Limit Port Config PoE Status Startup Delay Interval Default Setting 150.0 W Enabled Low Class 4 Default settings of PoE Auto Recovery Parameter Global Config PoE Auto Recovery Port Config Ping IP Address Startup Delay Interval Failure Threshold Break Time Status Default Setting Disabled None 60 seconds 60 seconds 5 15 seconds Disabled User...


