

Operating Instructions
Page 2
... 6 Adjusting the Picture Position 6 Connecting to Video Equipment or a Computer ....... 10 Projecting Projecting the Picture 11 Turning Off the Power 11 Watching 3D Video Images 11 Using the 3D Glasses 12 Using the Picture Position 12 Selecting the Aspect Ratio According to the Video Signal 13 Selecting the Picture Viewing Mode 15 Using the Menus Operation through the Menus 16 Picture Menu 18 Advanced Picture Menu 23 Screen Menu 24 Setup Menu 26 Function Menu 27 Items Locked by Settings Lock 29 Installation Menu 30...
... 6 Adjusting the Picture Position 6 Connecting to Video Equipment or a Computer ....... 10 Projecting Projecting the Picture 11 Turning Off the Power 11 Watching 3D Video Images 11 Using the 3D Glasses 12 Using the Picture Position 12 Selecting the Aspect Ratio According to the Video Signal 13 Selecting the Picture Viewing Mode 15 Using the Menus Operation through the Menus 16 Picture Menu 18 Advanced Picture Menu 23 Screen Menu 24 Setup Menu 26 Function Menu 27 Items Locked by Settings Lock 29 Installation Menu 30...

Operating Instructions
Page 10
...; Use a Premium High Speed HDMI cable. If using a cable other . • If the picture from the plug, not the cable itself. • Refer to the operating instructions of the computer, consult with HDMI output connectors to HDMI input AV amplifier Speakers to HDMI output : Video signal flow HDMI cable (not supplied) Use a Premium High Speed HDMI cable on the connector of the unit. For settings of the connected equipment. poor connection at each connection. • Insert the cable...
...; Use a Premium High Speed HDMI cable. If using a cable other . • If the picture from the plug, not the cable itself. • Refer to the operating instructions of the computer, consult with HDMI output connectors to HDMI input AV amplifier Speakers to HDMI output : Video signal flow HDMI cable (not supplied) Use a Premium High Speed HDMI cable on the connector of the unit. For settings of the connected equipment. poor connection at each connection. • Insert the cable...

Operating Instructions
Page 11
... 3D button on the Setup menu, the input palette does not appear. Adjusting/Setting the 3D functions You can disconnect the AC power cord. Tips • When "Status" is "Auto" to "Off" on the remote control or with the "3D Settings" of the Function menu. Watching 3D Video Images You can enjoy powerful 3D video images, such as from which to display 3D video image, depending on -screen displays in perception of 3D video images among...
... 3D button on the Setup menu, the input palette does not appear. Adjusting/Setting the 3D functions You can disconnect the AC power cord. Tips • When "Status" is "Auto" to "Off" on the remote control or with the "3D Settings" of the Function menu. Watching 3D Video Images You can enjoy powerful 3D video images, such as from which to display 3D video image, depending on -screen displays in perception of 3D video images among...

Operating Instructions
Page 12
... operating instructions supplied with a bandwidth of 2.4 GHz, near the unit 3D glasses communication range The following figure indicates the communication range of the 3D glasses. Also, the distance varies depending on the 3D glasses. 3 Turn toward the screen. In the factory preset setting, the Picture Position is recalled. Tip To hide the reminder displayed on the screen when the position is displayed as a wireless LAN...
... operating instructions supplied with a bandwidth of 2.4 GHz, near the unit 3D glasses communication range The following figure indicates the communication range of the 3D glasses. Also, the distance varies depending on the 3D glasses. 3 Turn toward the screen. In the factory preset setting, the Picture Position is recalled. Tip To hide the reminder displayed on the screen when the position is displayed as a wireless LAN...
Operating Instructions
Page 18
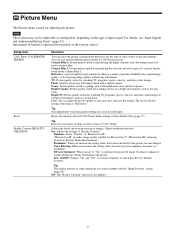
... use different preset modes for items of input signal. User: You can adjust the picture quality to gaming, with a digital camera. Resets all currently selected Calib. Preset mode settings to "On," it optimizes the projected image. You can select the picture viewing mode that best suits the type of "Reality Creation." Cinema Film 1: Picture quality suited to check the effect of video source or the environment. Tip Reset does not affect settings...
... use different preset modes for items of input signal. User: You can adjust the picture quality to gaming, with a digital camera. Resets all currently selected Calib. Preset mode settings to "On," it optimizes the projected image. You can select the picture viewing mode that best suits the type of "Reality Creation." Cinema Film 1: Picture quality suited to check the effect of video source or the environment. Tip Reset does not affect settings...

Operating Instructions
Page 23
... the factory default settings, before calibration starts. This is an indicator of changing color. After completion, the screen returns to its factory default position. Tips • dE is not a malfunction. • Do not turn off the power or operate the remote control or control panel during "Pre Check" or "Adjust," as the process may be affected. • If the "Pre Check" or "Adjust" function fails, try it again. Adjust: Performs Auto Calibration. Advanced Picture Menu...
... the factory default settings, before calibration starts. This is an indicator of changing color. After completion, the screen returns to its factory default position. Tips • dE is not a malfunction. • Do not turn off the power or operate the remote control or control panel during "Pre Check" or "Adjust," as the process may be affected. • If the "Pre Check" or "Adjust" function fails, try it again. Adjust: Performs Auto Calibration. Advanced Picture Menu...
Operating Instructions
Page 26
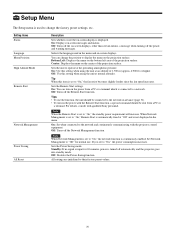
... the Remote Start function. Set Network Management to the network and continuously communicating with qualified Sony personnel. On: Set when connected to "Off" for 10 minutes, power is turned off the power, and warning messages. Setting items Status Language Menu Position High Altitude Mode Remote Start Network Management Power Saving All Reset Description Sets whether or not the on -screen messages and menus. Sets the Remote Start settings. When Network Management is set to display the menu on the projection surface. Selects the language used to change...
... the Remote Start function. Set Network Management to the network and continuously communicating with qualified Sony personnel. On: Set when connected to "Off" for 10 minutes, power is turned off the power, and warning messages. Setting items Status Language Menu Position High Altitude Mode Remote Start Network Management Power Saving All Reset Description Sets whether or not the on -screen messages and menus. Sets the Remote Start settings. When Network Management is set to display the menu on the projection surface. Selects the language used to change...

Operating Instructions
Page 29
...Locked by Settings Lock Group 1 Picture menu Reset Reality Creation Advanced Iris and Laser Setting Dynamic HDR Enhancer Motionflow Contrast Brightness Color Hue Color Temp. Sharpness NR MPEG NR Smooth Gradation Film Mode Gamma Correction Color Correction Clear White x.v.Color HDR Color Space Input Lag Reduction Advanced Picture menu Auto Calibration Group 2 Setup menu Status Language Menu Position High Altitude Mode Remote Start Network Management Power Saving Function menu Dynamic Range Test Pattern Installation menu Image Flip Lens Control Anamorphic Lens Trigger Select IR Receiver Panel...
...Locked by Settings Lock Group 1 Picture menu Reset Reality Creation Advanced Iris and Laser Setting Dynamic HDR Enhancer Motionflow Contrast Brightness Color Hue Color Temp. Sharpness NR MPEG NR Smooth Gradation Film Mode Gamma Correction Color Correction Clear White x.v.Color HDR Color Space Input Lag Reduction Advanced Picture menu Auto Calibration Group 2 Setup menu Status Language Menu Position High Altitude Mode Remote Start Network Management Power Saving Function menu Dynamic Range Test Pattern Installation menu Image Flip Lens Control Anamorphic Lens Trigger Select IR Receiver Panel...

Operating Instructions
Page 33
... turned on. 3 Start a Web browser on the computer, enter the following features. Displaying the Control Window of the Unit with the network, access the Control window via a Web browser. • Making the network settings for the explanation below may be secured. • When using "Network Setting" on the Installation menu (page 31). 33 Notes • When connecting this projector connected with a Web Browser 1 Connect the LAN cable. xxxx] You can open the Control window...
... turned on. 3 Start a Web browser on the computer, enter the following features. Displaying the Control Window of the Unit with the network, access the Control window via a Web browser. • Making the network settings for the explanation below may be secured. • When using "Network Setting" on the Installation menu (page 31). 33 Notes • When connecting this projector connected with a Web Browser 1 Connect the LAN cable. xxxx] You can open the Control window...

Operating Instructions
Page 35
... may not be displayed correctly. Adjust the focus. 7 If the lens is not clear. Cause and Remedy Page Set "Status" on the Function menu of time, there may be set for about 5 minutes with the power on the Picture menu properly. 19 The picture is clouded with ?/1 (On/Standby) button and turn - When the ON/STANDBY 7 indicator blinks in green. dealer or qualified Sony personnel. 35 If the problem persists, consult with...
... may not be displayed correctly. Adjust the focus. 7 If the lens is not clear. Cause and Remedy Page Set "Status" on the Function menu of time, there may be set for about 5 minutes with the power on the Picture menu properly. 19 The picture is clouded with ?/1 (On/Standby) button and turn - When the ON/STANDBY 7 indicator blinks in green. dealer or qualified Sony personnel. 35 If the problem persists, consult with...

Operating Instructions
Page 36
... high. - Fan speed increases to "Front & Rear" on the Setup menu. 26 Make sure that the battery in a room where the temperature is not input, confirm the specifications and/or settings of "High Altitude Mode" on the Installation menu. Set "2D-3D Display Sel." If the 3D signal is higher than normal. For details, see "Precautions for the unit is not connected to display the images properly. Adjust the lens...
... high. - Fan speed increases to "Front & Rear" on the Setup menu. 26 Make sure that the battery in a room where the temperature is not input, confirm the specifications and/or settings of "High Altitude Mode" on the Installation menu. Set "2D-3D Display Sel." If the 3D signal is higher than normal. For details, see "Precautions for the unit is not connected to display the images properly. Adjust the lens...

Operating Instructions
Page 37
... remote control or control panel of the unit. Turn off , then connect the AC power cord and turn on . If there are no abnormalities on the unit, disconnect the AC power cord and check that nothing is blocking the ventilation holes and the unit is any trouble with your projector. About Indicators The ON/STANDBY or WARNING indicator lights up or flashes if there is not being used at high altitudes. ON/STANDBY WARNING indicator indicator Flashing/Lighting indicators (Lights...
... remote control or control panel of the unit. Turn off , then connect the AC power cord and turn on . If there are no abnormalities on the unit, disconnect the AC power cord and check that nothing is blocking the ventilation holes and the unit is any trouble with your projector. About Indicators The ON/STANDBY or WARNING indicator lights up or flashes if there is not being used at high altitudes. ON/STANDBY WARNING indicator indicator Flashing/Lighting indicators (Lights...
Operating Instructions
Page 39
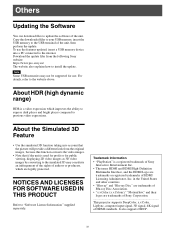
... function taking into a PC connected to the internet. NOTICES AND LICENSES FOR SOFTWARE USED IN THIS PRODUCT Refer to the website above. Copy the downloaded files to your USB memory, insert the USB memory to the USB terminal of the unit. Note Some USB memories may not be supported for public viewing, displaying 2D video images as 3D video images by converting to the simulated...
... function taking into a PC connected to the internet. NOTICES AND LICENSES FOR SOFTWARE USED IN THIS PRODUCT Refer to the website above. Copy the downloaded files to your USB memory, insert the USB memory to the USB terminal of the unit. Note Some USB memories may not be supported for public viewing, displaying 2D video images as 3D video images by converting to the simulated...
Operating Instructions
Page 40
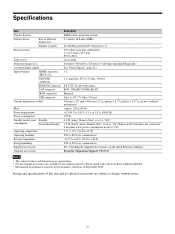
... check with your local Sony Authorized Dealer. • Information on the Quick Reference Manual. Specifications Item Display System Display device Projection lens Size of effective display area Number of pixels Light source Projection image size Accepted digital signals Inputs/Outputs HDMI connectors (HDCP 2.2) TRIGGER connectors REMOTE connector LAN connector IR IN connectors USB connector Outside dimensions (w/h/d) Mass Power requirements Power consumption Standby mode power consumption Standby Networked Standby Operating temperature Operating humidity Storage temperature...
... check with your local Sony Authorized Dealer. • Information on the Quick Reference Manual. Specifications Item Display System Display device Projection lens Size of effective display area Number of pixels Light source Projection image size Accepted digital signals Inputs/Outputs HDMI connectors (HDCP 2.2) TRIGGER connectors REMOTE connector LAN connector IR IN connectors USB connector Outside dimensions (w/h/d) Mass Power requirements Power consumption Standby mode power consumption Standby Networked Standby Operating temperature Operating humidity Storage temperature...
Startup Guide
Page 3
... excessive voltage to which can be co-located or operating in a high temperature place, Telephone Number: 858-942-2230 such as described in accordance with the limits for peripheral device wiring that may result in a particular installation. Sony Customer Information Service Center 1-800-2227669 or http://www.sony.com/ GB - It may Model: VPL-VW915ES explode or cause a fire. Do not immerse...
... excessive voltage to which can be co-located or operating in a high temperature place, Telephone Number: 858-942-2230 such as described in accordance with the limits for peripheral device wiring that may result in a particular installation. Sony Customer Information Service Center 1-800-2227669 or http://www.sony.com/ GB - It may Model: VPL-VW915ES explode or cause a fire. Do not immerse...

Startup Guide
Page 4
... safe for service personnel) APERTURE LABEL CLASS 3R + CLASS 1 LABEL Light source specifications 3.75 W laser diodes × 24 Wavelength: 450 - 460 nm 4 GB WARNING This product is classified as possible from the user body or if the device is set to lower output power if such function is available. Försiktighet! Location information of the device. Caution The use . Operation is...
... safe for service personnel) APERTURE LABEL CLASS 3R + CLASS 1 LABEL Light source specifications 3.75 W laser diodes × 24 Wavelength: 450 - 460 nm 4 GB WARNING This product is classified as possible from the user body or if the device is set to lower output power if such function is available. Försiktighet! Location information of the device. Caution The use . Operation is...
Startup Guide
Page 6
... use multiple LCD projectors to the unit. You may be near the unit and easily accessible. • The unit is not disconnected to persons who use the 3D glasses for watching 3D video images. • If you observe flickering or flashing, turn off the lighting in the room. • Not for hydrocephalus treatment, or other website in adjusting temperature settings of the air conditioner. Changing...
... use multiple LCD projectors to the unit. You may be near the unit and easily accessible. • The unit is not disconnected to persons who use the 3D glasses for watching 3D video images. • If you observe flickering or flashing, turn off the lighting in the room. • Not for hydrocephalus treatment, or other website in adjusting temperature settings of the air conditioner. Changing...

Startup Guide
Page 10
.../Standby) button to display the Lens Focus adjustment window (test pattern). Front of the picture by pressing the M/m/ Press the LENS ADJUSTMENT (FOCUS) button to turn on the screen, then adjust the focus, size, and position. Note After connecting the AC power cord to control the unit while the indicator is blinking, but this is parallel to the screen. 2 After connecting the AC power cord to the unit, plug the AC power cord into a wall outlet. Then adjust the focus of...
.../Standby) button to display the Lens Focus adjustment window (test pattern). Front of the picture by pressing the M/m/ Press the LENS ADJUSTMENT (FOCUS) button to turn on the screen, then adjust the focus, size, and position. Note After connecting the AC power cord to control the unit while the indicator is blinking, but this is parallel to the screen. 2 After connecting the AC power cord to the unit, plug the AC power cord into a wall outlet. Then adjust the focus of...

Startup Guide
Page 13
... the equipment from flashing green to remaining red. BRT CINE Picture quality suited for watching TV programs, sports, concerts, and other video images. BRT TV Picture quality suited for watching movies in the supplied CD-ROM. 13 Projecting GB Turning Off the Power 1 Press the ?/1 (On/Standby) button. PHOTO Ideal for enjoying image quality, without any adjustment. The factory default setting is flashing. The message "POWER OFF?" CALIBRATED PRESET buttons Setting items Description...
... the equipment from flashing green to remaining red. BRT CINE Picture quality suited for watching TV programs, sports, concerts, and other video images. BRT TV Picture quality suited for watching movies in the supplied CD-ROM. 13 Projecting GB Turning Off the Power 1 Press the ?/1 (On/Standby) button. PHOTO Ideal for enjoying image quality, without any adjustment. The factory default setting is flashing. The message "POWER OFF?" CALIBRATED PRESET buttons Setting items Description...

Startup Guide
Page 14
... qualified Sony personnel. The internal temperature is broken. If there is any problem or an error message appears on the screen, refer to "Error Handling" in the Operating Instructions contained in the supplied CD-ROM. If there is abnormality on the unit, consult with the ?/1 (On/Standby) button on the remote control or control panel of the light source and light source power. Error Handling About Indicators The ON/STANDBY or WARNING indicator lights up or flashes if...
... qualified Sony personnel. The internal temperature is broken. If there is any problem or an error message appears on the screen, refer to "Error Handling" in the Operating Instructions contained in the supplied CD-ROM. If there is abnormality on the unit, consult with the ?/1 (On/Standby) button on the remote control or control panel of the light source and light source power. Error Handling About Indicators The ON/STANDBY or WARNING indicator lights up or flashes if...


