Startup Guide
Page 3
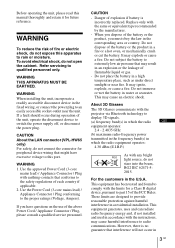
..., Ampere). WARNING When installing the unit, incorporate a readily accessible disconnect device in the fixed wiring, or connect the power plug to an easily accessible socket-outlet near fire. If you have excessive voltage to this port. Replace only with the limits for a Class B digital device, pursuant to part 15 of the unit, operate the disconnect device to switch the power supply off, or...
..., Ampere). WARNING When installing the unit, incorporate a readily accessible disconnect device in the fixed wiring, or connect the power plug to an easily accessible socket-outlet near fire. If you have excessive voltage to this port. Replace only with the limits for a Class B digital device, pursuant to part 15 of the unit, operate the disconnect device to switch the power supply off, or...

Startup Guide
Page 8
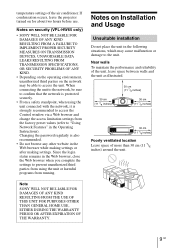
... model, the color reproduction among projectors may vary, since color balance may damage the object. On condensation If the room temperature where the projector is installed changes rapidly, or if the projector is manufactured using high-precision technology. Never pull the cord itself has been turned off the lighting in the room. • Not for watching 3D video images. • If you ever have it is connected...
... model, the color reproduction among projectors may vary, since color balance may damage the object. On condensation If the room temperature where the projector is installed changes rapidly, or if the projector is manufactured using high-precision technology. Never pull the cord itself has been turned off the lighting in the room. • Not for watching 3D video images. • If you ever have it is connected...
Startup Guide
Page 9
... projector turned on for about two hours before use. Changing the password regularly is strongly recommended to access the Control window via a Web browser and change the access limitation settings from the factory preset values (refer to "Using Network Features" in the Web browser, close the Web browser when you complete the settings to access the unit. Since the login status remains in the Operating Instructions). When connecting...
... projector turned on for about two hours before use. Changing the password regularly is strongly recommended to access the Control window via a Web browser and change the access limitation settings from the factory preset values (refer to "Using Network Features" in the Web browser, close the Web browser when you complete the settings to access the unit. Since the login status remains in the Operating Instructions). When connecting...

Startup Guide
Page 17
... display images. Example: To view the picture from which you can disconnect the AC power cord. Note Never disconnect the AC power cord while the indicator is turned off the unit by holding the ?/1 (ON/STANDBY) button for about 1 second, instead of performing the above steps. 3 Select the equipment from flashing green to "Projecting" in the Operating Instructions contained in green and the fan continues to run to the HDMI...
... display images. Example: To view the picture from which you can disconnect the AC power cord. Note Never disconnect the AC power cord while the indicator is turned off the unit by holding the ?/1 (ON/STANDBY) button for about 1 second, instead of performing the above steps. 3 Select the equipment from flashing green to "Projecting" in the Operating Instructions contained in green and the fan continues to run to the HDMI...
Startup Guide
Page 19
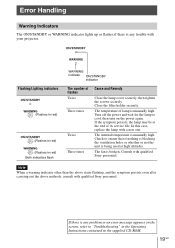
... its service life. The temperature of lamp is unusually high. Consult with a new one. Close the filter holder securely. The fan is broken. If there is any trouble with qualified Sony personnel. Error Handling Warning Indicators The ON/STANDBY or WARNING indicator lights up or flashes if there is any problem or an error message appears on the power again. Flashing/Lighting indicators (Flashes in red) (Flashes in red) (Flashes in the supplied CD-ROM. 19 GB In this case, replace the lamp...
... its service life. The temperature of lamp is unusually high. Consult with a new one. Close the filter holder securely. The fan is broken. If there is any trouble with qualified Sony personnel. Error Handling Warning Indicators The ON/STANDBY or WARNING indicator lights up or flashes if there is any problem or an error message appears on the power again. Flashing/Lighting indicators (Flashes in red) (Flashes in red) (Flashes in the supplied CD-ROM. 19 GB In this case, replace the lamp...
Startup Guide
Page 20
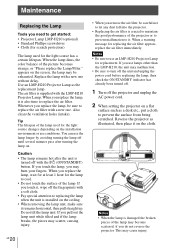
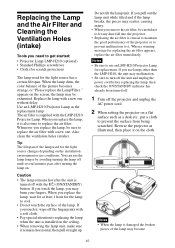
... power cord. 2 When setting the projector on the cloth. Notes • Be sure to use an LMP-H210 Projector Lamp for the light source changes depending on the ceiling. • When removing the lamp unit, make sure it . If you use the lamp longer by avoiding turning the lamp off with the ?/1 (ON/STANDBY) button. Also clean the ventilation holes (intake). Notes • When the lamp is installed on the installation environment or use...
... power cord. 2 When setting the projector on the cloth. Notes • Be sure to use an LMP-H210 Projector Lamp for the light source changes depending on the ceiling. • When removing the lamp unit, make sure it . If you use the lamp longer by avoiding turning the lamp off with the ?/1 (ON/STANDBY) button. Also clean the ventilation holes (intake). Notes • When the lamp is installed on the installation environment or use...

Startup Guide
Page 23
Disposal of the used . 1,500 hours are securely closed. • To clear a message displayed on the screen, press any dust fall into the projector. • Cleaning the air filter is used lamp For the customers in the U.S.A. Dispose according to it. Notes • When you clean the air filter, make sure you live. This value varies depending on the environment or how the projector is crucial...
Disposal of the used . 1,500 hours are securely closed. • To clear a message displayed on the screen, press any dust fall into the projector. • Cleaning the air filter is used lamp For the customers in the U.S.A. Dispose according to it. Notes • When you clean the air filter, make sure you live. This value varies depending on the environment or how the projector is crucial...

Operating Instructions
Page 2
... .......... 20 Picture Menu 22 Screen Menu 27 Setup Menu 29 Function Menu 30 Items Locked by Settings Lock 32 Installation Menu 33 Information Menu 36 About the Preset Memory .......... 36 Using Network Features Displaying the Control Window of the Unit with a Web Browser 37 Operating the Control Window ........ 38 Switching the Page 38 Setting the Access Limitation ....38 Confirming the Information Regarding the Unit 39 Error Handling Troubleshooting 40 Warning Indicators 43 Message Lists 44 Others Updating the Software 45...
... .......... 20 Picture Menu 22 Screen Menu 27 Setup Menu 29 Function Menu 30 Items Locked by Settings Lock 32 Installation Menu 33 Information Menu 36 About the Preset Memory .......... 36 Using Network Features Displaying the Control Window of the Unit with a Web Browser 37 Operating the Control Window ........ 38 Switching the Page 38 Setting the Access Limitation ....38 Confirming the Information Regarding the Unit 39 Error Handling Troubleshooting 40 Warning Indicators 43 Message Lists 44 Others Updating the Software 45...

Operating Instructions
Page 8
.../STANDBY), INPUT, MENU, and M/m/ Flashes in green for performing adjustments. Press the PATTERN button on the remote control to turn on the screen and then adjust the picture position. Adjusting the Picture Position Project an image on the unit. The ON/STANDBY indicator lights in green. 3 Display a test signal for a while (tens of seconds) and then lights in red and the unit goes into standby mode. Lights in green. Remote control detector The ON/STANDBY indicator flashes in green, and then lights in red. 2 Press the ?/1 (ON/STANDBY) button...
.../STANDBY), INPUT, MENU, and M/m/ Flashes in green for performing adjustments. Press the PATTERN button on the remote control to turn on the screen and then adjust the picture position. Adjusting the Picture Position Project an image on the unit. The ON/STANDBY indicator lights in green. 3 Display a test signal for a while (tens of seconds) and then lights in red and the unit goes into standby mode. Lights in green. Remote control detector The ON/STANDBY indicator flashes in green, and then lights in red. 2 Press the ?/1 (ON/STANDBY) button...

Operating Instructions
Page 14
.../STANDBY) button. 14 Projecting the Picture 1 Turn on both the unit and the equipment connected to the unit. 2 Press INPUT to display the input palette on the screen. 2 Press the ?/1 (ON/STANDBY) button again before the message disappears. Note Never disconnect the AC power cord while the indicator is set to "Off" on the Setup menu, the input palette does not appear. Press the INPUT button to switch between input terminals in green and the fan...
.../STANDBY) button. 14 Projecting the Picture 1 Turn on both the unit and the equipment connected to the unit. 2 Press INPUT to display the input palette on the screen. 2 Press the ?/1 (ON/STANDBY) button again before the message disappears. Note Never disconnect the AC power cord while the indicator is set to "Off" on the Setup menu, the input palette does not appear. Press the INPUT button to switch between input terminals in green and the fan...

Operating Instructions
Page 29
...). 29 Sets the power saving mode. Standby: If no signal is input for normal use. Selects the language used to change the position to operate at an altitude of 1,500 m (approx. 4,900 ft) or higher. Sets the unit to display the menu on the screen. Network Management Power Saving Lamp Setting Tip When this setting when using the unit at the prevailing atmospheric pressure. Set Network Management to turn off the power, and warning messages. Set to...
...). 29 Sets the power saving mode. Standby: If no signal is input for normal use. Selects the language used to change the position to operate at an altitude of 1,500 m (approx. 4,900 ft) or higher. Sets the unit to display the menu on the screen. Network Management Power Saving Lamp Setting Tip When this setting when using the unit at the prevailing atmospheric pressure. Set Network Management to turn off the power, and warning messages. Set to...

Operating Instructions
Page 32
Sharpness NR MPEG NR Smooth Gradation Film Mode Gamma Correction Color Correction Clear White x.v.Color Color Space Group 2 Setup menu Status Language Menu Position High Altitude Mode Network Management Lamp Setting Function menu Dynamic Range Installation menu Image Flip Trigger Select Panel Alignment Network Setting 32 Items Locked by Settings Lock Group 1 Picture menu Reset Reality Creation Advanced Iris Contrast Enhancer Lamp Control Motionflow Contrast Brightness Color Hue Color Temp.
Sharpness NR MPEG NR Smooth Gradation Film Mode Gamma Correction Color Correction Clear White x.v.Color Color Space Group 2 Setup menu Status Language Menu Position High Altitude Mode Network Management Lamp Setting Function menu Dynamic Range Installation menu Image Flip Trigger Select Panel Alignment Network Setting 32 Items Locked by Settings Lock Group 1 Picture menu Reset Reality Creation Advanced Iris Contrast Enhancer Lamp Control Motionflow Contrast Brightness Color Hue Color Temp.
Operating Instructions
Page 40
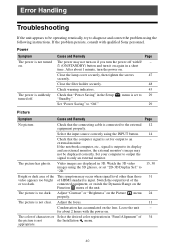
... 3D video 15, 30 images using the following instructions. appropriate. 40 Error Handling Troubleshooting If the unit appears to be displayed correctly. Set your computer to output the signal to "2D." Close the lamp cover securely, then tighten the screws 47 securely. menu is too dark. connected equipment, or switch the Dynamic Range on the lens. After about 2 hours with ?/ - 1 (ON/STANDBY) button and turn the power on again in the Setup "Standby...
... 3D video 15, 30 images using the following instructions. appropriate. 40 Error Handling Troubleshooting If the unit appears to be displayed correctly. Set your computer to output the signal to "2D." Close the lamp cover securely, then tighten the screws 47 securely. menu is too dark. connected equipment, or switch the Dynamic Range on the lens. After about 2 hours with ?/ - 1 (ON/STANDBY) button and turn the power on again in the Setup "Standby...
Operating Instructions
Page 41
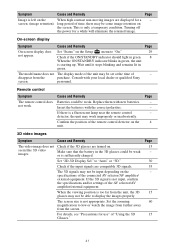
... be input depending on the When high contrast non-moving images are compatible 3D signals. Consult with new batteries. Cause and Remedy Batteries could be some image retention on the Setup menu to "Auto" or "3D." Replace them with your local dealer or qualified Sony screen. Set "2D-3D Display Sel." On-screen display Symptom Cause and Remedy Page On-screen display does Set "Status" on the screen. disappear from the screen. Remote control...
... be input depending on the When high contrast non-moving images are compatible 3D signals. Consult with new batteries. Cause and Remedy Batteries could be some image retention on the Setup menu to "Auto" or "3D." Replace them with your local dealer or qualified Sony screen. Set "2D-3D Display Sel." On-screen display Symptom Cause and Remedy Page On-screen display does Set "Status" on the screen. disappear from the screen. Remote control...

Operating Instructions
Page 43
The fan is unusually high. Flashing/Lighting indicators (Flashes in red) (Flashes in red) (Flashes in red) Both indicators flash WARNING indicator ON/STANDBY indicator The number of its service life. The temperature of lamp is broken. In this case, replace the lamp with qualified Sony personnel. Turn off the power and wait for the lamp to ensure that if nothing is blocking the ventilation holes or whether or not the unit is unusually high. Close the filter holder securely (page...
The fan is unusually high. Flashing/Lighting indicators (Flashes in red) (Flashes in red) (Flashes in red) Both indicators flash WARNING indicator ON/STANDBY indicator The number of its service life. The temperature of lamp is broken. In this case, replace the lamp with qualified Sony personnel. Turn off the power and wait for the lamp to ensure that if nothing is blocking the ventilation holes or whether or not the unit is unusually high. Close the filter holder securely (page...

Operating Instructions
Page 44
..., replace the air filter too. Clean the air filter. 49 Have you replace the lamp and filter, the lamp replacement process is set to clean the air filter. When using the unit at high altitude. Settings Lock enabled. Replace the lamp. 46 Filter. Mode should be activated by the button is blocking the ventilation 4, 5 holes. Message Lists Warning messages Symptom Cause and Remedy Page High temp.! Check to "On" in 1 minute. Check the lamp replacement process. The operation to be "On" if projector is switched to...
..., replace the air filter too. Clean the air filter. 49 Have you replace the lamp and filter, the lamp replacement process is set to clean the air filter. When using the unit at high altitude. Settings Lock enabled. Replace the lamp. 46 Filter. Mode should be activated by the button is blocking the ventilation 4, 5 holes. Message Lists Warning messages Symptom Cause and Remedy Page High temp.! Check to "On" in 1 minute. Check the lamp replacement process. The operation to be "On" if projector is switched to...
Operating Instructions
Page 45
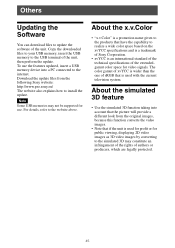
... is used for profit or for public viewing, displaying 2D video images as 3D video images by converting to update the software of authors or producers, which are legally protected. 45 Copy the downloaded files to your USB memory, insert the USB memory to the website above. Others Updating the Software You can download files to the simulated 3D may not be supported for video signals. Note Some USB...
... is used for profit or for public viewing, displaying 2D video images as 3D video images by converting to update the software of authors or producers, which are legally protected. 45 Copy the downloaded files to your USB memory, insert the USB memory to the website above. Others Updating the Software You can download files to the simulated 3D may not be supported for video signals. Note Some USB...
Operating Instructions
Page 46
... ventilation holes (intake). Tip The lifespan of the lamp used for the light source has a certain lifespan. Notes • Be sure to use an LMP-H210 Projector Lamp for replacing the air filter appears, replace the air filter immediately. You can use the lamp longer by avoiding turning the lamp off the projector and unplug the AC power cord. 2 When setting the projector on a flat surface such as a desk etc., put a cloth...
... ventilation holes (intake). Tip The lifespan of the lamp used for the light source has a certain lifespan. Notes • Be sure to use an LMP-H210 Projector Lamp for replacing the air filter appears, replace the air filter immediately. You can use the lamp longer by avoiding turning the lamp off the projector and unplug the AC power cord. 2 When setting the projector on a flat surface such as a desk etc., put a cloth...

Operating Instructions
Page 49
... U.S.A. and Canada Lamp contains mercury. appears on the screen, you live. • The unit will not turn on unless the lamp cover are approximate. This value varies depending on the environment or how the projector is used. 1,500 hours are securely closed. • To clear a message displayed on the screen, press any dust fall into the projector. • Cleaning the air filter is crucial to...
... U.S.A. and Canada Lamp contains mercury. appears on the screen, you live. • The unit will not turn on unless the lamp cover are approximate. This value varies depending on the environment or how the projector is used. 1,500 hours are securely closed. • To clear a message displayed on the screen, press any dust fall into the projector. • Cleaning the air filter is crucial to...

Operating Instructions
Page 82
... signals 52 Projecting the Picture 14 Projection distance 61 Projection distance and lens shift range 60 R Reality Creation 23 Remote control 6 Remote control detector 4 Replacing the lamp 46 Reset 22 Resetting the items 21 S Settings Lock 31 Sharpness 25 Signal type 36 Smooth Gradation 25 Software Version 36 Specifications 51 Status 29 T Trigger Select 33 Troubleshooting 40 Turning off 14 Turning on 8 U Updating the software 45 W Warning indicators 43 X x.v.Color 26, 45 Trademark Information • "PlayStation" is a registered trademark of HDMI...
... signals 52 Projecting the Picture 14 Projection distance 61 Projection distance and lens shift range 60 R Reality Creation 23 Remote control 6 Remote control detector 4 Replacing the lamp 46 Reset 22 Resetting the items 21 S Settings Lock 31 Sharpness 25 Signal type 36 Smooth Gradation 25 Software Version 36 Specifications 51 Status 29 T Trigger Select 33 Troubleshooting 40 Turning off 14 Turning on 8 U Updating the software 45 W Warning indicators 43 X x.v.Color 26, 45 Trademark Information • "PlayStation" is a registered trademark of HDMI...


