
User Manual
Page 1
2-148-435-11 (1) Data Projector Operating Instructions VPL-CS7 VPL-ES2 © 2004 Sony Corporation
2-148-435-11 (1) Data Projector Operating Instructions VPL-CS7 VPL-ES2 © 2004 Sony Corporation
User Manual
Page 5
...Side/Bottom 11 Control Panel 12 Connector Panel 13 Remote Commander 14 Projecting the Picture Installing the Projector 16 Connecting the Projector 17 Connecting with a Computer ......17 Connecting with a VCR 18 Connecting with a Monitor Equipment (VPL-CS7 only 19 Projecting 19 Turning Off the Power 21 Adjustments and Settings Using the Menu Using the... 43 Messages List 46 Specifications 48 Index 52 Convenient Function Selecting the Menu Language ..........23 Security Lock 24 Other Functions 25 Off & Go Function (VPL-CS7 only 25 Effective Tools for Your Presentation 26 5
...Side/Bottom 11 Control Panel 12 Connector Panel 13 Remote Commander 14 Projecting the Picture Installing the Projector 16 Connecting the Projector 17 Connecting with a Computer ......17 Connecting with a VCR 18 Connecting with a Monitor Equipment (VPL-CS7 only 19 Projecting 19 Turning Off the Power 21 Adjustments and Settings Using the Menu Using the... 43 Messages List 46 Specifications 48 Index 52 Convenient Function Selecting the Menu Language ..........23 Security Lock 24 Other Functions 25 Off & Go Function (VPL-CS7 only 25 Effective Tools for Your Presentation 26 5
User Manual
Page 6
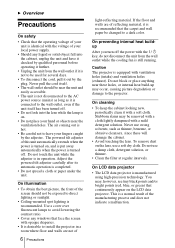
... unit while the adjuster is in a room where floor and walls are of reflecting material, it with a soft cloth. Caution The projector is manufactured using high-precision technology. Do not block or place anything near these will damage the cabinet. • Avoid touching the ...plug. Never use a damp cloth, detergent solution, or thinner. • Clean the filter at regular intervals. On LCD data projector • The LCD data projector is equipped with ventilation holes (intake) and ventilation holes (exhaust). If the floor and walls are not of 6 Precautions light-...
... unit while the adjuster is in a room where floor and walls are of reflecting material, it with a soft cloth. Caution The projector is manufactured using high-precision technology. Do not block or place anything near these will damage the cabinet. • Avoid touching the ...plug. Never use a damp cloth, detergent solution, or thinner. • Clean the filter at regular intervals. On LCD data projector • The LCD data projector is equipped with ventilation holes (intake) and ventilation holes (exhaust). If the floor and walls are not of 6 Precautions light-...
User Manual
Page 7
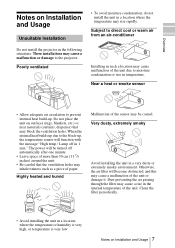
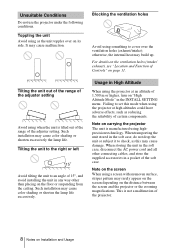
... of the unit due to prevent internal heat build-up. Overview Notes on Installation and Usage Unsuitable Installation Do not install the projector in a very dusty or extremely smoky environment. Very dusty, extremely smoky Avoid installing the unit in the following situations. Subject ...builds up , the temperature sensor will become obstructed, and this may cause a malfunction or damage to the block-up due to the projector. Clean the filter periodically. • Avoid installing the unit in the internal temperature of the unit or damage it. These installations may...
... of the unit due to prevent internal heat build-up. Overview Notes on Installation and Usage Unsuitable Installation Do not install the projector in a very dusty or extremely smoky environment. Very dusty, extremely smoky Avoid installing the unit in the following situations. Subject ...builds up , the temperature sensor will become obstructed, and this may cause a malfunction or damage to the block-up due to the projector. Clean the filter periodically. • Avoid installing the unit in the internal temperature of the unit or damage it. These installations may...
User Manual
Page 8
... the ceiling. Failing to an angle of 1,500 m or higher, turn on its side. When storing the unit in High Altitude When using the projector at high altitudes could have adverse effects, such as this mode when using something to shock, as reducing the reliability of Controls" on page 11... unit or subject it to cover over on "High Altitude Mode" in a pocket of the adjuster setting. Blocking the ventilation holes Avoid using the projector at an altitude of 15°, and avoid installing the unit in any way other connecting cables, and store the supplied accessories in the INSTALL...
... the ceiling. Failing to an angle of 1,500 m or higher, turn on its side. When storing the unit in High Altitude When using the projector at high altitudes could have adverse effects, such as this mode when using something to shock, as reducing the reliability of Controls" on page 11... unit or subject it to cover over on "High Altitude Mode" in a pocket of the adjuster setting. Blocking the ventilation holes Avoid using the projector at an altitude of 15°, and avoid installing the unit in any way other connecting cables, and store the supplied accessories in the INSTALL...
User Manual
Page 9
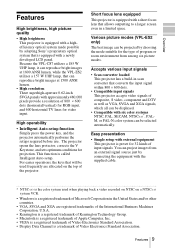
Overview Features High brightness, high picture quality • High brightness This projector is equipped with a highefficiency optical system made possible by adopting Sony's proprietary optical system that is equipped with a short focus lens that allows outputting to a larger screen even in a ...43*, PALM, or PAL-N color system can be selected automatically. Easy presentation • Simple setup with external equipment This projector is a trademark of the projector. Because the VPL-CS7 utilizes a 185 W UHP lamp, it can be used when playing back a video recorded on NTSC on the top ...
Overview Features High brightness, high picture quality • High brightness This projector is equipped with a highefficiency optical system made possible by adopting Sony's proprietary optical system that is equipped with a short focus lens that allows outputting to a larger screen even in a ...43*, PALM, or PAL-N color system can be selected automatically. Easy presentation • Simple setup with external equipment This projector is a trademark of the projector. Because the VPL-CS7 utilizes a 185 W UHP lamp, it can be used when playing back a video recorded on NTSC on the top ...
User Manual
Page 10
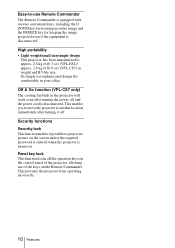
... weight/small size/simple design This projector has been miniaturized to another location immediately after turning the power off . This enables you to move the projector to approx. 2.8 kg (6 lb 3 oz) (VPL-ES2)/ approx. 2.9 kg (6 lb 6 oz) (VPL-CS7) in the projector will work even after turning it ...possible to -use of the projector, allowing use Remote Commander The Remote Commander is equipped with...
... weight/small size/simple design This projector has been miniaturized to another location immediately after turning the power off . This enables you to move the projector to approx. 2.8 kg (6 lb 3 oz) (VPL-ES2)/ approx. 2.9 kg (6 lb 6 oz) (VPL-CS7) in the projector will work even after turning it ...possible to -use of the projector, allowing use Remote Commander The Remote Commander is equipped with...
User Manual
Page 11
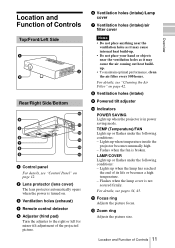
... or flashes under the following conditions: - For details, see pages 34, 45. Flashes when the lamp cover is broken. Lights up when temperature inside the projector becomes unusually high. - Lights up when the lamp has reached the end of the projected picture. 6 Ventilation holes (intake)/Lamp cover 7 Ventilation holes (intake)/air... lens protector automatically opens when the power is turned on page 42. 8 Ventilation holes (intake) 9 Powered tilt adjuster 0 Indicators POWER SAVING Lights up when the projector is in power saving mode. Location and Function of Controls 11 Overview
... or flashes under the following conditions: - For details, see pages 34, 45. Flashes when the lamp cover is broken. Lights up when temperature inside the projector becomes unusually high. - Lights up when the lamp has reached the end of the projected picture. 6 Ventilation holes (intake)/Lamp cover 7 Ventilation holes (intake)/air... lens protector automatically opens when the power is turned on page 42. 8 Ventilation holes (intake) 9 Powered tilt adjuster 0 Indicators POWER SAVING Lights up when the projector is in power saving mode. Location and Function of Controls 11 Overview
User Manual
Page 12
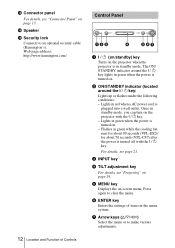
...on. 2 ON/STANDBY indicator (located around the I / 1 (on/standby) key Turns on the projector when the projector is in green while the cooling fan runs for about 90 seconds (VPL-ES2)/ for about 70 seconds (VPL-CS7) after the power is turned off with the I / 1 key. Press again to clear the menu.... a wall outlet. Web page address: http://www.kensington.com/ 12 Location and Function of items in red when a AC power cord is turned on the projector with the I / 1 key. - Lights in the menu system. 7 Arrow keys (f/F/g/G) Select the menu or to an optional security cable (Kensington's). For...
...on. 2 ON/STANDBY indicator (located around the I / 1 (on/standby) key Turns on the projector when the projector is in green while the cooling fan runs for about 90 seconds (VPL-ES2)/ for about 70 seconds (VPL-CS7) after the power is turned off with the I / 1 key. Press again to clear the menu.... a wall outlet. Web page address: http://www.kensington.com/ 12 Location and Function of items in red when a AC power cord is turned on the projector with the I / 1 key. - Lights in the menu system. 7 Arrow keys (f/F/g/G) Select the menu or to an optional security cable (Kensington's). For...
User Manual
Page 14
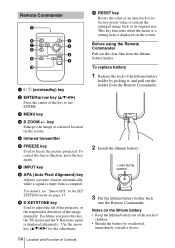
... from the lithium battery holder. Remote Commander 1 I / 1 (on/standby) key 2 ENTER/arrow key (v/V/b/B) Press the center of the key to adjust the tilt of the projector, or the trapezoidal distortion of the image manually. For details, see "Smart APA" in the SET SETTING menu on page 33. 9 D KEYSTONE key Used to...
... from the lithium battery holder. Remote Commander 1 I / 1 (on/standby) key 2 ENTER/arrow key (v/V/b/B) Press the center of the key to adjust the tilt of the projector, or the trapezoidal distortion of the image manually. For details, see "Smart APA" in the SET SETTING menu on page 33. 9 D KEYSTONE key Used to...
User Manual
Page 15
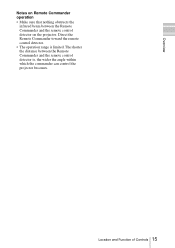
Direct the Remote Commander toward the remote control detector. • The operation range is , the wider the angle within which the commander can control the projector becomes. The shorter the distance between the Remote Commander and the remote control detector on Remote Commander operation • Make sure that nothing obstructs the infrared beam between the Remote Commander and the remote control detector is limited. Location and Function of Controls 15 Overview Notes on the projector.
Direct the Remote Commander toward the remote control detector. • The operation range is , the wider the angle within which the commander can control the projector becomes. The shorter the distance between the Remote Commander and the remote control detector on Remote Commander operation • Make sure that nothing obstructs the infrared beam between the Remote Commander and the remote control detector is limited. Location and Function of Controls 15 Overview Notes on the projector.

User Manual
Page 16
... distance between the actual value and the design value shown in the table above. 16 Installing the Projector Distance between the screen and the center of the lens Unit: m (feet) Screen size 40 60 80 100 120 150 200 300 (inches) Minimum Distance 1.1 1.7 2.3 2.9 3.5 4.4 5.9 8.8 (3.6) (5.6) (7.5) (9.5) (...
... distance between the actual value and the design value shown in the table above. 16 Installing the Projector Distance between the screen and the center of the lens Unit: m (feet) Screen size 40 60 80 100 120 150 200 300 (inches) Minimum Distance 1.1 1.7 2.3 2.9 3.5 4.4 5.9 8.8 (3.6) (5.6) (7.5) (9.5) (...
User Manual
Page 17
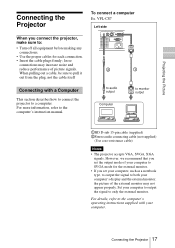
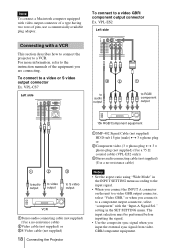
...(supplied) 2Stereo audio connecting cable (not supplied) (Use a no-resistance cable) Notes • The projector accepts VGA, SVGA, XGA signals. VPL-CS7 Left side When you connect the projector, make sure to SVGA mode for each connection. • Insert the cable plugs firmly; loose connections may... A MONITOR OUT 2 1 Connecting with your computer to output the signal to a computer. Projecting the Picture Connecting the Projector To connect a computer Ex. For details, refer to the computer's operating instructions supplied with a Computer This section describes how to connect the...
...(supplied) 2Stereo audio connecting cable (not supplied) (Use a no-resistance cable) Notes • The projector accepts VGA, SVGA, XGA signals. VPL-CS7 Left side When you connect the projector, make sure to SVGA mode for each connection. • Insert the cable plugs firmly; loose connections may... A MONITOR OUT 2 1 Connecting with your computer to output the signal to a computer. Projecting the Picture Connecting the Projector To connect a computer Ex. For details, refer to the computer's operating instructions supplied with a Computer This section describes how to connect the...
User Manual
Page 18
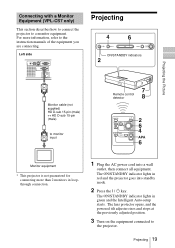
... when you input the external sync signal from video GBR/component equipment. Note To connect a Macintosh computer equipped with the "Input-A Signal Sel." VPL-CS7 Left side AUDIO AUDIO VIDEO S VIDEO INPUT A MONITOR OUT AUAUDDIIOO VIDEO S VIDEO INPUT A PR/CR PB/CB Y 32 to audio output ...VCR 1Stereo audio connecting cable (not supplied) (Use a no-resistance cable) 2Video cable (not supplied) or 3S-Video cable (not supplied) 18 Connecting the Projector 15k RGB/Component equipment 1SMF-402 Signal Cable (not supplied) HD D-sub 15-pin (male) y 3 × phono plug or 2Component video (3 &#...
... when you input the external sync signal from video GBR/component equipment. Note To connect a Macintosh computer equipped with the "Input-A Signal Sel." VPL-CS7 Left side AUDIO AUDIO VIDEO S VIDEO INPUT A MONITOR OUT AUAUDDIIOO VIDEO S VIDEO INPUT A PR/CR PB/CB Y 32 to audio output ...VCR 1Stereo audio connecting cable (not supplied) (Use a no-resistance cable) 2Video cable (not supplied) or 3S-Video cable (not supplied) 18 Connecting the Projector 15k RGB/Component equipment 1SMF-402 Signal Cable (not supplied) HD D-sub 15-pin (male) y 3 × phono plug or 2Component video (3 &#...
User Manual
Page 19
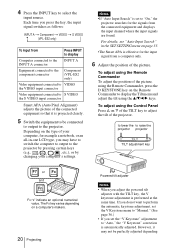
.... 3 Turn on the equipment connected to a monitor equipment. Projecting the Picture Connecting with a Monitor Equipment (VPL-CS7 only) This section describes how to connect the projector to the projector. Left side AUDIO VIDEO S VIDEO INPUT A MONITOR OUT Projecting INPUT TILT MENU PUSH ENTER ON/STANDBY indicators ... manuals of the equipment you are connecting. Projecting 19 The ON/STANDBY indicator lights in red and the projector goes into a wall outlet, then connect all equipment. For more information, refer to monitor input Remote control detector 8 Monitor equipment * This...
.... 3 Turn on the equipment connected to a monitor equipment. Projecting the Picture Connecting with a Monitor Equipment (VPL-CS7 only) This section describes how to connect the projector to the projector. Left side AUDIO VIDEO S VIDEO INPUT A MONITOR OUT Projecting INPUT TILT MENU PUSH ENTER ON/STANDBY indicators ... manuals of the equipment you are connecting. Projecting 19 The ON/STANDBY indicator lights in red and the projector goes into a wall outlet, then connect all equipment. For more information, refer to monitor input Remote control detector 8 Monitor equipment * This...
User Manual
Page 20
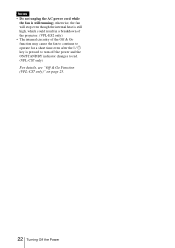
... set to display the Tilt menu and adjust the tilt using the Control Panel Press f on the Remote Commander to "On," the projector searches for the input signal from a computer only. 6 Adjust the position of the connected equipment so that it may have to switch...to display Computer connected to the INPUT A INPUT A connector Equipment connected to the component connector Component (VPL-ES2 only) Video equipment connected to VIDEO the VIDEO input connector Video equipment connected to the projector by pressing certain keys (e.g., / LCD VGA , / , etc.), or by changing your computer's ...
... set to display the Tilt menu and adjust the tilt using the Control Panel Press f on the Remote Commander to "On," the projector searches for the input signal from a computer only. 6 Adjust the position of the connected equipment so that it may have to switch...to display Computer connected to the INPUT A INPUT A connector Equipment connected to the component connector Component (VPL-ES2 only) Video equipment connected to VIDEO the VIDEO input connector Video equipment connected to the projector by pressing certain keys (e.g., / LCD VGA , / , etc.), or by changing your computer's ...

User Manual
Page 21
The corrected value is put away in green and the fan continues to run for about 70 seconds (VPL-CS7)/for about two seconds. The ON/STANDBY indicator flashes in the projector and the lens protector closes. Turning Off the Power 21 Press the D KEYSTONE key on the Remote Commander until the power turn... in a certain condition, you do not press any key except the I / 1 key, or if you can turn off . • Be careful not to let the projector down on the top of the picture. 8 Turn the focus ring to your fingers. • Do not push hard on your eyes. Projecting the Picture...
The corrected value is put away in green and the fan continues to run for about 70 seconds (VPL-CS7)/for about two seconds. The ON/STANDBY indicator flashes in the projector and the lens protector closes. Turning Off the Power 21 Press the D KEYSTONE key on the Remote Commander until the power turn... in a certain condition, you do not press any key except the I / 1 key, or if you can turn off . • Be careful not to let the projector down on the top of the picture. 8 Turn the focus ring to your fingers. • Do not push hard on your eyes. Projecting the Picture...
User Manual
Page 22
otherwise, the fan will stop even though the internal heat is still high, which could result in a breakdown of the projector. (VPL-ES2 only) • The internal circuitry of the Off & Go function may cause the fan to continue to red. (VPL-CS7 only) For details, see "Off & Go Function (VPL-CS7 only)" on page 25. 22 Turning Off the Power Notes • Do not unplug the AC power cord while the fan is pressed to turn off the power and the ON/STANDBY indicator changes to operate for a short time even after the I / 1 key is still running;
otherwise, the fan will stop even though the internal heat is still high, which could result in a breakdown of the projector. (VPL-ES2 only) • The internal circuitry of the Off & Go function may cause the fan to continue to red. (VPL-CS7 only) For details, see "Off & Go Function (VPL-CS7 only)" on page 25. 22 Turning Off the Power Notes • Do not unplug the AC power cord while the fan is pressed to turn off the power and the ON/STANDBY indicator changes to operate for a short time even after the I / 1 key is still running;
User Manual
Page 23
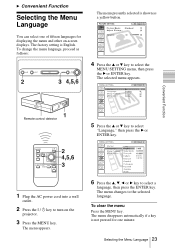
...: Standard Adjust Picture... The menu disappears automatically if a key is not pressed for one of fifteen languages for displaying the menu and other on the projector. 3 Press the MENU key. Convenient Function 1 Plug the AC power cord into a wall outlet. 2 Press the I / 1 key to select "Language," then press the B or ENTER...
...: Standard Adjust Picture... The menu disappears automatically if a key is not pressed for one of fifteen languages for displaying the menu and other on the projector. 3 Press the MENU key. Convenient Function 1 Plug the AC power cord into a wall outlet. 2 Press the I / 1 key to select "Language," then press the B or ENTER...
User Manual
Page 24
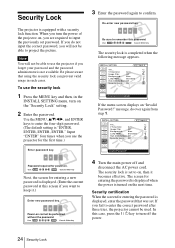
...will not be used. In this case, press the I / 1 key to input the previously set password. When you turn the power of the projector on . Power-on , then it .) Enter new password key. Be sure to on cannot be able to project the picture. V Keystone: Auto...... The security lock is not available. Input "ENTER" four times when you fail to enter the correct password after three tries, the projector cannot be able to keep it becomes effective. INSTALL SETTING X Tilt... Be please aware that was set to remember this screen if you are...
...will not be used. In this case, press the I / 1 key to input the previously set password. When you turn the power of the projector on . Power-on , then it .) Enter new password key. Be sure to on cannot be able to project the picture. V Keystone: Auto...... The security lock is not available. Input "ENTER" four times when you fail to enter the correct password after three tries, the projector cannot be able to keep it becomes effective. INSTALL SETTING X Tilt... Be please aware that was set to remember this screen if you are...


