User Manual
Page 5
... Panel 12 Connector Panel 13 Remote Commander 14 Projecting the Picture Installing the Projector 16 Connecting the Projector 17 Connecting with a Computer ......17 Connecting with a VCR 18 Connecting with a Monitor Equipment (VPL-CS7 only 19 Projecting 19 Turning Off the Power 21 Adjustments and Settings Using the Menu Using the MENU 27 The PICTURE SETTING Menu ..... 29 The INPUT SETTING Menu .......... 31 The SET SETTING Menu 33 The MENU SETTING Menu .......... 35 The INSTALL SETTING Menu ..... 36 The INFORMATION Menu 38 Maintenance Replacing the Lamp 40 Cleaning the Air Filter...
... Panel 12 Connector Panel 13 Remote Commander 14 Projecting the Picture Installing the Projector 16 Connecting the Projector 17 Connecting with a Computer ......17 Connecting with a VCR 18 Connecting with a Monitor Equipment (VPL-CS7 only 19 Projecting 19 Turning Off the Power 21 Adjustments and Settings Using the Menu Using the MENU 27 The PICTURE SETTING Menu ..... 29 The INPUT SETTING Menu .......... 31 The SET SETTING Menu 33 The MENU SETTING Menu .......... 35 The INSTALL SETTING Menu ..... 36 The INFORMATION Menu 38 Maintenance Replacing the Lamp 40 Cleaning the Air Filter...
User Manual
Page 6
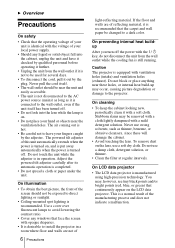
... screen with opaque draperies. • It is desirable to install the projector in operation. Caution The projector is manufactured using high-precision technology. Stubborn stains may , however, see tiny black points and/or bright points (red, blue, or green) that continuously appear on the lens, use a damp cloth, detergent solution, or thinner. • Clean the filter at regular intervals. To remove dust on the LCD data projector. On LCD data projector...
... screen with opaque draperies. • It is desirable to install the projector in operation. Caution The projector is manufactured using high-precision technology. Stubborn stains may , however, see tiny black points and/or bright points (red, blue, or green) that continuously appear on the lens, use a damp cloth, detergent solution, or thinner. • Clean the filter at regular intervals. To remove dust on the LCD data projector. On LCD data projector...
User Manual
Page 9
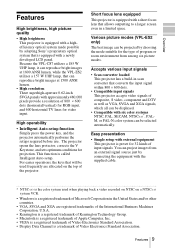
... lamp, that can project images from an external signal source just by connecting the equipment with approximately 480,000 pixels provide a resolution of 800 × 600 dots (horizontal/vertical) for RGB input, and 600 horizontal TV lines for the type of Video Electronics Standard Association. • Display Data Channel is called Intelligent Auto-setup. High operability • Intelligent Auto-setup function Simply press the power key, and the projector automatically...
... lamp, that can project images from an external signal source just by connecting the equipment with approximately 480,000 pixels provide a resolution of 800 × 600 dots (horizontal/vertical) for RGB input, and 600 horizontal TV lines for the type of Video Electronics Standard Association. • Display Data Channel is called Intelligent Auto-setup. High operability • Intelligent Auto-setup function Simply press the power key, and the projector automatically...
User Manual
Page 10
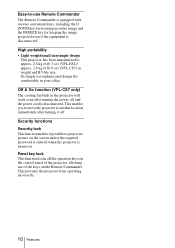
High portability • Light weight/small size/simple design This projector has been miniaturized to approx. 2.8 kg (6 lb 3 oz) (VPL-ES2)/ approx. 2.9 kg (6 lb 6 oz) (VPL-CS7) in the projector will work even after turning it possible to project no picture on the screen unless the required password is entered when the projector is equipped with various convenient keys, including the D ZOOM key for keeping the image projected even if...
High portability • Light weight/small size/simple design This projector has been miniaturized to approx. 2.8 kg (6 lb 3 oz) (VPL-ES2)/ approx. 2.9 kg (6 lb 6 oz) (VPL-CS7) in the projector will work even after turning it possible to project no picture on the screen unless the required password is entered when the projector is equipped with various convenient keys, including the D ZOOM key for keeping the image projected even if...
User Manual
Page 11
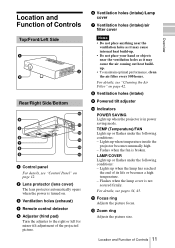
...) 9 Powered tilt adjuster 0 Indicators POWER SAVING Lights up when temperature inside the projector becomes unusually high. - For details, see "Cleaning the Air Filter" on . 3 Ventilation holes (exhaust) 4 Remote control detector 5 Adjuster (hind pad) Turn the adjuster to the right or left for minor tilt adjustment of its life or becomes a high temperature. - TEMP (Temperature)/FAN Lights up or flashes under the following conditions: - Lights up when the lamp has reached the end of the projected picture. 6 Ventilation holes (intake)/Lamp cover...
...) 9 Powered tilt adjuster 0 Indicators POWER SAVING Lights up when temperature inside the projector becomes unusually high. - For details, see "Cleaning the Air Filter" on . 3 Ventilation holes (exhaust) 4 Remote control detector 5 Adjuster (hind pad) Turn the adjuster to the right or left for minor tilt adjustment of its life or becomes a high temperature. - TEMP (Temperature)/FAN Lights up or flashes under the following conditions: - Lights up when the lamp has reached the end of the projected picture. 6 Ventilation holes (intake)/Lamp cover...
User Manual
Page 12
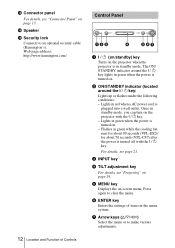
..., see "Projecting" on page 19. 5 MENU key Displays the on-screen menu. Once in green while the cooling fan runs for about 90 seconds (VPL-ES2)/ for about 70 seconds (VPL-CS7) after the power is plugged into a wall outlet. The ON/ STANDBY indicator around the I / 1 key. - Web page address: http://www.kensington.com/ 12 Location and Function of items in red when a AC power cord is turned off...
..., see "Projecting" on page 19. 5 MENU key Displays the on-screen menu. Once in green while the cooling fan runs for about 90 seconds (VPL-ES2)/ for about 70 seconds (VPL-CS7) after the power is plugged into a wall outlet. The ON/ STANDBY indicator around the I / 1 key. - Web page address: http://www.kensington.com/ 12 Location and Function of items in red when a AC power cord is turned off...
User Manual
Page 14
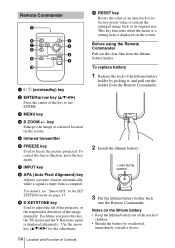
... Resets the value of the image manually. To replace battery 1 Release the lock of the key to freeze the picture projected. To cancel the freeze function, press the key again. 7 INPUT key 8 APA (Auto Pixel Alignment) key Adjusts a picture clearest automatically while a signal is displayed alternately. This key functions when the menu or a setting item is displayed on the screen. 5 Infrared transmitter 6 FREEZE key Used to use ENTER. 3 MENU key 4 D ZOOM +/- Remote Commander...
... Resets the value of the image manually. To replace battery 1 Release the lock of the key to freeze the picture projected. To cancel the freeze function, press the key again. 7 INPUT key 8 APA (Auto Pixel Alignment) key Adjusts a picture clearest automatically while a signal is displayed alternately. This key functions when the menu or a setting item is displayed on the screen. 5 Infrared transmitter 6 FREEZE key Used to use ENTER. 3 MENU key 4 D ZOOM +/- Remote Commander...
User Manual
Page 19
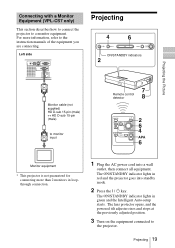
.... Projecting 19 The lens protector opens, and the powered tilt adjuster rises and stops at the previously adjusted position. 3 Turn on the equipment connected to a monitor equipment. For more information, refer to monitor input Remote control detector 8 Monitor equipment * This projector is not guaranteed for connecting more than 2 monitors in green and the Intelligent Auto-setup starts. Left side AUDIO VIDEO S VIDEO INPUT A MONITOR OUT Projecting INPUT TILT MENU PUSH ENTER ON/STANDBY indicators Monitor cable (not supplied...
.... Projecting 19 The lens protector opens, and the powered tilt adjuster rises and stops at the previously adjusted position. 3 Turn on the equipment connected to a monitor equipment. For more information, refer to monitor input Remote control detector 8 Monitor equipment * This projector is not guaranteed for connecting more than 2 monitors in green and the Intelligent Auto-setup starts. Left side AUDIO VIDEO S VIDEO INPUT A MONITOR OUT Projecting INPUT TILT MENU PUSH ENTER ON/STANDBY indicators Monitor cable (not supplied...
User Manual
Page 27
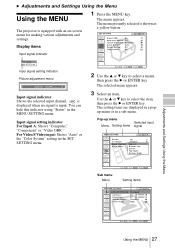
... menu Selected input Menu Setting items signal MENU SETTING Input A Status: On Language: English A Menu Position: Top left Menu Color: Bottom Left Center Top Right Bottom Right Sub menu Menu Setting items PICTURE SETTING ADJUST PICTURE Contrast: Brightness: Gamma Mode: Color Temp: Standard 80 50 Graphics High Input A Adjustments and Settings Using the Menu Using the MENU 27 The selected menu appears. 3 Select an item. B Adjustments and Settings Using the Menu Using the MENU The projector is equipped with an on-screen menu for making various adjustments and settings...
... menu Selected input Menu Setting items signal MENU SETTING Input A Status: On Language: English A Menu Position: Top left Menu Color: Bottom Left Center Top Right Bottom Right Sub menu Menu Setting items PICTURE SETTING ADJUST PICTURE Contrast: Brightness: Gamma Mode: Color Temp: Standard 80 50 Graphics High Input A Adjustments and Settings Using the Menu Using the MENU 27 The selected menu appears. 3 Select an item. B Adjustments and Settings Using the Menu Using the MENU The projector is equipped with an on-screen menu for making various adjustments and settings...
User Manual
Page 32
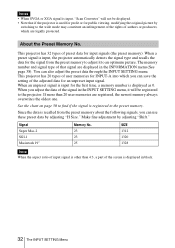
... Memory No. If more than 4:3, a part of the adjusted data for public viewing, modifying the original picture by switching to the wide mode may constitute an infringement of the rights of the signal in the INPUT SETTING menu, it to the preset memory. Since the data is displayed as 0. This projector has 20 types of preset data for the signal from the preset memory about the...
... Memory No. If more than 4:3, a part of the adjusted data for public viewing, modifying the original picture by switching to the wide mode may constitute an infringement of the rights of the signal in the INPUT SETTING menu, it to the preset memory. Since the data is displayed as 0. This projector has 20 types of preset data for the signal from the preset memory about the...
User Manual
Page 34
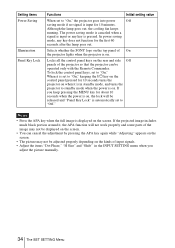
... be displayed on the screen. • You can be released and "Panel Key Lock" is pressed. If the projected image includes much black portion around it is in the INPUT SETTING menu when you keep pressing the MENU key for 10 seconds turns the projector on when it , the APA function will be operated only with the Remote Commander. If you adjust the picture manually. 34 The SET SETTING Menu In power saving mode...
... be displayed on the screen. • You can be released and "Panel Key Lock" is pressed. If the projected image includes much black portion around it is in the INPUT SETTING menu when you keep pressing the MENU key for 10 seconds turns the projector on when it , the APA function will be operated only with the Remote Commander. If you adjust the picture manually. 34 The SET SETTING Menu In power saving mode...
User Manual
Page 36
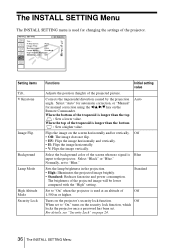
... the screen when no signal is longer than the top : Sets a lower value. V Keystone: Auto Image Flip: Off Background: Blue Lamp Mode: Standard High Altitude Mode:Off Security Lock: Off Input-A Setting items Tilt... Select "Auto" for automatic correction, or "Manual" for changing the settings of the trapezoid is used for manual correction using the b/v/B/V key on the Remote Commander. Select "Black" or "Blue." V Keystone Image Flip Background Lamp Mode High Altitude Mode Security Lock Functions Initial setting value Adjusts the position (height) of the projected image...
... the screen when no signal is longer than the top : Sets a lower value. V Keystone: Auto Image Flip: Off Background: Blue Lamp Mode: Standard High Altitude Mode:Off Security Lock: Off Input-A Setting items Tilt... Select "Auto" for automatic correction, or "Manual" for changing the settings of the trapezoid is used for manual correction using the b/v/B/V key on the Remote Commander. Select "Black" or "Blue." V Keystone Image Flip Background Lamp Mode High Altitude Mode Security Lock Functions Initial setting value Adjusts the position (height) of the projected image...
User Manual
Page 40
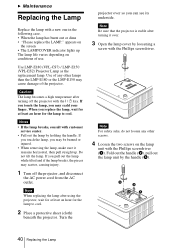
... can see its underside. Use of the projector. Turn the projector over . 3 Open the lamp cover by loosening a screw with customer service center. • Pull out the lamp by the handle (3). 40 Replacing the Lamp Note For safety sake, do not loosen any other screws. 4 Loosen the two screws on the screen • The LAMP/COVER indicator lights up . Use LMP-E180 (VPL-CS7) / LMP-E150 (VPL-ES2) Projector Lamp as the replacement lamp. Notes • If...
... can see its underside. Use of the projector. Turn the projector over . 3 Open the lamp cover by loosening a screw with customer service center. • Pull out the lamp by the handle (3). 40 Replacing the Lamp Note For safety sake, do not loosen any other screws. 4 Loosen the two screws on the screen • The LAMP/COVER indicator lights up . Use LMP-E180 (VPL-CS7) / LMP-E150 (VPL-ES2) Projector Lamp as the replacement lamp. Notes • If...
User Manual
Page 43
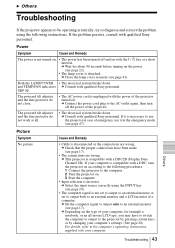
...). • The lamp cover is compatible with a DDC2B (Display Data Channel 2B). light up. Picture Symptom No picture. B Others Troubleshooting If the projector appears to be operating erratically, try to diagnose and correct the problem using the INPUT key (see page 17). • The connections are wrong. The powered tilt adjuster and the lens protector do not work at a short interval. c Check that the proper connections have to switch the computer...
...). • The lamp cover is compatible with a DDC2B (Display Data Channel 2B). light up. Picture Symptom No picture. B Others Troubleshooting If the projector appears to be operating erratically, try to diagnose and correct the problem using the INPUT key (see page 17). • The connections are wrong. The powered tilt adjuster and the lens protector do not work at a short interval. c Check that the proper connections have to switch the computer...
User Manual
Page 44
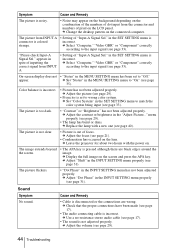
... connections are black edges around the image. c Adjust the focus (see page 31). c Adjust the picture (see page 29). • The lamp has burnt or dims. c Replace the lamp with the power on the lens. menu properly (see page 29). • Projector is set to wrong color system. "Please check Input-A Signal Sel." Color balance is incorrect. c Use a no-resistance stereo audio cable (see page 29). 44 Troubleshooting c Change the desktop pattern on the screen...
... connections are black edges around the image. c Adjust the focus (see page 31). c Adjust the picture (see page 29). • The lamp has burnt or dims. c Replace the lamp with the power on the lens. menu properly (see page 29). • Projector is set to wrong color system. "Please check Input-A Signal Sel." Color balance is incorrect. c Use a no-resistance stereo audio cable (see page 29). 44 Troubleshooting c Change the desktop pattern on the screen...
User Manual
Page 45
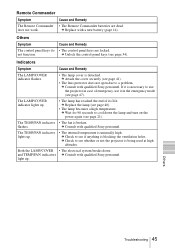
... Remedy The LAMP/COVER indicator flashes. • The lamp cover is unusually high. c Consult with a new battery (page 14). flashes. Others Troubleshooting 45 The LAMP/COVER indicator lights up . c Replace the lamp (see page 34). The TEMP/FAN indicator lights up. • The internal temperature is detached. and TEMP/FAN indicators c Consult with qualified Sony personnel. light up . • The lamp has reached the end of emergency, use the projector in the emergency mode (see page 21). c Unlock the control panel keys...
... Remedy The LAMP/COVER indicator flashes. • The lamp cover is unusually high. c Consult with a new battery (page 14). flashes. Others Troubleshooting 45 The LAMP/COVER indicator lights up . c Replace the lamp (see page 34). The TEMP/FAN indicator lights up. • The internal temperature is detached. and TEMP/FAN indicators c Consult with qualified Sony personnel. light up . • The lamp has reached the end of emergency, use the projector in the emergency mode (see page 21). c Unlock the control panel keys...
User Manual
Page 46
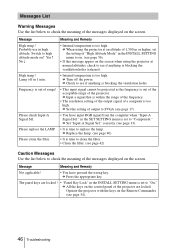
... output signal of the messages displayed on the screen. Operate the projector with the keys on the control panel of the messages displayed on ? Switch to see page 36) • If this message appers on the screen when using the projector at normal altitudes, check to check the meaning of the projector are locked ! • "Panel Key Lock" in the INSTALL SETTING menu is set to "Component." correctly (see page 34). 46 Troubleshooting High temp.! in the INSTALL SETTING menu to...
... output signal of the messages displayed on the screen. Operate the projector with the keys on the control panel of the messages displayed on ? Switch to see page 36) • If this message appers on the screen when using the projector at normal altitudes, check to check the meaning of the projector are locked ! • "Panel Key Lock" in the INSTALL SETTING menu is set to "Component." correctly (see page 34). 46 Troubleshooting High temp.! in the INSTALL SETTING menu to...

User Manual
Page 49
... Projector Lamp (for replacement) LMP-E180 (for VPL-CS7 only) LMP-E150 (for replacement) (1) Operating Instructions (CD-ROM) (1) Quick Reference Manual (1) Security Label (1) Design and specifications are subject to 90% Supplied accessories Remote Commander (1) Lithium battery CR2025 (1) HD D-sub 15 pin cable (2 m) (1) (1-791-992-21) Soft case (1) AC power cord (1) Air filter (for VPL-ES2 only) Signal Cable SMF-402 (HD D-sub 15-pin (male) y 3 × phono type (male)) Pin assignment INPUT...
... Projector Lamp (for replacement) LMP-E180 (for VPL-CS7 only) LMP-E150 (for replacement) (1) Operating Instructions (CD-ROM) (1) Quick Reference Manual (1) Security Label (1) Design and specifications are subject to 90% Supplied accessories Remote Commander (1) Lithium battery CR2025 (1) HD D-sub 15 pin cable (2 m) (1) (1-791-992-21) Soft case (1) AC power cord (1) Air filter (for VPL-ES2 only) Signal Cable SMF-402 (HD D-sub 15-pin (male) y 3 × phono type (male)) Pin assignment INPUT...
User Manual
Page 52
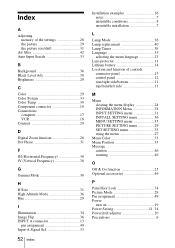
... 8 unsuitable installation 7 L Lamp Mode 36 Lamp replacement 40 Lamp Timer 38 Language 35 selecting the menu language 23 Lens protector 11 Lithium battery 14 Location and function of controls connector panel 13 control panel 12 rear/right side/bottom 11 top/front/left side 11 M Menu clearing the menu display 28 INFORMATION Menu 38 INPUT SETTING menu 31 INSTALL SETTING menu 36 MENU SETTING menu 35 PICTURE SETTING menu 29 SET SETTING menu 33 using the menu 27 Menu Color 35 Menu Position 35 Message caution 46 warning 46 O Off...
... 8 unsuitable installation 7 L Lamp Mode 36 Lamp replacement 40 Lamp Timer 38 Language 35 selecting the menu language 23 Lens protector 11 Lithium battery 14 Location and function of controls connector panel 13 control panel 12 rear/right side/bottom 11 top/front/left side 11 M Menu clearing the menu display 28 INFORMATION Menu 38 INPUT SETTING menu 31 INSTALL SETTING menu 36 MENU SETTING menu 35 PICTURE SETTING menu 29 SET SETTING menu 33 using the menu 27 Menu Color 35 Menu Position 35 Message caution 46 warning 46 O Off...
Brochure
Page 2
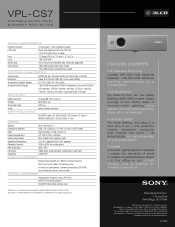
... method of Sony or their respective owners. Automatic Setup No more fussing! A soft carrying case is prohibited. Sony and Remote Commander are subject to turn it on your handouts. in and turn out the lights! the projector raises, keystone corrects, and locates the input - all automatically. meets the demands of Sony. DDII--00008881 VPL-CS7 PORTABLE ENTRY LEVEL BUSINESS PROJECTOR OPTICAL CHARACTERISTICS Projection System LCD Panel Lens Lamp Screen Size Light Output 3 LCD panels, 1 lens projection system Super high aperture...
... method of Sony or their respective owners. Automatic Setup No more fussing! A soft carrying case is prohibited. Sony and Remote Commander are subject to turn it on your handouts. in and turn out the lights! the projector raises, keystone corrects, and locates the input - all automatically. meets the demands of Sony. DDII--00008881 VPL-CS7 PORTABLE ENTRY LEVEL BUSINESS PROJECTOR OPTICAL CHARACTERISTICS Projection System LCD Panel Lens Lamp Screen Size Light Output 3 LCD panels, 1 lens projection system Super high aperture...


