User Manual
Page 5
...Picture Installing the Projector 16 Connecting the Projector 17 Connecting with a Computer ......17 Connecting with a VCR 18 Connecting with a Monitor Equipment (VPL-CS7 only 19 Projecting 19 Turning Off the Power 21 Adjustments and Settings Using the Menu Using the MENU 27 The PICTURE SETTING Menu ..... 29 The INPUT SETTING Menu .......... 31 The... 43 Messages List 46 Specifications 48 Index 52 Convenient Function Selecting the Menu Language ..........23 Security Lock 24 Other Functions 25 Off & Go Function (VPL-CS7 only 25 Effective Tools for Your Presentation 26 5
...Picture Installing the Projector 16 Connecting the Projector 17 Connecting with a Computer ......17 Connecting with a VCR 18 Connecting with a Monitor Equipment (VPL-CS7 only 19 Projecting 19 Turning Off the Power 21 Adjustments and Settings Using the Menu Using the MENU 27 The PICTURE SETTING Menu ..... 29 The INPUT SETTING Menu .......... 31 The... 43 Messages List 46 Specifications 48 Index 52 Convenient Function Selecting the Menu Language ..........23 Security Lock 24 Other Functions 25 Off & Go Function (VPL-CS7 only 25 Effective Tools for Your Presentation 26 5
User Manual
Page 6
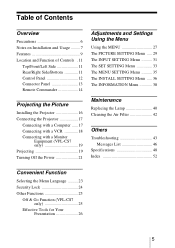
... unit from the wall outlet while the cooling fan is completed. • Do not spread a cloth or paper under the unit. Adjust the powered tilt adjuster carefully after its automatic operation is still running. Use a cover over fluorescent lamps to avoid lowering the contrast ratio. • Cover any...projector in operation. B Overview Precautions On safety • Check that the operating voltage of your unit is identical with the voltage of your local power supply. • Should any windows that the carpet and wall paper be changed to a dark color. If the floor and walls are of...
... unit from the wall outlet while the cooling fan is completed. • Do not spread a cloth or paper under the unit. Adjust the powered tilt adjuster carefully after its automatic operation is still running. Use a cover over fluorescent lamps to avoid lowering the contrast ratio. • Cover any...projector in operation. B Overview Precautions On safety • Check that the operating voltage of your unit is identical with the voltage of your local power supply. • Should any windows that the carpet and wall paper be changed to a dark color. If the floor and walls are of...
User Manual
Page 7
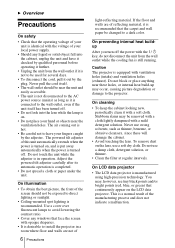
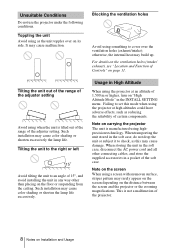
... cause a malfunction of the unit. Poorly ventilated • To avoid moisture condensation, do not install the unit in a very dusty or extremely smoky environment. The power will be caused. Very dusty, extremely smoky Avoid installing the unit in a location where the temperature may cause a rise in 1 min." Dust preventing the air...
... cause a malfunction of the unit. Poorly ventilated • To avoid moisture condensation, do not install the unit in a very dusty or extremely smoky environment. The power will be caused. Very dusty, extremely smoky Avoid installing the unit in a location where the temperature may cause a rise in 1 min." Dust preventing the air...
User Manual
Page 8
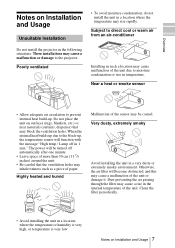
.... Note on the distance between the screen and the projector or the zooming magnifications. When storing the unit in the soft case, disconnect the AC power cord and all other connecting cables, and store the supplied accessories in any way other than placing on its side. otherwise, the internal heat may...
.... Note on the distance between the screen and the projector or the zooming magnifications. When storing the unit in the soft case, disconnect the AC power cord and all other connecting cables, and store the supplied accessories in any way other than placing on its side. otherwise, the internal heat may...
User Manual
Page 9
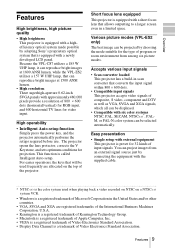
...projector is equipped with a highefficiency optical system made possible by adopting Sony's proprietary optical system that is called Intelligent Auto-setup. High operability • Intelligent Auto-setup function Simply press the power key, and the projector automatically performs the setups required before use...High resolution Three superhigh-aperture 0.62-inch SVGA panels with approximately 480,000 pixels provide a resolution of input signals. Because the VPL-CS7 utilizes a 185 W UHP lamp, it can project images from an external signal source just by choosing the mode suitable for ...
...projector is equipped with a highefficiency optical system made possible by adopting Sony's proprietary optical system that is called Intelligent Auto-setup. High operability • Intelligent Auto-setup function Simply press the power key, and the projector automatically performs the setups required before use...High resolution Three superhigh-aperture 0.62-inch SVGA panels with approximately 480,000 pixels provide a resolution of input signals. Because the VPL-CS7 utilizes a 185 W UHP lamp, it can project images from an external signal source just by choosing the mode suitable for ...
User Manual
Page 10
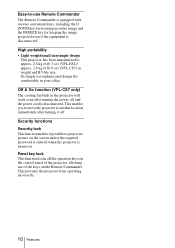
This enables you to move the projector to another location immediately after turning the power off . Panel key lock This function locks all the operation keys on the control ... functions Security lock This function makes it off and the power cord is disconnected. Its simple yet sophisticated design fits comfortably in weight and B5-file size. Off & Go function (VPL-CS7 only) The cooling fan built in on the image and... weight/small size/simple design This projector has been miniaturized to approx. 2.8 kg (6 lb 3 oz) (VPL-ES2)/ approx. 2.9 kg (6 lb 6 oz) (VPL-CS7) in your office.
This enables you to move the projector to another location immediately after turning the power off . Panel key lock This function locks all the operation keys on the control ... functions Security lock This function makes it off and the power cord is disconnected. Its simple yet sophisticated design fits comfortably in weight and B5-file size. Off & Go function (VPL-CS7 only) The cooling fan built in on the image and... weight/small size/simple design This projector has been miniaturized to approx. 2.8 kg (6 lb 3 oz) (VPL-ES2)/ approx. 2.9 kg (6 lb 6 oz) (VPL-CS7) in your office.
User Manual
Page 11
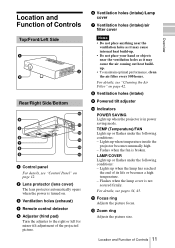
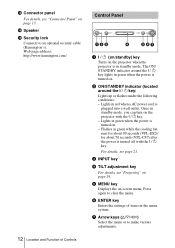
...holes as it may cause internal heat build-up or flashes under the following conditions: - Lights up when the projector is in power saving mode. Lights up or flashes under the following conditions: - TEMP (Temperature)/FAN Lights up when the lamp has reached ...qg 1 Control panel For details, see "Control Panel" on page 12. 2 Lens protector (lens cover) The lens protector automatically opens when the power is turned on page 42. 8 Ventilation holes (intake) 9 Powered tilt adjuster 0 Indicators POWER SAVING Lights up when temperature inside the projector becomes unusually high. -
...holes as it may cause internal heat build-up or flashes under the following conditions: - Lights up when the projector is in power saving mode. Lights up or flashes under the following conditions: - TEMP (Temperature)/FAN Lights up when the lamp has reached ...qg 1 Control panel For details, see "Control Panel" on page 12. 2 Lens protector (lens cover) The lens protector automatically opens when the power is turned on page 42. 8 Ventilation holes (intake) 9 Powered tilt adjuster 0 Indicators POWER SAVING Lights up when temperature inside the projector becomes unusually high. -
User Manual
Page 12
... address: http://www.kensington.com/ 12 Location and Function of items in green while the cooling fan runs for about 90 seconds (VPL-ES2)/ for about 70 seconds (VPL-CS7) after the power is turned off with the I / 1 (on/standby) key Turns on the projector when the projector is in red when a... AC power cord is turned on. - Flashes in the menu system. 7 Arrow keys (f/F/g/G) Select the menu or to make various adjustments. Press again to...
... address: http://www.kensington.com/ 12 Location and Function of items in green while the cooling fan runs for about 90 seconds (VPL-ES2)/ for about 70 seconds (VPL-CS7) after the power is turned off with the I / 1 (on/standby) key Turns on the projector when the projector is in red when a... AC power cord is turned on. - Flashes in the menu system. 7 Arrow keys (f/F/g/G) Select the menu or to make various adjustments. Press again to...
User Manual
Page 13
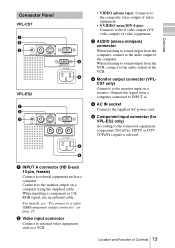
Connects to the monitor output on a monitor. Overview Connector Panel VPL-CS7 1 2 3 AUDIO VIDEO S VIDEO INPUT A MONITOR OUT 4 5 VPL-ES2 1 2 3 AUDIO VIDEO S VIDEO INPUT A PR/CR PB/CB Y • VIDEO (phono type): Connects to the composite video output of video ...and Function of the computer. When listening to sound output from a computer connected to INPUT A. 5 AC IN socket Connects the supplied AC power cord. 6 Component input connector (for VPL-ES2 only) According to the connected equipment, component (Y/CB/CR), HDTV or DTV (Y/PB/PR) signal is selected. 5 6 1 INPUT ...
Connects to the monitor output on a monitor. Overview Connector Panel VPL-CS7 1 2 3 AUDIO VIDEO S VIDEO INPUT A MONITOR OUT 4 5 VPL-ES2 1 2 3 AUDIO VIDEO S VIDEO INPUT A PR/CR PB/CB Y • VIDEO (phono type): Connects to the composite video output of video ...and Function of the computer. When listening to sound output from a computer connected to INPUT A. 5 AC IN socket Connects the supplied AC power cord. 6 Component input connector (for VPL-ES2 only) According to the connected equipment, component (Y/CB/CR), HDTV or DTV (Y/PB/PR) signal is selected. 5 6 1 INPUT ...
User Manual
Page 19
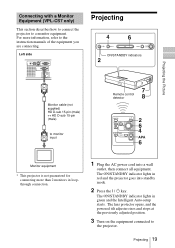
...loopthrough connection. 1 Plug the AC power cord into standby mode. 2 Press the I / 1 key. The ON/STANDBY indicator lights in red and the projector goes into a wall outlet, then connect all equipment. Projecting the Picture Connecting with a Monitor Equipment (VPL-CS7 only) This section describes how ...to connect the projector to the projector. For more than 2 monitors in green and the Intelligent Auto-setup starts. The lens protector opens, and the powered tilt adjuster rises and stops at the...
...loopthrough connection. 1 Plug the AC power cord into standby mode. 2 Press the I / 1 key. The ON/STANDBY indicator lights in red and the projector goes into a wall outlet, then connect all equipment. Projecting the Picture Connecting with a Monitor Equipment (VPL-CS7 only) This section describes how ...to connect the projector to the projector. For more than 2 monitors in green and the Intelligent Auto-setup starts. The lens protector opens, and the powered tilt adjuster rises and stops at the...
User Manual
Page 20
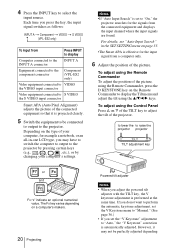
...picture of the picture. Each time you may not be connected to output to "Manual." (See page 36.) • If you adjust the powered tilt adjuster with the TILT key, the V keystone adjustment is automatically adjusted. Notes •If "Auto Input Search" is projected clearly. 5 ...the signals from Press INPUT to display Computer connected to the INPUT A INPUT A connector Equipment connected to the component connector Component (VPL-ES2 only) Video equipment connected to VIDEO the VIDEO input connector Video equipment connected to display the Tilt menu and adjust the tilt ...
...picture of the picture. Each time you may not be connected to output to "Manual." (See page 36.) • If you adjust the powered tilt adjuster with the TILT key, the V keystone adjustment is automatically adjusted. Notes •If "Auto Input Search" is projected clearly. 5 ...the signals from Press INPUT to display Computer connected to the INPUT A INPUT A connector Equipment connected to the component connector Component (VPL-ES2 only) Video equipment connected to VIDEO the VIDEO input connector Video equipment connected to display the Tilt menu and adjust the tilt ...

User Manual
Page 21
...injury to reduce the internal heat. Turning Off the Power 21 Turning Off the Power 1 Press the I / 1 key again." The ON/STANDBY indicator flashes in green and the fan continues to run for about 70 seconds (VPL-CS7)/for about 90 seconds (VPL-ES2) to your fingers. • Do not push...key for the first 60 seconds. Also, the ON/ STANDBY indicator flashes quickly for five seconds. 2 Press the I / 1 key again. The powered tilt adjuster is effective until "V Keystone" appears on the top of the picture. 8 Turn the focus ring to light up again the ON/STANDBY indicator...
...injury to reduce the internal heat. Turning Off the Power 21 Turning Off the Power 1 Press the I / 1 key again." The ON/STANDBY indicator flashes in green and the fan continues to run for about 70 seconds (VPL-CS7)/for about 90 seconds (VPL-ES2) to your fingers. • Do not push...key for the first 60 seconds. Also, the ON/ STANDBY indicator flashes quickly for five seconds. 2 Press the I / 1 key again. The powered tilt adjuster is effective until "V Keystone" appears on the top of the picture. 8 Turn the focus ring to light up again the ON/STANDBY indicator...
User Manual
Page 22
otherwise, the fan will stop even though the internal heat is still high, which could result in a breakdown of the projector. (VPL-ES2 only) • The internal circuitry of the Off & Go function may cause the fan to continue to red. (VPL-CS7 only) For details, see "Off & Go Function (VPL-CS7 only)" on page 25. 22 Turning Off the Power Notes • Do not unplug the AC power cord while the fan is pressed to turn off the power and the ON/STANDBY indicator changes to operate for a short time even after the I / 1 key is still running;
otherwise, the fan will stop even though the internal heat is still high, which could result in a breakdown of the projector. (VPL-ES2 only) • The internal circuitry of the Off & Go function may cause the fan to continue to red. (VPL-CS7 only) For details, see "Off & Go Function (VPL-CS7 only)" on page 25. 22 Turning Off the Power Notes • Do not unplug the AC power cord while the fan is pressed to turn off the power and the ON/STANDBY indicator changes to operate for a short time even after the I / 1 key is still running;
User Manual
Page 23
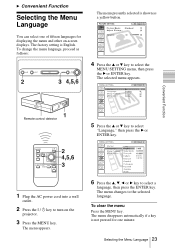
... the menu language, proceed as follows: INPUT TILT MENU PUSH ENTER The menu presently selected is shown as a yellow button. Convenient Function 1 Plug the AC power cord into a wall outlet. 2 Press the I / 1 key to turn on -screen displays. PICTURE SETTING Picture Mode: Standard Adjust Picture... B Convenient Function Selecting the Menu Language...
... the menu language, proceed as follows: INPUT TILT MENU PUSH ENTER The menu presently selected is shown as a yellow button. Convenient Function 1 Plug the AC power cord into a wall outlet. 2 Press the I / 1 key to turn on -screen displays. PICTURE SETTING Picture Mode: Standard Adjust Picture... B Convenient Function Selecting the Menu Language...
User Manual
Page 24
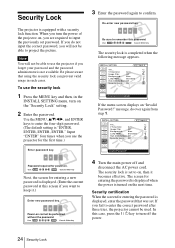
...Image Flip: Off Background: Blue Lamp Mode: Standard High Altitude Mode:Off Security Lock: Off Input A Invalid Password! 4 Turn the main power off the power. 24 Security Lock The security lock is equipped with a security lock function. Use: Cancel: Other key 3 Enter the password again to... A Security Lock enabled! V Keystone: Auto... Security Lock The projector is set to on, then it .) Enter new password key. INSTALL SETTING X Tilt... Power-on . In this case, press the I / 1 key to turn on the "Security Lock" setting. 2 Enter the password. The screen for the first...
...Image Flip: Off Background: Blue Lamp Mode: Standard High Altitude Mode:Off Security Lock: Off Input A Invalid Password! 4 Turn the main power off the power. 24 Security Lock The security lock is equipped with a security lock function. Use: Cancel: Other key 3 Enter the password again to... A Security Lock enabled! V Keystone: Auto... Security Lock The projector is set to on, then it .) Enter new password key. INSTALL SETTING X Tilt... Power-on . In this case, press the I / 1 key to turn on the "Security Lock" setting. 2 Enter the password. The screen for the first...
User Manual
Page 25
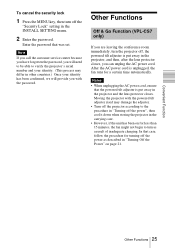
...off the projector according to the procedure in "Turning off , the powered tilt adjuster is put away in the projector and the lens protector closes. Moving the projector with the password. Other Functions Off & Go Function (VPL-CS7 only) If you are leaving the conference room immediately, turn the... projector off the power", then cool it down when storing the projector in the carrying case. • However, if...
...off the projector according to the procedure in "Turning off , the powered tilt adjuster is put away in the projector and the lens protector closes. Moving the projector with the password. Other Functions Off & Go Function (VPL-CS7 only) If you are leaving the conference room immediately, turn the... projector off the power", then cool it down when storing the projector in the carrying case. • However, if...
User Manual
Page 27
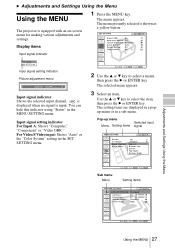
... a sub menu. The menu presently selected is input. SET SETTING Input A Smar t APA: On Auto Input Search: Off Input-A Signal Sel.: Computer Color System: Auto Power Saving: Off Illumination: On Video NTSC 3.58 Input signal setting indicator Picture adjustment menu Contrast Input signal indicator Shows the selected input channel. B Adjustments and...
... a sub menu. The menu presently selected is input. SET SETTING Input A Smar t APA: On Auto Input Search: Off Input-A Signal Sel.: Computer Color System: Auto Power Saving: Off Illumination: On Video NTSC 3.58 Input signal setting indicator Picture adjustment menu Contrast Input signal indicator Shows the selected input channel. B Adjustments and...
User Manual
Page 33
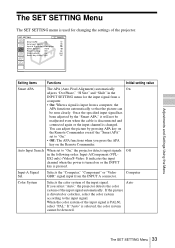
...from the INPUT A connector. SET SETTING Input-A Smar t APA: On Auto Input Search: Off Input-A Signal Sel.: Computer Color System: Auto Power Saving: Off Illumination: On Panel Key Lock: Off Adjustments and Settings Using the Menu Seittng items Functions Initial setting value Smart APA The APA (...key on or the INPUT key is changed. Computer Color System Selects the color system of the projector. It indicates the input channel when the power is used for the input signal from a computer. • On: When a signal is PAL60, select "PAL." If the picture is ...
...from the INPUT A connector. SET SETTING Input-A Smar t APA: On Auto Input Search: Off Input-A Signal Sel.: Computer Color System: Auto Power Saving: Off Illumination: On Panel Key Lock: Off Adjustments and Settings Using the Menu Seittng items Functions Initial setting value Smart APA The APA (...key on or the INPUT key is changed. Computer Color System Selects the color system of the projector. It indicates the input channel when the power is used for the input signal from a computer. • On: When a signal is PAL60, select "PAL." If the picture is ...
User Manual
Page 34
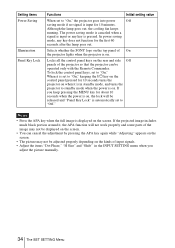
... the SONY logo on the top panel of On the projector lights when the projector is displayed on . Notes • Press the APA key when the full image is on the screen. Seittng items Power Saving Illumination Panel Key Lock Functions Initial setting value When set to "On." In power saving mode...screen. • The picture may not be operated only with the Remote Commander. Although the lamp goes out, the cooling fan keeps running. The power saving mode is canceled when a signal is input or any key does not function for 10 minutes. To lock the control panel keys, set ...
... the SONY logo on the top panel of On the projector lights when the projector is displayed on . Notes • Press the APA key when the full image is on the screen. Seittng items Power Saving Illumination Panel Key Lock Functions Initial setting value When set to "On." In power saving mode...screen. • The picture may not be operated only with the Remote Commander. Although the lamp goes out, the cooling fan keeps running. The power saving mode is canceled when a signal is input or any key does not function for 10 minutes. To lock the control panel keys, set ...

User Manual
Page 35
Selects the language used for the menus, a message when turning off the power, and warning messages. Available languages are: English, Nederlands, Français, Italiano, Deutsch, Español, Português, , Svenska, Norsk, , , , and . screen displays. Adjustments and ...
Selects the language used for the menus, a message when turning off the power, and warning messages. Available languages are: English, Nederlands, Français, Italiano, Deutsch, Español, Português, , Svenska, Norsk, , , , and . screen displays. Adjustments and ...


