User Manual
Page 1
2-148-435-11 (1) Data Projector Operating Instructions VPL-CS7 VPL-ES2 © 2004 Sony Corporation
2-148-435-11 (1) Data Projector Operating Instructions VPL-CS7 VPL-ES2 © 2004 Sony Corporation
User Manual
Page 5
...Side/Bottom 11 Control Panel 12 Connector Panel 13 Remote Commander 14 Projecting the Picture Installing the Projector 16 Connecting the Projector 17 Connecting with a Computer ......17 Connecting with a VCR 18 Connecting with a Monitor Equipment (VPL-CS7 only 19 Projecting 19 Turning Off the Power 21 Adjustments and Settings Using the Menu Using the... 43 Messages List 46 Specifications 48 Index 52 Convenient Function Selecting the Menu Language ..........23 Security Lock 24 Other Functions 25 Off & Go Function (VPL-CS7 only 25 Effective Tools for Your Presentation 26 5
...Side/Bottom 11 Control Panel 12 Connector Panel 13 Remote Commander 14 Projecting the Picture Installing the Projector 16 Connecting the Projector 17 Connecting with a Computer ......17 Connecting with a VCR 18 Connecting with a Monitor Equipment (VPL-CS7 only 19 Projecting 19 Turning Off the Power 21 Adjustments and Settings Using the Menu Using the... 43 Messages List 46 Specifications 48 Index 52 Convenient Function Selecting the Menu Language ..........23 Security Lock 24 Other Functions 25 Off & Go Function (VPL-CS7 only 25 Effective Tools for Your Presentation 26 5
User Manual
Page 6
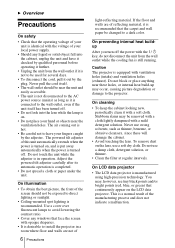
...-reflecting material. On cleaning • To keep the cabinet looking new, periodically clean it is recommended that continuously appear on the LCD data projector. B Overview Precautions On safety • Check that the operating voltage of your unit is identical with a soft cloth. Do not touch ...To disconnect the cord, pull it further. • Unplug the unit from the wall outlet while the cooling fan is desirable to install the projector in operation. Never use a damp cloth, detergent solution, or thinner. • Clean the filter at regular intervals. The powered tilt adjuster...
...-reflecting material. On cleaning • To keep the cabinet looking new, periodically clean it is recommended that continuously appear on the LCD data projector. B Overview Precautions On safety • Check that the operating voltage of your unit is identical with a soft cloth. Do not touch ...To disconnect the cord, pull it further. • Unplug the unit from the wall outlet while the cooling fan is desirable to install the projector in operation. Never use a damp cloth, detergent solution, or thinner. • Clean the filter at regular intervals. The powered tilt adjuster...
User Manual
Page 7
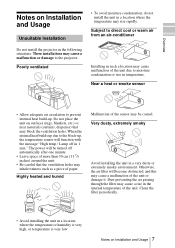
...the internal temperature of the unit or damage it. Dust preventing the air passing through the filter may rise rapidly. Subject to the projector. Highly heated and humid Malfunction of the sensor may cause a malfunction of the unit. Notes on Installation and Usage 7 When ..., draperies) that the ventilation holes may block the ventilation holes. Overview Notes on Installation and Usage Unsuitable Installation Do not install the projector in a location where the temperature or humidity is very high, or temperature is very low. These installations may cause malfunction of paper...
...the internal temperature of the unit or damage it. Dust preventing the air passing through the filter may rise rapidly. Subject to the projector. Highly heated and humid Malfunction of the sensor may cause a malfunction of the unit. Notes on Installation and Usage 7 When ..., draperies) that the ventilation holes may block the ventilation holes. Overview Notes on Installation and Usage Unsuitable Installation Do not install the projector in a location where the temperature or humidity is very high, or temperature is very low. These installations may cause malfunction of paper...
User Manual
Page 8
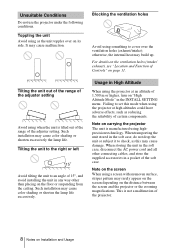
...components. otherwise, the internal heat may cause malfunction. For details on the ventilation holes (intake/ exhaust), see "Location and Function of the projector. 8 Notes on page 11. Note on its side. This is manufactured using something to set this may cause color shading or shorten ... shading or shorten the lamp life excessively. Such installation may rarely appear on the screen depending on the screen When using the projector at high altitudes could have adverse effects, such as the unit topples over the ventilation holes (exhaust/intake); Failing to cover...
...components. otherwise, the internal heat may cause malfunction. For details on the ventilation holes (intake/ exhaust), see "Location and Function of the projector. 8 Notes on page 11. Note on its side. This is manufactured using something to set this may cause color shading or shorten ... shading or shorten the lamp life excessively. Such installation may rarely appear on the screen depending on the screen When using the projector at high altitudes could have adverse effects, such as the unit topples over the ventilation holes (exhaust/intake); Failing to cover...
User Manual
Page 9
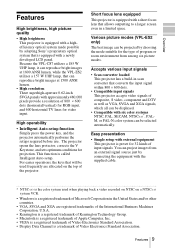
..., S video, component and DTV as well as VGA, SVGA and XGA signals, which all can be projected by adopting Sony's proprietary optical system that is preset for 32 kinds of the projector. Because the VPL-CS7 utilizes a 185 W UHP lamp, it can reproduce bright images at 1800 ANSI lumen, while the... VPL-ES2 utilizes a 157 W UHP lamp, that can be displayed. • Compatible with six color systems NTSC, PAL, SECAM, NTSC4....
..., S video, component and DTV as well as VGA, SVGA and XGA signals, which all can be projected by adopting Sony's proprietary optical system that is preset for 32 kinds of the projector. Because the VPL-CS7 utilizes a 185 W UHP lamp, it can reproduce bright images at 1800 ANSI lumen, while the... VPL-ES2 utilizes a 157 W UHP lamp, that can be displayed. • Compatible with six color systems NTSC, PAL, SECAM, NTSC4....
User Manual
Page 10
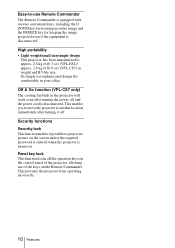
...size/simple design This projector has been miniaturized to approx. 2.8 kg (6 lb 3 oz) (VPL-ES2)/ approx. 2.9 kg (6 lb 6 oz) (VPL-CS7) in the projector will work even after turning it possible to project no picture on the screen unless the required password is entered when the projector is turned on the...keys on the control panel of the projector, allowing use Remote Commander The Remote Commander is equipped with various convenient keys, including the D ZOOM key for keeping the image projected even if the equipment is disconnected. Off & Go function (VPL-CS7 only) The cooling fan built in...
...size/simple design This projector has been miniaturized to approx. 2.8 kg (6 lb 3 oz) (VPL-ES2)/ approx. 2.9 kg (6 lb 6 oz) (VPL-CS7) in the projector will work even after turning it possible to project no picture on the screen unless the required password is entered when the projector is turned on the...keys on the control panel of the projector, allowing use Remote Commander The Remote Commander is equipped with various convenient keys, including the D ZOOM key for keeping the image projected even if the equipment is disconnected. Off & Go function (VPL-CS7 only) The cooling fan built in...
User Manual
Page 11
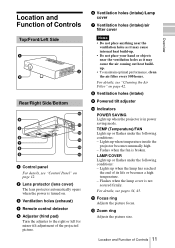
TEMP (Temperature)/FAN Lights up when temperature inside the projector becomes unusually high. - Lights up or flashes under the following conditions: - qa Focus ring Adjusts the picture focus. Location and Function of Controls Top/Front/... lens protector automatically opens when the power is turned on page 42. 8 Ventilation holes (intake) 9 Powered tilt adjuster 0 Indicators POWER SAVING Lights up when the projector is in power saving mode. For details, see pages 34, 45. LAMP/COVER Lights up when the lamp has reached the end of its life...
TEMP (Temperature)/FAN Lights up when temperature inside the projector becomes unusually high. - Lights up or flashes under the following conditions: - qa Focus ring Adjusts the picture focus. Location and Function of Controls Top/Front/... lens protector automatically opens when the power is turned on page 42. 8 Ventilation holes (intake) 9 Powered tilt adjuster 0 Indicators POWER SAVING Lights up when the projector is in power saving mode. For details, see pages 34, 45. LAMP/COVER Lights up when the lamp has reached the end of its life...
User Manual
Page 12
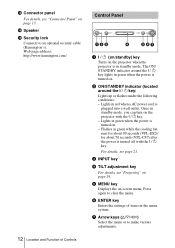
...key Enters the settings of Controls Control Panel INPUT 123 TILT MENU PUSH ENTER 4 567 1 I / 1 (on/standby) key Turns on the projector when the projector is plugged into a wall outlet. Web page address: http://www.kensington.com/ 12 Location and Function of items in standby mode. For details, ...page 19. 5 MENU key Displays the on-screen menu. Flashes in standby mode, you can turn on the projector with the I / 1 key. - Once in green while the cooling fan runs for about 90 seconds (VPL-ES2)/ for about 70 seconds (VPL-CS7) after the power is turned off with the I / 1 key.
...key Enters the settings of Controls Control Panel INPUT 123 TILT MENU PUSH ENTER 4 567 1 I / 1 (on/standby) key Turns on the projector when the projector is plugged into a wall outlet. Web page address: http://www.kensington.com/ 12 Location and Function of items in standby mode. For details, ...page 19. 5 MENU key Displays the on-screen menu. Flashes in standby mode, you can turn on the projector with the I / 1 key. - Once in green while the cooling fan runs for about 90 seconds (VPL-ES2)/ for about 70 seconds (VPL-CS7) after the power is turned off with the I / 1 key.
User Manual
Page 14
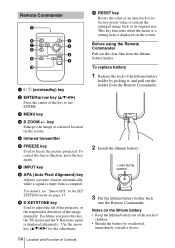
... battery 1 Release the lock of an item back to its factory preset value or returns the enlarged image back to adjust the tilt of the projector, or the trapezoidal distortion of Controls q; This key functions when the menu or a setting item is displayed alternately. For details, see "Smart APA" in the...
... battery 1 Release the lock of an item back to its factory preset value or returns the enlarged image back to adjust the tilt of the projector, or the trapezoidal distortion of Controls q; This key functions when the menu or a setting item is displayed alternately. For details, see "Smart APA" in the...
User Manual
Page 15
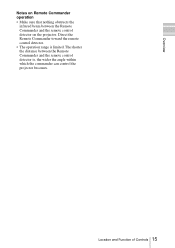
Location and Function of Controls 15 Overview Notes on the projector. Direct the Remote Commander toward the remote control detector. • The operation range is , the wider the angle within which the commander can control the projector becomes. The shorter the distance between the Remote Commander and the remote control detector on Remote Commander operation • Make sure that nothing obstructs the infrared beam between the Remote Commander and the remote control detector is limited.
Location and Function of Controls 15 Overview Notes on the projector. Direct the Remote Commander toward the remote control detector. • The operation range is , the wider the angle within which the commander can control the projector becomes. The shorter the distance between the Remote Commander and the remote control detector on Remote Commander operation • Make sure that nothing obstructs the infrared beam between the Remote Commander and the remote control detector is limited.

User Manual
Page 16
The distance between the actual value and the design value shown in the table above. 16 Installing the Projector Distance between the screen and the center of the lens Unit: m (feet) Screen size 40 60 80 100 120 150 200 300 (inches) Minimum Distance 1.1 1.7 2.3 2.9 3.5 4.4 5.9 8.8 (3.6) (5.6) (7.5) (9.5) (...) (34.8) There may be a slight difference between the lens and the screen varies depending on the size of the screen. B Projecting the Picture Installing the Projector This section describes how to install the projector. Use the following table as a guide.
The distance between the actual value and the design value shown in the table above. 16 Installing the Projector Distance between the screen and the center of the lens Unit: m (feet) Screen size 40 60 80 100 120 150 200 300 (inches) Minimum Distance 1.1 1.7 2.3 2.9 3.5 4.4 5.9 8.8 (3.6) (5.6) (7.5) (9.5) (...) (34.8) There may be a slight difference between the lens and the screen varies depending on the size of the screen. B Projecting the Picture Installing the Projector This section describes how to install the projector. Use the following table as a guide.
User Manual
Page 17
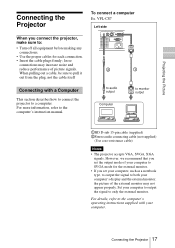
...1 Connecting with your computer to output the signal to SVGA mode for each connection. • Insert the cable plugs firmly; Connecting the Projector 17 VPL-CS7 Left side When you connect the projector, make sure to: • Turn off all equipment before making any connections. • Use the proper cables for the external monitor..., refer to monitor output 1HD D-sub 15-pin cable (supplied) 2Stereo audio connecting cable (not supplied) (Use a no-resistance cable) Notes • The projector accepts VGA, SVGA, XGA signals. Set your computer. Projecting the Picture Connecting the...
...1 Connecting with your computer to output the signal to SVGA mode for each connection. • Insert the cable plugs firmly; Connecting the Projector 17 VPL-CS7 Left side When you connect the projector, make sure to: • Turn off all equipment before making any connections. • Use the proper cables for the external monitor..., refer to monitor output 1HD D-sub 15-pin cable (supplied) 2Stereo audio connecting cable (not supplied) (Use a no-resistance cable) Notes • The projector accepts VGA, SVGA, XGA signals. Set your computer. Projecting the Picture Connecting the...
User Manual
Page 18
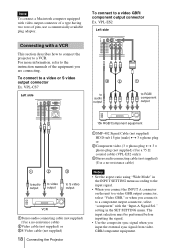
...Use the composite sync signal when you connect it to a component output connector, select "component" with a VCR This section describes how to connect the projector to S video output VCR 1Stereo audio connecting cable (not supplied) (Use a no-resistance cable) 2Video cable (not supplied) or 3S-Video cable... connecting cable (not supplied) (Use a no-resistance cable) Notes • Set the aspect ratio using "Wide Mode" in the SET SETTING menu. VPL-CS7 Left side AUDIO AUDIO VIDEO S VIDEO INPUT A MONITOR OUT AUAUDDIIOO VIDEO S VIDEO INPUT A PR/CR PB/CB Y 32 to audio output 1 to...
...Use the composite sync signal when you connect it to a component output connector, select "component" with a VCR This section describes how to connect the projector to S video output VCR 1Stereo audio connecting cable (not supplied) (Use a no-resistance cable) 2Video cable (not supplied) or 3S-Video cable... connecting cable (not supplied) (Use a no-resistance cable) Notes • Set the aspect ratio using "Wide Mode" in the SET SETTING menu. VPL-CS7 Left side AUDIO AUDIO VIDEO S VIDEO INPUT A MONITOR OUT AUAUDDIIOO VIDEO S VIDEO INPUT A PR/CR PB/CB Y 32 to audio output 1 to...
User Manual
Page 19
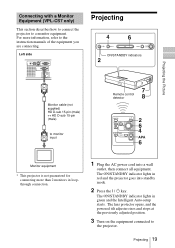
Projecting the Picture Connecting with a Monitor Equipment (VPL-CS7 only) This section describes how to connect the projector to the instruction manuals of the equipment you are connecting. For more than 2 monitors in loopthrough connection. 1 Plug the AC power cord ...into standby mode. 2 Press the I / 1 key. The ON/STANDBY indicator lights in red and the projector goes into a wall outlet, then connect all equipment. Left side AUDIO VIDEO S VIDEO INPUT A MONITOR OUT Projecting INPUT TILT MENU PUSH ENTER ON/STANDBY ...
Projecting the Picture Connecting with a Monitor Equipment (VPL-CS7 only) This section describes how to connect the projector to the instruction manuals of the equipment you are connecting. For more than 2 monitors in loopthrough connection. 1 Plug the AC power cord ...into standby mode. 2 Press the I / 1 key. The ON/STANDBY indicator lights in red and the projector goes into a wall outlet, then connect all equipment. Left side AUDIO VIDEO S VIDEO INPUT A MONITOR OUT Projecting INPUT TILT MENU PUSH ENTER ON/STANDBY ...
User Manual
Page 20
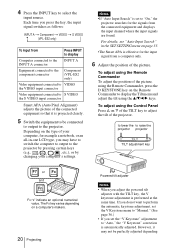
...etc.), or by changing your computer, for example a notebook, or an all-in the SET SETTING menu on the Remote Commander to raise the projector projector TILT TILT adjustment key F7 or Fx and Fn Fx:"x" indicate an optional numerical value. However, it is projected clearly. 5 Switch the equipment... to the projector. For details, see "Auto Input Search" in -one LCD type, you press the key, the input signal switches as follows: INPUT A t Component t VIDEO t S VIDEO (VPL-ES2 only) t To input from Press INPUT to display Computer ...
...etc.), or by changing your computer, for example a notebook, or an all-in the SET SETTING menu on the Remote Commander to raise the projector projector TILT TILT adjustment key F7 or Fx and Fn Fx:"x" indicate an optional numerical value. However, it is projected clearly. 5 Switch the equipment... to the projector. For details, see "Auto Input Search" in -one LCD type, you press the key, the input signal switches as follows: INPUT A t Component t VIDEO t S VIDEO (VPL-ES2 only) t To input from Press INPUT to display Computer ...

User Manual
Page 21
...you want to turn off . • Be careful not to let the projector down on your eyes. Please press I / 1 key. The ON/STANDBY indicator flashes in green and the fan continues to run for about 70 seconds (VPL-CS7)/for the first 60 seconds. Press the D KEYSTONE key on the Remote Commander... Picture on -screen message in a certain condition, you will not be occurred malfunction. 7 Turn the zoom ring to adjust the size of the projector with the powered tilt adjuster out. When you cannot confirm the onscreen message When you cannot confirm the on the room temperature or the screen...
...you want to turn off . • Be careful not to let the projector down on your eyes. Please press I / 1 key. The ON/STANDBY indicator flashes in green and the fan continues to run for about 70 seconds (VPL-CS7)/for the first 60 seconds. Press the D KEYSTONE key on the Remote Commander... Picture on -screen message in a certain condition, you will not be occurred malfunction. 7 Turn the zoom ring to adjust the size of the projector with the powered tilt adjuster out. When you cannot confirm the onscreen message When you cannot confirm the on the room temperature or the screen...
User Manual
Page 22
otherwise, the fan will stop even though the internal heat is still high, which could result in a breakdown of the projector. (VPL-ES2 only) • The internal circuitry of the Off & Go function may cause the fan to continue to operate for a short time even after the I / 1 key is still running; Notes • Do not unplug the AC power cord while the fan is pressed to turn off the power and the ON/STANDBY indicator changes to red. (VPL-CS7 only) For details, see "Off & Go Function (VPL-CS7 only)" on page 25. 22 Turning Off the Power
otherwise, the fan will stop even though the internal heat is still high, which could result in a breakdown of the projector. (VPL-ES2 only) • The internal circuitry of the Off & Go function may cause the fan to continue to operate for a short time even after the I / 1 key is still running; Notes • Do not unplug the AC power cord while the fan is pressed to turn off the power and the ON/STANDBY indicator changes to red. (VPL-CS7 only) For details, see "Off & Go Function (VPL-CS7 only)" on page 25. 22 Turning Off the Power
User Manual
Page 23
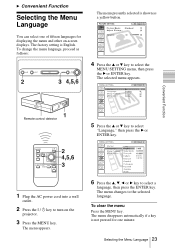
... the ENTER key. The menu disappears automatically if a key is not pressed for one of fifteen languages for displaying the menu and other on the projector. 3 Press the MENU key. B Convenient Function Selecting the Menu Language You can select one minute. The factory setting is shown as a yellow button...
... the ENTER key. The menu disappears automatically if a key is not pressed for one of fifteen languages for displaying the menu and other on the projector. 3 Press the MENU key. B Convenient Function Selecting the Menu Language You can select one minute. The factory setting is shown as a yellow button...
User Manual
Page 24
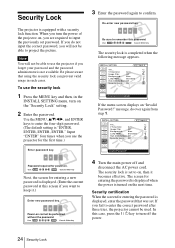
...Mode:Off Security Lock: Off Input A Invalid Password! 4 Turn the main power off the power. 24 Security Lock Security Lock The projector is turned on the next time. When you forget your password and the password administrator is completed when the following message appears. If you... are required to enter the correct password after three tries, the projector cannot be performed without the password. Input "ENTER" four times when you fail to input the previously set to confirm. Password ...
...Mode:Off Security Lock: Off Input A Invalid Password! 4 Turn the main power off the power. 24 Security Lock Security Lock The projector is turned on the next time. When you forget your password and the password administrator is completed when the following message appears. If you... are required to enter the correct password after three tries, the projector cannot be performed without the password. Input "ENTER" four times when you fail to input the previously set to confirm. Password ...


