User Instructions
Page 28
...only. If it may cause harmful interference to the equipments. 2. Plug this apparatus to Part 15 of this product. Refer servicing to Standard CSA C22.2 No.601.1. The shielded ... communications. If this unit is Non-Patient Equipment. The leakage current could void your Sony dealer regarding this equipment in the patient area*, the equipment shall be required to Standard...pursuant to cause harmful interference in which can radiate frequency energy. and Canada Model UP-897MD is used in the space provided below. When this unit causes interference (which case...
...only. If it may cause harmful interference to the equipments. 2. Plug this apparatus to Part 15 of this product. Refer servicing to Standard CSA C22.2 No.601.1. The shielded ... communications. If this unit is Non-Patient Equipment. The leakage current could void your Sony dealer regarding this equipment in the patient area*, the equipment shall be required to Standard...pursuant to cause harmful interference in which can radiate frequency energy. and Canada Model UP-897MD is used in the space provided below. When this unit causes interference (which case...
User Instructions
Page 30
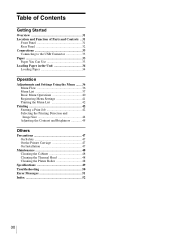
Table of Contents Getting Started Overview 31 Location and Function of Parts and Controls .. 31 Front Panel 31 Rear Panel 32 Connections 33 Connecting to the USB Connector 33 Paper 33 Paper You Can Use 33 Loading ...
Table of Contents Getting Started Overview 31 Location and Function of Parts and Controls .. 31 Front Panel 31 Rear Panel 32 Connections 33 Connecting to the USB Connector 33 Paper 33 Paper You Can Use 33 Loading ...

User Instructions
Page 31
Location and Function of Parts and Controls For more details, see "Paper" on page 33 and "Paper currently selected" on page 43. If an error occurs, a corresponding alarm message is ... for easy loading. Easy Paper Loading Free access to the door panel allows you to cancel the print job. 31 Overview / Location and Function of Parts and Controls Also, in normal operation, the paper currently selected is displayed. E BRIGHT (brightness) control (45) Adjusts the brightness of the printouts. You can make...
Location and Function of Parts and Controls For more details, see "Paper" on page 33 and "Paper currently selected" on page 43. If an error occurs, a corresponding alarm message is ... for easy loading. Easy Paper Loading Free access to the door panel allows you to cancel the print job. 31 Overview / Location and Function of Parts and Controls Also, in normal operation, the paper currently selected is displayed. E BRIGHT (brightness) control (45) Adjusts the brightness of the printouts. You can make...
User Instructions
Page 32
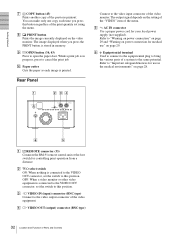
... paper as each time you press the PRINT button is stored in the medical environments" on page 29. Rear Panel Connect to bring the various parts of the video equipment. A REMOTE connector (33) Connects the RM-91 remote control unit or the foot switch for your local power supply (not ... on the setting of the "VIDEO" item of the menu. F Equipotential terminal Used to connect to the equipotential plug to the video input connector of Parts and Controls C t VIDEO IN (input) connector (BNC type) Connect to the video output connector of a system to "Warning on power connection" on page 29 ...
... paper as each time you press the PRINT button is stored in the medical environments" on page 29. Rear Panel Connect to bring the various parts of the video equipment. A REMOTE connector (33) Connects the RM-91 remote control unit or the foot switch for your local power supply (not ... on the setting of the "VIDEO" item of the menu. F Equipotential terminal Used to connect to the equipotential plug to the video input connector of Parts and Controls C t VIDEO IN (input) connector (BNC type) Connect to the video output connector of a system to "Warning on power connection" on page 29 ...
User Instructions
Page 49
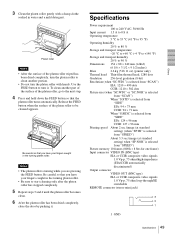
... turns automatically. Platen roller Notes • After the surface of the platen roller wiped has been dried completely, turn the platen roller to clean another part of the surface of the platen roller to the next step. 4 Press and hold down the FEED button so that you are pressing the FEED...
... turns automatically. Platen roller Notes • After the surface of the platen roller wiped has been dried completely, turn the platen roller to clean another part of the surface of the platen roller to the next step. 4 Press and hold down the FEED button so that you are pressing the FEED...
User Instructions
Page 52
Index Index C Connections 33 E Error messages 51 G Getting Started 31 L Location and function of parts and controls front panel 31 rear panel 32 M Maintenance cleaning the cabinet 48 cleaning the platen roller 48 cleaning the thermal head 48 Menu basic ...
Index Index C Connections 33 E Error messages 51 G Getting Started 31 L Location and function of parts and controls front panel 31 rear panel 32 M Maintenance cleaning the cabinet 48 cleaning the platen roller 48 cleaning the thermal head 48 Menu basic ...
