User Instructions
Page 28
...expressly approved in accordance with the instruction manual, may cause interference to Subpart B of Part 15 of FCC Rules. To avoid electrical shock, do not expose this apparatus to ... Patient Area R1.5m 3. Refer servicing to the susceptible equipment. and Canada Model UP-897MD is intended to alert the user to the same potential. Operation of important operating and ...maintenance (servicing) instructions in the medical environments 1. The leakage current could void your Sony dealer regarding this equipment in a residential area is certified according to rain or moisture....
...expressly approved in accordance with the instruction manual, may cause interference to Subpart B of Part 15 of FCC Rules. To avoid electrical shock, do not expose this apparatus to ... Patient Area R1.5m 3. Refer servicing to the susceptible equipment. and Canada Model UP-897MD is intended to alert the user to the same potential. Operation of important operating and ...maintenance (servicing) instructions in the medical environments 1. The leakage current could void your Sony dealer regarding this equipment in a residential area is certified according to rain or moisture....
User Instructions
Page 30
Table of Contents Getting Started Overview 31 Location and Function of Parts and Controls .. 31 Front Panel 31 Rear Panel 32 Connections 33 Connecting to the USB Connector 33 Paper 33 Paper You Can Use 33 Loading ...
Table of Contents Getting Started Overview 31 Location and Function of Parts and Controls .. 31 Front Panel 31 Rear Panel 32 Connections 33 Connecting to the USB Connector 33 Paper 33 Paper You Can Use 33 Loading ...

User Instructions
Page 31
...progress, press to meet your requirements using a menu You can store up the settings to cancel the print job. 31 Overview / Location and Function of Parts and Controls For more details, see "Paper" on page 33 and "Paper currently selected" on . Easy Paper Loading Free access to the door panel ... operations, menu items and settings are displayed C Jog dial (40, 48) Used to drop paper into the unit for easy loading. Location and Function of Parts and Controls F FEED button (35, 43) Hold down to turn the power on page 43. Front Panel A !Power ON/OFF Switch (34, 40, 42,...
...progress, press to meet your requirements using a menu You can store up the settings to cancel the print job. 31 Overview / Location and Function of Parts and Controls For more details, see "Paper" on page 33 and "Paper currently selected" on . Easy Paper Loading Free access to the door panel ... operations, menu items and settings are displayed C Jog dial (40, 48) Used to drop paper into the unit for easy loading. Location and Function of Parts and Controls F FEED button (35, 43) Hold down to turn the power on page 43. Front Panel A !Power ON/OFF Switch (34, 40, 42,...
User Instructions
Page 32
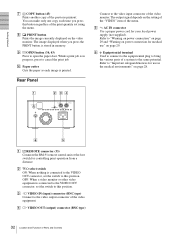
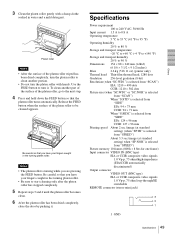
... using the menu. You can make only one copy each image is connected to the VIDEO OUT connector, set the switch to bring the various parts of the video monitor. H PRINT button Prints the image currently displayed on page 28. The output signal depends on page 29. OFF: When a .... Refer to "Warning on power connection" on page 29 and "Warning on power connection for use " on the setting of the "VIDEO" item of Parts and Controls B 75 Ω select switch ON: When nothing is printed. Refer to "Important safeguards/notices for medical use in the medical environments" on ...
... using the menu. You can make only one copy each image is connected to the VIDEO OUT connector, set the switch to bring the various parts of the video monitor. H PRINT button Prints the image currently displayed on page 28. The output signal depends on page 29. OFF: When a .... Refer to "Warning on power connection" on page 29 and "Warning on power connection for use " on the setting of the "VIDEO" item of Parts and Controls B 75 Ω select switch ON: When nothing is printed. Refer to "Important safeguards/notices for medical use in the medical environments" on ...
User Instructions
Page 49
Use the FEED button to turn the platen roller to clean another part of the surface of the platen roller, go to the next step. 4 Press and hold down the FEED button so that the platen roller turns ...
Use the FEED button to turn the platen roller to clean another part of the surface of the platen roller, go to the next step. 4 Press and hold down the FEED button so that the platen roller turns ...
User Instructions
Page 52
Index Index C Connections 33 E Error messages 51 G Getting Started 31 L Location and function of parts and controls front panel 31 rear panel 32 M Maintenance cleaning the cabinet 48 cleaning the platen roller 48 cleaning the thermal head 48 Menu basic ...
Index Index C Connections 33 E Error messages 51 G Getting Started 31 L Location and function of parts and controls front panel 31 rear panel 32 M Maintenance cleaning the cabinet 48 cleaning the platen roller 48 cleaning the thermal head 48 Menu basic ...
