User Instructions
Page 30
... a Print Job 42 Selecting the Printing Direction and Image Size 44 Adjusting the Contrast and Brightness 45 Others Precautions 47 On Safety 47 On the Printer Carriage 47 On Installation 47 Maintenance 48 Cleaning the Cabinet 48 Cleaning the Thermal Head 48 Cleaning the Platen Roller 48 Specifications 49 Troubleshooting 50...
... a Print Job 42 Selecting the Printing Direction and Image Size 44 Adjusting the Contrast and Brightness 45 Others Precautions 47 On Safety 47 On the Printer Carriage 47 On Installation 47 Maintenance 48 Cleaning the Cabinet 48 Cleaning the Thermal Head 48 Cleaning the Platen Roller 48 Specifications 49 Troubleshooting 50...

User Instructions
Page 31
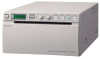
... requirements using a menu You can store up the settings to cancel the print job. 31 Overview / Location and Function of the printouts. Easy printer settings using a menu. The back light on the LCD. Also, in normal operation, the paper currently selected is indicated by the pointer on.... Front Panel A !Power ON/OFF Switch (34, 40, 42, 48) Press to switch to ON to three settings as a set of the printouts. B Printer window display (LCD: liquid crystal display) (36, 42) The back light lights in parentheses (). D CONTR (contrast) control (45) Adjusts the contrast of user settings...
... requirements using a menu You can store up the settings to cancel the print job. 31 Overview / Location and Function of the printouts. Easy printer settings using a menu. The back light on the LCD. Also, in normal operation, the paper currently selected is indicated by the pointer on.... Front Panel A !Power ON/OFF Switch (34, 40, 42, 48) Press to switch to ON to three settings as a set of the printouts. B Printer window display (LCD: liquid crystal display) (36, 42) The back light lights in parentheses (). D CONTR (contrast) control (45) Adjusts the contrast of user settings...

User Instructions
Page 33
...copy sheet. • To mount printouts on another sheet of paper, use with this position. Paper Use only Sony UPP-110S/110HD/110HG paper designed for the UP-880/890MD series printer. Storing printouts • To prevent printouts from fading or changing color, store them in a cool, dry ...Paper You Can Use Print paper characteristics are as specified for use double-sides tape or a water base adhesive. • Do not incinerate waste printer paper. 33 Connections / Paper Getting Started Connections Notes • Turn off the power to blur. • After removing the label from the...
...copy sheet. • To mount printouts on another sheet of paper, use with this position. Paper Use only Sony UPP-110S/110HD/110HG paper designed for the UP-880/890MD series printer. Storing printouts • To prevent printouts from fading or changing color, store them in a cool, dry ...Paper You Can Use Print paper characteristics are as specified for use double-sides tape or a water base adhesive. • Do not incinerate waste printer paper. 33 Connections / Paper Getting Started Connections Notes • Turn off the power to blur. • After removing the label from the...
User Instructions
Page 39
... SC:WD2 is as that displayed on the LCD. SPEED To select the (When printing speed "ME:HD" is selected in which rotated by the printer. [VI:THR]: Outputs the signal directly without processing. BACK: Cancels the setting change and returns to the item selection column. When DI:NOR is selected...
... SC:WD2 is as that displayed on the LCD. SPEED To select the (When printing speed "ME:HD" is selected in which rotated by the printer. [VI:THR]: Outputs the signal directly without processing. BACK: Cancels the setting change and returns to the item selection column. When DI:NOR is selected...

User Instructions
Page 43
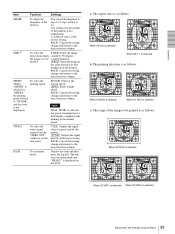
... the menu. 43 Printing As the number increases, the image displayed becomes older. 3 Display the image that you want to the paper currently selected. The printer start printing two images on one sheet. 1 Select "MU:MLT" in the "MULTI" menu item. 2 Press the PRINT button in step 3, following figure, the currently...
... the menu. 43 Printing As the number increases, the image displayed becomes older. 3 Display the image that you want to the paper currently selected. The printer start printing two images on one sheet. 1 Select "MU:MLT" in the "MULTI" menu item. 2 Press the PRINT button in step 3, following figure, the currently...

User Instructions
Page 44
... COPY button after turning the power on, the alarm buzzer will sound as nothing is stored in memory. • Turning off the power of the printer will cause the image stored in memory to be printed. SFT.H and SFT.V: Sets the printing range vertically and horizontally. Selecting the printing direction You...
... COPY button after turning the power on, the alarm buzzer will sound as nothing is stored in memory. • Turning off the power of the printer will cause the image stored in memory to be printed. SFT.H and SFT.V: Sets the printing range vertically and horizontally. Selecting the printing direction You...
User Instructions
Page 47
... protective earth terminal. Avoid locations near materials such as curtains and draperies. • To prevent internal heat built-up, leave enough room around the printer for a long time. Unplug the unit and have it is placed in "Specifications". • Stop operation immediately if any liquid or solid object ... off the power and allow the unit to prevent heat buildup. Precautions On Safety • Check the operating voltage before operation. On the Printer Carriage Do not carry or move the unit when the paper roll is left hand side and the ventilation holes (exhaust) on a level and...
... protective earth terminal. Avoid locations near materials such as curtains and draperies. • To prevent internal heat built-up, leave enough room around the printer for a long time. Unplug the unit and have it is placed in "Specifications". • Stop operation immediately if any liquid or solid object ... off the power and allow the unit to prevent heat buildup. Precautions On Safety • Check the operating voltage before operation. On the Printer Carriage Do not carry or move the unit when the paper roll is left hand side and the ventilation holes (exhaust) on a level and...
User Instructions
Page 49
... pressing the FEED button. Use the FEED button to 90 % Dimensions 154 × 88 × 240 mm (w/h/d) (6 1/6 × 3 1/2 × 9 1/2 inches) Mass 2.6 kg (5 lb 11 oz) (printer only) Thermal head Thin-film thermal head, 1280 dots Gradation 256-level gradation (8-bit) Resolution (when "SC:WD1" is selected from "SCAN") EIA: 1210 ×...
... pressing the FEED button. Use the FEED button to 90 % Dimensions 154 × 88 × 240 mm (w/h/d) (6 1/6 × 3 1/2 × 9 1/2 inches) Mass 2.6 kg (5 lb 11 oz) (printer only) Thermal head Thin-film thermal head, 1280 dots Gradation 256-level gradation (8-bit) Resolution (when "SC:WD1" is selected from "SCAN") EIA: 1210 ×...
User Instructions
Page 52
... settings 41 O Overview 31 P Paper loading 34 notes on storing and handling 33 paper you can use 33 Precautions on installation 47 paper cutter 47 printer carriage 47 safety 47 Printing adjusting the brightness 45 adjusting the contrast 45 cancelling 43 staring a print job 42 S Specifications 49 T Troubleshooting 50 52 Index
... settings 41 O Overview 31 P Paper loading 34 notes on storing and handling 33 paper you can use 33 Precautions on installation 47 paper cutter 47 printer carriage 47 safety 47 Printing adjusting the brightness 45 adjusting the contrast 45 cancelling 43 staring a print job 42 S Specifications 49 T Troubleshooting 50 52 Index


