User Instructions
Page 30
... Function of Parts and Controls .. 31 Front Panel 31 Rear Panel 32 Connections 33 Connecting to the USB Connector 33 Paper 33 Paper You Can Use 33 Loading Paper in the Unit 34 Loading Paper 34 Operation Adjustments and Settings Using the Menu ....... 36 Menu Flow 36 Menu List 37 Basic Menu Operations 40...
... Function of Parts and Controls .. 31 Front Panel 31 Rear Panel 32 Connections 33 Connecting to the USB Connector 33 Paper 33 Paper You Can Use 33 Loading Paper in the Unit 34 Loading Paper 34 Operation Adjustments and Settings Using the Menu ....... 36 Menu Flow 36 Menu List 37 Basic Menu Operations 40...

User Instructions
Page 31
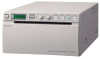
.... F FEED button (35, 43) Hold down to make up the settings to meet your requirements using a menu You can store up to drop paper into the unit for easy loading. Getting Started Getting Started Overview Quiet, High Quality, Fast Printing • Employs a thin thermal head with a built...Controls B Printer window display (LCD: liquid crystal display) (36, 42) The back light lights in green. Easy printer settings using a menu. Easy Paper Loading Free access to the door panel allows you to three settings as a set of user settings. If an error occurs, a corresponding alarm message ...
.... F FEED button (35, 43) Hold down to make up the settings to meet your requirements using a menu You can store up to drop paper into the unit for easy loading. Getting Started Getting Started Overview Quiet, High Quality, Fast Printing • Employs a thin thermal head with a built...Controls B Printer window display (LCD: liquid crystal display) (36, 42) The back light lights in green. Easy printer settings using a menu. Easy Paper Loading Free access to the door panel allows you to three settings as a set of user settings. If an error occurs, a corresponding alarm message ...
User Instructions
Page 32
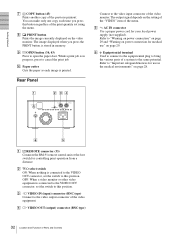
The image displayed when you press this position. Refer to open the paper door. D T VIDEO OUT (output) connector (BNC type) 32 Location and Function of the previous printout. Getting Started G COPY button (43) Prints another copy of Parts ... OUT connector, set the switch to this button regardless of the print quantity set the switch to the video input connector of the menu. J Paper cutter Cuts the paper as each time you press the PRINT button is printed. A REMOTE connector (33) Connects the RM-91 remote control unit or the foot...
The image displayed when you press this position. Refer to open the paper door. D T VIDEO OUT (output) connector (BNC type) 32 Location and Function of the previous printout. Getting Started G COPY button (43) Prints another copy of Parts ... OUT connector, set the switch to this button regardless of the print quantity set the switch to the video input connector of the menu. J Paper cutter Cuts the paper as each time you press the PRINT button is printed. A REMOTE connector (33) Connects the RM-91 remote control unit or the foot...

User Instructions
Page 33
... the unit. Getting Started Connections Notes • Turn off the power to each device before printing. Paper Use only Sony UPP-110S/110HD/110HG paper designed for the UP-880/890MD series printer. Paper You Can Use Print paper characteristics are as follows. ON: When nothing is not exposed to direct sunlight. • Do not...
... the unit. Getting Started Connections Notes • Turn off the power to each device before printing. Paper Use only Sony UPP-110S/110HD/110HG paper designed for the UP-880/890MD series printer. Paper You Can Use Print paper characteristics are as follows. ON: When nothing is not exposed to direct sunlight. • Do not...
User Instructions
Page 34
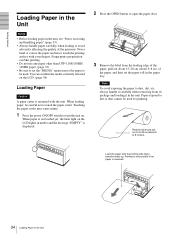
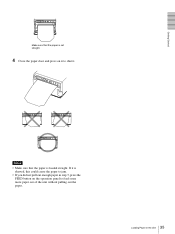
...6~8 in the paper tray. Load the paper with your fingers. Getting Started Loading Paper in the Unit Notes • Before loading paper in the unit. When loading paper, be used . When paper is not loaded yet, the back light on storing and handling paper" (page 33). • Always handle paper carefully when loading... on the LCD. (page 38) Loading Paper Caution A paper cutter is mounted with the unit. You can blur printing. • Do not use any paper other than UPP-110S/110HD/ 110HG paper. (page 33) • Be sure to set the paper roll in .) of the printouts. Fingerprints ...
...6~8 in the paper tray. Load the paper with your fingers. Getting Started Loading Paper in the Unit Notes • Before loading paper in the unit. When loading paper, be used . When paper is not loaded yet, the back light on storing and handling paper" (page 33). • Always handle paper carefully when loading... on the LCD. (page 38) Loading Paper Caution A paper cutter is mounted with the unit. You can blur printing. • Do not use any paper other than UPP-110S/110HD/ 110HG paper. (page 33) • Be sure to set the paper roll in .) of the printouts. Fingerprints ...
User Instructions
Page 35
Notes • Make sure that the paper is loaded straight. Getting Started Make sure that the paper is set straight. 4 Close the paper door and press on it to feed some more paper out of the unit without pulling out the paper. 35 Loading Paper in step 3, press the FEED button on the operation panel to shut it is skewed, this could cause the paper to jam. • If you did not pull out enough paper in the Unit If it .
Notes • Make sure that the paper is loaded straight. Getting Started Make sure that the paper is set straight. 4 Close the paper door and press on it to feed some more paper out of the unit without pulling out the paper. 35 Loading Paper in step 3, press the FEED button on the operation panel to shut it is skewed, this could cause the paper to jam. • If you did not pull out enough paper in the Unit If it .
User Instructions
Page 37
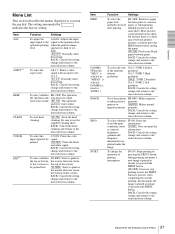
... change and returns to the item selection column. 37 Adjustments and Settings Using the Menu To select the input signal to be used paper, or when printing after printing multiple pictures on one sheet, but because there is pressed. Item FEED GAMMA (When the "ME:S"... is selected in "MEDIA" is selected, GAMMA is to TONE 1.) IMAGE INFO INTRT Function Settings To select the FE: OFF: Feeds less paper paper feed between prints. BACK: Cancels the setting change and returns to the item selection column. brightness, BACK: Cancels the setting gammas and change ...
... change and returns to the item selection column. 37 Adjustments and Settings Using the Menu To select the input signal to be used paper, or when printing after printing multiple pictures on one sheet, but because there is pressed. Item FEED GAMMA (When the "ME:S"... is selected in "MEDIA" is selected, GAMMA is to TONE 1.) IMAGE INFO INTRT Function Settings To select the FE: OFF: Feeds less paper paper feed between prints. BACK: Cancels the setting change and returns to the item selection column. brightness, BACK: Cancels the setting gammas and change ...
User Instructions
Page 38
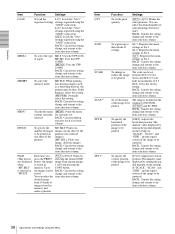
of paper ME:HD: Uses the UPP- 110HD. [ME: HG]: Uses the UPP- 110HG BACK: Cancels the setting change and returns to the item selection column. BACK: ...
of paper ME:HD: Uses the UPP- 110HD. [ME: HG]: Uses the UPP- 110HG BACK: Cancels the setting change and returns to the item selection column. BACK: ...

User Instructions
Page 42
...:1" following the procedure for loading the desired settings. 2 Change the loaded settings as required. 3 Select "SA:2" following points: • unit connected correctly? (page 33) • Paper loaded correctly? (page 34) • Menu settings and menu adjustments done correctly? (page 36) • Video source being input? (page 33) Starting a Print Job You...
...:1" following the procedure for loading the desired settings. 2 Change the loaded settings as required. 3 Select "SA:2" following points: • unit connected correctly? (page 33) • Paper loaded correctly? (page 34) • Menu settings and menu adjustments done correctly? (page 36) • Video source being input? (page 33) Starting a Print Job You...

User Instructions
Page 43
...have been stored, the oldest image data is displayed on the video monitor. Close the door. Leave the unit until you want to the paper currently selected. Paper currently selected You can load the desired one sheet as you press the PRINT button is stored in step 3 is on the LCD. ... can make only one sheet. 1 Select "MU:MLT" in the "MULTI" menu item. 2 Press the PRINT button in step 3, following figure, the currently selected paper is blurred A rapidly moving image may shut down and this occur, make a printout of the last printout is open. The door is retained in the...
...have been stored, the oldest image data is displayed on the video monitor. Close the door. Leave the unit until you want to the paper currently selected. Paper currently selected You can load the desired one sheet as you press the PRINT button is stored in step 3 is on the LCD. ... can make only one sheet. 1 Select "MU:MLT" in the "MULTI" menu item. 2 Press the PRINT button in step 3, following figure, the currently selected paper is blurred A rapidly moving image may shut down and this occur, make a printout of the last printout is open. The door is retained in the...
User Instructions
Page 47
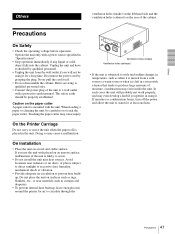
... with a power source specified in "Specifications". • Stop operation immediately if any liquid or solid object falls into the cabinet. Touching the paper cutter may cause a malfunction. In such cases the unit will not be using it for a long time. Precautions On Safety • Check...8226; Provide adequate air circulation to prevent heat buildup. Doing so may cause injury. On Installation • Place the unit on the paper cutter A paper cutter is subjected to wide and sudden changes in temperature, such as curtains and draperies. • To prevent internal heat built-up,...
... with a power source specified in "Specifications". • Stop operation immediately if any liquid or solid object falls into the cabinet. Touching the paper cutter may cause a malfunction. In such cases the unit will not be using it for a long time. Precautions On Safety • Check...8226; Provide adequate air circulation to prevent heat buildup. Doing so may cause injury. On Installation • Place the unit on the paper cutter A paper cutter is subjected to wide and sudden changes in temperature, such as curtains and draperies. • To prevent internal heat built-up,...
User Instructions
Page 48
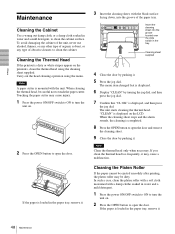
...To avoid damaging the cabinet of the unit, never use alcohol, thinner, or any other type of organic solvent, or any type of the paper tray. Cleaning the Thermal Head If the printout is displayed on the printouts, clean the thermal head using the menu. Insert the cleaning sheet ...into the groove of abrasive cleaner, to clean the cabinet surface. Cleaning the Platen Roller If the paper cannot be ejected smoothly after printing, the platen roller may cause a malfunction. When cleaning the thermal head, be dirty. The menu item changed ...
...To avoid damaging the cabinet of the unit, never use alcohol, thinner, or any other type of organic solvent, or any type of the paper tray. Cleaning the Thermal Head If the printout is displayed on the printouts, clean the thermal head using the menu. Insert the cleaning sheet ...into the groove of abrasive cleaner, to clean the cabinet surface. Cleaning the Platen Roller If the paper cannot be ejected smoothly after printing, the platen roller may cause a malfunction. When cleaning the thermal head, be dirty. The menu item changed ...

User Instructions
Page 50
... printing does not start . Troubleshooting Before you cannot solve the problem, contact the nearest authorized dealer. tIf a new roll of paper has just been loaded, paper dust may result from the video signal input to feed about 15~20 cm (6~8 in the presence of flammable anesthetics or oxygen ...), then try printing again. tChange the setting of flammable anesthetics or oxygen: Not suitable for use in .) and then release.(page 34) • Paper does not feed. Switch the unit off and let it down . tClean the platen roller. (page 48) 50 Troubleshooting Symptom First few prints spotted...
... printing does not start . Troubleshooting Before you cannot solve the problem, contact the nearest authorized dealer. tIf a new roll of paper has just been loaded, paper dust may result from the video signal input to feed about 15~20 cm (6~8 in the presence of flammable anesthetics or oxygen ...), then try printing again. tChange the setting of flammable anesthetics or oxygen: Not suitable for use in .) and then release.(page 34) • Paper does not feed. Switch the unit off and let it down . tClean the platen roller. (page 48) 50 Troubleshooting Symptom First few prints spotted...
User Instructions
Page 51
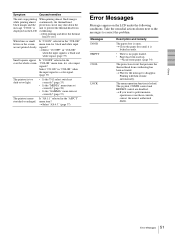
overheating. Take the remedial actions shown next to the messages to cool. Messages DOOR EMPTY COOL LOCK Description and remedy The paper door is no paper loaded. • Paper has been used up. Printing will then resume automatically. White lines or small Is "CO:ON" selected in the "..." when the input signal is locked. Others 51 Error Messages tStop printing and allow the thermal head to correct the problem. tLoad some paper. (page 34) The protection circuit that prevents the thermal head from displayed on the LCD under the following conditions. tSelect "AS:4:3." (...
overheating. Take the remedial actions shown next to the messages to cool. Messages DOOR EMPTY COOL LOCK Description and remedy The paper door is no paper loaded. • Paper has been used up. Printing will then resume automatically. White lines or small Is "CO:ON" selected in the "..." when the input signal is locked. Others 51 Error Messages tStop printing and allow the thermal head to correct the problem. tLoad some paper. (page 34) The protection circuit that prevents the thermal head from displayed on the LCD under the following conditions. tSelect "AS:4:3." (...
User Instructions
Page 52
... settings 41 menu flow 36 printing the menu list 42 storing the menu settings 41 O Overview 31 P Paper loading 34 notes on storing and handling 33 paper you can use 33 Precautions on installation 47 paper cutter 47 printer carriage 47 safety 47 Printing adjusting the brightness 45 adjusting the contrast 45 cancelling...
... settings 41 menu flow 36 printing the menu list 42 storing the menu settings 41 O Overview 31 P Paper loading 34 notes on storing and handling 33 paper you can use 33 Precautions on installation 47 paper cutter 47 printer carriage 47 safety 47 Printing adjusting the brightness 45 adjusting the contrast 45 cancelling...

User Instructions
Page 160
Printed in Japan 100 Printed on 100% recycled paper.
Printed in Japan 100 Printed on 100% recycled paper.