User Instructions
Page 30
... Function of Parts and Controls .. 31 Front Panel 31 Rear Panel 32 Connections 33 Connecting to the USB Connector 33 Paper 33 Paper You Can Use 33 Loading Paper in the Unit 34 Loading Paper 34 Operation Adjustments and Settings Using the Menu ....... 36 Menu Flow 36 Menu List 37 Basic Menu Operations 40... and Brightness 45 Others Precautions 47 On Safety 47 On the Printer Carriage 47 On Installation 47 Maintenance 48 Cleaning the Cabinet 48 Cleaning the Thermal Head 48 Cleaning the Platen Roller 48 Specifications 49 Troubleshooting 50 Error Messages 51 Index 52 30
... Function of Parts and Controls .. 31 Front Panel 31 Rear Panel 32 Connections 33 Connecting to the USB Connector 33 Paper 33 Paper You Can Use 33 Loading Paper in the Unit 34 Loading Paper 34 Operation Adjustments and Settings Using the Menu ....... 36 Menu Flow 36 Menu List 37 Basic Menu Operations 40... and Brightness 45 Others Precautions 47 On Safety 47 On the Printer Carriage 47 On Installation 47 Maintenance 48 Cleaning the Cabinet 48 Cleaning the Thermal Head 48 Cleaning the Platen Roller 48 Specifications 49 Troubleshooting 50 Error Messages 51 Index 52 30

User Instructions
Page 31
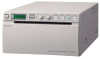
..., 40, 42, 48) Press to switch to ON to make up to meet your requirements using a menu. Also, in normal operation, the paper currently selected is in progress, press to cancel the print job. 31 Overview / Location and Function of Parts and Controls If an error occurs, ...the brightness of user settings. F FEED button (35, 43) Hold down to drop paper into the unit for easy loading. Getting Started Getting Started Overview Quiet, High Quality, Fast Printing • Employs a thin thermal head with up to 256 shades of gradation. • Built-in temperature correction circuits ...
..., 40, 42, 48) Press to switch to ON to make up to meet your requirements using a menu. Also, in normal operation, the paper currently selected is in progress, press to cancel the print job. 31 Overview / Location and Function of Parts and Controls If an error occurs, ...the brightness of user settings. F FEED button (35, 43) Hold down to drop paper into the unit for easy loading. Getting Started Getting Started Overview Quiet, High Quality, Fast Printing • Employs a thin thermal head with up to 256 shades of gradation. • Built-in temperature correction circuits ...

User Instructions
Page 43
...and brightness of the print quantity set using the menu. 1 Select "PAGE" from overheating. Close the door. Do not attempt to prevent the thermal head from among the menu items. Image captured Image captured in step 2 in step 3 When "IF:ON" is captured. 3 Press the... open. When the unit stops printing during printing When printing almost black images continuously, the thermal head protection circuit may be blurred when printed. Load paper. The image selected in memory. Printing images stored in sequence. The unit makes a copy of the Last Printout Press the ...
...and brightness of the print quantity set using the menu. 1 Select "PAGE" from overheating. Close the door. Do not attempt to prevent the thermal head from among the menu items. Image captured Image captured in step 2 in step 3 When "IF:ON" is captured. 3 Press the... open. When the unit stops printing during printing When printing almost black images continuously, the thermal head protection circuit may be blurred when printed. Load paper. The image selected in memory. Printing images stored in sequence. The unit makes a copy of the Last Printout Press the ...
User Instructions
Page 48
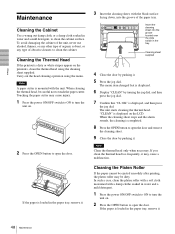
...avoid damaging the cabinet of the unit, never use alcohol, thinner, or any other type of organic solvent, or any type of the paper tray. If you clean the thermal head too frequently, it may cause injury. 1 Press the power ON/OFF switch to ON to turn the unit on . 2 ... jog dial. The unit starts cleaning the thermal head. Note Clean the thermal head only when necessary. Cleaning the Thermal Head If the printout is loaded in the paper tray, remove it . 5 Press the jog dial. Touching the paper cutter may cause a malfunction. If the paper is dirty or white stripes appear on the...
...avoid damaging the cabinet of the unit, never use alcohol, thinner, or any other type of organic solvent, or any type of the paper tray. If you clean the thermal head too frequently, it may cause injury. 1 Press the power ON/OFF switch to ON to turn the unit on . 2 ... jog dial. The unit starts cleaning the thermal head. Note Clean the thermal head only when necessary. Cleaning the Thermal Head If the printout is loaded in the paper tray, remove it . 5 Press the jog dial. Touching the paper cutter may cause a malfunction. If the paper is dirty or white stripes appear on the...

User Instructions
Page 50
... in the presence of flammable anesthetics or oxygen Mode of paper has just been loaded, paper dust may overheat when the unit prints dark image continuously. tPaper loaded correctly? (page 34) tHas the thermal head overheated? tChange the setting of LOW pulse over 100... msec. tClean the platen roller. (page 48) 50 Troubleshooting Causes/remedies New paper roll just installed? tPower switched on? initiates print. 3 PRINT BUSY (TTL) Goes HIGH during printing Accessories provided Thermal head cleaning sheet (1) Media label (1) Operating Instructions (1) Service Contact List (1) Medical...
... in the presence of flammable anesthetics or oxygen Mode of paper has just been loaded, paper dust may overheat when the unit prints dark image continuously. tPaper loaded correctly? (page 34) tHas the thermal head overheated? tChange the setting of LOW pulse over 100... msec. tClean the platen roller. (page 48) 50 Troubleshooting Causes/remedies New paper roll just installed? tPower switched on? initiates print. 3 PRINT BUSY (TTL) Goes HIGH during printing Accessories provided Thermal head cleaning sheet (1) Media label (1) Operating Instructions (1) Service Contact List (1) Medical...
User Instructions
Page 51
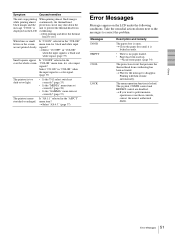
... input signal is open. menu item? Printing will then resume automatically. tStop printing and allow the thermal head to correct the problem. Messages DOOR EMPTY COOL LOCK Description and remedy The paper door is a black and white signal. (page 37) Small squares appear Is "CO:OFF" selected...Messages Messages appear on the LCD. Take the remedial actions shown next to the messages to cool. tLoad some paper. (page 34) The protection circuit that prevents the thermal head from displayed on the LCD under the following conditions. tIf you want to disappear. overheating. tWait for ...
... input signal is open. menu item? Printing will then resume automatically. tStop printing and allow the thermal head to correct the problem. Messages DOOR EMPTY COOL LOCK Description and remedy The paper door is a black and white signal. (page 37) Small squares appear Is "CO:OFF" selected...Messages Messages appear on the LCD. Take the remedial actions shown next to the messages to cool. tLoad some paper. (page 34) The protection circuit that prevents the thermal head from displayed on the LCD under the following conditions. tIf you want to disappear. overheating. tWait for ...
User Instructions
Page 52
... and function of parts and controls front panel 31 rear panel 32 M Maintenance cleaning the cabinet 48 cleaning the platen roller 48 cleaning the thermal head 48 Menu basic operations 40 list 37 loading the menu settings 41 menu flow 36 printing the menu list 42 storing the menu settings... 41 O Overview 31 P Paper loading 34 notes on storing and handling 33 paper you can use 33 Precautions on installation 47 paper cutter 47 printer carriage 47 safety 47 Printing adjusting the brightness 45 adjusting the contrast 45 cancelling...
... and function of parts and controls front panel 31 rear panel 32 M Maintenance cleaning the cabinet 48 cleaning the platen roller 48 cleaning the thermal head 48 Menu basic operations 40 list 37 loading the menu settings 41 menu flow 36 printing the menu list 42 storing the menu settings... 41 O Overview 31 P Paper loading 34 notes on storing and handling 33 paper you can use 33 Precautions on installation 47 paper cutter 47 printer carriage 47 safety 47 Printing adjusting the brightness 45 adjusting the contrast 45 cancelling...
