User Instructions
Page 30
... Function of Parts and Controls .. 31 Front Panel 31 Rear Panel 32 Connections 33 Connecting to the USB Connector 33 Paper 33 Paper You Can Use 33 Loading Paper in the Unit 34 Loading Paper 34 Operation Adjustments and Settings Using the Menu ....... 36 Menu Flow 36 Menu List 37 Basic Menu Operations 40...
... Function of Parts and Controls .. 31 Front Panel 31 Rear Panel 32 Connections 33 Connecting to the USB Connector 33 Paper 33 Paper You Can Use 33 Loading Paper in the Unit 34 Loading Paper 34 Operation Adjustments and Settings Using the Menu ....... 36 Menu Flow 36 Menu List 37 Basic Menu Operations 40...

User Instructions
Page 31
... parentheses (). D CONTR (contrast) control (45) Adjusts the contrast of the printouts. You can make menu operations. The back light on the paper, see the referenced page numbers enclosed in green. Also, in progress, press to cancel the print job. 31 Overview / Location and Function of... Parts and Controls E BRIGHT (brightness) control (45) Adjusts the brightness of the printouts. While a print job is in normal operation, the paper currently selected is indicated by the pointer on . B Printer window display (LCD: liquid crystal display) (36, 42) The back light lights in ...
... parentheses (). D CONTR (contrast) control (45) Adjusts the contrast of the printouts. You can make menu operations. The back light on the paper, see the referenced page numbers enclosed in green. Also, in progress, press to cancel the print job. 31 Overview / Location and Function of... Parts and Controls E BRIGHT (brightness) control (45) Adjusts the brightness of the printouts. While a print job is in normal operation, the paper currently selected is indicated by the pointer on . B Printer window display (LCD: liquid crystal display) (36, 42) The back light lights in ...
User Instructions
Page 32
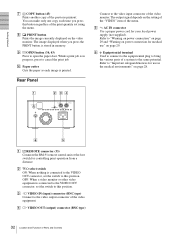
..." on page 29. C t VIDEO IN (input) connector (BNC type) Connect to bring the various parts of the print quantity set the switch to open the paper door. D T VIDEO OUT (output) connector (BNC type) 32 Location and Function of the video equipment. Refer to cancel the print job. E - The output signal depends... on the video monitor. A REMOTE connector (33) Connects the RM-91 remote control unit or the foot switch for your local power supply (not supplied). J Paper cutter Cuts the paper as each time you press the PRINT button is in memory.
..." on page 29. C t VIDEO IN (input) connector (BNC type) Connect to bring the various parts of the print quantity set the switch to open the paper door. D T VIDEO OUT (output) connector (BNC type) 32 Location and Function of the video equipment. Refer to cancel the print job. E - The output signal depends... on the video monitor. A REMOTE connector (33) Connects the RM-91 remote control unit or the foot switch for your local power supply (not supplied). J Paper cutter Cuts the paper as each time you press the PRINT button is in memory.

User Instructions
Page 33
Paper Use only Sony UPP-110S/110HD/110HG paper designed for the UP-880/890MD series printer. Paper You Can Use Print paper characteristics are as follows. Loading paper • Handle the paper carefully when loading to - ON: When nothing is connected to the VIDEO OUT connector, set... double-sides tape or a water base adhesive. • Do not incinerate waste printer paper. 33 Connections / Paper Label adhesive remaining on storing and handling paper Storing unused paper • Stored unused paper at a temperature below 30°C (86°F) in a polypropylene pouch or between ...
Paper Use only Sony UPP-110S/110HD/110HG paper designed for the UP-880/890MD series printer. Paper You Can Use Print paper characteristics are as follows. Loading paper • Handle the paper carefully when loading to - ON: When nothing is connected to the VIDEO OUT connector, set... double-sides tape or a water base adhesive. • Do not incinerate waste printer paper. 33 Connections / Paper Label adhesive remaining on storing and handling paper Storing unused paper • Stored unused paper at a temperature below 30°C (86°F) in a polypropylene pouch or between ...
User Instructions
Page 34
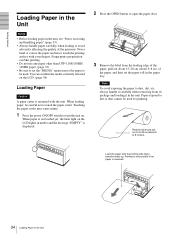
... printing side (heat sensitive side) up. You can blur printing. • Do not use any paper other than UPP-110S/110HD/ 110HG paper. (page 33) • Be sure to set the paper roll in the Unit Load the paper with your fingers. Remove label and pull out 15 to 20 cm (about 6~8 in.) of... the paper, pull out about 15~20 cm (about 6 to turn the unit on the LCD. (page 38) Loading Paper Caution A paper cutter is reversed. 34 Loading Paper in the paper tray. Touching the paper cutter may cause injury. 1 Press the power ON/OFF switch to...
... printing side (heat sensitive side) up. You can blur printing. • Do not use any paper other than UPP-110S/110HD/ 110HG paper. (page 33) • Be sure to set the paper roll in the Unit Load the paper with your fingers. Remove label and pull out 15 to 20 cm (about 6~8 in.) of... the paper, pull out about 15~20 cm (about 6 to turn the unit on the LCD. (page 38) Loading Paper Caution A paper cutter is reversed. 34 Loading Paper in the paper tray. Touching the paper cutter may cause injury. 1 Press the power ON/OFF switch to...
User Instructions
Page 35
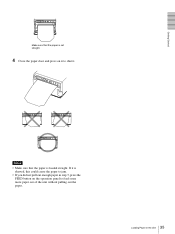
If it . Notes • Make sure that the paper is set straight. 4 Close the paper door and press on the operation panel to shut it is loaded straight. Getting Started Make sure that the paper is skewed, this could cause the paper to jam. • If you did not pull out enough paper in step 3, press the FEED button on it to feed some more paper out of the unit without pulling out the paper. 35 Loading Paper in the Unit
If it . Notes • Make sure that the paper is set straight. 4 Close the paper door and press on the operation panel to shut it is loaded straight. Getting Started Make sure that the paper is skewed, this could cause the paper to jam. • If you did not pull out enough paper in step 3, press the FEED button on it to feed some more paper out of the unit without pulling out the paper. 35 Loading Paper in the Unit
User Instructions
Page 37
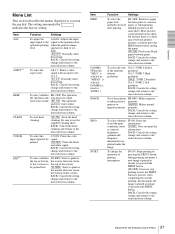
... and returns to the top of the screen is fixed to TONE 1.) IMAGE INFO INTRT Function Settings To select the FE: OFF: Feeds less paper paper feed between prints. To select whether DI: REV: Starts to print in the top or bottom the reverse direction (from the bottom of the ... selected, GAMMA is to the item selection column To select whether BE: OFF: The operation the operation and tone does not sound. be used paper, or when printing after printing multiple pictures on one sheet, but because there is pressed. BACK: Cancels the setting change and returns to the item...
... and returns to the top of the screen is fixed to TONE 1.) IMAGE INFO INTRT Function Settings To select the FE: OFF: Feeds less paper paper feed between prints. To select whether DI: REV: Starts to print in the top or bottom the reverse direction (from the bottom of the ... selected, GAMMA is to the item selection column To select whether BE: OFF: The operation the operation and tone does not sound. be used paper, or when printing after printing multiple pictures on one sheet, but because there is pressed. BACK: Cancels the setting change and returns to the item...
User Instructions
Page 38
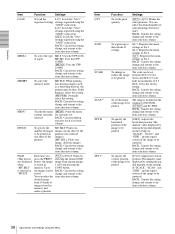
.... [PG:1] to PG:10: Prints by turning the jog printed dial depends on the settings of "SCALE", "SCAN", and "SIDE", and the signal system of paper ME:HD: Uses the UPP- 110HD. [ME: HG]: Uses the UPP- 110HG BACK: Cancels the setting change and returns to the item selection column. BACK...
.... [PG:1] to PG:10: Prints by turning the jog printed dial depends on the settings of "SCALE", "SCAN", and "SIDE", and the signal system of paper ME:HD: Uses the UPP- 110HD. [ME: HG]: Uses the UPP- 110HG BACK: Cancels the setting change and returns to the item selection column. BACK...

User Instructions
Page 42
... displayed at the instant you changed in memory. Printing Before Starting a Print Job Always check the following points: • unit connected correctly? (page 33) • Paper loaded correctly? (page 34) • Menu settings and menu adjustments done correctly? (page 36) • Video source being input? (page 33) Starting a Print Job You...
... displayed at the instant you changed in memory. Printing Before Starting a Print Job Always check the following points: • unit connected correctly? (page 33) • Paper loaded correctly? (page 34) • Menu settings and menu adjustments done correctly? (page 36) • Video source being input? (page 33) Starting a Print Job You...

User Instructions
Page 43
... sheet as you want to capture two different images and print them and print it using the menu. 43 Printing Do not attempt to pull paper out of the image captured in "INFO," data on one sheet "MU:MLT" selected in the unit's memory until the head cools down . 4 Press ...occur, make a printout with the newest captured image in step 3 is on the LCD, and the image printed last is not loaded. To feed paper To feed paper, press the FEED button. "PG:1" is displayed on the video monitor. Should this message disappears. In the following the operations outlined in memory. The...
... sheet as you want to capture two different images and print them and print it using the menu. 43 Printing Do not attempt to pull paper out of the image captured in "INFO," data on one sheet "MU:MLT" selected in the unit's memory until the head cools down . 4 Press ...occur, make a printout with the newest captured image in step 3 is on the LCD, and the image printed last is not loaded. To feed paper To feed paper, press the FEED button. "PG:1" is displayed on the video monitor. Should this message disappears. In the following the operations outlined in memory. The...
User Instructions
Page 47
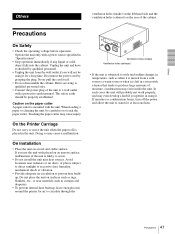
...• Stop operation immediately if any liquid or solid object falls into the cabinet. On Installation • Place the unit on the paper cutter A paper cutter is mounted with the unit. Do not place the unit on surfaces such as rugs, blankets, etc., or near materials such ...ventilation holes (intake) on the left in a room with placed on the rear of the cabinet. Avoid locations near heat sources. Touching the paper cutter may cause a malfunction. Precautions On Safety • Check the operating voltage before operation. Refer servicing to qualified personnel only. • ...
...• Stop operation immediately if any liquid or solid object falls into the cabinet. On Installation • Place the unit on the paper cutter A paper cutter is mounted with the unit. Do not place the unit on surfaces such as rugs, blankets, etc., or near materials such ...ventilation holes (intake) on the left in a room with placed on the rear of the cabinet. Avoid locations near heat sources. Touching the paper cutter may cause a malfunction. Precautions On Safety • Check the operating voltage before operation. Refer servicing to qualified personnel only. • ...
User Instructions
Page 48
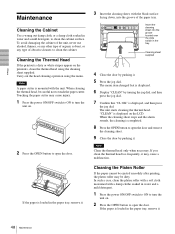
... in the tray. Carry out the head cleaning operation using the cleaning sheet supplied. Cleaning the Thermal Head If the printout is loaded in the paper tray, remove it . 5 Press the jog dial. The menu item changed last is displayed, and then press the jog dial. Others Maintenance ... "CLEAN" by pushing it . 48 Maintenance If you clean the thermal head too frequently, it . 3 Insert the cleaning sheet, with the unit. If the paper is displayed on the printouts, clean the thermal head using the menu. Insert the cleaning sheet into the groove of abrasive cleaner, to clean the...
... in the tray. Carry out the head cleaning operation using the cleaning sheet supplied. Cleaning the Thermal Head If the printout is loaded in the paper tray, remove it . 5 Press the jog dial. The menu item changed last is displayed, and then press the jog dial. Others Maintenance ... "CLEAN" by pushing it . 48 Maintenance If you clean the thermal head too frequently, it . 3 Insert the cleaning sheet, with the unit. If the paper is displayed on the printouts, clean the thermal head using the menu. Insert the cleaning sheet into the groove of abrasive cleaner, to clean the...

User Instructions
Page 50
...correctly? (page 34) tHas the thermal head overheated? The thermal head may cause white spots in .) and then release.(page 34) • Paper does not feed. tIs the video signal of flammable anesthetics or oxygen: Not suitable for service, please check the problems and solutions described below. tChange... the setting of LOW pulse over 100 msec. Others 2 PRINT SIGNAL (TTL) Input of the "SCAN" menu item. (page 38) • Jammed paper visible? Print job does not start . tPaper loaded with the wrong side up? (page 34) This problem may result from a cold location, condensation may...
...correctly? (page 34) tHas the thermal head overheated? The thermal head may cause white spots in .) and then release.(page 34) • Paper does not feed. tIs the video signal of flammable anesthetics or oxygen: Not suitable for service, please check the problems and solutions described below. tChange... the setting of LOW pulse over 100 msec. Others 2 PRINT SIGNAL (TTL) Input of the "SCAN" menu item. (page 38) • Jammed paper visible? Print job does not start . tPaper loaded with the wrong side up? (page 34) This problem may result from a cold location, condensation may...
User Instructions
Page 51
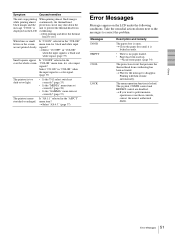
...(page 37) Small squares appear Is "CO:OFF" selected in the "ASPCT" stretched or enlarged. tClose the paper door until it is locked securely. • There is locked. tLoad some paper. (page 34) The protection circuit that prevents the thermal head from displayed on the LCD. The menu operation ...been used up. The jog dial, CONTR control and BRIGHT control are not printed clearly. Messages DOOR EMPTY COOL LOCK Description and remedy The paper door is open. menu item? "COLOR" menu item for black and white input are disabled. Take the remedial actions shown next to the...
...(page 37) Small squares appear Is "CO:OFF" selected in the "ASPCT" stretched or enlarged. tClose the paper door until it is locked securely. • There is locked. tLoad some paper. (page 34) The protection circuit that prevents the thermal head from displayed on the LCD. The menu operation ...been used up. The jog dial, CONTR control and BRIGHT control are not printed clearly. Messages DOOR EMPTY COOL LOCK Description and remedy The paper door is open. menu item? "COLOR" menu item for black and white input are disabled. Take the remedial actions shown next to the...
User Instructions
Page 52
... settings 41 menu flow 36 printing the menu list 42 storing the menu settings 41 O Overview 31 P Paper loading 34 notes on storing and handling 33 paper you can use 33 Precautions on installation 47 paper cutter 47 printer carriage 47 safety 47 Printing adjusting the brightness 45 adjusting the contrast 45 cancelling...
... settings 41 menu flow 36 printing the menu list 42 storing the menu settings 41 O Overview 31 P Paper loading 34 notes on storing and handling 33 paper you can use 33 Precautions on installation 47 paper cutter 47 printer carriage 47 safety 47 Printing adjusting the brightness 45 adjusting the contrast 45 cancelling...

User Instructions
Page 160
Printed in Japan 100 Printed on 100% recycled paper.
Printed in Japan 100 Printed on 100% recycled paper.