User Instructions
Page 28
... other equipment. 4. Operation of fire or electric shock, do not open the cabinet. This equipment generates, uses, and can be certified according to Subpart B of Part 15 of FCC Rules. If it is not installed and used in accordance with the instruction manual, it is likely ... this equipment in the space provided below. Plug this apparatus to these numbers in order to comply with the limits for use in the vicinity of a system to the equipments. 2. Refer servicing to Standard CSA C22.2 No.601.1. Owner's Record The model and serial numbers are located at his ...
... other equipment. 4. Operation of fire or electric shock, do not open the cabinet. This equipment generates, uses, and can be certified according to Subpart B of Part 15 of FCC Rules. If it is not installed and used in accordance with the instruction manual, it is likely ... this equipment in the space provided below. Plug this apparatus to these numbers in order to comply with the limits for use in the vicinity of a system to the equipments. 2. Refer servicing to Standard CSA C22.2 No.601.1. Owner's Record The model and serial numbers are located at his ...
User Instructions
Page 29
...2. United States Canada Plug Type Female end HOSPITAL GRADE* E62405, E35708 HOSPITAL GRADE* LR53182, LL022442, LL088408 Cord type E159216, E35496 Min.Type SJT Min.18 AWG LL112007-1, LL20262, LL32121, LL84494 Min.Type SJT Min.18AWG Minimum cord set 10A/125V rating 10A... in the relative area or country and the regulation in your local power supply. 1. Warning on power connection Use a proper power cord for medical use Please use of the above Power Cord/Appliance Connector/Plug, please consult a qualified service personnel. Warning on power connection for your area.
...2. United States Canada Plug Type Female end HOSPITAL GRADE* E62405, E35708 HOSPITAL GRADE* LR53182, LL022442, LL088408 Cord type E159216, E35496 Min.Type SJT Min.18 AWG LL112007-1, LL20262, LL32121, LL84494 Min.Type SJT Min.18AWG Minimum cord set 10A/125V rating 10A... in the relative area or country and the regulation in your local power supply. 1. Warning on power connection Use a proper power cord for medical use Please use of the above Power Cord/Appliance Connector/Plug, please consult a qualified service personnel. Warning on power connection for your area.
User Instructions
Page 30
... Basic Menu Operations 40 Registering Menu Settings 41 Printing the Menu List 42 Printing 42 Starting a Print Job 42 Selecting the Printing Direction and Image Size 44 Adjusting the Contrast and Brightness 45 Others Precautions 47 On Safety 47 On the Printer Carriage 47 On Installation 47 Maintenance 48 Cleaning the Cabinet 48 Cleaning the Thermal Head 48 Cleaning the Platen Roller 48 Specifications 49 Troubleshooting 50 Error Messages 51 Index...
... Basic Menu Operations 40 Registering Menu Settings 41 Printing the Menu List 42 Printing 42 Starting a Print Job 42 Selecting the Printing Direction and Image Size 44 Adjusting the Contrast and Brightness 45 Others Precautions 47 On Safety 47 On the Printer Carriage 47 On Installation 47 Maintenance 48 Cleaning the Cabinet 48 Cleaning the Thermal Head 48 Cleaning the Platen Roller 48 Specifications 49 Troubleshooting 50 Error Messages 51 Index...

User Instructions
Page 31
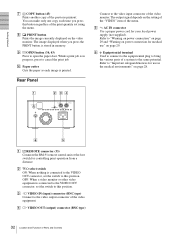
... numbers enclosed in normal operation, the paper currently selected is displayed. During menu operations, menu items and settings are displayed C Jog dial (40, 48) Used to feed paper. Location and Function of user settings. For detailed information on the LCD lights in green when the unit operates normally. D CONTR (contrast) control (45) Adjusts the contrast of Parts and Controls Also, in parentheses (). If an error occurs, a corresponding alarm message...
... numbers enclosed in normal operation, the paper currently selected is displayed. During menu operations, menu items and settings are displayed C Jog dial (40, 48) Used to feed paper. Location and Function of user settings. For detailed information on the LCD lights in green when the unit operates normally. D CONTR (contrast) control (45) Adjusts the contrast of Parts and Controls Also, in parentheses (). If an error occurs, a corresponding alarm message...
User Instructions
Page 32
... the video monitor. F Equipotential terminal Used to connect to the equipotential plug to bring the various parts of a system to the video output connector of the video monitor. The output signal depends on page 29. H PRINT button Prints the image currently displayed on page 28. J Paper cutter Cuts the paper as each time you press the PRINT button is in progress, press to...
... the video monitor. F Equipotential terminal Used to connect to the equipotential plug to bring the various parts of a system to the video output connector of the video monitor. The output signal depends on page 29. H PRINT button Prints the image currently displayed on page 28. J Paper cutter Cuts the paper as each time you press the PRINT button is in progress, press to...

User Instructions
Page 33
... video input connector Connecting cable (not supplied) to VIDEO OUT to REMOTE to wall outlet a) Set the 75 Ω select switch as follows. Paper Use only Sony UPP-110S/110HD/110HG paper designed for the UP-880/890MD series printer. Getting Started Connections Notes • Turn off the power to each device before printing. Label adhesive remaining on the paper could damage the unit...
... video input connector Connecting cable (not supplied) to VIDEO OUT to REMOTE to wall outlet a) Set the 75 Ω select switch as follows. Paper Use only Sony UPP-110S/110HD/110HG paper designed for the UP-880/890MD series printer. Getting Started Connections Notes • Turn off the power to each device before printing. Label adhesive remaining on the paper could damage the unit...
User Instructions
Page 34
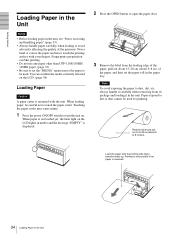
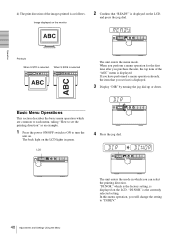
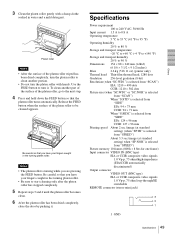
... and the message "EMPTY" is displayed. 2 Press the OPEN button to be used for printing. Fingerprints perspiration can confirm the media currently selected on the LCD lights in the paper tray. When loading paper, be used . always handle it carefully when removing from the leading edge of the paper, and then set the "MEDIA" menu item to the paper to open the paper door. 3 Remove the label from...
... and the message "EMPTY" is displayed. 2 Press the OPEN button to be used for printing. Fingerprints perspiration can confirm the media currently selected on the LCD lights in the paper tray. When loading paper, be used . always handle it carefully when removing from the leading edge of the paper, and then set the "MEDIA" menu item to the paper to open the paper door. 3 Remove the label from...
User Instructions
Page 37
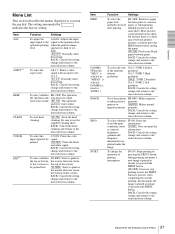
... PRINT button during printing and prints a new image captured at instant you turn the jog dial. BACK: Cancels the setting change and returns to print in "MEDIA" is selected, GAMMA is so little space between printed pictures, you must press the FEED button before cutting the paper. [FE: ON]: Feeds extra blank paper between prints to conserve method to be used paper, or when printing after printing multiple pictures on one sheet, but because there is fixed...
... PRINT button during printing and prints a new image captured at instant you turn the jog dial. BACK: Cancels the setting change and returns to print in "MEDIA" is selected, GAMMA is so little space between printed pictures, you must press the FEED button before cutting the paper. [FE: ON]: Feeds extra blank paper between prints to conserve method to be used paper, or when printing after printing multiple pictures on one sheet, but because there is fixed...
User Instructions
Page 38
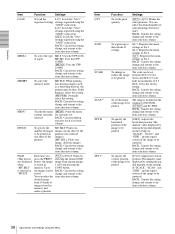
... turning the jog printed dial depends on the settings of "SCALE", "SCAN", and "SIDE", and the signal system of the image to the item selection column. To specify the [S.V:0]: Adjusts the vertical vertical position position. PAGE (This item is not displayed when "MU:MLT" is the factory setting. Each time you press the PRINT button, the image is widened in memory and make...
... turning the jog printed dial depends on the settings of "SCALE", "SCAN", and "SIDE", and the signal system of the image to the item selection column. To specify the [S.V:0]: Adjusts the vertical vertical position position. PAGE (This item is not displayed when "MU:MLT" is the factory setting. Each time you press the PRINT button, the image is widened in memory and make...
User Instructions
Page 39
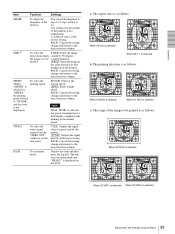
... is fixed to "SP:NOR" and this item and then press the jog dial. When SC:NOR is selected When SC:WD1 is selected When SC:WD2 is the factory setting. When DI:NOR is selected When DI: REV is selected c) The range of step 2 is selected 39 Adjustments and Settings Using the Menu When AS:4:3 is selected When AS:1:1 is selected b) The printing direction...
... is fixed to "SP:NOR" and this item and then press the jog dial. When SC:NOR is selected When SC:WD1 is selected When SC:WD2 is the factory setting. When DI:NOR is selected When DI: REV is selected c) The range of step 2 is selected 39 Adjustments and Settings Using the Menu When AS:4:3 is selected When AS:1:1 is selected b) The printing direction...
User Instructions
Page 40
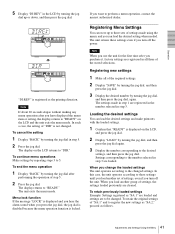
... menu operation which is the factory setting, is displayed. 3 Display "DIR" by turning the jog dial up or down. Operation Printouts When S:STD is selected The unit enters the menu mode. In this menu operation, you set the printing direction" as follows. If you have performed a menu operation already, the item that "READY" is the currently selected setting. LCD 4 Press the jog dial. 40 Adjustments and Settings Using the...
... menu operation which is the factory setting, is displayed. 3 Display "DIR" by turning the jog dial up or down. Operation Printouts When S:STD is selected The unit enters the menu mode. In this menu operation, you set the printing direction" as follows. If you have performed a menu operation already, the item that "READY" is the currently selected setting. LCD 4 Press the jog dial. 40 Adjustments and Settings Using the...
User Instructions
Page 41
... turning the jog dial, and then press the jog dial again. 3 Display the number corresponding to the desired settings, and then press the jog dial. The settings made using the menu, and you change the loaded settings The unit operates according to register the new settings as "SA:2," proceed as follows. 41 Adjustments and Settings Using the Menu Loading the desired settings You can load the desired settings and make...
... turning the jog dial, and then press the jog dial again. 3 Display the number corresponding to the desired settings, and then press the jog dial. The settings made using the menu, and you change the loaded settings The unit operates according to register the new settings as "SA:2," proceed as follows. 41 Adjustments and Settings Using the Menu Loading the desired settings You can load the desired settings and make...

User Instructions
Page 42
... being input? (page 33) Starting a Print Job You can make a printout of "LO:1" following procedure for loading the desired settings. 2 Change the loaded settings as "SA:2" (No.2). When the message is displayed on the LCD If a problem occurs, the back light on the LCD lights in umber and the error message stating the problem is displayed on the LCD. 4 Display "BACK" by turning the jog dial and then...
... being input? (page 33) Starting a Print Job You can make a printout of "LO:1" following procedure for loading the desired settings. 2 Change the loaded settings as "SA:2" (No.2). When the message is displayed on the LCD If a problem occurs, the back light on the LCD lights in umber and the error message stating the problem is displayed on the LCD. 4 Display "BACK" by turning the jog dial and then...

User Instructions
Page 43
... paper out of another image or turn the power off. Printing two different images on page 42. Do not attempt to the paper currently selected. The unit makes a copy of the Last Printout Press the COPY button. When the unit stops printing during printing When printing almost black images continuously, the thermal head protection circuit may be blurred when printed. To feed paper To feed paper, press the FEED button...
... paper out of another image or turn the power off. Printing two different images on page 42. Do not attempt to the paper currently selected. The unit makes a copy of the Last Printout Press the COPY button. When the unit stops printing during printing When printing almost black images continuously, the thermal head protection circuit may be blurred when printed. To feed paper To feed paper, press the FEED button...

User Instructions
Page 44
... COPY button after turning the power on, the alarm buzzer will cause the image stored in the maximum number. To make multiple copies of the same printout becomes 15. To set the range of the image to two times the size of the image up to be printed. The image within the frame is printed. 44 Printing The frame displayed on the video monitor Select...
... COPY button after turning the power on, the alarm buzzer will cause the image stored in the maximum number. To make multiple copies of the same printout becomes 15. To set the range of the image to two times the size of the image up to be printed. The image within the frame is printed. 44 Printing The frame displayed on the video monitor Select...
User Instructions
Page 47
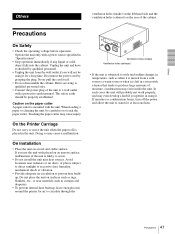
... power cord by qualified personnel. • Unplug the unit from a cold room to a warm room or when it checked by grasping the plug. Do not place the unit on the paper cutter A paper cutter is left hand side and the ventilation holes (exhaust) on the rear of the cabinet. Operate the unit only with a protective earth terminal. When loading a paper or cleaning...
... power cord by qualified personnel. • Unplug the unit from a cold room to a warm room or when it checked by grasping the plug. Do not place the unit on the paper cutter A paper cutter is left hand side and the ventilation holes (exhaust) on the rear of the cabinet. Operate the unit only with a protective earth terminal. When loading a paper or cleaning...
User Instructions
Page 49
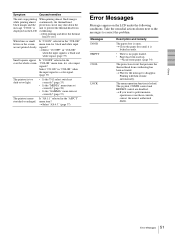
... roller with a damp clothe soaked in the turning platen roller. Use the FEED button to clean another part of the surface of the platen roller to the next step. 4 Press and hold down the FEED button so that the platen roller turns automatically. Specifications Power requirement 100 to 240 V AC, 50/60 Hz Input current 1.5 A to 0.8 A Operating temperature 5 °C to 35 °C (41...
... roller with a damp clothe soaked in the turning platen roller. Use the FEED button to clean another part of the surface of the platen roller to the next step. 4 Press and hold down the FEED button so that the platen roller turns automatically. Specifications Power requirement 100 to 240 V AC, 50/60 Hz Input current 1.5 A to 0.8 A Operating temperature 5 °C to 35 °C (41...

User Instructions
Page 50
... paper door, remove the printout or the paper roll, and then gently pull the jammed paper out of paper has just been loaded, paper dust may overheat when the unit prints dark image continuously. Thermal head dirty? Wait until it set for service, please check the problems and solutions described below. tPress the OPEN button to room temperature), then try printing again. Troubleshooting Before you cannot solve the problem...
... paper door, remove the printout or the paper roll, and then gently pull the jammed paper out of paper has just been loaded, paper dust may overheat when the unit prints dark image continuously. Thermal head dirty? Wait until it set for service, please check the problems and solutions described below. tPress the OPEN button to room temperature), then try printing again. Troubleshooting Before you cannot solve the problem...
User Instructions
Page 51
... used up. tSelect "AS:4:3." (page 37) Error Messages Messages appear on the LCD. The jog dial, CONTR control and BRIGHT control are not printed clearly. White lines or small Is "CO:ON" selected in the over the whole screen. signals? Take the remedial actions shown next to the messages to disappear. Printing will then resume automatically. Others 51 Error Messages tStop printing and allow the thermal head...
... used up. tSelect "AS:4:3." (page 37) Error Messages Messages appear on the LCD. The jog dial, CONTR control and BRIGHT control are not printed clearly. White lines or small Is "CO:ON" selected in the over the whole screen. signals? Take the remedial actions shown next to the messages to disappear. Printing will then resume automatically. Others 51 Error Messages tStop printing and allow the thermal head...
User Instructions
Page 52
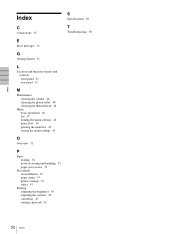
... basic operations 40 list 37 loading the menu settings 41 menu flow 36 printing the menu list 42 storing the menu settings 41 O Overview 31 P Paper loading 34 notes on storing and handling 33 paper you can use 33 Precautions on installation 47 paper cutter 47 printer carriage 47 safety 47 Printing adjusting the brightness 45 adjusting the contrast 45 cancelling 43 staring a print job 42 S Specifications 49 T Troubleshooting...
... basic operations 40 list 37 loading the menu settings 41 menu flow 36 printing the menu list 42 storing the menu settings 41 O Overview 31 P Paper loading 34 notes on storing and handling 33 paper you can use 33 Precautions on installation 47 paper cutter 47 printer carriage 47 safety 47 Printing adjusting the brightness 45 adjusting the contrast 45 cancelling 43 staring a print job 42 S Specifications 49 T Troubleshooting...


