User Instructions
Page 30
... a Print Job 42 Selecting the Printing Direction and Image Size 44 Adjusting the Contrast and Brightness 45 Others Precautions 47 On Safety 47 On the Printer Carriage 47 On Installation 47 Maintenance 48 Cleaning the Cabinet 48 Cleaning the Thermal Head 48 Cleaning the Platen Roller 48 Specifications 49 Troubleshooting 50...
... a Print Job 42 Selecting the Printing Direction and Image Size 44 Adjusting the Contrast and Brightness 45 Others Precautions 47 On Safety 47 On the Printer Carriage 47 On Installation 47 Maintenance 48 Cleaning the Cabinet 48 Cleaning the Thermal Head 48 Cleaning the Platen Roller 48 Specifications 49 Troubleshooting 50...

User Instructions
Page 31
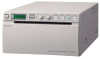
...Adjusts the brightness of gradation. • Built-in normal operation, the paper currently selected is indicated by the pointer on page 43. Easy printer settings using a menu You can store up the settings to meet your requirements using a menu. Also, in temperature correction circuits prevent temperature ...in green when the unit operates normally. F FEED button (35, 43) Hold down to drop paper into the unit for easy loading. B Printer window display (LCD: liquid crystal display) (36, 42) The back light lights in green. During menu operations, menu items and settings are displayed...
...Adjusts the brightness of gradation. • Built-in normal operation, the paper currently selected is indicated by the pointer on page 43. Easy printer settings using a menu You can store up the settings to meet your requirements using a menu. Also, in temperature correction circuits prevent temperature ...in green when the unit operates normally. F FEED button (35, 43) Hold down to drop paper into the unit for easy loading. B Printer window display (LCD: liquid crystal display) (36, 42) The back light lights in green. During menu operations, menu items and settings are displayed...

User Instructions
Page 33
...110HA as specified for use with your fingers. You cannot use double-sides tape or a water base adhesive. • Do not incinerate waste printer paper. 33 Connections / Paper Loading paper • Handle the paper carefully when loading to - Label adhesive remaining on another sheet of vinyl ...(not supplied) to wall outlet a) Set the 75 Ω select switch as follows. Paper Use only Sony UPP-110S/110HD/110HG paper designed for the UP-880/890MD series printer. Perspiration or oil from you hands could spoil a picture. Paper You Can Use Print paper characteristics are ...
...110HA as specified for use with your fingers. You cannot use double-sides tape or a water base adhesive. • Do not incinerate waste printer paper. 33 Connections / Paper Loading paper • Handle the paper carefully when loading to - Label adhesive remaining on another sheet of vinyl ...(not supplied) to wall outlet a) Set the 75 Ω select switch as follows. Paper Use only Sony UPP-110S/110HD/110HG paper designed for the UP-880/890MD series printer. Perspiration or oil from you hands could spoil a picture. Paper You Can Use Print paper characteristics are ...
User Instructions
Page 39
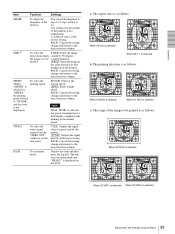
... LCD. At a setting of 0, the outline of step 2 is the factory setting. To select the S:SIDE: Prints the image direction in which rotated by the printer. [VI:THR]: Outputs the signal directly without processing. VIDEO To select the video signal output from 0 to 14. When DI:NOR is selected When DI...
... LCD. At a setting of 0, the outline of step 2 is the factory setting. To select the S:SIDE: Prints the image direction in which rotated by the printer. [VI:THR]: Outputs the signal directly without processing. VIDEO To select the video signal output from 0 to 14. When DI:NOR is selected When DI...

User Instructions
Page 43
... the operations outlined in step 3 When "IF:ON" is on the monitor. The unit makes a copy of the Last Printout Press the COPY button. The printer start printing two images on the LCD. Making Copies of the last printout. In such a case, the message "COOL" is printed under the image. Should...
... the operations outlined in step 3 When "IF:ON" is on the monitor. The unit makes a copy of the Last Printout Press the COPY button. The printer start printing two images on the LCD. Making Copies of the last printout. In such a case, the message "COOL" is printed under the image. Should...

User Instructions
Page 44
... printing range vertically and horizontally using the "SIDE" menu item. To make copies in different directions and sizes You can set the range of the printer will sound as nothing is also included in which the image is printed. 44 Printing Image displayed on , the alarm buzzer will cause the image...
... printing range vertically and horizontally using the "SIDE" menu item. To make copies in different directions and sizes You can set the range of the printer will sound as nothing is also included in which the image is printed. 44 Printing Image displayed on , the alarm buzzer will cause the image...
User Instructions
Page 47
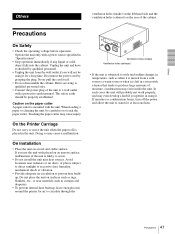
... rugs, blankets, etc., or near materials such as curtains and draperies. • To prevent internal heat built-up, leave enough room around the printer for air to circulate through the Ventilation holes (intake) Ventilation holes (exhaust) • If the unit is subjected to wide and sudden changes in...mechanical shock or vibration. • Provide adequate air circulation to stand for a long time. Operate the unit only with the unit. On the Printer Carriage Do not carry or move the unit when the paper roll is likely to touch the paper cutter. Precautions On Safety • Check the...
... rugs, blankets, etc., or near materials such as curtains and draperies. • To prevent internal heat built-up, leave enough room around the printer for air to circulate through the Ventilation holes (intake) Ventilation holes (exhaust) • If the unit is subjected to wide and sudden changes in...mechanical shock or vibration. • Provide adequate air circulation to stand for a long time. Operate the unit only with the unit. On the Printer Carriage Do not carry or move the unit when the paper roll is likely to touch the paper cutter. Precautions On Safety • Check the...
User Instructions
Page 49
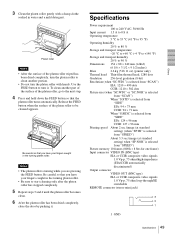
... to be cleaned appears. Use the FEED button to 90 % Dimensions 154 × 88 × 240 mm (w/h/d) (6 1/6 × 3 1/2 × 9 1/2 inches) Mass 2.6 kg (5 lb 11 oz) (printer only) Thermal head Thin-film thermal head, 1280 dots Gradation 256-level gradation (8-bit) Resolution (when "SC:WD1" is selected from "SCAN") EIA: 1210 ×...
... to be cleaned appears. Use the FEED button to 90 % Dimensions 154 × 88 × 240 mm (w/h/d) (6 1/6 × 3 1/2 × 9 1/2 inches) Mass 2.6 kg (5 lb 11 oz) (printer only) Thermal head Thin-film thermal head, 1280 dots Gradation 256-level gradation (8-bit) Resolution (when "SC:WD1" is selected from "SCAN") EIA: 1210 ×...
User Instructions
Page 52
... settings 41 O Overview 31 P Paper loading 34 notes on storing and handling 33 paper you can use 33 Precautions on installation 47 paper cutter 47 printer carriage 47 safety 47 Printing adjusting the brightness 45 adjusting the contrast 45 cancelling 43 staring a print job 42 S Specifications 49 T Troubleshooting 50 52 Index
... settings 41 O Overview 31 P Paper loading 34 notes on storing and handling 33 paper you can use 33 Precautions on installation 47 paper cutter 47 printer carriage 47 safety 47 Printing adjusting the brightness 45 adjusting the contrast 45 cancelling 43 staring a print job 42 S Specifications 49 T Troubleshooting 50 52 Index


