User Instructions
Page 37
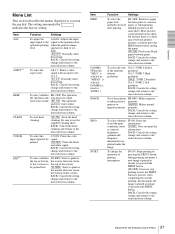
... and tone does not sound. To select the input signal to be used paper, or when printing after printing multiple pictures on one sheet, but because there is so little space between prints to conserve method to TONE 1.) IMAGE INFO INTRT Function Settings To select the FE...select whether DI: REV: Starts to print in "MEDIA" is selected, GAMMA is to the sharpness item selection column. To start head cleaning [CL: OK]: Starts the head cleaning. BACK: Cancels the setting change and returns to the item selection column. conditions (such [IF:OFF]: Does not print the as ...
... and tone does not sound. To select the input signal to be used paper, or when printing after printing multiple pictures on one sheet, but because there is so little space between prints to conserve method to TONE 1.) IMAGE INFO INTRT Function Settings To select the FE...select whether DI: REV: Starts to print in "MEDIA" is selected, GAMMA is to the sharpness item selection column. To start head cleaning [CL: OK]: Starts the head cleaning. BACK: Cancels the setting change and returns to the item selection column. conditions (such [IF:OFF]: Does not print the as ...
User Instructions
Page 48
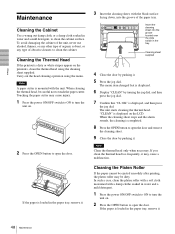
... use alcohol, thinner, or any other type of organic solvent, or any type of the paper tray. Carry out the head cleaning operation using the cleaning sheet supplied. Touching the paper cutter may cause injury. 1 Press the power ON/OFF switch to ON to turn the unit on... the OPEN button to open the door. Cleaning sheet supplied 4 Close the door by pushing it . 3 Insert the cleaning sheet, with the unit. The unit starts cleaning the thermal head. If you clean the thermal head too frequently, it . 5 Press the jog dial. Cleaning the Thermal Head If the printout is completed. 8 Press ...
... use alcohol, thinner, or any other type of organic solvent, or any type of the paper tray. Carry out the head cleaning operation using the cleaning sheet supplied. Touching the paper cutter may cause injury. 1 Press the power ON/OFF switch to ON to turn the unit on... the OPEN button to open the door. Cleaning sheet supplied 4 Close the door by pushing it . 3 Insert the cleaning sheet, with the unit. The unit starts cleaning the thermal head. If you clean the thermal head too frequently, it . 5 Press the jog dial. Cleaning the Thermal Head If the printout is completed. 8 Press ...

User Instructions
Page 50
... it warms to the unit. tPaper loaded correctly? (page 34) tHas the thermal head overheated? initiates print. 3 PRINT BUSY (TTL) Goes HIGH during printing Accessories provided Thermal head cleaning sheet (1) Media label (1) Operating Instructions (1) Service Contact List (1) Medical Specifications Protection against...: Continuous The design and these specifications are subject to feed about 15~20 cm (6~8 in unit? tUse the head cleaning sheet provided with small dots. Black borders or missing portions around the printout Paper Jams Printouts dirty. tUnit connected correctly?...
... it warms to the unit. tPaper loaded correctly? (page 34) tHas the thermal head overheated? initiates print. 3 PRINT BUSY (TTL) Goes HIGH during printing Accessories provided Thermal head cleaning sheet (1) Media label (1) Operating Instructions (1) Service Contact List (1) Medical Specifications Protection against...: Continuous The design and these specifications are subject to feed about 15~20 cm (6~8 in unit? tUse the head cleaning sheet provided with small dots. Black borders or missing portions around the printout Paper Jams Printouts dirty. tUnit connected correctly?...

