
Operating Instructions
Page 183
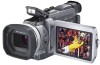
... the computer's "Memory Stick" slot. For details about your computer - Tape stills and movies "Memory Stick" stills and movies Camcorder Connection jack USB jack i.LINK (DV Interface) USB jack Connection cable USB cable (supplied) i.LINK cable (optional) USB cable ...(supplied) Computer environment requirements USB connector, editing software DV connector, editing software USB connector, editing software When connecting to a computer via the USB jack, complete installation of connecting the camcorder to a computer in order to install the USB driver correctly.
... the computer's "Memory Stick" slot. For details about your computer - Tape stills and movies "Memory Stick" stills and movies Camcorder Connection jack USB jack i.LINK (DV Interface) USB jack Connection cable USB cable (supplied) i.LINK cable (optional) USB cable ...(supplied) Computer environment requirements USB connector, editing software DV connector, editing software USB connector, editing software When connecting to a computer via the USB jack, complete installation of connecting the camcorder to a computer in order to install the USB driver correctly.

Operating Instructions
Page 184
.... Viewing images on a "Memory Stick" When connecting to a computer using the i.LINK (DV interface) Your computer must have a DV connector and editing software installed that can also use the camcorder with a standard USB connection (NORMAL). When connecting to a computer using the USB jack There are two methods of USB connection, NORMAL and...
.... Viewing images on a "Memory Stick" When connecting to a computer using the i.LINK (DV interface) Your computer must have a DV connector and editing software installed that can also use the camcorder with a standard USB connection (NORMAL). When connecting to a computer using the USB jack There are two methods of USB connection, NORMAL and...

Operating Instructions
Page 185
... will differ so a file error indicator may appear and you may be unable to your camcorder or when you open the file. Software •Depending on your application software, the file size may not recover after recovering from your computer to open a still image...Stick" •"Memory Stick" operations on your computer - Introduction Notes on using retouching software from Suspend, Resume, or Sleep. 185 Communications with your computer Communications between your camcorder and your camcorder. Compressed files cannot be assured if a "Memory Stick" formatted on your computer is...
... will differ so a file error indicator may appear and you may be unable to your camcorder or when you open the file. Software •Depending on your application software, the file size may not recover after recovering from your computer to open a still image...Stick" •"Memory Stick" operations on your computer - Introduction Notes on using retouching software from Suspend, Resume, or Sleep. 185 Communications with your computer Communications between your camcorder and your camcorder. Compressed files cannot be assured if a "Memory Stick" formatted on your computer is...
Operating Instructions
Page 186
... driver onto your computer using the USB cable - If you connect the camcorder to the computer first, you will not operate correctly.) Others: This product is compatible with the application software required for installation: at least 200MB Available hard disc memory recommended: at least... 1GB (depending on your computer, you download pictures from your camcorder and pictures recorded on a tape on the computer OS:...
... driver onto your computer using the USB cable - If you connect the camcorder to the computer first, you will not operate correctly.) Others: This product is compatible with the application software required for installation: at least 200MB Available hard disc memory recommended: at least... 1GB (depending on your computer, you download pictures from your camcorder and pictures recorded on a tape on the computer OS:...
Operating Instructions
Page 188
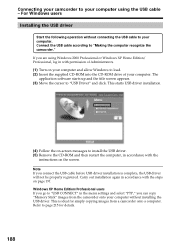
... and then restart the computer, in accordance with the steps on page 191. The application software starts up and the title screen appears. (3) Move the cursor to "Making the computer recognize the camcorder." Carry out installation again in with permission of Administrators. (1) Turn on the screen. If... the menu settings and select "PTP," you are using the USB cable - Refer to page 215 for simply copying images from the camcorder onto your computer without connecting the USB cable to your computer using Windows 2000 Professional or Windows XP Home Edition/ Professional, log in ...
... and then restart the computer, in accordance with the steps on page 191. The application software starts up and the title screen appears. (3) Move the cursor to "Making the computer recognize the camcorder." Carry out installation again in with permission of Administrators. (1) Turn on the screen. If... the menu settings and select "PTP," you are using the USB cable - Refer to page 215 for simply copying images from the camcorder onto your computer without connecting the USB cable to your computer using Windows 2000 Professional or Windows XP Home Edition/ Professional, log in ...
Operating Instructions
Page 189
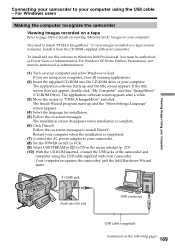
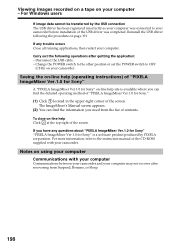
...Restart your computer when the installation is complete. (6) Click DirectX Follow the on your camcorder. You need to install "PIXELA ImageMixer " to view images recorded on a tape on -screen messages. The application software screen appears after a while. (3) Move the cursor to load. The installation screen ... the USB cable - For Windows users Making the computer recognize the camcorder Viewing images recorded on a tape Refer to page 190 for installation. (5) Follow the on your computer. To install and use this software in the menu settings (p. 215). (10) With the CD-ROM...
...Restart your computer when the installation is complete. (6) Click DirectX Follow the on your camcorder. You need to install "PIXELA ImageMixer " to view images recorded on a tape on -screen messages. The application software screen appears after a while. (3) Move the cursor to load. The installation screen ... the USB cable - For Windows users Making the computer recognize the camcorder Viewing images recorded on a tape Refer to page 190 for installation. (5) Follow the on your computer. To install and use this software in the menu settings (p. 215). (10) With the CD-ROM...

Operating Instructions
Page 194
...use the software in the menu settings (p. 215). (4) Select "Start" t "Programs" t "PIXELA" t "ImageMixer" t "PIXELA ImageMixer Ver.1.0 for Sony." Viewing images recorded on a tape (1) Turn on your computer and allow Windows to load. (2) Connect the AC power adaptor, and insert a tape into your camcorder. (3)... Set the POWER switch to ON in Windows 2000 Professional, you must be authorized as Power Users or Administrators. For Windows users Capturing images with "PIXELA ImageMixer Ver.1.0 for Sony" startup screen appears on the screen....
...use the software in the menu settings (p. 215). (4) Select "Start" t "Programs" t "PIXELA" t "ImageMixer" t "PIXELA ImageMixer Ver.1.0 for Sony." Viewing images recorded on a tape (1) Turn on your computer and allow Windows to load. (2) Connect the AC power adaptor, and insert a tape into your camcorder. (3)... Set the POWER switch to ON in Windows 2000 Professional, you must be authorized as Power Users or Administrators. For Windows users Capturing images with "PIXELA ImageMixer Ver.1.0 for Sony" startup screen appears on the screen....
Operating Instructions
Page 198
...the procedure on using your computer Communications with your camcorder. Seeing the on-line help (operating instructions) of "PIXELA ImageMixer Ver.1.0 for Sony" A "PIXELA ImageMixer Ver.1.0 for Sony" on -line help site is a software product produced by the USB connection The USB driver... application: - Disconnect the USB cable. - Viewing images recorded on a tape on your camcorder. For more information, refer to your camcorder before installation of "PIXELA ImageMixer Ver.1.0 for Sony" is available where you need from Suspend, Resume, or Sleep. 198 The ImageMixer's Manual...
...the procedure on using your computer Communications with your camcorder. Seeing the on-line help (operating instructions) of "PIXELA ImageMixer Ver.1.0 for Sony" A "PIXELA ImageMixer Ver.1.0 for Sony" on -line help site is a software product produced by the USB connection The USB driver... application: - Disconnect the USB cable. - Viewing images recorded on a tape on your camcorder. For more information, refer to your camcorder before installation of "PIXELA ImageMixer Ver.1.0 for Sony" is available where you need from Suspend, Resume, or Sleep. 198 The ImageMixer's Manual...

Operating Instructions
Page 201
... in each case in this manual. 201 Recommended computer usage environment when connecting via USB cable and viewing "Memory Stick" images on your camcorder. Furthermore, "TM" and "®" are not guaranteed for the Macintosh environment if you connect two or more USB equipment to play back... on the CD-ROM supplied with your computer Mac OS 8.5.1/8.6/9.0/9.1/9.2 or Mac OS X (v10.0/v10.1) Standard installation is packaged together with application software for the following models. •iMac with the Mac OS 8.6 standard installation and a slot loading type CD-ROM drive •iBook or...
... in each case in this manual. 201 Recommended computer usage environment when connecting via USB cable and viewing "Memory Stick" images on your camcorder. Furthermore, "TM" and "®" are not guaranteed for the Macintosh environment if you connect two or more USB equipment to play back... on the CD-ROM supplied with your computer Mac OS 8.5.1/8.6/9.0/9.1/9.2 or Mac OS X (v10.0/v10.1) Standard installation is packaged together with application software for the following models. •iMac with the Mac OS 8.6 standard installation and a slot loading type CD-ROM drive •iBook or...
Operating Instructions
Page 202
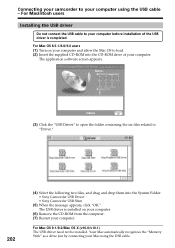
...Installing the USB driver Do not connect the USB cable to load. (2) Insert the supplied CD-ROM into the System Folder. • Sony Camcorder USB Driver • Sony Camcorder USB Shim (5) When the message appears, click "OK." The USB driver is completed. For Mac OS 9.1/9.2/Mac OS X (v10.0/v10....1) The USB driver need not be installed. The application software screen appears. (3) Click the "USB Driver" to open the folder containing the six ...
...Installing the USB driver Do not connect the USB cable to load. (2) Insert the supplied CD-ROM into the System Folder. • Sony Camcorder USB Driver • Sony Camcorder USB Shim (5) When the message appears, click "OK." The USB driver is completed. For Mac OS 9.1/9.2/Mac OS X (v10.0/v10....1) The USB driver need not be installed. The application software screen appears. (3) Click the "USB Driver" to open the folder containing the six ...

Operating Instructions
Page 204
...i.LINK jack connected to ON with an S video cable (optional) instead of your camcorder. Signal convert function You can capture images and sound from an analog video unit on your computer and the software you are using. Before operation Set DISPLAY in to LCD in the menu settings..... (2) Press MENU, then select A/V t DV OUT in to your computer and software you convert video signals into digital video signals via your camcorder. •You cannot record or capture the video output via your camcorder when the video tapes include copyright protection signals such as the ID-2 system. •...
...i.LINK jack connected to ON with an S video cable (optional) instead of your camcorder. Signal convert function You can capture images and sound from an analog video unit on your computer and the software you are using. Before operation Set DISPLAY in to LCD in the menu settings..... (2) Press MENU, then select A/V t DV OUT in to your computer and software you convert video signals into digital video signals via your camcorder. •You cannot record or capture the video output via your camcorder when the video tapes include copyright protection signals such as the ID-2 system. •...

Operating Instructions
Page 227
...You selected MULTI in 9PIC PRINT on the tape.* You cannot dub new audio. Check the format (p. 145, 212).* There are more than two of software (p. 229).* The tape has reached its end.* Insert a cassette.* You selected MARKED in 9PIC PRINT on the touch panel using a "Memory Stick"... back the image again. The tape contains copyright control signals for copyright protection of the same directories (p. 166).* The image cannot be recorded by your camcorder on the screen. 227 DIRECTORY ERROR • PLAY ERROR • REC ERROR •COPY INHIBIT •Q Z TAPE END •Q NO TAPE &#...
...You selected MULTI in 9PIC PRINT on the tape.* You cannot dub new audio. Check the format (p. 145, 212).* There are more than two of software (p. 229).* The tape has reached its end.* Insert a cassette.* You selected MARKED in 9PIC PRINT on the touch panel using a "Memory Stick"... back the image again. The tape contains copyright control signals for copyright protection of the same directories (p. 166).* The image cannot be recorded by your camcorder on the screen. 227 DIRECTORY ERROR • PLAY ERROR • REC ERROR •COPY INHIBIT •Q Z TAPE END •Q NO TAPE &#...
Operating Instructions
Page 229
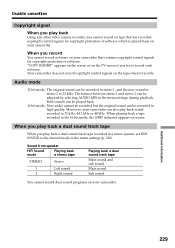
...When you cannot record on tape that has recorded copyright control signals for copyright protection of software which is played back on your camcorder that contains copyright control signals for copyright protection of software. Your camcorder does not record copyright control signals on screen. Sound from speaker HiFi Sound mode Playing...the tape when it records. "COPY INHIBIT" appears on the screen or on the TV screen if you record You cannot record software on your camcorder can be adjusted by selecting AUDIO MIX in 32 kHz, 44.1 kHz or 48 kHz. Audio mode 12-bit mode: The original...
...When you cannot record on tape that has recorded copyright control signals for copyright protection of software which is played back on your camcorder that contains copyright control signals for copyright protection of software. Your camcorder does not record copyright control signals on screen. Sound from speaker HiFi Sound mode Playing...the tape when it records. "COPY INHIBIT" appears on the screen or on the TV screen if you record You cannot record software on your camcorder can be adjusted by selecting AUDIO MIX in 32 kHz, 44.1 kHz or 48 kHz. Audio mode 12-bit mode: The original...

Operating Instructions
Page 234
... (DV Interface) compatible equipment made by this unit is connected to other than video equipment. Required i.LINK cable Use the Sony i.LINK 4-pin-to a personal computer, make sure that application software supported by SONY (e.g. Before connecting this unit to -4-pin cable (during DV dubbing). This unit can also be connected. VAIO series personal...
... (DV Interface) compatible equipment made by this unit is connected to other than video equipment. Required i.LINK cable Use the Sony i.LINK 4-pin-to a personal computer, make sure that application software supported by SONY (e.g. Before connecting this unit to -4-pin cable (during DV dubbing). This unit can also be connected. VAIO series personal...


