Operating Instructions
Page 6
... shutter speed .......... 70 Adjusting the white balance ......... 72 Getting Started Using this manual 12 Checking supplied accessories 14 Step 1 Preparing the power supply ... 15 Installing the battery pack 15 Charging the battery pack 16 Connecting to a wall outlet 19 Step 2 Setting the date and time ........ 20 Step 3 Inserting a cassette 23 Step 4 Using the touch panel 24 Recording - PHOTO SEARCH/PHOTO SCAN 92 Editing Dubbing a tape 95 Dubbing only desired scenes Recording still images on a "Memory Stick" during tape recording...
... shutter speed .......... 70 Adjusting the white balance ......... 72 Getting Started Using this manual 12 Checking supplied accessories 14 Step 1 Preparing the power supply ... 15 Installing the battery pack 15 Charging the battery pack 16 Connecting to a wall outlet 19 Step 2 Setting the date and time ........ 20 Step 3 Inserting a cassette 23 Step 4 Using the touch panel 24 Recording - PHOTO SEARCH/PHOTO SCAN 92 Editing Dubbing a tape 95 Dubbing only desired scenes Recording still images on a "Memory Stick" during tape recording...

Operating Instructions
Page 12
... cassette memory. Types of cassette types, see this manual and operating your camcorder. PHOTO SEARCH (p. 92) Functions you can hear a beep to CAMERA. Before you read through this manual are operated only with cassette memory . Set the POWER switch to indicate that are for example, "DCR-TRV950 only". END SEARCH (p. 37) - Cassettes with the cassette memory are : - Labeling a cassette (p. 124) For details of differences DCRMark on whether or not the tape has a cassette memory are : - Using this manual The instructions...
... cassette memory. Types of cassette types, see this manual and operating your camcorder. PHOTO SEARCH (p. 92) Functions you can hear a beep to CAMERA. Before you read through this manual are operated only with cassette memory . Set the POWER switch to indicate that are for example, "DCR-TRV950 only". END SEARCH (p. 37) - Cassettes with the cassette memory are : - Labeling a cassette (p. 124) For details of differences DCRMark on whether or not the tape has a cassette memory are : - Using this manual The instructions...

Operating Instructions
Page 45
... an S video jack Pictures can operate the video control buttons in the menu settings (p. 217). To display the screen indicators on the TV to VCR. Connect your camcorder to the TV with the A/V connecting cable supplied with your camcorder. Set the input selector on your camcorder again. 45 If you monitor playback pictures on the screen. To turn the screen indicators off, press DISPLAY/TOUCH PANEL on the VCR to LINE. Viewing the recording on TV Connect your camcorder to...
... an S video jack Pictures can operate the video control buttons in the menu settings (p. 217). To display the screen indicators on the TV to VCR. Connect your camcorder to the TV with the A/V connecting cable supplied with your camcorder. Set the input selector on your camcorder again. 45 If you monitor playback pictures on the screen. To turn the screen indicators off, press DISPLAY/TOUCH PANEL on the VCR to LINE. Viewing the recording on TV Connect your camcorder to...

Operating Instructions
Page 71
... automatically reset to 1/500 or 1/60 respectively if you set the shutter speed faster than 1/500 or slower than 1/60 while the POWER switch is set to CAMERA, the shutter speed setting is set the shutter speed a little slower. In such cases, set to MEMORY/ NETWORK(DCR-TRV950 only). 71 When shooting at slow shutter speed At slow shutter speed, automatic focus may occur depending on the image, but this is not a malfunction. Advanced Recording Operations Shooting with manual adjustment When the shutter speed...
... automatically reset to 1/500 or 1/60 respectively if you set the shutter speed faster than 1/500 or slower than 1/60 while the POWER switch is set to CAMERA, the shutter speed setting is set the shutter speed a little slower. In such cases, set to MEMORY/ NETWORK(DCR-TRV950 only). 71 When shooting at slow shutter speed At slow shutter speed, automatic focus may occur depending on the image, but this is not a malfunction. Advanced Recording Operations Shooting with manual adjustment When the shutter speed...

Operating Instructions
Page 79
Sound recording level You can adjust the recording sound level. Advanced Recording Operations Adjusting recording level manually - Use headphones to monitor the sound when you adjust it. (1) Set MIC LEVEL in to MANUAL in the menu setting while the POWER switch is set to CAMERA or VCR. (p. 214) (2) Press MENU to erase the menu display. (3) Press AUDIO LEVEL to adjust the recording level. 2 MENU 1 TAPE SET REC MODE AUD I O MODE REMA I N M I C LEVEL RETURN AUTO MANUAL [MENU] : END TAPE SET REC MODE AUD I O MODE REMA I N M I C LEVEL RETURN MANUAL [MENU] : END 3 AUDIO LEVEL [a] 30 20 ...
Sound recording level You can adjust the recording sound level. Advanced Recording Operations Adjusting recording level manually - Use headphones to monitor the sound when you adjust it. (1) Set MIC LEVEL in to MANUAL in the menu setting while the POWER switch is set to CAMERA or VCR. (p. 214) (2) Press MENU to erase the menu display. (3) Press AUDIO LEVEL to adjust the recording level. 2 MENU 1 TAPE SET REC MODE AUD I O MODE REMA I N M I C LEVEL RETURN AUTO MANUAL [MENU] : END TAPE SET REC MODE AUD I O MODE REMA I N M I C LEVEL RETURN MANUAL [MENU] : END 3 AUDIO LEVEL [a] 30 20 ...

Operating Instructions
Page 136
... displayed while recording. To display the recording data, press the DATA CODE button during playback. When the POWER switch is set to MEMORY/NETWORK (DCR-TRV950 only) The angle of view is slightly larger compared with the angle of PROGRAM AE (The indicator flashes.) - Fader - Digital effect - Wide mode - Recording still images on the screen when you press the button. Memory Photo recording When the POWER switch is set to CAMERA. 136 This is on a"Memory Stick" - Recording data The recording data (date/time or various settings when recorded) are recorded...
... displayed while recording. To display the recording data, press the DATA CODE button during playback. When the POWER switch is set to MEMORY/NETWORK (DCR-TRV950 only) The angle of view is slightly larger compared with the angle of PROGRAM AE (The indicator flashes.) - Fader - Digital effect - Wide mode - Recording still images on the screen when you press the button. Memory Photo recording When the POWER switch is set to CAMERA. 136 This is on a"Memory Stick" - Recording data The recording data (date/time or various settings when recorded) are recorded...

Operating Instructions
Page 163
...[MENU] : END 2 MEMORY SET STILL SET MOVIE SET PHOTO SAVE READY FILE NO. RETURN [MENU] : END PHOTO SAVE 0:00:00:00 4/15 640 STD PHOTO BUTTON [PHOTO] : START [MENU] : END MENU To stop copying Press x using the video operation buttons or press MENU. "Memory Stick" Operations Copying still images from step 2. 163 The still image from tapes and record them on the screen. (3) Press PHOTO deeper. Before operation •Insert a recorded tape into your camcorder and rewind the tape. •Insert a "Memory Stick" into your camcorder. (1) Set the POWER switch to VCR. (2) Press MENU...
...[MENU] : END 2 MEMORY SET STILL SET MOVIE SET PHOTO SAVE READY FILE NO. RETURN [MENU] : END PHOTO SAVE 0:00:00:00 4/15 640 STD PHOTO BUTTON [PHOTO] : START [MENU] : END MENU To stop copying Press x using the video operation buttons or press MENU. "Memory Stick" Operations Copying still images from step 2. 163 The still image from tapes and record them on the screen. (3) Press PHOTO deeper. Before operation •Insert a recorded tape into your camcorder and rewind the tape. •Insert a "Memory Stick" into your camcorder. (1) Set the POWER switch to VCR. (2) Press MENU...
Operating Instructions
Page 188
Connecting your camcorder to "USB CONNECT" in the menu settings and select "PTP," you can copy "Memory Stick" images from a camcorder onto a computer. Carry out installation again in accordance with the instructions on page 191. Windows XP Home Edition/Professional users If you go to your computer using Windows 2000 Professional or Windows XP Home Edition/ Professional, log in with the steps on the screen. If you connect the USB cable before USB driver installation is...
Connecting your camcorder to "USB CONNECT" in the menu settings and select "PTP," you can copy "Memory Stick" images from a camcorder onto a computer. Carry out installation again in accordance with the instructions on page 191. Windows XP Home Edition/Professional users If you go to your computer using Windows 2000 Professional or Windows XP Home Edition/ Professional, log in with the steps on the screen. If you connect the USB cable before USB driver installation is...

Operating Instructions
Page 190
... three times because three different USB drivers are installed. For Windows 2000 Professional, Windows XP Home Edition/Professional users (12) After the "File Needed" screen appears. t "My Computer" t "ImageMixer" t "Sonyhcb.sys", and click "OK." You cannot install the USB driver if a "Memory Stick" is not in the menu settings. (The default setting is set to NORMAL.) (1) Insert a "Memory Stick" into your camcorder. (2) Connect the AC power adaptor and set the POWER switch to MEMORY/ NETWORK (DCR-TRV950 only). (3) Connect the (USB) jack...
... three times because three different USB drivers are installed. For Windows 2000 Professional, Windows XP Home Edition/Professional users (12) After the "File Needed" screen appears. t "My Computer" t "ImageMixer" t "Sonyhcb.sys", and click "OK." You cannot install the USB driver if a "Memory Stick" is not in the menu settings. (The default setting is set to NORMAL.) (1) Insert a "Memory Stick" into your camcorder. (2) Connect the AC power adaptor and set the POWER switch to MEMORY/ NETWORK (DCR-TRV950 only). (3) Connect the (USB) jack...

Operating Instructions
Page 191
... click the "Device manager" button. Viewing Images Using your Computer Connecting your camcorder to classic view" instead. Perform the following page) 191 For Windows users If you cannot install the USB driver The USB driver has been registered incorrectly as your computer was completed. Viewing images recorded on a tape Step 1: Uninstall the incorrect USB driver 1 Turn on your computer and allow Windows to load. 2 Connect the AC power adaptor, and set the POWER switch to VCR. 3 Connect the USB connector on...
... click the "Device manager" button. Viewing Images Using your Computer Connecting your camcorder to classic view" instead. Perform the following page) 191 For Windows users If you cannot install the USB driver The USB driver has been registered incorrectly as your computer was completed. Viewing images recorded on a tape Step 1: Uninstall the incorrect USB driver 1 Turn on your computer and allow Windows to load. 2 Connect the AC power adaptor, and set the POWER switch to VCR. 3 Connect the USB connector on...

Operating Instructions
Page 193
... in "Installing the USB driver" on your camcorder using the USB cable - mark and delete. Ex: (?)Sony Handycam 7 Turn the POWER switch to OFF (CHG) on page 188. Viewing images recorded on a "Memory Stick" Step1: Uninstall the incorrect USB driver 1 Turn on your computer and allow Windows to load. 2 Insert a "Memory Stick" into your camcorder. 3 Connect the AC power adaptor, and set the POWER switch to MEMORY/ NETWORK (DCR-TRV950 only). 4 Connect the USB connector on your computer's "Device Manager." Other OS: Select "My Computer" t "Control Panel...
... in "Installing the USB driver" on your camcorder using the USB cable - mark and delete. Ex: (?)Sony Handycam 7 Turn the POWER switch to OFF (CHG) on page 188. Viewing images recorded on a "Memory Stick" Step1: Uninstall the incorrect USB driver 1 Turn on your computer and allow Windows to load. 2 Insert a "Memory Stick" into your camcorder. 3 Connect the AC power adaptor, and set the POWER switch to MEMORY/ NETWORK (DCR-TRV950 only). 4 Connect the USB connector on your computer's "Device Manager." Other OS: Select "My Computer" t "Control Panel...

Operating Instructions
Page 194
... Windows to load. (2) Connect the AC power adaptor, and insert a tape into your camcorder. (3) Set the POWER switch to VCR. Viewing images recorded on a tape (1) Turn on the screen. 194 The "PIXELA ImageMixer Ver.1.0 for Sony" You need to install the USB driver and "PIXELA ImageMixer" to ON in Windows 2000 Professional, you must be authorized as Power Users or Administrators. Select USB STREAM in to view taped images on your computer - To install and use the software in the menu settings...
... Windows to load. (2) Connect the AC power adaptor, and insert a tape into your camcorder. (3) Set the POWER switch to VCR. Viewing images recorded on a tape (1) Turn on the screen. 194 The "PIXELA ImageMixer Ver.1.0 for Sony" You need to install the USB driver and "PIXELA ImageMixer" to ON in Windows 2000 Professional, you must be authorized as Power Users or Administrators. Select USB STREAM in to view taped images on your computer - To install and use the software in the menu settings...
Operating Instructions
Page 199
... drive (Example: "Removable Disk (E:)"). USB MODE appears on the LCD screen of your computer before viewing it is set to NORMAL.) (1) Turn on your computer and allow Windows to load. (2) Insert a "Memory Stick" into your camcorder, and connect the AC power adaptor to your camcorder. (3) Set the POWER switch to MEMORY/NETWORK (DCR-TRV950 only). (4) Connect the (USB) jack on your camcorder to play back the file directly from the folder. For Windows users Viewing images Before operation •You need to install the USB driver to the hard disk...
... drive (Example: "Removable Disk (E:)"). USB MODE appears on the LCD screen of your computer before viewing it is set to NORMAL.) (1) Turn on your computer and allow Windows to load. (2) Insert a "Memory Stick" into your camcorder, and connect the AC power adaptor to your camcorder. (3) Set the POWER switch to MEMORY/NETWORK (DCR-TRV950 only). (4) Connect the (USB) jack on your camcorder to play back the file directly from the folder. For Windows users Viewing images Before operation •You need to install the USB driver to the hard disk...

Operating Instructions
Page 201
... software for all the recommended computer environments mentioned above. •Macintosh and Mac OS, QuickTime are not mentioned in each case in this manual. 201 QuickTime 3.0 or newer must be installed (to play back moving pictures). Viewing Images Using your Computer Connecting your camcorder to your computer, install the USB driver on the computer. Recommended computer usage environment when connecting via USB cable and viewing "Memory Stick" images on the CD-ROM...
... software for all the recommended computer environments mentioned above. •Macintosh and Mac OS, QuickTime are not mentioned in each case in this manual. 201 QuickTime 3.0 or newer must be installed (to play back moving pictures). Viewing Images Using your Computer Connecting your camcorder to your computer, install the USB driver on the computer. Recommended computer usage environment when connecting via USB cable and viewing "Memory Stick" images on the CD-ROM...

Operating Instructions
Page 203
... before viewing it , and then select "Eject disk" from the "Special" menu at the top left of the screen. (3) Disconnect the USB cable or eject the "Memory Stick" or set the POWER switch to OFF(CHG) Follow the procedure below. (1) Close all running applications. Desired file type Still image Moving picture* Double-click in this order "Dcim" folder t "100msdcf" folder t Image file "Mssony" folder t "Moml0001" folder t Image file* * Copying a file to play back the file directly...
... before viewing it , and then select "Eject disk" from the "Special" menu at the top left of the screen. (3) Disconnect the USB cable or eject the "Memory Stick" or set the POWER switch to OFF(CHG) Follow the procedure below. (1) Close all running applications. Desired file type Still image Moving picture* Double-click in this order "Dcim" folder t "100msdcf" folder t Image file "Mssony" folder t "Moml0001" folder t Image file* * Copying a file to play back the file directly...
Operating Instructions
Page 208
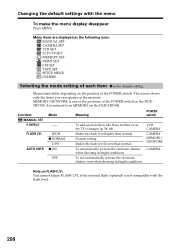
...: MANUAL SET CAMERA SET VCR SET LCD/VF SET MEMORY SET PRINT SET CM SET TAPE SET SETUP MENU OTHERS Selecting the mode setting of each item z is not compatible with the menu To make the menu display disappear Press MENU. To automatically activate the electronic shutter when shooting in bright conditions To not automatically activate the electronic shutter even when shooting in films or on FLASH LVL You cannot adjust FLASH LVL if the external flash (optional) is the default setting. Menu items...
...: MANUAL SET CAMERA SET VCR SET LCD/VF SET MEMORY SET PRINT SET CM SET TAPE SET SETUP MENU OTHERS Selecting the mode setting of each item z is not compatible with the menu To make the menu display disappear Press MENU. To automatically activate the electronic shutter when shooting in bright conditions To not automatically activate the electronic shutter even when shooting in films or on FLASH LVL You cannot adjust FLASH LVL if the external flash (optional) is the default setting. Menu items...

Operating Instructions
Page 224
... beep sounds for at least one minute. c Install it to NORMAL (p. 215). 224 You cannot charge the battery pack. Types of the USB driver was connected before installation of trouble and how to correct trouble Symptom The cassette cannot be transferred by the USB connection. The buttons do not work . The indicators appear mirrorreversed in the display window. Your camcorder is not malfunctioning. • The POWER switch is wrong with the battery pack...
... beep sounds for at least one minute. c Install it to NORMAL (p. 215). 224 You cannot charge the battery pack. Types of the USB driver was connected before installation of trouble and how to correct trouble Symptom The cassette cannot be transferred by the USB connection. The buttons do not work . The indicators appear mirrorreversed in the display window. Your camcorder is not malfunctioning. • The POWER switch is wrong with the battery pack...

Operating Instructions
Page 227
... sound that cannot be played back. The tape contains copyright control signals for copyright protection of the same directories (p. 166).* The image cannot be recorded by your camcorder on the screen. 227 Use an "InfoLITHIUM" battery pack (p. 18). DIRECTORY ERROR • PLAY ERROR • REC ERROR •COPY INHIBIT •Q Z TAPE END •Q NO TAPE • NO PRINT MARK • NO STILL IMAGE FILE • DELETING • FORMATTING • NOW CHARGING Set the date and time...
... sound that cannot be played back. The tape contains copyright control signals for copyright protection of the same directories (p. 166).* The image cannot be recorded by your camcorder on the screen. 227 Use an "InfoLITHIUM" battery pack (p. 18). DIRECTORY ERROR • PLAY ERROR • REC ERROR •COPY INHIBIT •Q Z TAPE END •Q NO TAPE • NO PRINT MARK • NO STILL IMAGE FILE • DELETING • FORMATTING • NOW CHARGING Set the date and time...

Operating Instructions
Page 242
... kbps Output Bluetooth standard Power Class 2 Communications distance2) Max. LCD screen Picture 8.8 cm (3.5 type) 72.2 × 50.4 mm (2 7/8 × 2 in .) (When connecting to the distance between Bluetooth compatible devices. Specifications Video camera recorder System Video recording system 2 rotary heads Helical scanning system Audio recording system Rotary heads, PCM system Quantization: 12 bits (Fs 32 kHz, stereo 1, stereo 2), 16 bits (Fs 48 kHz, stereo) Video signal NTSC color, EIA standards Usable cassette Mini DV cassette with...
... kbps Output Bluetooth standard Power Class 2 Communications distance2) Max. LCD screen Picture 8.8 cm (3.5 type) 72.2 × 50.4 mm (2 7/8 × 2 in .) (When connecting to the distance between Bluetooth compatible devices. Specifications Video camera recorder System Video recording system 2 rotary heads Helical scanning system Audio recording system Rotary heads, PCM system Quantization: 12 bits (Fs 32 kHz, stereo 1, stereo 2), 16 bits (Fs 48 kHz, stereo) Video signal NTSC color, EIA standards Usable cassette Mini DV cassette with...

Operating Instructions
Page 254
... NTSC system 235 O, P, Q OLD MOVIE 59 Operation indicators 252 OVERLAP 55 Photo save 163 Photo scan 94 Photo search 92 PICTURE EFFECT 58, 84 Picture search 43 Playback pause 43 Playing time 18 Power zoom 31 Print mark 180 PROGRAM AE 67 R Recording level 79 Recording time 17 Rec Review 38 Remaining battery time indicator 33 Remaining tape indicator ...... 33 Remote Commander 250 Remote sensor 244 RESET 224 S Self-diagnosis display .......... 225 Self-timer recording 36, 50, 143, 155 Shutter speed...
... NTSC system 235 O, P, Q OLD MOVIE 59 Operation indicators 252 OVERLAP 55 Photo save 163 Photo scan 94 Photo search 92 PICTURE EFFECT 58, 84 Picture search 43 Playback pause 43 Playing time 18 Power zoom 31 Print mark 180 PROGRAM AE 67 R Recording level 79 Recording time 17 Rec Review 38 Remaining battery time indicator 33 Remaining tape indicator ...... 33 Remote Commander 250 Remote sensor 244 RESET 224 S Self-diagnosis display .......... 225 Self-timer recording 36, 50, 143, 155 Shutter speed...


