Operating Instructions
Page 1
Record the serial number in the space provided below. Serial No. AC- DCR-TRV830 TM SERIES DCR-TRV730/TRV828/TRV830 ©2001 Sony Corporation 3-066-521-12 (1) Digital Video Camera Recorder Operating Instructions Before operating the unit, please read this product. Owner's Record The model and serial numbers are located on the bottom. Refer to these numbers whenever you call upon your Sony dealer regarding this manual thoroughly, and retain it for future reference. DCR-TRV Model No. Serial No. Model No.
Record the serial number in the space provided below. Serial No. AC- DCR-TRV830 TM SERIES DCR-TRV730/TRV828/TRV830 ©2001 Sony Corporation 3-066-521-12 (1) Digital Video Camera Recorder Operating Instructions Before operating the unit, please read this product. Owner's Record The model and serial numbers are located on the bottom. Refer to these numbers whenever you call upon your Sony dealer regarding this manual thoroughly, and retain it for future reference. DCR-TRV Model No. Serial No. Model No.
Operating Instructions
Page 3
.... The shielded interface cable supplied with this equipment must accept any interference received, including interference that any changes or modifications not expressly approved in this manual could void your authority to Subpart B of Part 15 of the FCC Rules. Increase the separation between the equipment and receiver. - Consult the dealer or...
.... The shielded interface cable supplied with this equipment must accept any interference received, including interference that any changes or modifications not expressly approved in this manual could void your authority to Subpart B of Part 15 of the FCC Rules. Increase the separation between the equipment and receiver. - Consult the dealer or...
Operating Instructions
Page 4
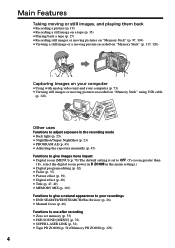
... recording mode • Back light (p. 23) • NightShot/Super NightShot (p. 23) • PROGRAM AE (p. 43) • Adjusting the exposure manually (p. 45) Functions to give images more impact • Digital zoom [MENU] (p. 78) The default setting is set to OFF. (To zoom greater...Title (p. 47, 49) • MEMORY MIX (p. 110) Functions to give a natural appearance to your recordings • END SEARCH/EDITSEARCH/Rec Review (p. 26) • Manual focus (p. 46) Functions to use after recording • Zero set memory (p. 55) • HiFi SOUND [MENU] (p. 78) • SUPER LASER LINK (p. 32) ...
... recording mode • Back light (p. 23) • NightShot/Super NightShot (p. 23) • PROGRAM AE (p. 43) • Adjusting the exposure manually (p. 45) Functions to give images more impact • Digital zoom [MENU] (p. 78) The default setting is set to OFF. (To zoom greater...Title (p. 47, 49) • MEMORY MIX (p. 110) Functions to give a natural appearance to your recordings • END SEARCH/EDITSEARCH/Rec Review (p. 26) • Manual focus (p. 46) Functions to use after recording • Zero set memory (p. 55) • HiFi SOUND [MENU] (p. 78) • SUPER LASER LINK (p. 32) ...
Operating Instructions
Page 5
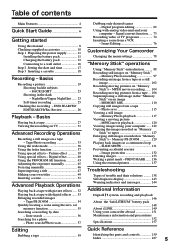
... Focusing manually 46 Superimposing a title 47 Making your own titles 49 Inserting a scene 51 Advanced Playback Operations Playing back a tape with picture effects ..... 52 Playing back a tape with analog video unit and your camcorder abroad 151 Maintenance information and precautions 152 ... the dark - Table of trouble and their solutions ......... 138 Self-diagnosis display 143 Warning indicators and messages 144 Additional Information Digital8 system, recording and playback 146 About the "InfoLITHIUM" battery pack 148 About i.LINK 149 Using your computer - NightShot/Super ...
... Focusing manually 46 Superimposing a title 47 Making your own titles 49 Inserting a scene 51 Advanced Playback Operations Playing back a tape with picture effects ..... 52 Playing back a tape with analog video unit and your camcorder abroad 151 Maintenance information and precautions 152 ... the dark - Table of trouble and their solutions ......... 138 Self-diagnosis display 143 Warning indicators and messages 144 Additional Information Digital8 system, recording and playback 146 About the "InfoLITHIUM" battery pack 148 About i.LINK 149 Using your computer - NightShot/Super ...
Operating Instructions
Page 8
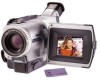
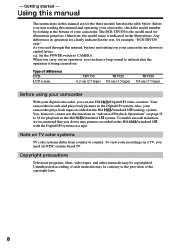
...TRV730 6.2 cm (2.5 type) TRV828 8.8 cm (3.5 type) TRV830 8.8 cm (3.5 type) Before using your camcorder With your digital camcorder, you can hear a beep sound to indicate that you do not mix pictures recorded in the Hi8 /standard 8 with the Digital8 system on a TV, you read through this manual...at the bottom of the copyright laws. 8 Using this manual The instructions in this manual and operating your camcorder. When you carry out an operation, you start reading this manual are for playback in the Digital8 system. The DCR-TRV830 is being carried out. Copyright ...
...TRV730 6.2 cm (2.5 type) TRV828 8.8 cm (3.5 type) TRV830 8.8 cm (3.5 type) Before using your camcorder With your digital camcorder, you can hear a beep sound to indicate that you do not mix pictures recorded in the Hi8 /standard 8 with the Digital8 system on a TV, you read through this manual...at the bottom of the copyright laws. 8 Using this manual The instructions in this manual and operating your camcorder. When you carry out an operation, you start reading this manual are for playback in the Digital8 system. The DCR-TRV830 is being carried out. Copyright ...

Operating Instructions
Page 9
However, there may be repaired [a]. •Never leave your camcorder exposed to malfunction. Letting your camcorder get wet. Sometimes this manual Precautions on camcorder care Lens and LCD screen/finder (on mounted models only) •The LCD screen and the finder are manufactured using extremely high-precision technology so ...
However, there may be repaired [a]. •Never leave your camcorder exposed to malfunction. Letting your camcorder get wet. Sometimes this manual Precautions on camcorder care Lens and LCD screen/finder (on mounted models only) •The LCD screen and the finder are manufactured using extremely high-precision technology so ...

Operating Instructions
Page 24
...In MEMORY mode You cannot use the NightShot function in bright places (ex. The maximum shooting distance using the NightShot function, focus manually. Notes •Do not use the Super NightShot function. Exposure - Exposure - PROGRAM AE Shutter speed in the Super NightShot mode ...unnatural colors. •If focusing is about 3 m (10 feet). 24 and "NIGHTSHOT" indicators flash on the screen. This may cause your camcorder to malfunction. •When you can not use the following functions: - Digital effect - To cancel the Super NightShot mode, press SUPER NIGHTSHOT...
...In MEMORY mode You cannot use the NightShot function in bright places (ex. The maximum shooting distance using the NightShot function, focus manually. Notes •Do not use the Super NightShot function. Exposure - Exposure - PROGRAM AE Shutter speed in the Super NightShot mode ...unnatural colors. •If focusing is about 3 m (10 feet). 24 and "NIGHTSHOT" indicators flash on the screen. This may cause your camcorder to malfunction. •When you can not use the following functions: - Digital effect - To cancel the Super NightShot mode, press SUPER NIGHTSHOT...

Operating Instructions
Page 28
DISPLAY Using the data code function Your camcorder automatically records not only images on the screen. The display changes as follows: date/time t various settings (SteadyShot, exposure AUTO/MANUAL, white balance, gain, shutter speed, aperture value) t no indicator Note on the ... F1.6 9dB [d] [e] [f] Not to display various settings Set DATA CODE to DATE in the Digital8 system. Press DATA CODE on your camcorder or the Remote Commander supplied with your camcorder's information when you have recorded. Use the Remote Commander for tapes recorded in the menu settings (p....
DISPLAY Using the data code function Your camcorder automatically records not only images on the screen. The display changes as follows: date/time t various settings (SteadyShot, exposure AUTO/MANUAL, white balance, gain, shutter speed, aperture value) t no indicator Note on the ... F1.6 9dB [d] [e] [f] Not to display various settings Set DATA CODE to DATE in the Digital8 system. Press DATA CODE on your camcorder or the Remote Commander supplied with your camcorder's information when you have recorded. Use the Remote Commander for tapes recorded in the menu settings (p....

Operating Instructions
Page 42
... in the slow shutter mode: - Shutter speed Shutter speed number SLOW SHTR 1 SLOW SHTR 2 SLOW SHTR 3 SLOW SHTR 4 Shutter speed 1/30 1/15 1/8 1/4 42 Fader - Focus manually using a tripod. Using special effects -
... in the slow shutter mode: - Shutter speed Shutter speed number SLOW SHTR 1 SLOW SHTR 2 SLOW SHTR 3 SLOW SHTR 4 Shutter speed 1/30 1/15 1/8 1/4 42 Fader - Focus manually using a tripod. Using special effects -

Operating Instructions
Page 45
... - To record dark pictures (e.g. Your camcorder automatically returns to the automatic exposure mode Press EXPOSURE. The exposure indicator appears on the screen. (2) Turn the SEL/PUSH EXEC dial to adjust the brightness. 1 EXPOSURE 2 To return to the automatic mode: - Note When you adjust the exposure manually, the backlight function does not work...
... - To record dark pictures (e.g. Your camcorder automatically returns to the automatic exposure mode Press EXPOSURE. The exposure indicator appears on the screen. (2) Turn the SEL/PUSH EXEC dial to adjust the brightness. 1 EXPOSURE 2 To return to the automatic mode: - Note When you adjust the exposure manually, the backlight function does not work...

Operating Instructions
Page 46
...To return to the autofocus mode Set FOCUS to focus on. 46 subjects with little contrast with water droplets. - This makes focusing easier. Focusing manually You can gain better results by first focusing at the "T" (telephoto) position and then shooting at the end of the "W" (wide-angle)...mode is too close to the subject Focus at the "W" (wide-angle) position. horizontal stripes. - To focus precisely Adjust the zoom by manually adjusting the focus in the following indicators: when recording a distant subject. when the subject is not effective when shooting: - When you want ...
...To return to the autofocus mode Set FOCUS to focus on. 46 subjects with little contrast with water droplets. - This makes focusing easier. Focusing manually You can gain better results by first focusing at the "T" (telephoto) position and then shooting at the end of the "W" (wide-angle)...mode is too close to the subject Focus at the "W" (wide-angle) position. horizontal stripes. - To focus precisely Adjust the zoom by manually adjusting the focus in the following indicators: when recording a distant subject. when the subject is not effective when shooting: - When you want ...

Operating Instructions
Page 73
... After capturing images and sound Stop capturing procedures on your computer and the software which has the i.LINK (DV) jack to the instruction manual of the analog video signals, the computer may contain noise or incorrect colors. •You cannot record or capture the video output via ...your computer. Signal convert function You can exchange video signals. •Depending on the condition of your camcorder. For details on your camcorder. Notes •You need to install software which can capture images and sound from an analog video unit connected to your...
... After capturing images and sound Stop capturing procedures on your computer and the software which has the i.LINK (DV) jack to the instruction manual of the analog video signals, the computer may contain noise or incorrect colors. •You cannot record or capture the video output via ...your computer. Signal convert function You can exchange video signals. •Depending on the condition of your camcorder. For details on your camcorder. Notes •You need to install software which can capture images and sound from an analog video unit connected to your...
Operating Instructions
Page 79
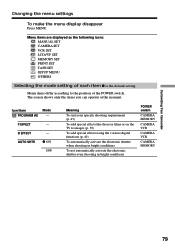
... requirement (p. 43) To add special effects like those in bright conditions POWER switch CAMERA MEMORY CAMERA VCR CAMERA VCR CAMERA MEMORY Customizing Your Camcorder 79 Changing the menu settings To make the menu display disappear Press MENU. Menu items differ according to images (p. 39) To add special... EFFECT - The screen shows only the items you can operate at the moment. P EFFECT - Menu items are displayed as the following icons: MANUAL SET CAMERA SET VCR SET LCD/VF SET MEMORY SET PRINT SET TAPE SET SETUP MENU OTHERS Selecting the mode setting of the POWER switch.
... requirement (p. 43) To add special effects like those in bright conditions POWER switch CAMERA MEMORY CAMERA VCR CAMERA VCR CAMERA MEMORY Customizing Your Camcorder 79 Changing the menu settings To make the menu display disappear Press MENU. Menu items differ according to images (p. 39) To add special... EFFECT - The screen shows only the items you can operate at the moment. P EFFECT - Menu items are displayed as the following icons: MANUAL SET CAMERA SET VCR SET LCD/VF SET MEMORY SET PRINT SET TAPE SET SETUP MENU OTHERS Selecting the mode setting of the POWER switch.
Operating Instructions
Page 89
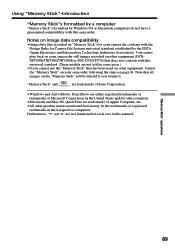
..."Memory Stick" and are trademarks of Sony Corporation. •Windows and ActiveMovie, DirectShow are either registered trademarks or trademarks of Microsoft Corporation in the United States and/or other equipment, format the "Memory Stick" on your camcorder following the steps on other countries. &#... (DCRTRV890E/TRV900/TRV900E or DSC-D700/D770) that does not conform with this manual. Notes on image data compatibility •Image data files recorded on "Memory Stick"s by your camcorder still images recorded on other product names mentioned herein may be deleted if you ...
..."Memory Stick" and are trademarks of Sony Corporation. •Windows and ActiveMovie, DirectShow are either registered trademarks or trademarks of Microsoft Corporation in the United States and/or other equipment, format the "Memory Stick" on your camcorder following the steps on other countries. &#... (DCRTRV890E/TRV900/TRV900E or DSC-D700/D770) that does not conform with this manual. Notes on image data compatibility •Image data files recorded on "Memory Stick"s by your camcorder still images recorded on other product names mentioned herein may be deleted if you ...

Operating Instructions
Page 138
...the cassette and leave your camcorder, use the following table to ON. (p. 78) • FOCUS is activated. In the recording mode Symptom START/STOP does not operate. c Set FOCUS to MANUAL to OFF in the standby mode for at least 1 hour to MANUAL. c Use Hi8 /Digital8 tapes. (p. 85) •... 27) • The write-protect tab is not set to acclimatize. (p. 152) • While being operated in CAMERA mode, your Sony dealer or local authorized Sony service facility. Some tiny white spots appear on the screen or the display window, the self-diagnosis display function has worked.
...the cassette and leave your camcorder, use the following table to ON. (p. 78) • FOCUS is activated. In the recording mode Symptom START/STOP does not operate. c Set FOCUS to MANUAL to OFF in the standby mode for at least 1 hour to MANUAL. c Use Hi8 /Digital8 tapes. (p. 85) •... 27) • The write-protect tab is not set to acclimatize. (p. 152) • While being operated in CAMERA mode, your Sony dealer or local authorized Sony service facility. Some tiny white spots appear on the screen or the display window, the self-diagnosis display function has worked.

Operating Instructions
Page 149
...indicated such as this unit is a more i.LINK jacks (DV jacks), refer to the instruction manual of Electrical and Electronic Engineers. When units are connected to be sent or received in the instruction manual of data that operations and data transactions are defined: S100 (approx. 100Mbps*) S200 (approx. 200Mbps... can be connected to i.LINK-compatible equipment having two or more familiar term for IEEE 1394 data transport bus proposed by SONY, and is "Mbps"? This section describes the i.LINK standard and its features. About the Name "i.LINK" i.LINK is connected to the equipment...
...indicated such as this unit is a more i.LINK jacks (DV jacks), refer to the instruction manual of Electrical and Electronic Engineers. When units are connected to be sent or received in the instruction manual of data that operations and data transactions are defined: S100 (approx. 100Mbps*) S200 (approx. 200Mbps... can be connected to i.LINK-compatible equipment having two or more familiar term for IEEE 1394 data transport bus proposed by SONY, and is "Mbps"? This section describes the i.LINK standard and its features. About the Name "i.LINK" i.LINK is connected to the equipment...
Operating Instructions
Page 150
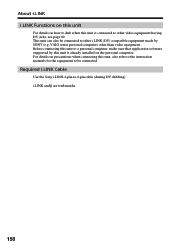
...this unit is connected to other video equipment having DV jacks, see page 60. For details on the personal computer. Required i.LINK Cable Use the Sony i.LINK 4-pin-to-4-pin cable (during DV dubbing). i.LINK and are trademarks. 150 Before connecting this unit to a personal computer, make sure ...that application software supported by SONY (e.g. This unit can also be connected. About i.LINK i.LINK Functions on this unit For details on how to dub when this unit is already...
...this unit is connected to other video equipment having DV jacks, see page 60. For details on the personal computer. Required i.LINK Cable Use the Sony i.LINK 4-pin-to-4-pin cable (during DV dubbing). i.LINK and are trademarks. 150 Before connecting this unit to a personal computer, make sure ...that application software supported by SONY (e.g. This unit can also be connected. About i.LINK i.LINK Functions on this unit For details on how to dub when this unit is already...

Operating Instructions
Page 166
...) 7 Picture effect indicator (p. 39, 52) 8 Volume indicator (p. 27)/Data code indicator (p. 28) 9 PROGRAM AE indicator (p. 43) 0 Backlight indicator (p. 23) qa SteadyShot off indicator (p. 80) qs Manual focusing indicator (p. 46) qd Self-timer indicator (p. 25, 34, 101) qf STBY/REC indicator (p. 19)/Video control mode (p. 29)/Image size indicator (p. 93)/Image quality...
...) 7 Picture effect indicator (p. 39, 52) 8 Volume indicator (p. 27)/Data code indicator (p. 28) 9 PROGRAM AE indicator (p. 43) 0 Backlight indicator (p. 23) qa SteadyShot off indicator (p. 80) qs Manual focusing indicator (p. 46) qd Self-timer indicator (p. 25, 34, 101) qf STBY/REC indicator (p. 19)/Video control mode (p. 29)/Image size indicator (p. 93)/Image quality...
Operating Instructions
Page 167
... Charging battery 12 Charging built-in rechargeable battery 154 Clock set 17 Data code 28 Date search 56 DEMO 86 Digital effect 40, 53 Digital8 system 146 Digital program editing ......... 62 DISPLAY 28 DOT 37 Dual sound track tape .......... 147 DV connecting cable ....... 60, 103 E ...screen 118 "InfoLITHIUM" battery pack 148 Infrared rays emitter ........ 23, 32 JPEG 88 LANC jack 164 LUMINANCEKEY 40 M, N Main sound 81 Manual focus 46 Memory chroma key 110 Memory luminance key ....... 110 MEMORY MIX 110 Memory overlap 110 Memory PB ZOOM 129 Memory photo recording ...... 97...
... Charging battery 12 Charging built-in rechargeable battery 154 Clock set 17 Data code 28 Date search 56 DEMO 86 Digital effect 40, 53 Digital8 system 146 Digital program editing ......... 62 DISPLAY 28 DOT 37 Dual sound track tape .......... 147 DV connecting cable ....... 60, 103 E ...screen 118 "InfoLITHIUM" battery pack 148 Infrared rays emitter ........ 23, 32 JPEG 88 LANC jack 164 LUMINANCEKEY 40 M, N Main sound 81 Manual focus 46 Memory chroma key 110 Memory luminance key ....... 110 MEMORY MIX 110 Memory overlap 110 Memory PB ZOOM 129 Memory photo recording ...... 97...


