
Operating Instructions
Page 6
... from a VCR - Table of contents Main Features 4 Focusing manually 63 Using the spot focus function Quick Start Guide - Back light function 34 Shooting in Cassette Memory Adjusting the white balance manually 101 49 Using the wide mode 50 "Memory Stick" Operations Using the fader function 52 Using a "Memory Stick" Using special effects - NightShot/Super NightShot/ Color Slow Shutter 34 Checking recordings - Title search 75 Searching a recording by frame recording - Basics Playing back a tape 39 To display the screen indicators - Introduction 102 Using special...
... from a VCR - Table of contents Main Features 4 Focusing manually 63 Using the spot focus function Quick Start Guide - Back light function 34 Shooting in Cassette Memory Adjusting the white balance manually 101 49 Using the wide mode 50 "Memory Stick" Operations Using the fader function 52 Using a "Memory Stick" Using special effects - NightShot/Super NightShot/ Color Slow Shutter 34 Checking recordings - Title search 75 Searching a recording by frame recording - Basics Playing back a tape 39 To display the screen indicators - Introduction 102 Using special...
Operating Instructions
Page 10
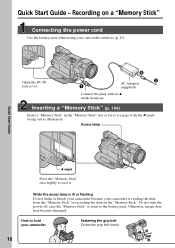
... data from the "Memory Stick" or recording the data on a "Memory Stick" Connecting the power cord Use the battery pack when using your camcorder Fastening the grip belt Fasten the grip belt firmly. 10 How to eject it can go with its v mark facing up. Otherwise, image data may become damaged. Recording on the "Memory Stick." Do not turn the power off, eject the "Memory Stick" or remove the battery pack. Access lamp Quick Start Guide b mark Press the "Memory Stick" once lightly...
... data from the "Memory Stick" or recording the data on a "Memory Stick" Connecting the power cord Use the battery pack when using your camcorder Fastening the grip belt Fasten the grip belt firmly. 10 How to eject it can go with its v mark facing up. Otherwise, image data may become damaged. Recording on the "Memory Stick." Do not turn the power off, eject the "Memory Stick" or remove the battery pack. Access lamp Quick Start Guide b mark Press the "Memory Stick" once lightly...
Operating Instructions
Page 12
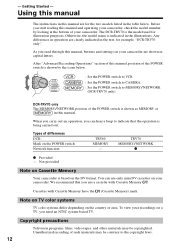
... model number by the icons below . The DCR-TRV70 is shown by looking at the bottom of your camcorder. As you need an NTSC system-based TV. After "Advanced Recording Operations" section of this manual, buttons and settings on your recordings on a TV, you read through this manual, position of the POWER switch is based on the DV format. When you carry out an operation, you use only mini DV cassettes...
... model number by the icons below . The DCR-TRV70 is shown by looking at the bottom of your camcorder. As you need an NTSC system-based TV. After "Advanced Recording Operations" section of this manual, buttons and settings on your recordings on a TV, you read through this manual, position of the POWER switch is based on the DV format. When you carry out an operation, you use only mini DV cassettes...

Operating Instructions
Page 44
... red plug, the sound is L (left) signal. S VIDEO AUDIO/ VIDEO A/V connecting cable (supplied) : Signal flow IN Yellow S VIDEO TV VIDEO AUDIO Red White If your TV is a monaural type Connect the yellow plug of your TV or VCR is already connected to the VCR Connect your camcorder to the LINE IN input on the LCD screen. Viewing a recording on the TV Connect your camcorder to the TV with the A/V connecting cable supplied with your camcorder. Open the jack cover. You can operate the video control buttons...
... red plug, the sound is L (left) signal. S VIDEO AUDIO/ VIDEO A/V connecting cable (supplied) : Signal flow IN Yellow S VIDEO TV VIDEO AUDIO Red White If your TV is a monaural type Connect the yellow plug of your TV or VCR is already connected to the VCR Connect your camcorder to the LINE IN input on the LCD screen. Viewing a recording on the TV Connect your camcorder to the TV with the A/V connecting cable supplied with your camcorder. Open the jack cover. You can operate the video control buttons...
Operating Instructions
Page 72
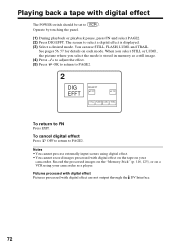
... image. (4) Press -/+ to adjust the effect. (5) Press OK to return to PAGE2. 2 DIG EFFT DIG EFFT OFF OK STILL FLASH LUMI. Notes • You cannot process externally input scenes using your camcorder. Playing back a tape with digital effect are not output through the DV Interface. 72 Operate by touching the panel. (1) During playback or playback pause, press FN and select PAGE2. (2) Press DIG EFFT. The screen...
... image. (4) Press -/+ to adjust the effect. (5) Press OK to return to PAGE2. 2 DIG EFFT DIG EFFT OFF OK STILL FLASH LUMI. Notes • You cannot process externally input scenes using your camcorder. Playing back a tape with digital effect are not output through the DV Interface. 72 Operate by touching the panel. (1) During playback or playback pause, press FN and select PAGE2. (2) Press DIG EFFT. The screen...
Operating Instructions
Page 110
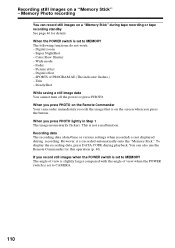
... operation (p. 40). Wide mode - SteadyShot While saving a still image data You cannot turn off the power or press PHOTO. Recording data The recording data (date/time or various settings when recorded) is not a malfunction. If you press PHOTO lightly in Step 1 The image momentarily flickers. When the POWER switch is set to CAMERA. 110 However, it is on a "Memory Stick" - You can record still images on a "Memory Stick" during playback. Recording still images on the screen when you press the button. Memory Photo recording You can also use...
... operation (p. 40). Wide mode - SteadyShot While saving a still image data You cannot turn off the power or press PHOTO. Recording data The recording data (date/time or various settings when recorded) is not a malfunction. If you press PHOTO lightly in Step 1 The image momentarily flickers. When the POWER switch is set to CAMERA. 110 However, it is on a "Memory Stick" - You can record still images on a "Memory Stick" during playback. Recording still images on the screen when you press the button. Memory Photo recording You can also use...
Operating Instructions
Page 116
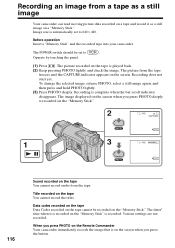
.... Operate by touching the panel. (1) Press . The date/ time when it as a still image Your camcorder can read moving picture data recorded on a tape and record it is recorded on the "Memory Stick" is recorded on the "Memory Stick." 2 640 FINE 12 CAPTURE PHOTO 101 1 3 640 FINE PHOTO 101 116 Sound recorded on the "Memory Stick." Recording does not start yet. The image displayed on the screen when you press PHOTO deeply is recorded. Data codes recorded on the tape Data Codes recorded on the tape cannot...
.... Operate by touching the panel. (1) Press . The date/ time when it as a still image Your camcorder can read moving picture data recorded on a tape and record it is recorded on the "Memory Stick" is recorded on the "Memory Stick." 2 640 FINE 12 CAPTURE PHOTO 101 1 3 640 FINE PHOTO 101 116 Sound recorded on the "Memory Stick." Recording does not start yet. The image displayed on the screen when you press PHOTO deeply is recorded. Data codes recorded on the tape Data Codes recorded on the tape cannot...
Operating Instructions
Page 125
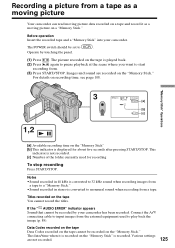
... "Memory Stick" Operations 3 50min N 320REC BBB 0:15:42:43 0:00:03 15sec 101 [a] [b] [c] 1,2 [a] Available recording time on the tape is displayed for recording To stop recording Press START/STOP. If the " AUDIO ERROR" indicator appears Sound that cannot be set to play back the image (p. 89). The picture recorded on the "Memory Stick" [b] This indicator is played back. (2) Press again to pause playback at the scene where you want to start recording from the external equipment used...
... "Memory Stick" Operations 3 50min N 320REC BBB 0:15:42:43 0:00:03 15sec 101 [a] [b] [c] 1,2 [a] Available recording time on the tape is displayed for recording To stop recording Press START/STOP. If the " AUDIO ERROR" indicator appears Sound that cannot be set to play back the image (p. 89). The picture recorded on the "Memory Stick" [b] This indicator is played back. (2) Press again to pause playback at the scene where you want to start recording from the external equipment used...
Operating Instructions
Page 148
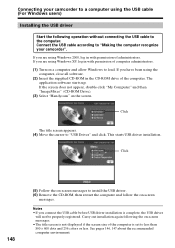
... dots and 256 colors or less. If you connect the USB cable before USB driver installation is not displayed if the screen size of the computer. If you have been using the USB cable (For Windows users) Installing the USB driver Start the following the on a computer and allow Windows to load. This starts USB driver installation. If you are using Windows XP, log in the CD-ROM drive of the computer is set to "USB Driver" and click...
... dots and 256 colors or less. If you connect the USB cable before USB driver installation is not displayed if the screen size of the computer. If you have been using the USB cable (For Windows users) Installing the USB driver Start the following the on a computer and allow Windows to load. This starts USB driver installation. If you are using Windows XP, log in the CD-ROM drive of the computer is set to "USB Driver" and click...
Operating Instructions
Page 152
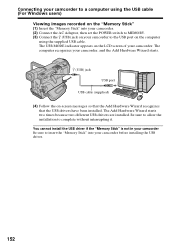
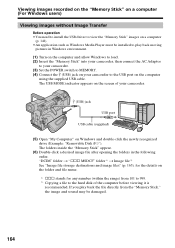
... USB cable (For Windows users) Viewing images recorded on the "Memory Stick" (1) Insert the "Memory Stick" into your camcorder. You cannot install the USB driver if the "Memory Stick" is not in your camcorder Be sure to insert the "Memory Stick" into your camcorder. (2) Connect the AC Adaptor, then set the POWER switch to MEMORY. (3) Connect the (USB) jack on your camcorder, and the Add Hardware Wizard starts. (USB) jack USB port USB cable (supplied) (4) Follow the on the LCD screen of your camcorder before installing the USB driver...
... USB cable (For Windows users) Viewing images recorded on the "Memory Stick" (1) Insert the "Memory Stick" into your camcorder. You cannot install the USB driver if the "Memory Stick" is not in your camcorder Be sure to insert the "Memory Stick" into your camcorder. (2) Connect the AC Adaptor, then set the POWER switch to MEMORY. (3) Connect the (USB) jack on your camcorder, and the Add Hardware Wizard starts. (USB) jack USB port USB cable (supplied) (4) Follow the on the LCD screen of your camcorder before installing the USB driver...
Operating Instructions
Page 153
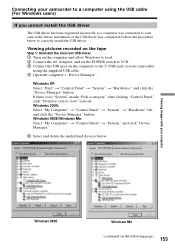
... "Device Manager" button. If there is no "System" inside "Pick a category" after clicking "Control Panel," click "Switch to classic view" instead. Windows 98SE/Windows Me: Select "My Computer" t "Control Panel" t "System," and click "Device Manager." 5 Select and delete the underlined devices below to correctly install the USB driver. Connecting your camcorder to a computer using the supplied USB cable. 4 Open the computer's "Device Manager." Follow the procedure below . Viewing images with your computer Windows 98SE Windows...
... "Device Manager" button. If there is no "System" inside "Pick a category" after clicking "Control Panel," click "Switch to classic view" instead. Windows 98SE/Windows Me: Select "My Computer" t "Control Panel" t "System," and click "Device Manager." 5 Select and delete the underlined devices below to correctly install the USB driver. Connecting your camcorder to a computer using the supplied USB cable. 4 Open the computer's "Device Manager." Follow the procedure below . Viewing images with your computer Windows 98SE Windows...
Operating Instructions
Page 155
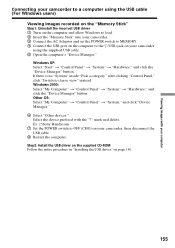
...: (?)Sony Handycam 7 Set the POWER switch to classic view" instead. Windows XP: Select "Start" t "Control Panel" t "System" t "Hardware," and click the "Device Manager" button. If there is no "System" inside "Pick a category" after clicking "Control Panel," click "Switch to OFF (CHG) on your camcorder, then disconnect the USB cable. 8 Restart the computer. Select the device prefixed with your computer Connecting your camcorder to a computer using the USB cable (For Windows users) Viewing images recorded on the "Memory Stick...
...: (?)Sony Handycam 7 Set the POWER switch to classic view" instead. Windows XP: Select "Start" t "Control Panel" t "System" t "Hardware," and click the "Device Manager" button. If there is no "System" inside "Pick a category" after clicking "Control Panel," click "Switch to OFF (CHG) on your camcorder, then disconnect the USB cable. 8 Restart the computer. Select the device prefixed with your computer Connecting your camcorder to a computer using the USB cable (For Windows users) Viewing images recorded on the "Memory Stick...

Operating Instructions
Page 160
... function makes it simple to create a video CD by capturing images recorded on a computer - Viewing pictures recorded on the tape on the tape or images live from which you want to capture images onto the CD-R. (3) Click . (4) Connect the (USB) jack on your camcorder. Easy Video CD automatically begins to capture images onto the CD-R to the USB port on the computer using the supplied USB cable. (5) Insert a new CD-R in the CD-R drive...
... function makes it simple to create a video CD by capturing images recorded on a computer - Viewing pictures recorded on the tape on the tape or images live from which you want to capture images onto the CD-R. (3) Click . (4) Connect the (USB) jack on your camcorder. Easy Video CD automatically begins to capture images onto the CD-R to the USB port on the computer using the supplied USB cable. (5) Insert a new CD-R in the CD-R drive...
Operating Instructions
Page 163
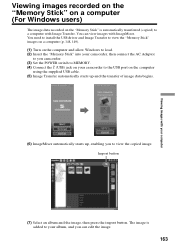
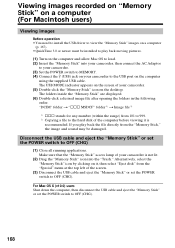
...). (1) Turn on the computer and allow Windows to load. (2) Insert the "Memory Stick" into your camcorder, then connect the AC Adaptor to you camcorder. (3) Set the POWER switch to MEMORY. (4) Connect the (USB) jack on your camcorder to the USB port on the "Memory Stick" is added to view the copied image. The image is automatically transferred (copied) to a computer with ImageMixer. Viewing images recorded on the "Memory Stick" on a computer (For Windows users) The image data recorded on the computer using the supplied USB cable. (5) Image Transfer...
...). (1) Turn on the computer and allow Windows to load. (2) Insert the "Memory Stick" into your camcorder, then connect the AC Adaptor to you camcorder. (3) Set the POWER switch to MEMORY. (4) Connect the (USB) jack on your camcorder to the USB port on the "Memory Stick" is added to view the copied image. The image is automatically transferred (copied) to a computer with ImageMixer. Viewing images recorded on the "Memory Stick" on a computer (For Windows users) The image data recorded on the computer using the supplied USB cable. (5) Image Transfer...
Operating Instructions
Page 164
... play back the file directly from 101 to 999. 2) Copying a file to the hard disk of your camcorder to the USB port on the computer using the supplied USB cable. The folders inside the "Memory Stick" appear. (6) Double-click a desired image file after opening the folders in Windows environment. (1) Turn on the computer and allow Windows to load. (2) Insert the "Memory Stick" into your camcorder, then connect the AC Adaptor to your camcorder. (3) Set the POWER switch to MEMORY. (4) Connect...
... play back the file directly from 101 to 999. 2) Copying a file to the hard disk of your camcorder to the USB port on the computer using the supplied USB cable. The folders inside the "Memory Stick" appear. (6) Double-click a desired image file after opening the folders in Windows environment. (1) Turn on the computer and allow Windows to load. (2) Insert the "Memory Stick" into your camcorder, then connect the AC Adaptor to your camcorder. (3) Set the POWER switch to MEMORY. (4) Connect...
Operating Instructions
Page 168
... using the supplied USB cable. The folders inside the "Memory Stick" are displayed. (6) Double-click a desired image file after opening the folders in the following order. "DCIM" folder t "sss MSDCF" folder 1) t Image file 2) 1) sss stands for any number (within the range) from 101 to 999. 2) Copying a file to the hard disk of the screen. (3) Disconnect the USB cable and eject the "Memory Stick" or set the POWER switch to OFF (CHG). If you play back moving pictures. (1) Turn...
... using the supplied USB cable. The folders inside the "Memory Stick" are displayed. (6) Double-click a desired image file after opening the folders in the following order. "DCIM" folder t "sss MSDCF" folder 1) t Image file 2) 1) sss stands for any number (within the range) from 101 to 999. 2) Copying a file to the hard disk of the screen. (3) Disconnect the USB cable and eject the "Memory Stick" or set the POWER switch to OFF (CHG). If you play back moving pictures. (1) Turn...
Operating Instructions
Page 170
... this connection, you convert video signals to digital video signals via your VCR has an S video jack Pictures can connect using an S video cable (optional). Depending on the analog video unit, the image may contain noise or incorrect colors. •You cannot record or capture the video output via your camcorder and the VCR. 170 Connect an S video cable (optional) to connect the yellow (video) plug of the A/V connecting cable. Signal convert function Notes •You need to the S video jacks...
... this connection, you convert video signals to digital video signals via your VCR has an S video jack Pictures can connect using an S video cable (optional). Depending on the analog video unit, the image may contain noise or incorrect colors. •You cannot record or capture the video output via your camcorder and the VCR. 170 Connect an S video cable (optional) to connect the yellow (video) plug of the A/V connecting cable. Signal convert function Notes •You need to the S video jacks...
Operating Instructions
Page 193
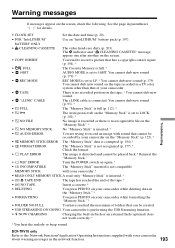
... MEMORY STICK No "Memory Stick" is inserted. * • AUDIO ERROR You are dirty (p. 203). Troubleshooting • CLOCK SET Set the date and time (p. 20). • FOR "InfoLITHIUM" Use an "InfoLITHIUM" battery pack (p. 197). The x indicator and " CLEANING CASSETTE" message appear one after another on the screen. • COPY INHIBIT You tried to LOCK (p. 102). * • NO FILE No image is recorded or there is no recorded portion on the tape recorded in flash or an external flash...
... MEMORY STICK No "Memory Stick" is inserted. * • AUDIO ERROR You are dirty (p. 203). Troubleshooting • CLOCK SET Set the date and time (p. 20). • FOR "InfoLITHIUM" Use an "InfoLITHIUM" battery pack (p. 197). The x indicator and " CLEANING CASSETTE" message appear one after another on the screen. • COPY INHIBIT You tried to LOCK (p. 102). * • NO FILE No image is recorded or there is no recorded portion on the tape recorded in flash or an external flash...
Operating Instructions
Page 208
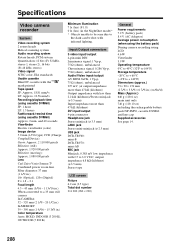
...) LANC jack Stereo mini-minijack (ø 2.5 mm) USB jack DCR-TRV60: mini-B DCR-TRV70: mini-AB MIC jack Minijack, 0.388 mV low impedance with 2.5 to 3.0 V DC, output impedance 6.8 kΩ (kilohms) (ø 3.5 mm) Stereo type General Power requirements 7.2 V (battery pack) 8.4 V (AC Adaptor) Average power consumption (when using the battery pack) During camera recording using cassette DVM60) Approx. 2 min. Specifications Video camera recorder System Video recording system 2 rotary heads Helical scanning system Audio recording system Rotary heads, PCM system Quantization: 12...
...) LANC jack Stereo mini-minijack (ø 2.5 mm) USB jack DCR-TRV60: mini-B DCR-TRV70: mini-AB MIC jack Minijack, 0.388 mV low impedance with 2.5 to 3.0 V DC, output impedance 6.8 kΩ (kilohms) (ø 3.5 mm) Stereo type General Power requirements 7.2 V (battery pack) 8.4 V (AC Adaptor) Average power consumption (when using the battery pack) During camera recording using cassette DVM60) Approx. 2 min. Specifications Video camera recorder System Video recording system 2 rotary heads Helical scanning system Audio recording system Rotary heads, PCM system Quantization: 12...
Operating Instructions
Page 218
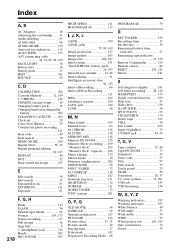
... 96 AUDIO MODE 179 Auto red eye reduction ........ 113 AUTO SHTR 173 A/V connecting cable 44, 78, 89, 94, 169 BACK LIGHT 34 Battery Info 18 Battery pack 15 BEEP 181 BOUNCE 52 C, D CALIBRATION 204 Cassette Memory 12, 194 C. LUMI 118 MEMORY MIX 118 Memory PB ZOOM 135 Memory Photo recording .... 109 "Memory Stick 102 "Memory Stick" capacity ..... 108 Menu settings 172 Mirror mode 29 Moisture condensation ........ 202 MONOTONE 52 MOSC. FADER 52 NTSC system 201 O, P, Q OLD MOVIE...
... 96 AUDIO MODE 179 Auto red eye reduction ........ 113 AUTO SHTR 173 A/V connecting cable 44, 78, 89, 94, 169 BACK LIGHT 34 Battery Info 18 Battery pack 15 BEEP 181 BOUNCE 52 C, D CALIBRATION 204 Cassette Memory 12, 194 C. LUMI 118 MEMORY MIX 118 Memory PB ZOOM 135 Memory Photo recording .... 109 "Memory Stick 102 "Memory Stick" capacity ..... 108 Menu settings 172 Mirror mode 29 Moisture condensation ........ 202 MONOTONE 52 MOSC. FADER 52 NTSC system 201 O, P, Q OLD MOVIE...


