Camera Operations Guide
Page 5
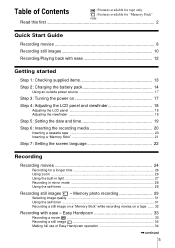
...time 19 Step 6: Inserting the recording media 20 Inserting a cassette tape 20 Inserting a "Memory Stick 21 Step 7: Setting the screen language 22 Recording Recording movies 24 Recording for "Memory Stick" only. Read this first 2 Quick Start Guide Recording movies 8 Recording still images 10 Recording...an outside power source 17 Step 3: Turning the power on a tape ....... 32 Recording with ease - Table of Easy Handycam operation 34 ,continued 5 Easy Handycam 33 Recording a movie 33 Recording a still image 34 Making full use of Contents : Features available for tape only. ...
...time 19 Step 6: Inserting the recording media 20 Inserting a cassette tape 20 Inserting a "Memory Stick 21 Step 7: Setting the screen language 22 Recording Recording movies 24 Recording for "Memory Stick" only. Read this first 2 Quick Start Guide Recording movies 8 Recording still images 10 Recording...an outside power source 17 Step 3: Turning the power on a tape ....... 32 Recording with ease - Table of Easy Handycam operation 34 ,continued 5 Easy Handycam 33 Recording a movie 33 Recording a still image 34 Making full use of Contents : Features available for tape only. ...
Camera Operations Guide
Page 6
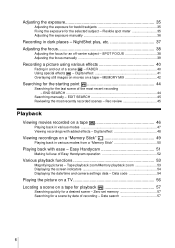
...Handycam operation 52 Various playback functions 53 Magnifying pictures - Date search 57 6 Flexible spot meter 35 Adjusting the exposure manually 36 Recording in various modes 47 Viewing recordings with ease - SPOT FOCUS 38 Adjusting the focus manually 39 Recording a picture using various effects 40 Fading in various modes from a "Memory Stick... 50 Playing back with added effects - Tape playback zoom/Memory playback zoom 53 Displaying the screen indicators 54 Displaying the date/time and...
...Handycam operation 52 Various playback functions 53 Magnifying pictures - Date search 57 6 Flexible spot meter 35 Adjusting the exposure manually 36 Recording in various modes 47 Viewing recordings with ease - SPOT FOCUS 38 Adjusting the focus manually 39 Recording a picture using various effects 40 Fading in various modes from a "Memory Stick... 50 Playing back with added effects - Tape playback zoom/Memory playback zoom 53 Displaying the screen indicators 54 Displaying the date/time and...
Camera Operations Guide
Page 7
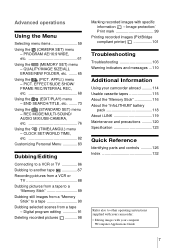
... another tape 87 Recording pictures from a VCR or TV 88 Dubbing pictures from a tape to a "Memory Stick 89 Dubbing still images from a "Memory Stick" to other operating instructions supplied with your camcorder abroad ..........114 Usable cassette tapes 115 About the "Memory Stick 116 About the "InfoLITHIUM" battery pack 118 About i.LINK 119 Maintenance and precautions ..........120 Specification...
... another tape 87 Recording pictures from a VCR or TV 88 Dubbing pictures from a tape to a "Memory Stick 89 Dubbing still images from a "Memory Stick" to other operating instructions supplied with your camcorder abroad ..........114 Usable cassette tapes 115 About the "Memory Stick 116 About the "InfoLITHIUM" battery pack 118 About i.LINK 119 Maintenance and precautions ..........120 Specification...
Camera Operations Guide
Page 10
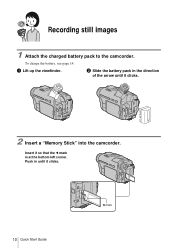
Insert it clicks. 2 Insert a "Memory Stick" into the camcorder. To charge the battery, see page 14. a Lift up the viewfinder. b Slide the battery pack in until it so that the b mark is at the bottom left corner. Push in the direction of the arrow until it clicks. 10 Quick Start Guide b mark Recording still images 1 Attach the charged battery pack to the camcorder.
Insert it clicks. 2 Insert a "Memory Stick" into the camcorder. To charge the battery, see page 14. a Lift up the viewfinder. b Slide the battery pack in until it so that the b mark is at the bottom left corner. Push in the direction of the arrow until it clicks. 10 Quick Start Guide b mark Recording still images 1 Attach the charged battery pack to the camcorder.

Camera Operations Guide
Page 13
... started 13 Wireless Remote Commander (1) A button-type lithium battery is no "Memory Stick" media supplied with DCR-TRV460. Getting started Step 1: Checking supplied items Make sure you have following items supplied with DCR-TRV361. "Memory Stick" 8MB (1) (DCR-TRV361) "Memory Stick" media is only supplied with your camcorder. A/V connecting cable (1) USB cable (1) AC Adaptor (1) Power cord (1) Rechargeable battery...
... started 13 Wireless Remote Commander (1) A button-type lithium battery is no "Memory Stick" media supplied with DCR-TRV460. Getting started Step 1: Checking supplied items Make sure you have following items supplied with DCR-TRV361. "Memory Stick" 8MB (1) (DCR-TRV361) "Memory Stick" media is only supplied with your camcorder. A/V connecting cable (1) USB cable (1) AC Adaptor (1) Power cord (1) Rechargeable battery...
Camera Operations Guide
Page 17
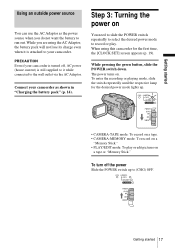
...Step 3: Turning the power on a tape or "Memory Stick." To enter the recording or playing mode, slide the switch repeatedly until the respective lamp for the first time, the [CLOCK SET] screen appears (p. 19). Connect your camcorder. Getting started Using an outside power source You can ...PRECAUTION Even if your camcorder is turned off the power Slide the POWER switch up . • CAMERA-TAPE mode: To record on a tape. • CAMERA-MEMORY mode: To record on . While pressing the green button, slide the POWER switch down. The power turns on a "Memory Stick." • PLAY/EDIT...
...Step 3: Turning the power on a tape or "Memory Stick." To enter the recording or playing mode, slide the switch repeatedly until the respective lamp for the first time, the [CLOCK SET] screen appears (p. 19). Connect your camcorder. Getting started Using an outside power source You can ...PRECAUTION Even if your camcorder is turned off the power Slide the POWER switch up . • CAMERA-TAPE mode: To record on a tape. • CAMERA-MEMORY mode: To record on . While pressing the green button, slide the POWER switch down. The power turns on a "Memory Stick." • PLAY/EDIT...
Camera Operations Guide
Page 19
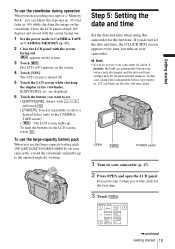
... you do not use your camcorder, extend the viewfinder and pull it repeatedly to select a desired effect (only in rechargeable button-type battery gets discharged and the date and time settings may be cleared from the memory. are recording on a tape or a "Memory Stick", you can adjust the exposure... (p. 35) and fader (p. 40) while checking the image on your camcorder for viewing. b Note • If you do not set the date...
... you do not use your camcorder, extend the viewfinder and pull it repeatedly to select a desired effect (only in rechargeable button-type battery gets discharged and the date and time settings may be cleared from the memory. are recording on a tape or a "Memory Stick", you can adjust the exposure... (p. 35) and fader (p. 40) while checking the image on your camcorder for viewing. b Note • If you do not set the date...

Camera Operations Guide
Page 21
.... b Note • When using the half-sized "Memory Stick," the "Memory Stick Duo," make sure you attach the Memory Stick Duo adaptor. Access lamp Getting started 21 Lightly push in the direction of the cassette lightly. 3 Press . The cassette compartment automatically slides back in . 3 Close the lid. Your camcorder may malfunction when it clicks. The cassette compartment...
.... b Note • When using the half-sized "Memory Stick," the "Memory Stick Duo," make sure you attach the Memory Stick Duo adaptor. Access lamp Getting started 21 Lightly push in the direction of the cassette lightly. 3 Press . The cassette compartment automatically slides back in . 3 Close the lid. Your camcorder may malfunction when it clicks. The cassette compartment...
Camera Operations Guide
Page 22
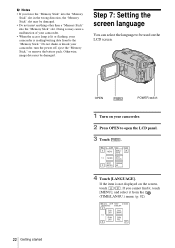
...If you force the "Memory Stick" into the "Memory Stick" slot in the wrong direction, the "Memory Stick" slot may be damaged. • Do not insert anything other than a "Memory Stick" into the "Memory Stick" slot. SURE 1/3 FADER SPOT FOCUS SPOT PRGRAM METER AE 4 Touch [LANGUAGE]. Do not shake or knock your camcorder is reading/writing data from...;AIS ENG [SIMP] ESPA ÑOL Otherwise, image data may be damaged. If the item is lit or flashing, your camcorder, turn the power off, eject the "Memory Stick," or remove the battery pack. Doing so may cause a malfunction of your...
...If you force the "Memory Stick" into the "Memory Stick" slot in the wrong direction, the "Memory Stick" slot may be damaged. • Do not insert anything other than a "Memory Stick" into the "Memory Stick" slot. SURE 1/3 FADER SPOT FOCUS SPOT PRGRAM METER AE 4 Touch [LANGUAGE]. Do not shake or knock your camcorder is reading/writing data from...;AIS ENG [SIMP] ESPA ÑOL Otherwise, image data may be damaged. If the item is lit or flashing, your camcorder, turn the power off, eject the "Memory Stick," or remove the battery pack. Doing so may cause a malfunction of your...
Camera Operations Guide
Page 24
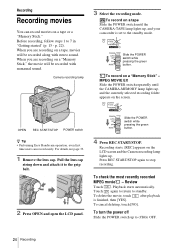
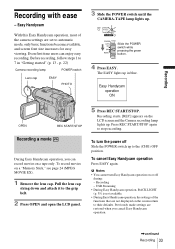
... switch up , and your camcorder is finished, then [YES]. When you are recording on a tape or a "Memory Stick." To record on a tape, movies will be recorded along with monaural sound. OPEN REC START/STOP POWER switch z Tip • Performing Easy Handycam operation, even first time users... can record movies on a "Memory Stick," the movie will be recorded with stereo sound. Slide the POWER switch while pressing the green button. 4 ...
... switch up , and your camcorder is finished, then [YES]. When you are recording on a tape or a "Memory Stick." To record on a tape, movies will be recorded along with monaural sound. OPEN REC START/STOP POWER switch z Tip • Performing Easy Handycam operation, even first time users... can record movies on a "Memory Stick," the movie will be recorded with stereo sound. Slide the POWER switch while pressing the green button. 4 ...
Camera Operations Guide
Page 25
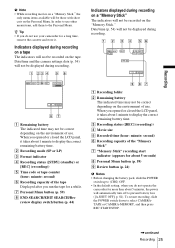
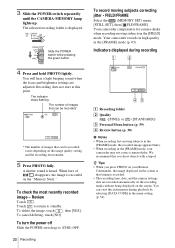
... do not use your camcorder for a while. Date/time (p. 54) will not be displayed during recording. 60min REC 101 0:00:00 320 2min P-MENU 60min REC 0:00:00 P-MENU A Remaining battery The indicated time may not be displayed during recording on a "Memory Stick" The indicators will not...8226; While recording movies on a "Memory Stick," the only menu items available will be correct depending on the environment of use. Date/time and the camera settings data (p. 54) will automatically turn off to the Personal Menu. When you do not operate the camcorder for more than about 1 minute ...
... do not use your camcorder for a while. Date/time (p. 54) will not be displayed during recording. 60min REC 101 0:00:00 320 2min P-MENU 60min REC 0:00:00 P-MENU A Remaining battery The indicated time may not be displayed during recording on a "Memory Stick" The indicators will not...8226; While recording movies on a "Memory Stick," the only menu items available will be correct depending on the environment of use. Date/time and the camera settings data (p. 54) will automatically turn off to the Personal Menu. When you do not operate the camcorder for more than about 1 minute ...
Camera Operations Guide
Page 26
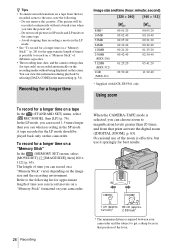
...IMAGE SIZE], then [160 × 112] (p. 65). In the LP mode, you can record movies on a "Memory Stick" formatted on your camcorder and the subject to record on a "Memory Stick" of different capacities. • The recording time, date, and the camera settings data (for best results. 26 Recording... 1 cm (approx. 80 cm (approx. 1/2 inch)* 2 5/8 feet)* * The minimum distance required between your camcorder. A tape recorded in SP ...
...IMAGE SIZE], then [160 × 112] (p. 65). In the LP mode, you can record movies on a "Memory Stick" formatted on your camcorder and the subject to record on a "Memory Stick" of different capacities. • The recording time, date, and the camera settings data (for best results. 26 Recording... 1 cm (approx. 80 cm (approx. 1/2 inch)* 2 5/8 feet)* * The minimum distance required between your camcorder. A tape recorded in SP ...
Camera Operations Guide
Page 29
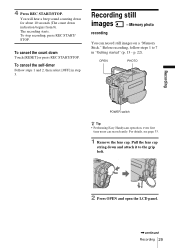
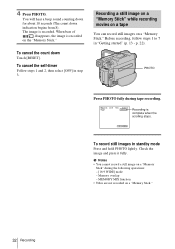
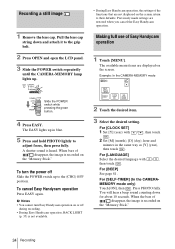
... LCD panel. ,continued Recording 29 Recording still images - OPEN PHOTO POWER switch z Tip • Performing Easy Handycam operation, even first time users can record still images on a "Memory Stick." For details, see page 33. 1 Remove the lens cap. Pull the lens cap string down Touch [RESET...] or press REC START/STOP. The recording starts. To stop recording, press REC START/ STOP. p. 22). Memory photo recording You can record easily...
... LCD panel. ,continued Recording 29 Recording still images - OPEN PHOTO POWER switch z Tip • Performing Easy Handycam operation, even first time users can record still images on a "Memory Stick." For details, see page 33. 1 Remove the lens cap. Pull the lens cap string down Touch [RESET...] or press REC START/STOP. The recording starts. To stop recording, press REC START/ STOP. p. 22). Memory photo recording You can record easily...
Camera Operations Guide
Page 30
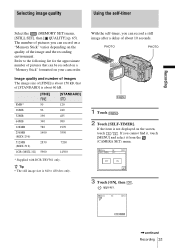
...on the image quality setting and the recording environment. 5 Press PHOTO fully. Your camcorder records in high quality in the [FIELD] mode. You can be recorded varies depending on the "Memory Stick." The number of images that you press PHOTO on the screen. To cancel deleting,... will hear a light beeping sound when the focus and brightness settings are recorded automatically on the recording media without being displayed on your camcorder may not correct camera-shake. Touch to return to (CHG) OFF. 30 Recording To record moving subjects correcting jitter - z Tips ...
...on the image quality setting and the recording environment. 5 Press PHOTO fully. Your camcorder records in high quality in the [FIELD] mode. You can be recorded varies depending on the "Memory Stick." The number of images that you press PHOTO on the screen. To cancel deleting,... will hear a light beeping sound when the focus and brightness settings are recorded automatically on the recording media without being displayed on your camcorder may not correct camera-shake. Touch to return to (CHG) OFF. 30 Recording To record moving subjects correcting jitter - z Tips ...
Camera Operations Guide
Page 31
... about 10 seconds. If the item is 640 × 480 dots only. With the self-timer, you can be recorded on a "Memory Stick" formatted on your camcorder. If you can record on a "Memory Stick" varies depending on the screen, touch / . The number of pictures you cannot find it, touch [MENU] and select it from the...
... about 10 seconds. If the item is 640 × 480 dots only. With the self-timer, you can be recorded on a "Memory Stick" formatted on your camcorder. If you can record on a "Memory Stick" varies depending on the screen, touch / . The number of pictures you cannot find it, touch [MENU] and select it from the...
Camera Operations Guide
Page 32
...scrolling stops. Recording a still image on a "Memory Stick" while recording movies on a tape You can record still images on a "Memory Stick" during tape recording. PHOTO Press PHOTO fully during the following operations: - [16:9 WIDE] mode - Memory overlap - To cancel the count down indication begins ... standby mode Press and hold PHOTO lightly. To record still images in "Getting started" (p. 13 - MEMORY MIX function • Titles are not recorded on the "Memory Stick." Recording is recorded. You will hear a beep sound counting down for about 10 seconds (The count down...
...scrolling stops. Recording a still image on a "Memory Stick" while recording movies on a tape You can record still images on a "Memory Stick" during tape recording. PHOTO Press PHOTO fully during the following operations: - [16:9 WIDE] mode - Memory overlap - To cancel the count down indication begins ... standby mode Press and hold PHOTO lightly. To record still images in "Getting started" (p. 13 - MEMORY MIX function • Titles are not recorded on the "Memory Stick." Recording is recorded. You will hear a beep sound counting down for about 10 seconds (The count down...
Camera Operations Guide
Page 33
...the camera settings are restored when you can enjoy easy recording. Slide the POWER switch while pressing the green button. 4 Press EASY. To cancel Easy Handycam operation Press EASY again. b Notes • You cannot turn the power off during: - Press REC START/STOP again to the grip belt. ...) Camera recording lamp POWER switch Lens cap EASY PHOTO 3 Slide the POWER switch until the CAMERA-TAPE lamp lights up . To turn Easy Handycam operation on a "Memory Stick," see page 24 (MPEG MOVIE EX). 1 Remove the lens cap. To record movies on or off Slide the POWER switch up in "...
...the camera settings are restored when you can enjoy easy recording. Slide the POWER switch while pressing the green button. 4 Press EASY. To cancel Easy Handycam operation Press EASY again. b Notes • You cannot turn the power off during: - Press REC START/STOP again to the grip belt. ...) Camera recording lamp POWER switch Lens cap EASY PHOTO 3 Slide the POWER switch until the CAMERA-TAPE lamp lights up . To turn Easy Handycam operation on a "Memory Stick," see page 24 (MPEG MOVIE EX). 1 Remove the lens cap. To record movies on or off Slide the POWER switch up in "...
Camera Operations Guide
Page 34
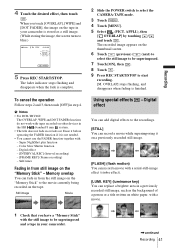
Pull the lens cap string down for about 10 seconds. A shutter sound is not available. • During Easy Handycam operation, the settings of disappear, the image is recorded on the "Memory Stick." For [CLOCK SET] 1 Set [Y] (year) with then touch . /, For [BEEP] See page 81. The ... it to their defaults. Making full use of disappear, the image is recorded on the "Memory Stick." 34 Recording When the bars of Easy Handycam operation 1 Touch [MENU]. To cancel Easy Handycam operation Press EASY again. The available menu items are restored when you cancel the Easy...
Pull the lens cap string down for about 10 seconds. A shutter sound is not available. • During Easy Handycam operation, the settings of disappear, the image is recorded on the "Memory Stick." For [CLOCK SET] 1 Set [Y] (year) with then touch . /, For [BEEP] See page 81. The ... it to their defaults. Making full use of disappear, the image is recorded on the "Memory Stick." 34 Recording When the bars of Easy Handycam operation 1 Touch [MENU]. To cancel Easy Handycam operation Press EASY again. The available menu items are restored when you cancel the Easy...
Camera Operations Guide
Page 41
... a movie with a serial-still-image effect (strobe effect). [LUMI. Recording 4 Touch the desired effect, then touch . b Notes • For DCR-TRV460: The OVERLAP, WIPE and DOT FADER functions do not work with tapes recorded on a previously recorded still image. [FLASH] (flash motion) You can record ... NightShot plus function - Self-timer Fading in your camcorder is not needed. • You cannot use the FADER function together with the still image to be superimposed and a tape in from the still image on the "Memory Stick" to the movie currently being recorded on white paper...
... a movie with a serial-still-image effect (strobe effect). [LUMI. Recording 4 Touch the desired effect, then touch . b Notes • For DCR-TRV460: The OVERLAP, WIPE and DOT FADER functions do not work with tapes recorded on a previously recorded still image. [FLASH] (flash motion) You can record ... NightShot plus function - Self-timer Fading in your camcorder is not needed. • You cannot use the FADER function together with the still image to be superimposed and a tape in from the still image on the "Memory Stick" to the movie currently being recorded on white paper...

Camera Operations Guide
Page 43
...will be superimposed and a tape (only if you are recording on tape) in your camcorder. 2 Slide the POWER switch repeatedly to select the CAMERA-TAPE mode (when you are recording on a tape) or the CAMERA-MEMORY mode (when you have recorded on the LCD screen. 60min STBY 0:00:00...is superimposed on the movie which is not displayed on top of a still image, such as an image which you are currently recording on a "Memory Stick"). 3 Touch . 4 Touch [MEMORY MIX]. Still image Movie [CAMTM CHROMA] (Camera Chroma key) You can superimpose a movie on the screen, touch / . If the item is...
...will be superimposed and a tape (only if you are recording on tape) in your camcorder. 2 Slide the POWER switch repeatedly to select the CAMERA-TAPE mode (when you are recording on a tape) or the CAMERA-MEMORY mode (when you have recorded on the LCD screen. 60min STBY 0:00:00...is superimposed on the movie which is not displayed on top of a still image, such as an image which you are currently recording on a "Memory Stick"). 3 Touch . 4 Touch [MEMORY MIX]. Still image Movie [CAMTM CHROMA] (Camera Chroma key) You can superimpose a movie on the screen, touch / . If the item is...


