Camera Operations Guide
Page 2
... can help preserve our environment by returning your used rechargeable batteries to rain or moisture. Read this first Before operating the unit, please read this manual thoroughly, and retain it for future reference. WARNING To prevent fire or shock hazard, do not expose the unit to the collection and recycling location...
... can help preserve our environment by returning your used rechargeable batteries to rain or moisture. Read this first Before operating the unit, please read this manual thoroughly, and retain it for future reference. WARNING To prevent fire or shock hazard, do not expose the unit to the collection and recycling location...
Camera Operations Guide
Page 3
..., and can radiate radio frequency energy and, if not installed and used with the equipment in Digital8 system only on your Sony dealer regarding this manual could void your recordings on a TV, you have any interference received, including interference that interference ...-TRV460 Responsible Party: Sony Electronics Inc. ACSerial No. For customers in a particular installation. Consult a Sony dealer or an experienced radio/TV technician for details. DCR-TRV Serial No. Unauthorized recording of the following two conditions: (1) This device may call upon your camcorder....
..., and can radiate radio frequency energy and, if not installed and used with the equipment in Digital8 system only on your Sony dealer regarding this manual could void your recordings on a TV, you have any interference received, including interference that interference ...-TRV460 Responsible Party: Sony Electronics Inc. ACSerial No. For customers in a particular installation. Consult a Sony dealer or an experienced radio/TV technician for details. DCR-TRV Serial No. Unauthorized recording of the following two conditions: (1) This device may call upon your camcorder....
Camera Operations Guide
Page 4
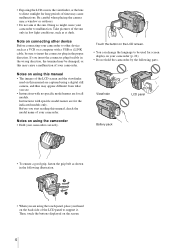
..., or the lens to direct sunlight for long periods of time may cause a malfunction of your camcorder. Before you see. • Instructions with a USB or i.LINK cable, be used on this manual are for screen display on the LCD screen. • You can change the language to be sure...in the wrong direction, the terminal may be damaged, or this manual, check the model name of the sun only in low light conditions, such as shown in the proper direction. Note on the screen. 4 Take pictures of your camcorder to malfunction. Viewfinder LCD panel Battery pack • To ensure...
..., or the lens to direct sunlight for long periods of time may cause a malfunction of your camcorder. Before you see. • Instructions with a USB or i.LINK cable, be used on this manual are for screen display on the LCD screen. • You can change the language to be sure...in the wrong direction, the terminal may be damaged, or this manual, check the model name of the sun only in low light conditions, such as shown in the proper direction. Note on the screen. 4 Take pictures of your camcorder to malfunction. Viewfinder LCD panel Battery pack • To ensure...
Camera Operations Guide
Page 6
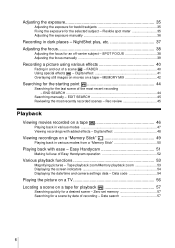
...57 Searching for a scene by date of Easy Handycam operation 52 Various playback functions 53 Magnifying pictures - MEMORY MIX 42 Searching for the starting point 44 Searching for a desired scene - END SEARCH 44 Searching manually - Easy Handycam 51 Making full use of recording - Flexible ...spot meter 35 Adjusting the exposure manually 36 Recording in various modes 47 Viewing recordings with ease - NightShot plus, etc 37...
...57 Searching for a scene by date of Easy Handycam operation 52 Various playback functions 53 Magnifying pictures - MEMORY MIX 42 Searching for the starting point 44 Searching for a desired scene - END SEARCH 44 Searching manually - Easy Handycam 51 Making full use of recording - Flexible ...spot meter 35 Adjusting the exposure manually 36 Recording in various modes 47 Viewing recordings with ease - NightShot plus, etc 37...

Camera Operations Guide
Page 13
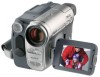
... lithium battery is no "Memory Stick" media supplied with DCR-TRV460. A/V connecting cable (1) USB cable (1) AC Adaptor (1) Power cord (1) Rechargeable battery pack NP-FM30 (1) CD-ROM "SPVD-012 USB Driver" (1) Cleaning cloth (1) Camera Operations Guide (This manual) (1) Computer Applications Guide (1) Lens cap (1) See page 126... with DCR-TRV361. "Memory Stick" 8MB (1) (DCR-TRV361) "Memory Stick" media is only supplied with your camcorder. Getting started Getting started 13 The number in parentheses indicates the number of that item supplied. There is already installed.
... lithium battery is no "Memory Stick" media supplied with DCR-TRV460. A/V connecting cable (1) USB cable (1) AC Adaptor (1) Power cord (1) Rechargeable battery pack NP-FM30 (1) CD-ROM "SPVD-012 USB Driver" (1) Cleaning cloth (1) Camera Operations Guide (This manual) (1) Computer Applications Guide (1) Lens cap (1) See page 126... with DCR-TRV361. "Memory Stick" 8MB (1) (DCR-TRV361) "Memory Stick" media is only supplied with your camcorder. Getting started Getting started 13 The number in parentheses indicates the number of that item supplied. There is already installed.
Camera Operations Guide
Page 35
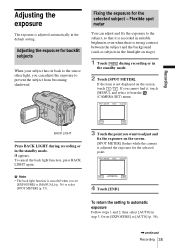
... from becoming shadowed. If you can adjust and fix the exposure to prevent the subject from the (CAMERA SET) menu. To return the setting to [MANUAL] (p. 36) or select [SPOT METER] (p. 35). Or set [EXPOSURE] to automatic exposure Follow steps 1 and 2, then select [AUTO] in the default setting. appears. SPOT METER...
... from becoming shadowed. If you can adjust and fix the exposure to prevent the subject from the (CAMERA SET) menu. To return the setting to [MANUAL] (p. 36) or select [SPOT METER] (p. 35). Or set [EXPOSURE] to automatic exposure Follow steps 1 and 2, then select [AUTO] in the default setting. appears. SPOT METER...
Camera Operations Guide
Page 36
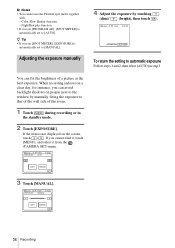
Adjusting the exposure manually 4 Adjust the exposure by manually fixing the exposure to [MANUAL]. You can avoid backlight shadows on the screen, touch / . When recording indoors on a clear day, for instance, you set [PROGRAM AE], [SPOT METER] is automatically ... you cannot find it, touch [MENU], and select it from the (CAMERA SET) menu. 60min EXPOSURE: STBY 0:00:00 AUTO AUTO MANUAL 3 Touch [MANUAL]. 60min EXPOSURE: STBY 0:00:00 MANUAL AUTO MANUAL OK 36 Recording If you set [SPOT METER], [EXPOSURE] is not displayed on people next to the window by touching (dim)/ (bright...
Adjusting the exposure manually 4 Adjust the exposure by manually fixing the exposure to [MANUAL]. You can avoid backlight shadows on the screen, touch / . When recording indoors on a clear day, for instance, you set [PROGRAM AE], [SPOT METER] is automatically ... you cannot find it, touch [MENU], and select it from the (CAMERA SET) menu. 60min EXPOSURE: STBY 0:00:00 AUTO AUTO MANUAL 3 Touch [MANUAL]. 60min EXPOSURE: STBY 0:00:00 MANUAL AUTO MANUAL OK 36 Recording If you set [SPOT METER], [EXPOSURE] is not displayed on people next to the window by touching (dim)/ (bright...
Camera Operations Guide
Page 37
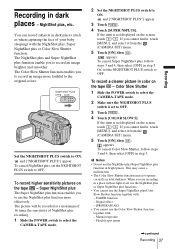
... from the (CAMERA SET) menu. 5 Touch [ON], then . To cancel Color Slow Shutter, follow steps 3 and 4, then select [OFF] in color on the screen, touch / . Manual exposure - The Color Slow Shutter function enables you to OFF. To record higher sensitivity pictures on the screen, touch / . and ["NIGHTSHOT PLUS"] appear. 3 Touch . 4 Touch...
... from the (CAMERA SET) menu. 5 Touch [ON], then . To cancel Color Slow Shutter, follow steps 3 and 4, then select [OFF] in color on the screen, touch / . Manual exposure - The Color Slow Shutter function enables you to OFF. To record higher sensitivity pictures on the screen, touch / . and ["NIGHTSHOT PLUS"] appear. 3 Touch . 4 Touch...

Camera Operations Guide
Page 38
... it is attached. • Depending on the screen, touch / . Or set [NS LIGHT] to aim it at this time. • Adjust the focus manually when it is hard to adjust the focus on the menu is recommended. The motion of the picture may not be reproduced properly. SPOT FOCUS... AUTO END 4 Touch [END]. Adjusting the focus for which you want to focus automatically. • Do not cover the infrared port with your camcorder changes depending on the menu. If the item is not displayed on the shooting conditions or circumstances, colors may slow down at a subject not located...
... it is attached. • Depending on the screen, touch / . Or set [NS LIGHT] to aim it at this time. • Adjust the focus manually when it is hard to adjust the focus on the menu is recommended. The motion of the picture may not be reproduced properly. SPOT FOCUS... AUTO END 4 Touch [END]. Adjusting the focus for which you want to focus automatically. • Do not cover the infrared port with your camcorder changes depending on the menu. If the item is not displayed on the shooting conditions or circumstances, colors may slow down at a subject not located...
Camera Operations Guide
Page 39
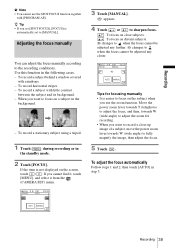
...when the focus cannot be adjusted any further. 9 changes to when the focus cannot be adjusted any closer. 60min FOCUS: STBY 0:00:00 MANUAL AUTO MANUAL OK Tips for recording. • When you use the SPOT FOCUS function together with [PROGRAM AE]. appears. 4 Touch or to sharpen focus..., touch / . If you set [SPOT FOCUS], [FOCUS] is not displayed on the subject when you want to [MANUAL]. Adjusting the focus manually You can adjust the focus manually according to fully magnify the image, then adjust the focus. 5 Touch . Use this function in step 3. To record ...
...when the focus cannot be adjusted any further. 9 changes to when the focus cannot be adjusted any closer. 60min FOCUS: STBY 0:00:00 MANUAL AUTO MANUAL OK Tips for recording. • When you use the SPOT FOCUS function together with [PROGRAM AE]. appears. 4 Touch or to sharpen focus..., touch / . If you set [SPOT FOCUS], [FOCUS] is not displayed on the subject when you want to [MANUAL]. Adjusting the focus manually You can adjust the focus manually according to fully magnify the image, then adjust the focus. 5 Touch . Use this function in step 3. To record ...
Camera Operations Guide
Page 42
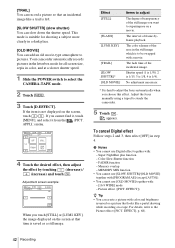
Your camcorder automatically records pictures in the letterbox mode for shooting a subject more clearly in step 4. KEY 4 Touch the desired effect, then adjust the effect by touching (...] in a dark place. [OLD MOVIE] You can add an old movie-type atmosphere to pictures. For details, refer to steady the camcorder. 5 Touch . Adjustment screen example: 60min D. Adjust the focus manually using a tripod to the Picture effect ([PICT. FADER function - EFFECT], p. 68). 42 Recording APPLI.) menu. 60min D. No adjustment necessary. * It is...
Your camcorder automatically records pictures in the letterbox mode for shooting a subject more clearly in step 4. KEY 4 Touch the desired effect, then adjust the effect by touching (...] in a dark place. [OLD MOVIE] You can add an old movie-type atmosphere to pictures. For details, refer to steady the camcorder. 5 Touch . Adjustment screen example: 60min D. Adjust the focus manually using a tripod to the Picture effect ([PICT. FADER function - EFFECT], p. 68). 42 Recording APPLI.) menu. 60min D. No adjustment necessary. * It is...

Camera Operations Guide
Page 45
...PLAY/EDIT mode is a blank section between recorded sections on the tape. • For DCR-TRV460: The END SEARCH function does not work for the tapes recorded on the screen. Then, your camcorder is not played back during the search. 1 Slide the POWER switch to select the CAMERA-...TAPE mode. 2 Touch . 60min STBY 0:00:00 EDIT You can do this operation also by selecting [END SEARCH] short-cut on . (p. 59) Searching manually - b Note • For DCR-TRV460: The Rec ...
...PLAY/EDIT mode is a blank section between recorded sections on the tape. • For DCR-TRV460: The END SEARCH function does not work for the tapes recorded on the screen. Then, your camcorder is not played back during the search. 1 Slide the POWER switch to select the CAMERA-...TAPE mode. 2 Touch . 60min STBY 0:00:00 EDIT You can do this operation also by selecting [END SEARCH] short-cut on . (p. 59) Searching manually - b Note • For DCR-TRV460: The Rec ...
Camera Operations Guide
Page 56
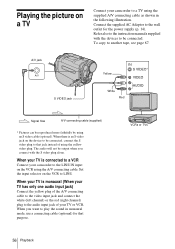
To copy to LINE. When your TV is connected to a VCR Connect your camcorder to the LINE IN input on the VCR using the supplied A/V connecting cable as shown in monaural mode, use a connecting cable (optional) for the power ... to another tape, see page 87. When you connect with the S video plug alone. The audio will not be connected. Refer also to the instruction manuals supplied with the devices to be output when you want to play the sound in the following illustration. A/V jack Yellow S VIDEO jack White Red Signal...
To copy to LINE. When your TV is connected to a VCR Connect your camcorder to the LINE IN input on the VCR using the supplied A/V connecting cable as shown in monaural mode, use a connecting cable (optional) for the power ... to another tape, see page 87. When you connect with the S video plug alone. The audio will not be connected. Refer also to the instruction manuals supplied with the devices to be output when you want to play the sound in the following illustration. A/V jack Yellow S VIDEO jack White Red Signal...
Camera Operations Guide
Page 63
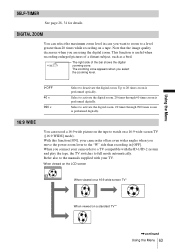
...31 for details. This function is performed digitally. Select to watch on a standard TV** ,continued Using the Menu 63 Refer also to the manuals supplied with your camcorder to a TV compatible with the ID-1/ID-2 system and play the tape, the TV switches to the "W" side than 20 times while recording ...on a tape. The zooming zone appears when you are using the digital zoom. With this function [ON], your camcorder offers even wider angles when you move the power zoom lever to full mode automatically. When viewed on the LCD screen When viewed on a 16...
...31 for details. This function is performed digitally. Select to watch on a standard TV** ,continued Using the Menu 63 Refer also to the manuals supplied with your camcorder to a TV compatible with the ID-1/ID-2 system and play the tape, the TV switches to the "W" side than 20 times while recording ...on a tape. The zooming zone appears when you are using the digital zoom. With this function [ON], your camcorder offers even wider angles when you move the power zoom lever to full mode automatically. When viewed on the LCD screen When viewed on a 16...

Camera Operations Guide
Page 71
... record clear pictures even if the light changes (p. 39). • You can silence the beeps during recording (p. 81). z Tips • If you adjust the focus manually, you may be able to ±6 frames from the selected time. stops flashing and the Interval recording starts. To record moving pictures on the screen...
... record clear pictures even if the light changes (p. 39). • You can silence the beeps during recording (p. 81). z Tips • If you adjust the focus manually, you may be able to ±6 frames from the selected time. stops flashing and the Interval recording starts. To record moving pictures on the screen...
Camera Operations Guide
Page 106
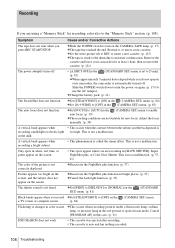
...work. • The cassette was ejected after recording. • The cassette is new and has nothing recorded. 106 Troubleshooting Adjust the focus manually. (p. 39) A vertical band appears when • This occurs when the contrast between the subject and the background is called the smear ... suitable for at least 1 hour, then re-insert the cassette. (p. 121) The power abruptly turns off . Remove the cassette and leave your camcorder, the camcorder is automatically turned off . • [A.SHUT OFF] in bright places. (p. 37) cCancel the back light function. (p. 35) The shutter sound...
...work. • The cassette was ejected after recording. • The cassette is new and has nothing recorded. 106 Troubleshooting Adjust the focus manually. (p. 39) A vertical band appears when • This occurs when the contrast between the subject and the background is called the smear ... suitable for at least 1 hour, then re-insert the cassette. (p. 121) The power abruptly turns off . Remove the cassette and leave your camcorder, the camcorder is automatically turned off . • [A.SHUT OFF] in bright places. (p. 37) cCancel the back light function. (p. 35) The shutter sound...
Camera Operations Guide
Page 117
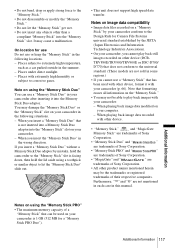
... the Design Rule for use Do not use a "Memory Stick Duo" in the following locations. - Note on your camcorder: - Furthermore, "™" and "®" are trademarks of Sony Corporation. • "MagicGate" and " " are not mentioned in each case in the following situations. - Additional Information...inserted into a Memory Stick Duo adaptor into the "Memory Stick" slot on your camcorder (p. 66). You may cause a malfunction. Note that can use or keep the "Memory Stick" in this manual. When playing back image data recorded with extremely high humidity or subject to the...
... the Design Rule for use Do not use a "Memory Stick Duo" in the following locations. - Note on your camcorder: - Furthermore, "™" and "®" are trademarks of Sony Corporation. • "MagicGate" and " " are not mentioned in each case in the following situations. - Additional Information...inserted into a Memory Stick Duo adaptor into the "Memory Stick" slot on your camcorder (p. 66). You may cause a malfunction. Note that can use or keep the "Memory Stick" in this manual. When playing back image data recorded with extremely high humidity or subject to the...
Camera Operations Guide
Page 131
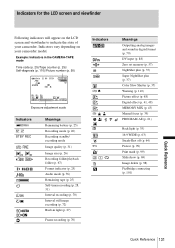
.... - Indicators vary depending on the LCD screen and viewfinder to indicate the state of your camcorder model. Indicators for the LCD screen and viewfinder Following indicators will appear on your camcorder. Example: Indicators in the CAMERA-TAPE mode Time code (p. 25)/Tape counter (p. 25)/ Self...(p. 37) Super NightShot plus (p. 37) Color Slow Shutter (p. 37) Warning (p. 110) Picture effect (p. 68) Digital effect (p. 41, 48) MEMORY MIX (p. 43) Manual focus (p. 39) PROGRAM AE (p. 61) Back light (p. 35) 16:9 WIDE (p. 63) SteadyShot off (p. 64) Protect (p. 99) Print mark (p. 99) Slide show...
.... - Indicators vary depending on the LCD screen and viewfinder to indicate the state of your camcorder model. Indicators for the LCD screen and viewfinder Following indicators will appear on your camcorder. Example: Indicators in the CAMERA-TAPE mode Time code (p. 25)/Tape counter (p. 25)/ Self...(p. 37) Super NightShot plus (p. 37) Color Slow Shutter (p. 37) Warning (p. 110) Picture effect (p. 68) Digital effect (p. 41, 48) MEMORY MIX (p. 43) Manual focus (p. 39) PROGRAM AE (p. 61) Back light (p. 35) 16:9 WIDE (p. 63) SteadyShot off (p. 64) Protect (p. 99) Print mark (p. 99) Slide show...

Camera Operations Guide
Page 133
... Playing time 16 Power mode 17 PRINT See PictBridge Print mark 99 PROGRAM AE 61 Program edit (PROG. KEY 41 M Main sound See MULTI-SOUND Manual focus 39 Memory Chroma key (MTCAM CHROMA 43 Memory Luminance key (MTCAM LUMI.) ....43 MEMORY MIX 42 Memory Overlap (OVERLAP 41 Memory photo 29, 49...
... Playing time 16 Power mode 17 PRINT See PictBridge Print mark 99 PROGRAM AE 61 Program edit (PROG. KEY 41 M Main sound See MULTI-SOUND Manual focus 39 Memory Chroma key (MTCAM CHROMA 43 Memory Luminance key (MTCAM LUMI.) ....43 MEMORY MIX 42 Memory Overlap (OVERLAP 41 Memory photo 29, 49...


