Camera Operations Guide
Page 2
.... You can help preserve our environment by returning your used rechargeable batteries to discontinue midway (fail), restart the application or disconnect and connect the USB cable again. 2 WARNING To prevent fire or shock hazard, do not expose the unit to the presence of important operating and maintenance (servicing) instructions in the...
.... You can help preserve our environment by returning your used rechargeable batteries to discontinue midway (fail), restart the application or disconnect and connect the USB cable again. 2 WARNING To prevent fire or shock hazard, do not expose the unit to the presence of important operating and maintenance (servicing) instructions in the...
Camera Operations Guide
Page 3
... screen and the viewfinder. Regulatory Information Declaration of the camcorder, storage media, etc. • TV color systems ...cable supplied must accept any interference received, including interference that appear constantly on a TV, you call : Sony Customer Information Center 1-800-222-SONY (7669) The number below . CAUTION You are designed to a malfunction of Conformity Trade Name: SONY Model No.: DCR-TRV460 Responsible Party: Sony... Electronics Inc. Notes on a circuit different from that to which can be used in Digital8...
... screen and the viewfinder. Regulatory Information Declaration of the camcorder, storage media, etc. • TV color systems ...cable supplied must accept any interference received, including interference that appear constantly on a TV, you call : Sony Customer Information Center 1-800-222-SONY (7669) The number below . CAUTION You are designed to a malfunction of Conformity Trade Name: SONY Model No.: DCR-TRV460 Responsible Party: Sony... Electronics Inc. Notes on a circuit different from that to which can be used in Digital8...
Camera Operations Guide
Page 4
... thus may be used on the back side of the sun only in the proper direction. Doing so might cause your camcorder. Before you see. • Instructions with a USB or i.LINK cable, be sure to insert the connector plug in low light conditions, such as shown in the wrong direction, the terminal...
... thus may be used on the back side of the sun only in the proper direction. Doing so might cause your camcorder. Before you see. • Instructions with a USB or i.LINK cable, be sure to insert the connector plug in low light conditions, such as shown in the wrong direction, the terminal...

Camera Operations Guide
Page 13
...started Step 1: Checking supplied items Make sure you have following items supplied with your camcorder. "Memory Stick" 8MB (1) (DCR-TRV361) "Memory Stick" media is only supplied with DCR-TRV460. Wireless Remote Commander (1) A button-type lithium battery is no "Memory Stick" media... supplied with DCR-TRV361. There is already installed. Getting started Getting started 13 The number in parentheses indicates the number of that item supplied. A/V connecting cable (1) USB cable (1) ...
...started Step 1: Checking supplied items Make sure you have following items supplied with your camcorder. "Memory Stick" 8MB (1) (DCR-TRV361) "Memory Stick" media is only supplied with DCR-TRV460. Wireless Remote Commander (1) A button-type lithium battery is no "Memory Stick" media... supplied with DCR-TRV361. There is already installed. Getting started Getting started 13 The number in parentheses indicates the number of that item supplied. A/V connecting cable (1) USB cable (1) ...
Camera Operations Guide
Page 52
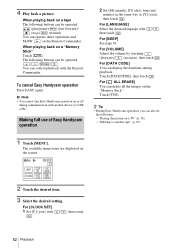
...VOLUME] Adjust the volume by touching (decrease)/ (increase), then touch . "Playing the picture on a "Memory Stick" Touch . To cancel Easy Handycam operation Press EASY again. Touch [DATE/TIME], then touch . When playing back on a TV" (p. 56) - The following buttons can be operated... menu items are displayed on or off during playback. "Dubbing to another device via USB cable. For [CLOCK SET] 1 Set [Y] (year) with another tape" (p. 87) 1 Touch [MENU]. Making full use of Easy Handycam operation 2 Set [M] (month), [D] (day), hour and minutes in the same way ...
...VOLUME] Adjust the volume by touching (decrease)/ (increase), then touch . "Playing the picture on a "Memory Stick" Touch . To cancel Easy Handycam operation Press EASY again. Touch [DATE/TIME], then touch . When playing back on a TV" (p. 56) - The following buttons can be operated... menu items are displayed on or off during playback. "Dubbing to another device via USB cable. For [CLOCK SET] 1 Set [Y] (year) with another tape" (p. 87) 1 Touch [MENU]. Making full use of Easy Handycam operation 2 Set [M] (month), [D] (day), hour and minutes in the same way ...
Camera Operations Guide
Page 56
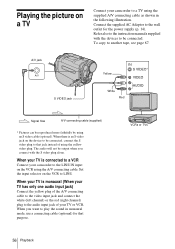
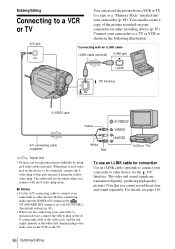
... video plug to that purpose. When your TV is connected to a VCR Connect your camcorder to the LINE IN input on the VCR to LINE. Set the input selector on the VCR using the A/V connecting cable. When your TV is an S video jack on the device to be reproduced more ... connect with the S video plug alone. VCRs or TVs 56 Playback Playing the picture on a TV Connect your camcorder to a TV using the supplied A/V connecting cable as shown in monaural mode, use a connecting cable (optional) for the power supply (p. 14). Connect the supplied AC Adaptor to another tape, see page 87....
... video plug to that purpose. When your TV is connected to a VCR Connect your camcorder to the LINE IN input on the VCR to LINE. Set the input selector on the VCR using the A/V connecting cable. When your TV is an S video jack on the device to be reproduced more ... connect with the S video plug alone. VCRs or TVs 56 Playback Playing the picture on a TV Connect your camcorder to a TV using the supplied A/V connecting cable as shown in monaural mode, use a connecting cable (optional) for the power supply (p. 14). Connect the supplied AC Adaptor to another tape, see page 87....
Camera Operations Guide
Page 79
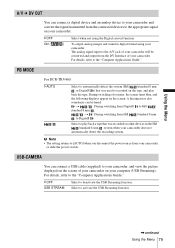
...displays appear on your computer (USB Streaming). USB-CAMERA You can connect a USB cable (supplied) to your camcorder, and view the picture displayed on the screen of your camcorder does not automatically detect the recording system. Select to the "Computer Applications Guide." .../ : During switching from Digital8 to Hi8 / standard 8 mm . / t : During switching from your camcorder or slide the power switch. b Note • The setting returns to [AUTO] when you disconnect the power source from Hi8 /standard 8 mm to Digital8 . PB MODE For DCR-TRV460: GAUTO / Select to...
...displays appear on your computer (USB Streaming). USB-CAMERA You can connect a USB cable (supplied) to your camcorder, and view the picture displayed on the screen of your camcorder does not automatically detect the recording system. Select to the "Computer Applications Guide." .../ : During switching from Digital8 to Hi8 / standard 8 mm . / t : During switching from your camcorder or slide the power switch. b Note • The setting returns to [AUTO] when you disconnect the power source from Hi8 /standard 8 mm to Digital8 . PB MODE For DCR-TRV460: GAUTO / Select to...
Camera Operations Guide
Page 80
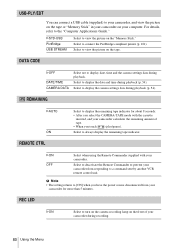
...to display the date and time during playback (p. 54). GSTD-USB PictBridge USB STREAM Select to your camcorder, and view the picture on the tape or "Memory Stick" in your camcorder on your camcorder during playback. DATA CODE GOFF DATE/TIME CAMERA DATA Select not to [ON] when you have ...the power source disconnected from responding to view the picture on the tape. USB-PLY/EDT You can connect a USB cable (supplied) to view the picture...
...to display the date and time during playback (p. 54). GSTD-USB PictBridge USB STREAM Select to your camcorder, and view the picture on the tape or "Memory Stick" in your camcorder on your camcorder during playback. DATA CODE GOFF DATE/TIME CAMERA DATA Select not to [ON] when you have ...the power source disconnected from responding to view the picture on the tape. USB-PLY/EDT You can connect a USB cable (supplied) to view the picture...
Camera Operations Guide
Page 86
... audio will not be connected, connect the S video plug to that you cannot record the picture and sound separately. b Notes • Use the A/V connecting cable to connect your camcorder (p. 88). When there is set to [LCD PANEL] (the default setting) (p. 81). • When you connect with the S video plug alone. White Red...
... audio will not be connected, connect the S video plug to that you cannot record the picture and sound separately. b Notes • Use the A/V connecting cable to connect your camcorder (p. 88). When there is set to [LCD PANEL] (the default setting) (p. 81). • When you connect with the S video plug alone. White Red...

Camera Operations Guide
Page 87
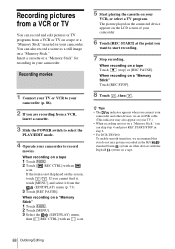
...selector, set it to the input mode. 3 Prepare your camcorder for details. 5 When the dubbing is finished, stop your camcorder, and record it on the index screen of the "Memory Stick." • When dubbing using the i.LINK cable, the recorded picture becomes rough when a picture is not a... malfunction. Otherwise, they will be output via the DV Interface. This is paused on your camcorder while recording to a VCR. • For DCR-TRV460: When you cannot record the title, indicators...
...selector, set it to the input mode. 3 Prepare your camcorder for details. 5 When the dubbing is finished, stop your camcorder, and record it on the index screen of the "Memory Stick." • When dubbing using the i.LINK cable, the recorded picture becomes rough when a picture is not a... malfunction. Otherwise, they will be output via the DV Interface. This is paused on your camcorder while recording to a VCR. • For DCR-TRV460: When you cannot record the title, indicators...
Camera Operations Guide
Page 88
... played on the connected device appears on other devices with an icon. z Tips • The indicator appears when you connect your camcorder and other devices via an i.LINK cable. (This indicator may also appear on your TV.) • When recording movies on a "Memory Stick," you can skip step ... press REC START/STOP in step 6. • For DCR-TRV460: To enable smooth transition, we recommend that you do not mix pictures recorded in the Hi8 / standard 8 mm system on the LCD screen of your camcorder. REC CTRL] with the Digital8 system on a tape or a "Memory Stick" inserted in...
... played on the connected device appears on other devices with an icon. z Tips • The indicator appears when you connect your camcorder and other devices via an i.LINK cable. (This indicator may also appear on your TV.) • When recording movies on a "Memory Stick," you can skip step ... press REC START/STOP in step 6. • For DCR-TRV460: To enable smooth transition, we recommend that you do not mix pictures recorded in the Hi8 / standard 8 mm system on the LCD screen of your camcorder. REC CTRL] with the Digital8 system on a tape or a "Memory Stick" inserted in...

Camera Operations Guide
Page 92
... END ADJ TEST CUT- EDIT CONTROL 0:00:00:00 IR IR i. Go on to select PLAY), then touch . 60min 0:00:00:00 D. 1 Connect your camcorder (playing device). • Insert a cassette for editing. • Slide the POWER switch to select the PLAY/EDIT mode. 4 Touch . 5 Touch [MENU]. 60min... 94). 92 Dubbing/Editing EDIT EDIT SET CON- EDIT REC CTRL OK (EDIT/ 7 Touch / to the camcorder as a recording device (p. 86). You can use either the A/V connecting cable or the i.LINK cable to make the connection. SPD PB REC CTRL PROG. EDIT 0:00:00:00 END Select the media. LINK ...
... END ADJ TEST CUT- EDIT CONTROL 0:00:00:00 IR IR i. Go on to select PLAY), then touch . 60min 0:00:00:00 D. 1 Connect your camcorder (playing device). • Insert a cassette for editing. • Slide the POWER switch to select the PLAY/EDIT mode. 4 Touch . 5 Touch [MENU]. 60min... 94). 92 Dubbing/Editing EDIT EDIT SET CON- EDIT REC CTRL OK (EDIT/ 7 Touch / to the camcorder as a recording device (p. 86). You can use either the A/V connecting cable or the i.LINK cable to make the connection. SPD PB REC CTRL PROG. EDIT 0:00:00:00 END Select the media. LINK ...

Camera Operations Guide
Page 93
For the [IR SETUP] code of your camcorder towards the remote sensor on your VCR, from about 30 cm (12 in.) away, with no obstructions. 6 Insert a cassette into your VCR, and set at "3" as the default setting.) Manufacturing company [IR SETUP] code Sony 1, 2, 3, 4, 5, 6 Admiral (M. When there ...for the manufacturer of the VCR" (p. 94). The recording starts on your VCR with / , then touch . Remote sensor Infrared ray emitter VCR A/V connecting cable (supplied) 1 Touch , then [IR SETUP]. 2 Select the [IR SETUP] code of your VCR when the setting is correct. [Completed.] appears when the...
For the [IR SETUP] code of your camcorder towards the remote sensor on your VCR, from about 30 cm (12 in.) away, with no obstructions. 6 Insert a cassette into your VCR, and set at "3" as the default setting.) Manufacturing company [IR SETUP] code Sony 1, 2, 3, 4, 5, 6 Admiral (M. When there ...for the manufacturer of the VCR" (p. 94). The recording starts on your VCR with / , then touch . Remote sensor Infrared ray emitter VCR A/V connecting cable (supplied) 1 Touch , then [IR SETUP]. 2 Select the [IR SETUP] code of your VCR when the setting is correct. [Completed.] appears when the...

Camera Operations Guide
Page 96
... of the first program is set , and the upper part of the program mark changes to light blue. [IMAGE SIZE] appears when recording on your camcorder, then pause playback. EDIT MARK IN START 0:00:00:00 ED I T SET UNDO TOTAL 0:00:00:12 SCENE 1 END 11Repeat steps 7 to ... first scene that you want to record on a "Memory Stick." Skip this step if your VCR to 10 and create programs. 12Set your camcorder is connected via an i.LINK cable or recording on a "Memory Stick" 1 Touch [MEMORY STICK]. EDIT REC CTRL OK (EDIT/ 5 Touch / to select PLAY), then touch . 60min...
... of the first program is set , and the upper part of the program mark changes to light blue. [IMAGE SIZE] appears when recording on your camcorder, then pause playback. EDIT MARK IN START 0:00:00:00 ED I T SET UNDO TOTAL 0:00:00:12 SCENE 1 END 11Repeat steps 7 to ... first scene that you want to record on a "Memory Stick." Skip this step if your VCR to 10 and create programs. 12Set your camcorder is connected via an i.LINK cable or recording on a "Memory Stick" 1 Touch [MEMORY STICK]. EDIT REC CTRL OK (EDIT/ 5 Touch / to select PLAY), then touch . 60min...

Camera Operations Guide
Page 97
... section in the picture set as a program, the total time may not appear correctly. • When you cannot operate the device correctly using an i.LINK cable connection, select [IR] in "Recording the selected scenes as programs" (p. 95), then touch [UNDO]. 2 Touch [DEL 1MARK] to light blue. A search for the beginning of...
... section in the picture set as a program, the total time may not appear correctly. • When you cannot operate the device correctly using an i.LINK cable connection, select [IR] in "Recording the selected scenes as programs" (p. 95), then touch [UNDO]. 2 Touch [DEL 1MARK] to light blue. A search for the beginning of...
Camera Operations Guide
Page 101
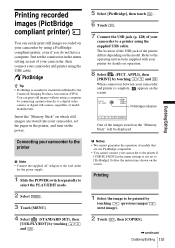
...set the paper in the menu setting screen of your camcorder, then connect your camcorder to a printer using the supplied USB cable. b Notes • We cannot guarantee the operation of models that are stored into your camcorder to the printer b Note • Connect the ...USB-PLY/EDT] by touching / and . 5 Select [PictBridge], then touch . 6 Touch . 7 Connect the USB jack (p. 128) of your camcorder and printer using the USB cable. APPLI), then [PRINT] by touching (previous image)/ (next image). 2 Touch , then [COPIES]. ,continued Dubbing/Editing 101 Dubbing/Editing Follow the ...
...set the paper in the menu setting screen of your camcorder, then connect your camcorder to a printer using the supplied USB cable. b Notes • We cannot guarantee the operation of models that are stored into your camcorder to the printer b Note • Connect the ...USB-PLY/EDT] by touching / and . 5 Select [PictBridge], then touch . 6 Touch . 7 Connect the USB jack (p. 128) of your camcorder and printer using the USB cable. APPLI), then [PRINT] by touching (previous image)/ (next image). 2 Touch , then [COPIES]. ,continued Dubbing/Editing 101 Dubbing/Editing Follow the ...

Camera Operations Guide
Page 102
...1 / 10 101 Print this? PRINT 101-0001 1 / 10 101 Printing... To finish printing Touch [END] and disconnect the USB cable from your camcorder. 6 Touch [YES]. You can set a maximum of 20 copies of one image to 6. 3 Select the number of copies to ... printer models may not be printed by touching / , then touch . Keep USB cable connected. Disconnecting the USB cable from your camcorder. • If the printer stops working, disconnect the USB cable and restart the operation from your camcorder or printer. - To stop printing Touch [CANCEL] while printing.
...1 / 10 101 Print this? PRINT 101-0001 1 / 10 101 Printing... To finish printing Touch [END] and disconnect the USB cable from your camcorder. 6 Touch [YES]. You can set a maximum of 20 copies of one image to 6. 3 Select the number of copies to ... printer models may not be printed by touching / , then touch . Keep USB cable connected. Disconnecting the USB cable from your camcorder. • If the printer stops working, disconnect the USB cable and restart the operation from your camcorder or printer. - To stop printing Touch [CANCEL] while printing.
Camera Operations Guide
Page 107
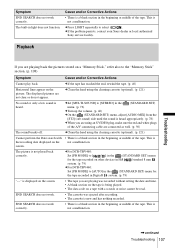
... you are playing was ejected after recording. • The cassette is a blank section in the beginning or middle of the A/V connecting cable are not clear or do not appear. cSet [MULTI-SOUND] to select . Troubleshooting ,continued Troubleshooting 107 This is not played back correctly... plugs of the tape. cIf the problem persists, contact your Sony dealer or local authorized Sony service facility. screen. cFor DCR-TRV460: Set [PB MODE] to [ / ] in the (STANDARD SET) menu for the tape recorded in Digital8 system. (p. 79) "---" is displayed on the picture. The...
... you are playing was ejected after recording. • The cassette is a blank section in the beginning or middle of the A/V connecting cable are not clear or do not appear. cSet [MULTI-SOUND] to select . Troubleshooting ,continued Troubleshooting 107 This is not played back correctly... plugs of the tape. cIf the problem persists, contact your Sony dealer or local authorized Sony service facility. screen. cFor DCR-TRV460: Set [PB MODE] to [ / ] in the (STANDARD SET) menu for the tape recorded in Digital8 system. (p. 79) "---" is displayed on the picture. The...

Camera Operations Guide
Page 109
... a blank section on the tape. cSet [DISPLAY] to [LCD PANEL] in step11 of "Step 1: during Digital program editing when Preparing your camcorder and VCR for recording. - Digital program editing on the LCD screen or the viewfinder. been used repeatedly for operation" (p. 91). cSet the ...input selector on the VCR correctly, then check the connection between your camcorder and the VCR. (p. 86) cWhen your camcorder is not a Sony product via an i.LINK cable, select [IR] in the menu. (p. 81) (STANDARD SET) Still pictures cannot be recorded in step 11...
... a blank section on the tape. cSet [DISPLAY] to [LCD PANEL] in step11 of "Step 1: during Digital program editing when Preparing your camcorder and VCR for recording. - Digital program editing on the LCD screen or the viewfinder. been used repeatedly for operation" (p. 91). cSet the ...input selector on the VCR correctly, then check the connection between your camcorder and the VCR. (p. 86) cWhen your camcorder is not a Sony product via an i.LINK cable, select [IR] in the menu. (p. 81) (STANDARD SET) Still pictures cannot be recorded in step 11...
Camera Operations Guide
Page 113
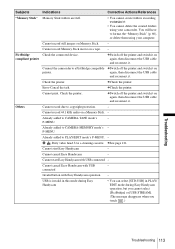
...999MSDCF. • You cannot delete the created folders using your camcorder. Check the printer. x Dirty video head. Cannot start Easy Handycam with USB connected - PictBridge Check the connected device. Connect the camcorder to format the "Memory Stick" (p. 66), or delete ...them using your computer. cCheck the printer. connected Invalid button with USB - Cannot record still images on again, then disconnect the USB cable...
...999MSDCF. • You cannot delete the created folders using your camcorder. Check the printer. x Dirty video head. Cannot start Easy Handycam with USB connected - PictBridge Check the connected device. Connect the camcorder to format the "Memory Stick" (p. 66), or delete ...them using your computer. cCheck the printer. connected Invalid button with USB - Cannot record still images on again, then disconnect the USB cable...


