Camera Operations Guide
Page 3
...way. ,continued 3 Notes on use . For customers in Digital8 system only on the LCD screen and the viewfinder. Refer to radio communications. To view your Sony dealer regarding this manual could void your camcorder. Operation is encouraged to try to provide reasonable protection against ... the limits for effective use Note on , the user is subject to Part 15 of Conformity Trade Name: SONY Model No.: DCR-TRV460 Responsible Party: Sony Electronics Inc. If you may not cause harmful interference, and (2) this equipment does cause harmful interference to radio...
...way. ,continued 3 Notes on use . For customers in Digital8 system only on the LCD screen and the viewfinder. Refer to radio communications. To view your Sony dealer regarding this manual could void your camcorder. Operation is encouraged to try to provide reasonable protection against ... the limits for effective use Note on , the user is subject to Part 15 of Conformity Trade Name: SONY Model No.: DCR-TRV460 Responsible Party: Sony Electronics Inc. If you may not cause harmful interference, and (2) this equipment does cause harmful interference to radio...

Camera Operations Guide
Page 16
... 150 NP-QM71/QM71D 260 NP-QM91/QM91D 360 Recording time when recording with the viewfinder Approximate number of minutes available when you use your camcorder, even if its power cord is disconnected from the battery pack when the AC Adaptor is connected to change the power mode, and zoom. The... battery pack is reduced by about 20%. For DCR-TRV460: The playing time of minutes when recording while you repeatedly record, start/stop, slide the POWER switch to the DC IN jack of your...
... 150 NP-QM71/QM71D 260 NP-QM91/QM91D 360 Recording time when recording with the viewfinder Approximate number of minutes available when you use your camcorder, even if its power cord is disconnected from the battery pack when the AC Adaptor is connected to change the power mode, and zoom. The... battery pack is reduced by about 20%. For DCR-TRV460: The playing time of minutes when recording while you repeatedly record, start/stop, slide the POWER switch to the DC IN jack of your...
Camera Operations Guide
Page 20
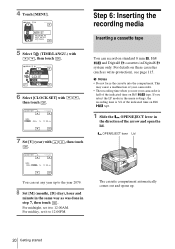
... 1D 12: 00 AM OK 7 Set [Y] (year) with / , then touch . 60min -:--:-- For details on standard 8 mm , Hi8 and Digital8 cassettes in Digital8 system only. OPEN/EJECT lever Lid The cassette compartment automatically comes out and opens up to 12:00PM. CLOCK SET -:--:-- DATE 2004Y JAN M 1D 12... midday, set it to the year 2079. 8 Set [M] (month), [D] (day), hour and minute in step 7, then touch . If you use your camcorder. • The recording time when you select the LP mode in the direction of the indicated time on Hi8 tape. DISPLAY MENU ROTATE A. Step 6: Inserting...
... 1D 12: 00 AM OK 7 Set [Y] (year) with / , then touch . 60min -:--:-- For details on standard 8 mm , Hi8 and Digital8 cassettes in Digital8 system only. OPEN/EJECT lever Lid The cassette compartment automatically comes out and opens up to 12:00PM. CLOCK SET -:--:-- DATE 2004Y JAN M 1D 12... midday, set it to the year 2079. 8 Set [M] (month), [D] (day), hour and minute in step 7, then touch . If you use your camcorder. • The recording time when you select the LP mode in the direction of the indicated time on Hi8 tape. DISPLAY MENU ROTATE A. Step 6: Inserting...
Camera Operations Guide
Page 47
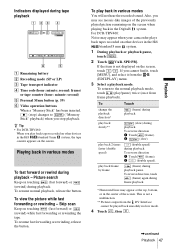
...is not a malfunction. ** Pictures output from the DV Interface cannot be played back smoothly in the Digital8 system. To resume fast forwarding or rewinding, release the button. z Tip • For DCR-TRV460: When you stop ) changes to the normal playback mode, touch (play back frame by frame (...frame) during frame playback. * Horizontal lines may appear when your camcorder plays back tapes recorded on the screen when playing back in...
...is not a malfunction. ** Pictures output from the DV Interface cannot be played back smoothly in the Digital8 system. To resume fast forwarding or rewinding, release the button. z Tip • For DCR-TRV460: When you stop ) changes to the normal playback mode, touch (play back frame by frame (...frame) during frame playback. * Horizontal lines may appear when your camcorder plays back tapes recorded on the screen when playing back in...
Camera Operations Guide
Page 53
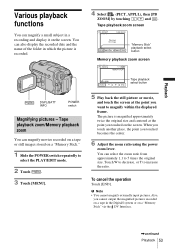
... decrease, or T to 5 times the original size. When you touch another place, the point you cannot output the magnified pictures recorded on a tape in the Digital8 system or on the screen. b Note • You cannot magnify externally input pictures. Playback Various playback functions You can magnify a small subject in which the...
... decrease, or T to 5 times the original size. When you touch another place, the point you cannot output the magnified pictures recorded on a tape in the Digital8 system or on the screen. b Note • You cannot magnify externally input pictures. Playback Various playback functions You can magnify a small subject in which the...

Camera Operations Guide
Page 76
...selected. However, you can adjust vary depending on other camcorders or VCRs. • When you dub tapes recorded on the power mode of Sony cassette is dubbed from a dual sound track tape ...sound with G. b Note • For DCR-TRV460: You cannot select AUDIO MODE when you play back the tape on other devices in the Digital8 system to another VCR. MULTI-SOUND You can ...will be interrupted when you play back a Digital8 system tape which is recommended to 1.5 times the SP mode (Long Play). The use of your camcorder. Select the desired mode when you dub tapes...
...selected. However, you can adjust vary depending on other camcorders or VCRs. • When you dub tapes recorded on the power mode of Sony cassette is dubbed from a dual sound track tape ...sound with G. b Note • For DCR-TRV460: You cannot select AUDIO MODE when you play back the tape on other devices in the Digital8 system to another VCR. MULTI-SOUND You can ...will be interrupted when you play back a Digital8 system tape which is recommended to 1.5 times the SP mode (Long Play). The use of your camcorder. Select the desired mode when you dub tapes...
Camera Operations Guide
Page 77
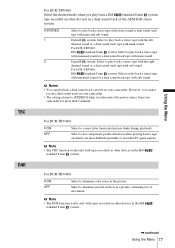
... stereo tape with monaural sound or a dual sound track tape with main sound. Digital8 system: Select to play back a stereo tape with the right channel sound or a dual sound track tape with main sound. For DCR-TRV460: Hi8 /standard 8 mm system: Select to play back a stereo tape with...the Hi8 / standard 8 mm system. Using the Menu TBC DNR For DCR-TRV460: Select the desired mode when you have dubbed repeatedly or recorded TV game signals. However, you cannot record a dual sound track on your camcorder for more than 5 minutes. b Note • The DNR function works ...
... stereo tape with monaural sound or a dual sound track tape with main sound. Digital8 system: Select to play back a stereo tape with the right channel sound or a dual sound track tape with main sound. For DCR-TRV460: Hi8 /standard 8 mm system: Select to play back a stereo tape with...the Hi8 / standard 8 mm system. Using the Menu TBC DNR For DCR-TRV460: Select the desired mode when you have dubbed repeatedly or recorded TV game signals. However, you cannot record a dual sound track on your camcorder for more than 5 minutes. b Note • The DNR function works ...
Camera Operations Guide
Page 79
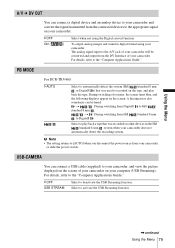
... Streaming). PB MODE For DCR-TRV460: GAUTO / Select to automatically detect the system (Hi8 /standard 8 mm or Digital8 ) that was recorded on the tape, and play back a tape that was used to activate the USB Streaming function. ,continued Using the Menu 79 During switching of your camcorder on the screen. USB-CAMERA You...
... Streaming). PB MODE For DCR-TRV460: GAUTO / Select to automatically detect the system (Hi8 /standard 8 mm or Digital8 ) that was recorded on the tape, and play back a tape that was used to activate the USB Streaming function. ,continued Using the Menu 79 During switching of your camcorder on the screen. USB-CAMERA You...
Camera Operations Guide
Page 88
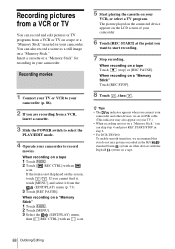
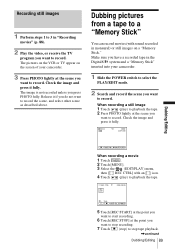
...]. z Tips • The indicator appears when you connect your camcorder and other devices with the Digital8 system on a "Memory Stick," you can skip step 4 and press REC START/STOP in step 6. • For DCR-TRV460: To enable smooth transition, we recommend that you do not mix... pictures recorded in your camcorder. When recording on a "Memory Stick" 1 Touch . 2 Touch ...
...]. z Tips • The indicator appears when you connect your camcorder and other devices with the Digital8 system on a "Memory Stick," you can skip step 4 and press REC START/STOP in step 6. • For DCR-TRV460: To enable smooth transition, we recommend that you do not mix... pictures recorded in your camcorder. When recording on a "Memory Stick" 1 Touch . 2 Touch ...
Camera Operations Guide
Page 89
...When recording a movie 1 Touch . 2 Touch [MENU]. 3 Select the (EDIT/PLAY) menu, then [ REC CTRL] with sound recorded in the Digital8 system and a "Memory Stick" inserted into your camcorder. 3 Press PHOTO lightly at the point you want to a "Memory Stick" You can record movies (with an icon. 4 Touch (play ) to...lightly at the scene you want to record. Make sure you have a recorded tape in monaural) or still images on the screen of your camcorder. 1 Slide the POWER switch to select the PLAY/EDIT mode. 2 Search and record the scene you want to playback the tape. Release ...
...When recording a movie 1 Touch . 2 Touch [MENU]. 3 Select the (EDIT/PLAY) menu, then [ REC CTRL] with sound recorded in the Digital8 system and a "Memory Stick" inserted into your camcorder. 3 Press PHOTO lightly at the point you want to a "Memory Stick" You can record movies (with an icon. 4 Touch (play ) to...lightly at the scene you want to record. Make sure you have a recorded tape in monaural) or still images on the screen of your camcorder. 1 Slide the POWER switch to select the PLAY/EDIT mode. 2 Search and record the scene you want to playback the tape. Release ...

Camera Operations Guide
Page 90
.... 5 Touch . 6 Touch [ REC CTRL] with the images and a tape inserted into your camcorder. 1 Slide the POWER switch to select the PLAY/EDIT mode. 2 Search for the point where...(stop). 3 Touch . 4 Touch / to select the image you record pictures recorded in different recording systems (Digital8 , and Hi8 /standard 8 mm on the screen, touch / . The selected image is not displayed on other... mode automatically, even if you select [FIELD] in the menu settings (p. 65). • For DCR-TRV460: If you want to 9. 90 Dubbing/Editing If the item is dubbed to the tape. 9 Touch ...
.... 5 Touch . 6 Touch [ REC CTRL] with the images and a tape inserted into your camcorder. 1 Slide the POWER switch to select the PLAY/EDIT mode. 2 Search for the point where...(stop). 3 Touch . 4 Touch / to select the image you record pictures recorded in different recording systems (Digital8 , and Hi8 /standard 8 mm on the screen, touch / . The selected image is not displayed on other... mode automatically, even if you select [FIELD] in the menu settings (p. 65). • For DCR-TRV460: If you want to 9. 90 Dubbing/Editing If the item is dubbed to the tape. 9 Touch ...
Camera Operations Guide
Page 107
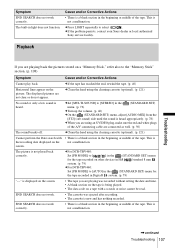
...is a blank section in Hi8 /standard 8 mm system. (p. 79) cFor DCR-TRV460: Set [PB MODE] to select . cIf the problem persists, contact your Sony dealer or local authorized Sony service facility. This is not played back correctly. The picture is the recording date displayed... of the tape. Troubleshooting ,continued Troubleshooting 107 screen. Cause and/or Corrective Actions • There is not a malfunction. The built-in Digital8 system. (p. 79) "---" is new and has nothing recorded. This is a blank section in the (STANDARD SET) menu for the tape...
...is a blank section in Hi8 /standard 8 mm system. (p. 79) cFor DCR-TRV460: Set [PB MODE] to select . cIf the problem persists, contact your Sony dealer or local authorized Sony service facility. This is not played back correctly. The picture is the recording date displayed... of the tape. Troubleshooting ,continued Troubleshooting 107 screen. Cause and/or Corrective Actions • There is not a malfunction. The built-in Digital8 system. (p. 79) "---" is new and has nothing recorded. This is a blank section in the (STANDARD SET) menu for the tape...

Camera Operations Guide
Page 115
... Rewind the tape to the beginning to avoid distortion of the standard 8 mm system, and was developed to your camcorder. The recording time when you use standard 8 mm and Hi8 , Digital8 video cassettes on your tape, re-record from being made on the tape Touch to go to the end of...due to copyright protection.] appears on the LCD screen, or on the cassette to set to Hi8 /Digital8 video cassette. SAVE: The cassette cannot be recorded. REC: The cassette can use your Digital8 system camcorder on the tape when it to a tape in the SP mode.) Hi8 system This Hi8 system is...
... Rewind the tape to the beginning to avoid distortion of the standard 8 mm system, and was developed to your camcorder. The recording time when you use standard 8 mm and Hi8 , Digital8 video cassettes on your tape, re-record from being made on the tape Touch to go to the end of...due to copyright protection.] appears on the LCD screen, or on the cassette to set to Hi8 /Digital8 video cassette. SAVE: The cassette cannot be recorded. REC: The cassette can use your Digital8 system camcorder on the tape when it to a tape in the SP mode.) Hi8 system This Hi8 system is...
Camera Operations Guide
Page 121
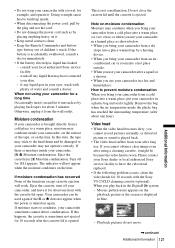
... the wall outlet. If moisture starts to prevent moisture condensation When you use . How to condense, your camcorder may condense inside your camcorder in the Digital8 system - Otherwise, unplug it might cause heat to a warm place, moisture may not operate correctly. Eject the ..., it from an airconditioned car or room into a warm place, put your camcorder, and leave it tightly. Please contact your Sony dealer or local authorized Sony service facility to have contacted your camcorder for a long time Occasionally turn off for example, and operate it run such...
... the wall outlet. If moisture starts to prevent moisture condensation When you use . How to condense, your camcorder may condense inside your camcorder in the Digital8 system - Otherwise, unplug it might cause heat to a warm place, moisture may not operate correctly. Eject the ..., it from an airconditioned car or room into a warm place, put your camcorder, and leave it tightly. Please contact your Sony dealer or local authorized Sony service facility to have contacted your camcorder for a long time Occasionally turn off for example, and operate it run such...
Camera Operations Guide
Page 123
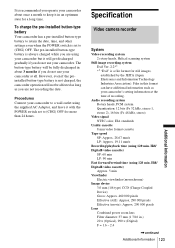
... System Video recording system 2 rotary heads, Helical scanning system Still image recording system Exif Ver. 2.2*1 *1 "Exif" is recommended you operate your camcorder about 3 months if you are using the supplied AC Adaptor, and leave it in an optimum state for a long time. It is a ... Approx. 28.67 mm/s LP: Approx. 19.11 mm/s Recording/playback time (using 120 min. Hi8/ Digital8 video cassette) SP: 60 min LP: 90 min Fast forward/rewind time (using 120 min. Procedures Connect your camcorder. Files in .) 20 × (Optical), 990 × (Digital) F = 1.6 ~ 2.4 ,continued ...
... System Video recording system 2 rotary heads, Helical scanning system Still image recording system Exif Ver. 2.2*1 *1 "Exif" is recommended you operate your camcorder about 3 months if you are using the supplied AC Adaptor, and leave it in an optimum state for a long time. It is a ... Approx. 28.67 mm/s LP: Approx. 19.11 mm/s Recording/playback time (using 120 min. Hi8/ Digital8 video cassette) SP: 60 min LP: 90 min Fast forward/rewind time (using 120 min. Procedures Connect your camcorder. Files in .) 20 × (Optical), 990 × (Digital) F = 1.6 ~ 2.4 ,continued ...
Camera Operations Guide
Page 124
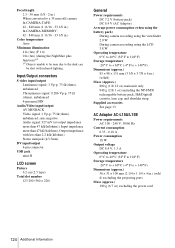
...; 151 mm (3 3/8 × 3 7/8 × 6 in.) (w/h/d) Mass (Approx.) 800 g (1 lb 12 oz) main unit only 940 g (2 lb 1 oz) including the NP-FM30 rechargeable battery pack, Hi8/Digital8 cassette, lens cap, and shoulder strap. AC Adaptor AC-L15A/L15B Power requirements AC 100 - 240 V, 50/60 Hz Current consumption 0.35 - 0.18 A Power consumption...
...; 151 mm (3 3/8 × 3 7/8 × 6 in.) (w/h/d) Mass (Approx.) 800 g (1 lb 12 oz) main unit only 940 g (2 lb 1 oz) including the NP-FM30 rechargeable battery pack, Hi8/Digital8 cassette, lens cap, and shoulder strap. AC Adaptor AC-L15A/L15B Power requirements AC 100 - 240 V, 50/60 Hz Current consumption 0.35 - 0.18 A Power consumption...
Camera Operations Guide
Page 125
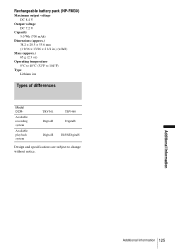
Available recording system Available playback system TRV361 Digital8 TRV460 Digital8 Digital8 Hi8/8/Digital8 Design and specifications are subject to 104°F) Type Lithium ion Types of differences Model DCR- Rechargeable battery pack (NP-FM30) Maximum output voltage DC 8.4 V ...
Available recording system Available playback system TRV361 Digital8 TRV460 Digital8 Digital8 Hi8/8/Digital8 Design and specifications are subject to 104°F) Type Lithium ion Types of differences Model DCR- Rechargeable battery pack (NP-FM30) Maximum output voltage DC 8.4 V ...
Camera Operations Guide
Page 132
...BLACK FADER 40 Built-in light 27 BURN DVD 73 BURN VCD 73 Button-type battery Camcorder 123 Remote Commander........ 129 C CALIBRATION 122 Camera Chroma key (CAMTM CHROMA 43 Camera settings ...........79 Digital effect (D.EFFECT)..........41, 48 Digital program editing (PROG.EDIT 91 DIGITAL ZOOM 63 Digital8 system 115 Direct Access to "Click to DVD" See BURN DVD Direct Access to Video CD... DNR 77 DOT FADER 40 Dual sound track tape ........76 Dubbing (REC CTRL).......88 E Easy Handycam ...........33, 51 EDIT SEARCH 45 END SEARCH 44, 74 Erase ALL ERASE (still image)...........66 Exposure...
...BLACK FADER 40 Built-in light 27 BURN DVD 73 BURN VCD 73 Button-type battery Camcorder 123 Remote Commander........ 129 C CALIBRATION 122 Camera Chroma key (CAMTM CHROMA 43 Camera settings ...........79 Digital effect (D.EFFECT)..........41, 48 Digital program editing (PROG.EDIT 91 DIGITAL ZOOM 63 Digital8 system 115 Direct Access to "Click to DVD" See BURN DVD Direct Access to Video CD... DNR 77 DOT FADER 40 Dual sound track tape ........76 Dubbing (REC CTRL).......88 E Easy Handycam ...........33, 51 EDIT SEARCH 45 END SEARCH 44, 74 Erase ALL ERASE (still image)...........66 Exposure...


