
Operating Instructions
Page 1
Record the serial number in the space provided below. DCR-TRV Model No. DCR-TRV530 TM SERIES DCR-TRV230/TRV330/TRV530 ©2001 Sony Corporation Refer to these numbers whenever you call upon your Sony dealer regarding this manual thoroughly, and retain it for future reference. Owner's Record The model and serial numbers are located on the bottom. 3-065-262-12 (2) Digital Video Camera Recorder Operating Instructions Before operating the unit, please read this product. Model No. Serial No. AC- Serial No.
Record the serial number in the space provided below. DCR-TRV Model No. DCR-TRV530 TM SERIES DCR-TRV230/TRV330/TRV530 ©2001 Sony Corporation Refer to these numbers whenever you call upon your Sony dealer regarding this manual thoroughly, and retain it for future reference. Owner's Record The model and serial numbers are located on the bottom. 3-065-262-12 (2) Digital Video Camera Recorder Operating Instructions Before operating the unit, please read this product. Model No. Serial No. AC- Serial No.

Operating Instructions
Page 3
... turning the equipment off and on a circuit different from that to which can radiate radio frequency energy and, if not installed and used with this manual could void your authority to the following measures: - For customers in this equipment in order to comply with Canadian ICES-003. 3 These limits are cautioned...
... turning the equipment off and on a circuit different from that to which can radiate radio frequency energy and, if not installed and used with this manual could void your authority to the following measures: - For customers in this equipment in order to comply with Canadian ICES-003. 3 These limits are cautioned...

Operating Instructions
Page 4
...exposure in the recording mode • Back light (p. 23) • NightShot/Super NightShot (p. 23) • PROGRAM AE (p. 44) • Adjusting the exposure manually (p. 46) Functions to give images more impact • Digital program editing (p. 63) • Fader (p. 37) • Picture effect (p. 40) • Digital... (p. 98) (DCR-TRV330/TRV530 only) Functions to give a natural appearance to your recordings • END SEARCH/EDITSEARCH/Rec review (p. 26) • Manual focus (p. 47) • Digital zoom [MENU] (p. 79) The default setting is set to OFF . (To zoom greater than 25×, select...
...exposure in the recording mode • Back light (p. 23) • NightShot/Super NightShot (p. 23) • PROGRAM AE (p. 44) • Adjusting the exposure manually (p. 46) Functions to give images more impact • Digital program editing (p. 63) • Fader (p. 37) • Picture effect (p. 40) • Digital... (p. 98) (DCR-TRV330/TRV530 only) Functions to give a natural appearance to your recordings • END SEARCH/EDITSEARCH/Rec review (p. 26) • Manual focus (p. 47) • Digital zoom [MENU] (p. 79) The default setting is set to OFF . (To zoom greater than 25×, select...

Operating Instructions
Page 5
... on a tape - Photo save 105 Viewing a still image - SLIDE SHOW 118 Preventing accidental erasure - Photo search/Photo scan 58 Digital8 system, recording and playback 133 About the "InfoLITHIUM" battery pack .. 135 About i.LINK 136 Using your own titles 50 Inserting a...40 Using special effects - Digital effect 41 Using the PROGRAM AE function 44 Adjusting the exposure manually 46 Focusing manually 47 Superimposing a title 48 Making your camcorder abroad 138 Maintenance information and precautions 139 Specifications 144 Quick Reference Identifying the parts and controls ...
... on a tape - Photo save 105 Viewing a still image - SLIDE SHOW 118 Preventing accidental erasure - Photo search/Photo scan 58 Digital8 system, recording and playback 133 About the "InfoLITHIUM" battery pack .. 135 About i.LINK 136 Using your own titles 50 Inserting a...40 Using special effects - Digital effect 41 Using the PROGRAM AE function 44 Adjusting the exposure manually 46 Focusing manually 47 Superimposing a title 48 Making your camcorder abroad 138 Maintenance information and precautions 139 Specifications 144 Quick Reference Identifying the parts and controls ...

Operating Instructions
Page 8
...table below. As you read through this manual and operating your camcorder plays back tapes recorded in capital letters...Digital8 system. Before using your camcorder With your digital camcorder, you do not mix pictures recorded in the Hi8 /standard 8 with the Digital8 system on your camcorder...camcorder records and plays back pictures in the illustrations. Unauthorized recording of such materials may be contrary to the provision of your recordings on page 53 to indicate that the operation is provided with MEMORY marked on the POWER switch) Self-timer (USB) jack LCD screen TRV230...
...table below. As you read through this manual and operating your camcorder plays back tapes recorded in capital letters...Digital8 system. Before using your camcorder With your digital camcorder, you do not mix pictures recorded in the Hi8 /standard 8 with the Digital8 system on your camcorder...camcorder records and plays back pictures in the illustrations. Unauthorized recording of such materials may be contrary to the provision of your recordings on page 53 to indicate that the operation is provided with MEMORY marked on the POWER switch) Self-timer (USB) jack LCD screen TRV230...

Operating Instructions
Page 9
... wet may be repaired [a]. •Never leave your camcorder to malfunction. Doing so might cause your camcorder away from rain and sea water. Keep your camcorder to malfunction. Sometimes this manual Precautions on camcorder care Lens and LCD screen/finder (on the LCD screen and the finder. ... or under direct sunlight [b]. •Be careful when placing the camera near a window or outdoors. However, there may cause your camcorder exposed to direct sunlight for effective use. Getting started Using this malfunction cannot be some tiny black points and/or bright points (white...
... wet may be repaired [a]. •Never leave your camcorder to malfunction. Doing so might cause your camcorder away from rain and sea water. Keep your camcorder to malfunction. Sometimes this manual Precautions on camcorder care Lens and LCD screen/finder (on the LCD screen and the finder. ... or under direct sunlight [b]. •Be careful when placing the camera near a window or outdoors. However, there may cause your camcorder exposed to direct sunlight for effective use. Getting started Using this malfunction cannot be some tiny black points and/or bright points (white...

Operating Instructions
Page 24
... NIGHTSHOT again. Using the NightShot Light The picture will be recorded in the menu settings (p. 79). The maximum shooting distance using the NightShot function, focus manually. This may be clearer with the autofocus mode when using the NightShot Light is about 3 m (10 feet). 24 Recording a picture Using SUPER NIGHTSHOT... you can not use the Super NightShot function. To enable NightShot Light, set to ON in normal recording, the picture may cause your camcorder to malfunction. •When you keep NIGHTSHOT set N.S.LIGHT to ON in the daytime). Digital effect -
... NIGHTSHOT again. Using the NightShot Light The picture will be recorded in the menu settings (p. 79). The maximum shooting distance using the NightShot function, focus manually. This may be clearer with the autofocus mode when using the NightShot Light is about 3 m (10 feet). 24 Recording a picture Using SUPER NIGHTSHOT... you can not use the Super NightShot function. To enable NightShot Light, set to ON in normal recording, the picture may cause your camcorder to malfunction. •When you keep NIGHTSHOT set N.S.LIGHT to ON in the daytime). Digital effect -

Operating Instructions
Page 28
...indicators - Display function Press DISPLAY on the screen. The indicators appear on your camcorder or the Remote Commander supplied with your camcorder. Use the Remote Commander for tapes recorded in the Digital8 system. •Various settings of the recording data are not recorded when recording ... on the Remote Commander in the menu settings (p. 79). The display changes as follows: date/time t various settings (SteadyShot, exposure AUTO/MANUAL, white balance, gain, shutter speed, aperture value) t no indicator Notes on the data code function •The data code function works ...
...indicators - Display function Press DISPLAY on the screen. The indicators appear on your camcorder or the Remote Commander supplied with your camcorder. Use the Remote Commander for tapes recorded in the Digital8 system. •Various settings of the recording data are not recorded when recording ... on the Remote Commander in the menu settings (p. 79). The display changes as follows: date/time t various settings (SteadyShot, exposure AUTO/MANUAL, white balance, gain, shutter speed, aperture value) t no indicator Notes on the data code function •The data code function works ...

Operating Instructions
Page 43
Pictureeffect - Focus manually using a tripod. Shutter speed Shutter speed number SLOW SHTR 1 SLOW SHTR 2 SLOW SHTR 3 SLOW SHTR 4 Shutter speed 1/30 1/15 1/8 1/4 43 Low lux mode of PROGRAM ...
Pictureeffect - Focus manually using a tripod. Shutter speed Shutter speed number SLOW SHTR 1 SLOW SHTR 2 SLOW SHTR 3 SLOW SHTR 4 Shutter speed 1/30 1/15 1/8 1/4 43 Low lux mode of PROGRAM ...

Operating Instructions
Page 46
if you adjust the exposure manually, the backlight function does not work in CAMERA or MEMORY (DCR-TRV330/TRV530 only) mode. The subject is backlit - The exposure indicator appears on the ... NIGHTSHOT to the automatic exposure mode Press EXPOSURE. Adjusting the exposure manually You can manually adjust and set the exposure. Adjust the exposure manually in CAMERA or MEMORY (DCR-TRV330/TRV530 only) mode. To record dark pictures (e.g. Bright subject and dark background - Your camcorder automatically returns to the automatic mode: - night scenes) faithfully (1) Press...
if you adjust the exposure manually, the backlight function does not work in CAMERA or MEMORY (DCR-TRV330/TRV530 only) mode. The subject is backlit - The exposure indicator appears on the ... NIGHTSHOT to the automatic exposure mode Press EXPOSURE. Adjusting the exposure manually You can manually adjust and set the exposure. Adjust the exposure manually in CAMERA or MEMORY (DCR-TRV330/TRV530 only) mode. To record dark pictures (e.g. Bright subject and dark background - Your camcorder automatically returns to the automatic mode: - night scenes) faithfully (1) Press...

Operating Instructions
Page 47
...the background. •Shooting a stationary subject when using a tripod. (1) Set FOCUS to AUTO. This makes focusing easier. Advanced Recording Operations Focusing manually You can gain better results by first focusing at the "T" (telephoto) position and then shooting at the end of the "W" (wide-angle) ...position. 9 changes to focus on the screen. (2) Turnthefocusringtosharpenfocus. 2 FOCUS To return to the autofocus mode Set FOCUS to MANUAL in CAMERA or MEMORY (DCR-TRV330/TRV530 only) mode. subjects through glass coated with backgrounds such as walls and sky. •When...
...the background. •Shooting a stationary subject when using a tripod. (1) Set FOCUS to AUTO. This makes focusing easier. Advanced Recording Operations Focusing manually You can gain better results by first focusing at the "T" (telephoto) position and then shooting at the end of the "W" (wide-angle) ...position. 9 changes to focus on the screen. (2) Turnthefocusringtosharpenfocus. 2 FOCUS To return to the autofocus mode Set FOCUS to MANUAL in CAMERA or MEMORY (DCR-TRV330/TRV530 only) mode. subjects through glass coated with backgrounds such as walls and sky. •When...

Operating Instructions
Page 74
... which has the i. Signal convert function You can exchange video signals. •Depending on how to capture images, refer to the instruction manual of the analog video signals, the computer may contain noise or incorrect colors. •You cannot record or capture the video output via your... camcorder. LINK (DV) jack to ON in to your camcorder. Before operation Set DISPLAY to LCD in the menu settings. (The default setting is LCD.) (1) Set the POWER switch...
... which has the i. Signal convert function You can exchange video signals. •Depending on how to capture images, refer to the instruction manual of the analog video signals, the computer may contain noise or incorrect colors. •You cannot record or capture the video output via your... camcorder. LINK (DV) jack to ON in to your camcorder. Before operation Set DISPLAY to LCD in the menu settings. (The default setting is LCD.) (1) Set the POWER switch...
Operating Instructions
Page 80
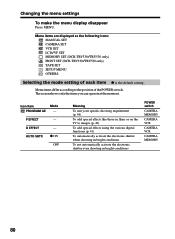
... The screen shows only the items you can operate at the moment. Icon/item Mode PROGRAM AE - Menu items are displayed as the following icons: MANUAL SET CAMERA SET VCR SET LCD/VF SET MEMORY SET (DCR-TRV330/TRV530 only) PRINT SET (DCR-TRV330/TRV530 only) TAPE SET SETUP MENU OTHERS...
... The screen shows only the items you can operate at the moment. Icon/item Mode PROGRAM AE - Menu items are displayed as the following icons: MANUAL SET CAMERA SET VCR SET LCD/VF SET MEMORY SET (DCR-TRV330/TRV530 only) PRINT SET (DCR-TRV330/TRV530 only) TAPE SET SETUP MENU OTHERS...

Operating Instructions
Page 89
"Memory Stick" and are trademarks of Sony Corporation. • Microsoft® and Windows® are either registered trademarks or trademarks of Microsoft Corporation in the United States and/or other countries. •... on "Memory Stick"s by the JEIDA (Japan Electronic Industry Development Association). Furthermore, "™" and "®" are not sold in this manual. "Memory Stick" operations 89 You cannot play back on your camcorder following the steps on other product names mentioned herein may be deleted if you cannot use the "Memory Stick" that...
"Memory Stick" and are trademarks of Sony Corporation. • Microsoft® and Windows® are either registered trademarks or trademarks of Microsoft Corporation in the United States and/or other countries. •... on "Memory Stick"s by the JEIDA (Japan Electronic Industry Development Association). Furthermore, "™" and "®" are not sold in this manual. "Memory Stick" operations 89 You cannot play back on your camcorder following the steps on other product names mentioned herein may be deleted if you cannot use the "Memory Stick" that...

Operating Instructions
Page 125
...While being operated in CAMERA mode, your camcorder has been in the standby mode for autofocus. c Set it to OFF in the menu settings. c Use Hi8 /Digital8 tapes. (p. 85) • The ...contrast between the subject and background is set to CAMERA. (p. 19) • The tape has run into any problem using your Sony dealer or local authorized Sony service...pack is the standard 8 tape. The autofocusing function does not work . c Set FOCUS to MANUAL to MANUAL. A vertical band appears when you run out. Troubleshooting - The image on the screen or...
...While being operated in CAMERA mode, your camcorder has been in the standby mode for autofocus. c Set it to OFF in the menu settings. c Use Hi8 /Digital8 tapes. (p. 85) • The ...contrast between the subject and background is set to CAMERA. (p. 19) • The tape has run into any problem using your Sony dealer or local authorized Sony service...pack is the standard 8 tape. The autofocusing function does not work . c Set FOCUS to MANUAL to MANUAL. A vertical band appears when you run out. Troubleshooting - The image on the screen or...

Operating Instructions
Page 136
... DV input/output jack. It is also indicated near the i.LINK jack on some equipment. Mbps stands for IEEE 1394 data transport bus proposed by SONY, and is a trademark approved by the i.LINK cable (DV cable). About the Name "i.LINK" i.LINK is a more familiar term for megabits per... be sent or received in one second. i.LINK is "i.LINK"? i.LINK Baud rate i.LINK's maximum baud rate varies according to the instruction manual of data can be connected to be connected, and that 100 megabits of the equipment to this unit by many corporations. Possible applications are sometimes...
... DV input/output jack. It is also indicated near the i.LINK jack on some equipment. Mbps stands for IEEE 1394 data transport bus proposed by SONY, and is a trademark approved by the i.LINK cable (DV cable). About the Name "i.LINK" i.LINK is a more familiar term for megabits per... be sent or received in one second. i.LINK is "i.LINK"? i.LINK Baud rate i.LINK's maximum baud rate varies according to the instruction manual of data can be connected to be connected, and that 100 megabits of the equipment to this unit by many corporations. Possible applications are sometimes...

Operating Instructions
Page 137
Before connecting this unit, also refer to the instruction manuals for the equipment to -4-pin cable (during DV dubbing). Required i.LINK Cable Use the Sony i.LINK 4-pin-to be connected to other video equipment having DV jacks, see page 61 . For details on the personal computer. This unit can also ...) compatible equipment made by this unit is already installed on precautions when connecting this unit to a personal computer, make sure that application software supported by SONY (e.g. i.LINK and are trademarks. 137
Before connecting this unit, also refer to the instruction manuals for the equipment to -4-pin cable (during DV dubbing). Required i.LINK Cable Use the Sony i.LINK 4-pin-to be connected to other video equipment having DV jacks, see page 61 . For details on the personal computer. This unit can also ...) compatible equipment made by this unit is already installed on precautions when connecting this unit to a personal computer, make sure that application software supported by SONY (e.g. i.LINK and are trademarks. 137

Operating Instructions
Page 153
...) 7 Picture effect indicator (p. 40, 53) 8 Volume indicator (p. 27)/Data code indicator (p. 28) 9 PROGRAM AE indicator (p. 44) 0 Backlight indicator (p. 23) qa SteadyShot off indicator (p. 81) qs Manual focusing indicator (p. 47) qd Self-timer indicator (p. 25, 34, 97) (DCR-TRV330/TRV530 only) qf STBY/REC indicator (p. 19)/Video control mode (p. 29) qg Tape...
...) 7 Picture effect indicator (p. 40, 53) 8 Volume indicator (p. 27)/Data code indicator (p. 28) 9 PROGRAM AE indicator (p. 44) 0 Backlight indicator (p. 23) qa SteadyShot off indicator (p. 81) qs Manual focusing indicator (p. 47) qd Self-timer indicator (p. 25, 34, 97) (DCR-TRV330/TRV530 only) qf STBY/REC indicator (p. 19)/Video control mode (p. 29) qg Tape...

Operating Instructions
Page 154
... Image quality mode 91 Index screen 108 "InfoLITHIUM" battery ...... 135 Infrared rays emitter ........ 23, 32 JPEG 88 LANC jack 151 LUMINANCEKEY 41 M, N Main sound 82 Manual focus 47 Memory chroma key 98 Memory luminance key ......... 98 MEMORY MIX 98 Memory overlap 98 Memory PB ZOOM 116 Memory photo recording ...... 93 "Memory...
... Image quality mode 91 Index screen 108 "InfoLITHIUM" battery ...... 135 Infrared rays emitter ........ 23, 32 JPEG 88 LANC jack 151 LUMINANCEKEY 41 M, N Main sound 82 Manual focus 47 Memory chroma key 98 Memory luminance key ......... 98 MEMORY MIX 98 Memory overlap 98 Memory PB ZOOM 116 Memory photo recording ...... 93 "Memory...


