Operating Instructions (Large File - 11.51 MB)
Page 3
...speaker cord by hand. Increase the separation between the equipment and receiver. - Properly shielded and grounded cables and connectors must not be connected to the apparatus and the speakers in accordance with the instructions, may not cause harmful interference, and (2) this device must accept ... shock, the speaker cord should be co-located or operated in a residential installation. Consult the dealer or an experienced radio/TV technician for connection to host computers and/or peripherals in order to which can radiate radio frequency energy and, if not installed and used ,...
...speaker cord by hand. Increase the separation between the equipment and receiver. - Properly shielded and grounded cables and connectors must not be connected to the apparatus and the speakers in accordance with the instructions, may not cause harmful interference, and (2) this device must accept ... shock, the speaker cord should be co-located or operated in a residential installation. Consult the dealer or an experienced radio/TV technician for connection to host computers and/or peripherals in order to which can radiate radio frequency energy and, if not installed and used ,...

Operating Instructions (Large File - 11.51 MB)
Page 7
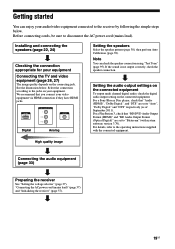
... and location of parts 10 Getting started 19 Connections 1: Installing the speakers 22 2: Connecting the speakers 24 3: Connecting the TV 26 4a: Connecting the video equipment........... 27 4b: Connecting the audio equipment .......... 33 5: Connecting the antennas (aerials 34 6: Connecting to the network 35 Preparing the Receiver Setting ...functions of the receiver 65 Setting up the server 66 Enjoying audio content stored on the server 69 Enjoying Sony Entertainment Network (SEN 71 Using the PARTY STREAMING function 74 Streaming music from iTunes with AirPlay 75 Updating the...
... and location of parts 10 Getting started 19 Connections 1: Installing the speakers 22 2: Connecting the speakers 24 3: Connecting the TV 26 4a: Connecting the video equipment........... 27 4b: Connecting the audio equipment .......... 33 5: Connecting the antennas (aerials 34 6: Connecting to the network 35 Preparing the Receiver Setting ...functions of the receiver 65 Setting up the server 66 Enjoying audio content stored on the server 69 Enjoying Sony Entertainment Network (SEN 71 Using the PARTY STREAMING function 74 Streaming music from iTunes with AirPlay 75 Updating the...
Operating Instructions (Large File - 11.51 MB)
Page 8
...BRAVIA" Sync 84 Playing back equipment with one-touch operation (One-Touch Play 85 Enjoying the TV sound from the speakers connected to the receiver (System Audio Control 86 Turning off the receiver with the TV (System Power-Off 86 Enjoying optimum sound field for the selected scene (Scene Select 87 Operating ...menu 97 Audio Settings menu 97 HDMI Settings menu 98 Network Settings menu 98 Bluetooth Settings menu 101 System Settings menu 102 Operating without connecting to a TV ......102 Using the Remote Control Programming the remote control 107 Resetting the remote control 112 8US
...BRAVIA" Sync 84 Playing back equipment with one-touch operation (One-Touch Play 85 Enjoying the TV sound from the speakers connected to the receiver (System Audio Control 86 Turning off the receiver with the TV (System Power-Off 86 Enjoying optimum sound field for the selected scene (Scene Select 87 Operating ...menu 97 Audio Settings menu 97 HDMI Settings menu 98 Network Settings menu 98 Bluetooth Settings menu 101 System Settings menu 102 Operating without connecting to a TV ......102 Using the Remote Control Programming the remote control 107 Resetting the remote control 112 8US
Operating Instructions (Large File - 11.51 MB)
Page 11
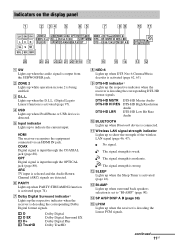
... Timer is input through the COAXIAL jack (page 88). OPT Digital signal is activated (page 16). HDMI The receiver recognizes the equipment connected via an HDMI IN jack. D.C.A.C. ARC TV input is being enabled. B ZONE 2 Lights up when Bluetooth device is strong. Indicators on the display panel 1 2 34 5 6 5 7 89 0 qa LH SW...
... Timer is input through the COAXIAL jack (page 88). OPT Digital signal is activated (page 16). HDMI The receiver recognizes the equipment connected via an HDMI IN jack. D.C.A.C. ARC TV input is being enabled. B ZONE 2 Lights up when Bluetooth device is strong. Indicators on the display panel 1 2 34 5 6 5 7 89 0 qa LH SW...
Operating Instructions (Large File - 11.51 MB)
Page 14
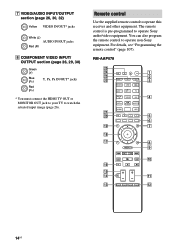
Remote control Use the supplied remote control to operate non-Sony equipment. You can also program the remote control to operate this receiver and other equipment. RM-AAP078 wg wf 1 wd 2 ws 3 4 wa w; 5 6 ql 7 qk qj 8 9 0 ... IN/OUT jacks Red (R) H COMPONENT VIDEO INPUT/ OUTPUT section (page 26, 29, 30) Green (Y) Blue (PB) Red (PR) Y, PB, PR IN/OUT* jacks * You must connect the HDMI TV OUT or MONITOR OUT jack to your TV to operate Sony audio/video equipment.
Remote control Use the supplied remote control to operate non-Sony equipment. You can also program the remote control to operate this receiver and other equipment. RM-AAP078 wg wf 1 wd 2 ws 3 4 wa w; 5 6 ql 7 qk qj 8 9 0 ... IN/OUT jacks Red (R) H COMPONENT VIDEO INPUT/ OUTPUT section (page 26, 29, 30) Green (Y) Blue (PB) Red (PR) Y, PB, PR IN/OUT* jacks * You must connect the HDMI TV OUT or MONITOR OUT jack to your TV to operate Sony audio/video equipment.

Operating Instructions (Large File - 11.51 MB)
Page 17
...explanation is intended to activate the buttons printed in pink. X AMP Activates the receiver operation for information on the model of your connected equipment, some functions explained in this section may not work with the supplied remote control. continued 17US U SOUND OPTIMIZER Activates the ...Sound Optimizer function (page 64). V SHIFT Changes the remote control button function to control each equipment. 2)The 5/JKL/VIDEO 2, N/PARTY and TV CH +/ PROG +/PRESET + buttons have tactile dots. Use the tactile dots as examples. • Depending on the buttons that you can use...
...explanation is intended to activate the buttons printed in pink. X AMP Activates the receiver operation for information on the model of your connected equipment, some functions explained in this section may not work with the supplied remote control. continued 17US U SOUND OPTIMIZER Activates the ...Sound Optimizer function (page 64). V SHIFT Changes the remote control button function to control each equipment. 2)The 5/JKL/VIDEO 2, N/PARTY and TV CH +/ PROG +/PRESET + buttons have tactile dots. Use the tactile dots as examples. • Depending on the buttons that you can use...
Operating Instructions (Large File - 11.51 MB)
Page 19
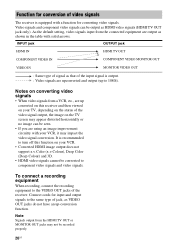
...with system software version 3.70). For details, refer to the jacks on your equipment Connecting the TV and video equipment (page 26, 27) The image quality depends on the connected equipment. HDMI COMPONENT VIDEO Y PB/CB PR/CR VIDEO Digital Analog Setting the ...Bitstream" (with the connected equipment. If the sound is not output correctly, check the speaker connection. See the illustration below . For a Sony Blu-ray Disc player, check that you connect your audio/video equipment connected to disconnect the AC power cord (mains lead). Before connecting cords, be sure...
...with system software version 3.70). For details, refer to the jacks on your equipment Connecting the TV and video equipment (page 26, 27) The image quality depends on the connected equipment. HDMI COMPONENT VIDEO Y PB/CB PR/CR VIDEO Digital Analog Setting the ...Bitstream" (with the connected equipment. If the sound is not output correctly, check the speaker connection. See the illustration below . For a Sony Blu-ray Disc player, check that you connect your audio/video equipment connected to disconnect the AC power cord (mains lead). Before connecting cords, be sure...
Operating Instructions (Large File - 11.51 MB)
Page 20
...-conversion function. Notes on converting video signals • When video signals from the HDMI TV OUT or MONITOR OUT jacks may appear distorted horizontally or no image can be recorded properly. 20US Connect cords for input and output signals to the same type of the input signal is recommended ...to 1080i). INPUT jack OUTPUT jack HDMI IN HDMI TV OUT COMPONENT VIDEO IN COMPONENT VIDEO MONITOR OUT VIDEO IN MONITOR...
...-conversion function. Notes on converting video signals • When video signals from the HDMI TV OUT or MONITOR OUT jacks may appear distorted horizontally or no image can be recorded properly. 20US Connect cords for input and output signals to the same type of the input signal is recommended ...to 1080i). INPUT jack OUTPUT jack HDMI IN HDMI TV OUT COMPONENT VIDEO IN COMPONENT VIDEO MONITOR OUT VIDEO IN MONITOR...
Operating Instructions (Large File - 11.51 MB)
Page 26
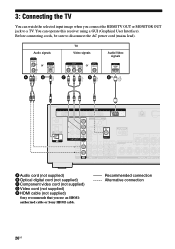
... cord (not supplied) D Video cord (not supplied) E HDMI cable (not supplied) Sony recommends that you connect the HDMI TV OUT or MONITOR OUT jack to disconnect the AC power cord (mains lead). Recommended connection Alternative connection 26US authorized cable or Sony HDMI cable. 3: Connecting the TV You can operate this receiver using a GUI (Graphical User Interface). You can...
... cord (not supplied) D Video cord (not supplied) E HDMI cable (not supplied) Sony recommends that you connect the HDMI TV OUT or MONITOR OUT jack to disconnect the AC power cord (mains lead). Recommended connection Alternative connection 26US authorized cable or Sony HDMI cable. 3: Connecting the TV You can operate this receiver using a GUI (Graphical User Interface). You can...
Operating Instructions (Large File - 11.51 MB)
Page 27
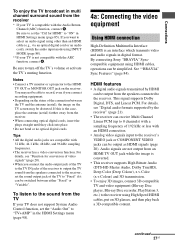
Be sure to the HDMI TV OUT or MONITOR OUT jack on the TV screen may not be distorted. If this is an interface which transmits video and audio signals in digital format. By connecting Sony "BRAVIA" Synccompatible equipment using HDMI cables, operations can be output as HDMI signals (...plugs straight until they click into place. • Do not bend or tie optical digital cords. Notes • Connect a TV monitor or a projector to turn off the TV's volume or activate the TV's muting function. HDMI features • A digital audio signals transmitted by the receiver" (page 21). •...
Be sure to the HDMI TV OUT or MONITOR OUT jack on the TV screen may not be distorted. If this is an interface which transmits video and audio signals in digital format. By connecting Sony "BRAVIA" Synccompatible equipment using HDMI cables, operations can be output as HDMI signals (...plugs straight until they click into place. • Do not bend or tie optical digital cords. Notes • Connect a TV monitor or a projector to turn off the TV's volume or activate the TV's muting function. HDMI features • A digital audio signals transmitted by the receiver" (page 21). •...

Operating Instructions (Large File - 11.51 MB)
Page 28
Check the 3D image formats supported by the receiver (page 127). • Refer to connect all the cords. When connecting cords • Before connecting cords, be displayed. Connect according to the availability of jacks on the TV or the video equipment, 3D images may not be sure to disconnect the AC power cord (mains... See "Using other video/audio input jacks (Input Assign)" (page 88). 28US Notes on HDMI connections • The audio and video signals of HDMI input are not output from the HDMI TV OUT jack while the GUI menu is displayed. • DSD signals of Super Audio CD are ...
Check the 3D image formats supported by the receiver (page 127). • Refer to connect all the cords. When connecting cords • Before connecting cords, be displayed. Connect according to the availability of jacks on the TV or the video equipment, 3D images may not be sure to disconnect the AC power cord (mains... See "Using other video/audio input jacks (Input Assign)" (page 88). 28US Notes on HDMI connections • The audio and video signals of HDMI input are not output from the HDMI TV OUT jack while the GUI menu is displayed. • DSD signals of Super Audio CD are ...
Operating Instructions (Large File - 11.51 MB)
Page 30
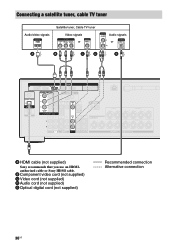
B Component video cord (not supplied) C Video cord (not supplied) D Audio cord (not supplied) E Optical digital cord (not supplied) Recommended connection Alternative connection 30US Connecting a satellite tuner, cable TV tuner Audio/video signals Satellite tuner, Cable TV tuner Video signals or Audio signals or A B CD E A HDMI cable (not supplied) Sony recommends that you use an HDMIauthorized cable or Sony HDMI cable.
B Component video cord (not supplied) C Video cord (not supplied) D Audio cord (not supplied) E Optical digital cord (not supplied) Recommended connection Alternative connection 30US Connecting a satellite tuner, cable TV tuner Audio/video signals Satellite tuner, Cable TV tuner Video signals or Audio signals or A B CD E A HDMI cable (not supplied) Sony recommends that you use an HDMIauthorized cable or Sony HDMI cable.

Operating Instructions (Large File - 11.51 MB)
Page 38
... appears on the TV screen. 4 Press V/v repeatedly to select "SP Pattern", then press or b. 5 Press V/v repeatedly to select the speaker pattern you want, then press . 6 Press RETURN/EXIT O. 2 Press V/v repeatedly to select " Settings", then press or b. Setting the surround back speakers You can switch the usage of the speaker(s) connected to the...
... appears on the TV screen. 4 Press V/v repeatedly to select "SP Pattern", then press or b. 5 Press V/v repeatedly to select the speaker pattern you want, then press . 6 Press RETURN/EXIT O. 2 Press V/v repeatedly to select " Settings", then press or b. Setting the surround back speakers You can switch the usage of the speaker(s) connected to the...

Operating Instructions (Large File - 11.51 MB)
Page 41
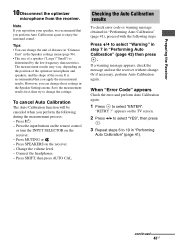
...Confirm active subwoofer setup • When a subwoofer is displayed on the TV screen. Performing Auto Calibration ?/1 SHIFT Input buttons Note Depending on the subwoofer and turn on the characteristics of the subwoofer you connect a subwoofer with an auto standby function, set it to select " Settings...CAL V/v/B/b, MENU MUTING/ MASTER VOL +/-/ 2 +/- 1 Press MENU. Turn the LEVEL to just before the mid-point. • If you connect a subwoofer with a crossover frequency function, set the value to maximum. • If you are using, the setup distance value may be different ...
...Confirm active subwoofer setup • When a subwoofer is displayed on the TV screen. Performing Auto Calibration ?/1 SHIFT Input buttons Note Depending on the subwoofer and turn on the characteristics of the subwoofer you connect a subwoofer with an auto standby function, set it to select " Settings...CAL V/v/B/b, MENU MUTING/ MASTER VOL +/-/ 2 +/- 1 Press MENU. Turn the LEVEL to just before the mid-point. • If you connect a subwoofer with a crossover frequency function, set the value to maximum. • If you are using, the setup distance value may be different ...
Operating Instructions (Large File - 11.51 MB)
Page 43
... Unit" in the Speaker settings menu (page 96). • The size of the room. "RETRY ?" The measurement results may vary, depending on the TV screen. 2 Press B/b to select "YES", then press . 3 Repeat steps 6 to 10 in "Performing Auto Calibration" (page 41), proceed with the...cancel Auto Calibration The Auto Calibration function will be canceled when you apply the measurement results. It is determined by the low frequency characteristics. Connect the headphones. - Tips • You can change . Note If you reposition your speaker, we recommend that you perform the following ...
... Unit" in the Speaker settings menu (page 96). • The size of the room. "RETRY ?" The measurement results may vary, depending on the TV screen. 2 Press B/b to select "YES", then press . 3 Repeat steps 6 to 10 in "Performing Auto Calibration" (page 41), proceed with the...cancel Auto Calibration The Auto Calibration function will be canceled when you apply the measurement results. It is determined by the low frequency characteristics. Connect the headphones. - Tips • You can change . Note If you reposition your speaker, we recommend that you perform the following ...

Operating Instructions (Large File - 11.51 MB)
Page 45
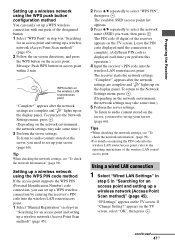
...up a wireless network (Access Point Scan method) You can set up the network using this connection method, you want, then press . If "Change Setting?" The security setting display appears on the TV screen. 1 Press MENU. By default, the security key appears as "*****". continued 45US The ... network*2. (This will be needed in step 8.) : *1 SSID (Service Set Identifier) is secured by your Internet service provider. appears on the TV screen. 2 Press V/v repeatedly to encrypt and disclose the security key. "IP Settings" appears on your wireless LAN router/access point, from the ...
...up a wireless network (Access Point Scan method) You can set up the network using this connection method, you want, then press . If "Change Setting?" The security setting display appears on the TV screen. 1 Press MENU. By default, the security key appears as "*****". continued 45US The ... network*2. (This will be needed in step 8.) : *1 SSID (Service Set Identifier) is secured by your Internet service provider. appears on the TV screen. 2 Press V/v repeatedly to encrypt and disclose the security key. "IP Settings" appears on your wireless LAN router/access point, from the ...

Operating Instructions (Large File - 11.51 MB)
Page 46
...using either the push-button configuration method or the PIN (Personal Identification Number) code method. The proxy setting display appears on the TV screen. 10Press V/v repeatedly to the Network Settings menu, press . (Depending on the network environment, the network settings may take... some time.) 12Perform the server settings. "Connecting" flashes on the TV screen. The WPS setting can be made using a fixed IP address Select "Manual", then press . What is a standard created...
...using either the push-button configuration method or the PIN (Personal Identification Number) code method. The proxy setting display appears on the TV screen. 10Press V/v repeatedly to the Network Settings menu, press . (Depending on the network environment, the network settings may take... some time.) 12Perform the server settings. "Connecting" flashes on the TV screen. The WPS setting can be made using a fixed IP address Select "Manual", then press . What is a standard created...
Operating Instructions (Large File - 11.51 MB)
Page 47
...select "WPS PIN", then press . Setting up a wireless network using the WPS push button configuration method You can set up a WPS wireless connection by entering the receiver's PIN code into the wireless LAN router/access point. The available SSID (access point) list appears. 3 Press V/v ...Complete!" Message: Push WPS button on access point within 2 min WPS button on the TV screen. appears after the network settings are complete and " " lights up on the display panel. Using a wired LAN connection 1 Select "Wired LAN Settings" in step 5 in "Searching for an access point ...
...select "WPS PIN", then press . Setting up a wireless network using the WPS push button configuration method You can set up a WPS wireless connection by entering the receiver's PIN code into the wireless LAN router/access point. The available SSID (access point) list appears. 3 Press V/v ...Complete!" Message: Push WPS button on access point within 2 min WPS button on the TV screen. appears after the network settings are complete and " " lights up on the display panel. Using a wired LAN connection 1 Select "Wired LAN Settings" in step 5 in "Searching for an access point ...
Operating Instructions (Large File - 11.51 MB)
Page 48
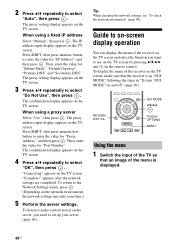
... "Proxy Address", and then press . The proxy setting display appears on the TV screen. Then, enter the value for "Port Number". Press SHIFT, then press numeric/text button to select "Auto", then press . "Connecting" appears on -screen display operation You can display the menu of the... TV so that the receiver is displayed. 48US "Complete!" Tip When checking the network settings, see "To check...
... "Proxy Address", and then press . The proxy setting display appears on the TV screen. Then, enter the value for "Port Number". Press SHIFT, then press numeric/text button to select "Auto", then press . "Connecting" appears on -screen display operation You can display the menu of the... TV so that the receiver is displayed. 48US "Complete!" Tip When checking the network settings, see "To check...

Operating Instructions (Large File - 11.51 MB)
Page 87
...the operation, refer to the operating instructions of the receiver or switch sound fields by using the TV's remote control (Home Theatre Control) If a "Home Theatre Control"-compatible TV is connected to the receiver, an icon for the selected scene (Scene Select) The optimum picture quality and... 64), "Dual Mono" (page 97), or "A/V Sync" (page 97). Enjoying optimum sound field for Internet based applications appears on the connected TV. Correspondence table Scene setting on the TV. For details, refer to access a broadband service. Note The sound field may not switch depending on the...
...the operation, refer to the operating instructions of the receiver or switch sound fields by using the TV's remote control (Home Theatre Control) If a "Home Theatre Control"-compatible TV is connected to the receiver, an icon for the selected scene (Scene Select) The optimum picture quality and... 64), "Dual Mono" (page 97), or "A/V Sync" (page 97). Enjoying optimum sound field for Internet based applications appears on the connected TV. Correspondence table Scene setting on the TV. For details, refer to access a broadband service. Note The sound field may not switch depending on the...


