GUI Menu List
Page 1
...[OPTIONS] System GUI* iPod* Function List* [OPTIONS] System GUI* iPod* [OPTIONS] Auto Tuning Direct Tuning Name Input* Settings Auto Cal. 4-420-302-11(1) STR-DN1030 GUI Menu List/Liste des menus de l'interface utilisateur/Lista de menús de la interfaz gráfica de usuario/ Lista do ícone... selecionado. © 2012 Sony Corporation Printed in Malaysia Type Full Flat Engineer Front Reference Off SP Pattern SB Assign* Manual Setup Crossover Freq* Test Tone D.Range Comp ...
...[OPTIONS] System GUI* iPod* Function List* [OPTIONS] System GUI* iPod* [OPTIONS] Auto Tuning Direct Tuning Name Input* Settings Auto Cal. 4-420-302-11(1) STR-DN1030 GUI Menu List/Liste des menus de l'interface utilisateur/Lista de menús de la interfaz gráfica de usuario/ Lista do ícone... selecionado. © 2012 Sony Corporation Printed in Malaysia Type Full Flat Engineer Front Reference Off SP Pattern SB Assign* Manual Setup Crossover Freq* Test Tone D.Range Comp ...
Operating Instructions (Large File - 11.51 MB)
Page 3
...the U.S.A. However, there is required when the apparatus has been damaged in order to avoid injury from the apparatus and the speakers. continued 3US Servicing is no guarantee that any other antenna or transmitter. This device complies with the apparatus. NOTE: This ...harmful interference in this manual could void your authority to operate this equipment does cause harmful interference to the apparatus and the speakers in accordance with any changes or modifications not expressly approved in a residential installation. This equipment must be connected to radio ...
...the U.S.A. However, there is required when the apparatus has been damaged in order to avoid injury from the apparatus and the speakers. continued 3US Servicing is no guarantee that any other antenna or transmitter. This device complies with the apparatus. NOTE: This ...harmful interference in this manual could void your authority to operate this equipment does cause harmful interference to the apparatus and the speakers in accordance with any changes or modifications not expressly approved in a residential installation. This equipment must be connected to radio ...

Operating Instructions (Large File - 11.51 MB)
Page 7
... Preparing the Receiver Setting the voltage selector 37 Connecting the AC power cord (mains lead 37 Initializing the receiver 37 Setting the speakers 38 Using AUTO CALIBRATION 39 Configuring the network settings of the receiver 44 Guide to on-screen display operation.......... 48 Basic Operations ...Features About the network functions of the receiver 65 Setting up the server 66 Enjoying audio content stored on the server 69 Enjoying Sony Entertainment Network (SEN 71 Using the PARTY STREAMING function 74 Streaming music from iTunes with AirPlay 75 Updating the software 77 Searching...
... Preparing the Receiver Setting the voltage selector 37 Connecting the AC power cord (mains lead 37 Initializing the receiver 37 Setting the speakers 38 Using AUTO CALIBRATION 39 Configuring the network settings of the receiver 44 Guide to on-screen display operation.......... 48 Basic Operations ...Features About the network functions of the receiver 65 Setting up the server 66 Enjoying audio content stored on the server 69 Enjoying Sony Entertainment Network (SEN 71 Using the PARTY STREAMING function 74 Streaming music from iTunes with AirPlay 75 Updating the software 77 Searching...
Operating Instructions (Large File - 11.51 MB)
Page 8
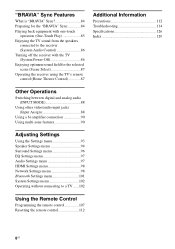
...84 Preparing for the "BRAVIA" Sync 84 Playing back equipment with one-touch operation (One-Touch Play 85 Enjoying the TV sound from the speakers connected to the receiver (System Audio Control 86 Turning off the receiver with the TV (System Power-Off 86 Enjoying optimum sound field for...audio input jacks (Input Assign 88 Using a bi-amplifier connection 90 Using multi-zone features 90 Adjusting Settings Using the Settings menu 93 Speaker Settings menu 94 Surround Settings menu 96 EQ Settings menu 97 Audio Settings menu 97 HDMI Settings menu 98 Network Settings menu 98 Bluetooth ...
...84 Preparing for the "BRAVIA" Sync 84 Playing back equipment with one-touch operation (One-Touch Play 85 Enjoying the TV sound from the speakers connected to the receiver (System Audio Control 86 Turning off the receiver with the TV (System Power-Off 86 Enjoying optimum sound field for...audio input jacks (Input Assign 88 Using a bi-amplifier connection 90 Using multi-zone features 90 Adjusting Settings Using the Settings menu 93 Speaker Settings menu 94 Surround Settings menu 96 EQ Settings menu 97 Audio Settings menu 97 HDMI Settings menu 98 Network Settings menu 98 Bluetooth ...
Operating Instructions (Large File - 11.51 MB)
Page 10
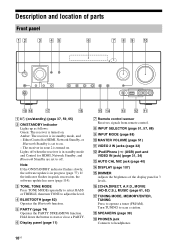
.../STANDBY indicator flashes slowly, the software update is in standby mode and Control for HDMI, Network Standby, or Bluetooth Standby is set to scan a station. R SPEAKERS (page 39) S PHONES jack Connects to operate a tuner (FM/AM). F Display panel (page 11) qg qf qd qs qa G Remote control sensor Receives signals from...
.../STANDBY indicator flashes slowly, the software update is in standby mode and Control for HDMI, Network Standby, or Bluetooth Standby is set to scan a station. R SPEAKERS (page 39) S PHONES jack Connects to operate a tuner (FM/AM). F Display panel (page 11) qg qf qd qs qa G Remote control sensor Receives signals from...
Operating Instructions (Large File - 11.51 MB)
Page 11
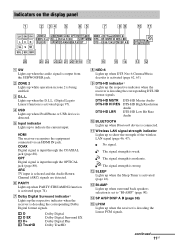
... is set to indicate the current input. HDMI The receiver recognizes the equipment connected via an HDMI IN jack. F PARTY Lights up when surround back speakers selection is activated (page 74). L SLEEP Lights up when the receiver is activated (page 16). N SP A/SP B/SP A B (page 39) O LPCM Lights up when the...
... is set to indicate the current input. HDMI The receiver recognizes the equipment connected via an HDMI IN jack. F PARTY Lights up when surround back speakers selection is activated (page 74). L SLEEP Lights up when the receiver is activated (page 16). N SP A/SP B/SP A B (page 39) O LPCM Lights up when the...
Operating Instructions (Large File - 11.51 MB)
Page 12
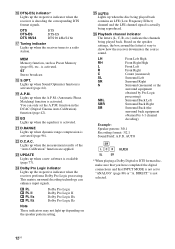
... A.P.M. (Automatic Phase Matching) function is available (page 77). Y Lights up when a new software is activated. Based on the speaker pattern setting. MEM Memory function, such as Preset Memory (page 60), etc., is not selected. 12US function in the DCAC (Digital...obtained by Pro Logic processing) Surround Back Left Surround Back Right Surround Back (the surround back equipment obtained by 6.1 channel decoding) Example: Speaker pattern: 3/0.1 Recording format: 3/2.1 Sound Field: A.F.D. ST Stereo broadcast R S.OPT. DIRECT" is activated. This matrix surround decoding technology ...
... A.P.M. (Automatic Phase Matching) function is available (page 77). Y Lights up when a new software is activated. Based on the speaker pattern setting. MEM Memory function, such as Preset Memory (page 60), etc., is not selected. 12US function in the DCAC (Digital...obtained by Pro Logic processing) Surround Back Left Surround Back Right Surround Back (the surround back equipment obtained by 6.1 channel decoding) Example: Speaker pattern: 3/0.1 Recording format: 3/2.1 Sound Field: A.F.D. ST Stereo broadcast R S.OPT. DIRECT" is activated. This matrix surround decoding technology ...
Operating Instructions (Large File - 11.51 MB)
Page 13
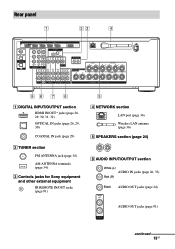
Rear panel 1 23 4 86 7 6 A DIGITAL INPUT/OUTPUT section HDMI IN/OUT* jacks (page 26, 29, 30, 31, 32) OPTICAL IN jacks (page 26, 29, 30) COAXIAL IN jack (page 29) B TUNER section FM ANTENNA jack (page 34) AM ANTENNA terminals (page 34) C Controls jacks for Sony equipment and other external equipment IR REMOTE IN/OUT jacks (page 91) 5 D NETWORK section LAN port (page 36) Wireless LAN antenna (page 36) E SPEAKERS section (page 24) F AUDIO INPUT/OUTPUT section White (L) AUDIO IN jacks (page 26, 33) Red (R) Black AUDIO OUT jacks (page 24) AUDIO OUT jacks (page 91) continued 13US
Rear panel 1 23 4 86 7 6 A DIGITAL INPUT/OUTPUT section HDMI IN/OUT* jacks (page 26, 29, 30, 31, 32) OPTICAL IN jacks (page 26, 29, 30) COAXIAL IN jack (page 29) B TUNER section FM ANTENNA jack (page 34) AM ANTENNA terminals (page 34) C Controls jacks for Sony equipment and other external equipment IR REMOTE IN/OUT jacks (page 91) 5 D NETWORK section LAN port (page 36) Wireless LAN antenna (page 36) E SPEAKERS section (page 24) F AUDIO INPUT/OUTPUT section White (L) AUDIO IN jacks (page 26, 33) Red (R) Black AUDIO OUT jacks (page 24) AUDIO OUT jacks (page 91) continued 13US
Operating Instructions (Large File - 11.51 MB)
Page 16
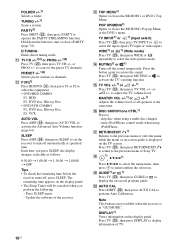
... check the remaining time before the receiver turns off the sound temporarily. Each time you perform the following. - Update the software of all speakers at specified time. to enter/confirm the selection. Q RETURN/EXIT O1) Returns to turn off automatically at the same time. TUNING +/-1) Scans... 16US N MUTING1) or 1) Turns off , press SLEEP. Press TV (W), then press RETURN/EXIT O to return to display information of Sony TV. to activate the Advanced Auto Volume function (page 64). Note This button is not available when the receiver is displayed on the display...
... check the remaining time before the receiver turns off the sound temporarily. Each time you perform the following. - Update the software of all speakers at specified time. to enter/confirm the selection. Q RETURN/EXIT O1) Returns to turn off automatically at the same time. TUNING +/-1) Scans... 16US N MUTING1) or 1) Turns off , press SLEEP. Press TV (W), then press RETURN/EXIT O to return to display information of Sony TV. to activate the Advanced Auto Volume function (page 64). Note This button is not available when the receiver is displayed on the display...
Operating Instructions (Large File - 11.51 MB)
Page 19
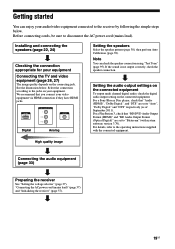
... "Connecting the AC power cord (mains lead)" (page 37) and "Initializing the receiver" (page 37). 19US See the illustration below . For a Sony Blu-ray Disc player, check that you connect your equipment Connecting the TV and video equipment (page 26, 27) The image quality depends on the...connected equipment. Note You can enjoy your audio/video equipment connected to disconnect the AC power cord (mains lead). Installing and connecting the speakers (page 22, 24) Checking the connection appropriate for your video equipment via HDMI connection if they have HDMI jacks. Setting the audio ...
... "Connecting the AC power cord (mains lead)" (page 37) and "Initializing the receiver" (page 37). 19US See the illustration below . For a Sony Blu-ray Disc player, check that you connect your equipment Connecting the TV and video equipment (page 26, 27) The image quality depends on the...connected equipment. Note You can enjoy your audio/video equipment connected to disconnect the AC power cord (mains lead). Installing and connecting the speakers (page 22, 24) Checking the connection appropriate for your video equipment via HDMI connection if they have HDMI jacks. Setting the audio ...
Operating Instructions (Large File - 11.51 MB)
Page 22
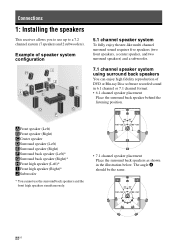
... the illustration below. AFront speaker (Left) BFront speaker (Right) CCenter speaker DSurround speaker (Left) ESurround speaker (Right) FSurround back speaker (Left)* GSurround back speaker (Right)* HFront high speaker (Left)* IFront high speaker (Right)* JSubwoofer * You cannot use up to use the surround back speakers and the front high speakers simultaneously. • 7.1 channel speaker placement Place the surround back speakers as shown in 6.1 channel...
... the illustration below. AFront speaker (Left) BFront speaker (Right) CCenter speaker DSurround speaker (Left) ESurround speaker (Right) FSurround back speaker (Left)* GSurround back speaker (Right)* HFront high speaker (Left)* IFront high speaker (Right)* JSubwoofer * You cannot use up to use the surround back speakers and the front high speakers simultaneously. • 7.1 channel speaker placement Place the surround back speakers as shown in 6.1 channel...

Operating Instructions (Large File - 11.51 MB)
Page 23
Place the front high speakers - at an angle between 25° to 35°. - Connections 7.1 channel speaker system using front high speakers You can place it wherever you can enjoy vertical sound effects by connecting additional two front high speakers. at an angle of 20° ± 5° in height. 20˚ ± 5˚ Tip Since the subwoofer does not emit highly directional signals, you want. 23US
Place the front high speakers - at an angle between 25° to 35°. - Connections 7.1 channel speaker system using front high speakers You can place it wherever you can enjoy vertical sound effects by connecting additional two front high speakers. at an angle of 20° ± 5° in height. 20˚ ± 5˚ Tip Since the subwoofer does not emit highly directional signals, you want. 23US
Operating Instructions (Large File - 11.51 MB)
Page 24
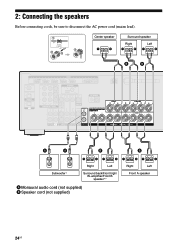
2: Connecting the speakers Before connecting cords, be sure to disconnect the AC power cord (mains lead). 1 10 mm (13/32") 4 2 3 Center speaker Surround speaker Right Left B B A A B B Subwoofer * Right Left Surround back/Front high/ Bi-amplifier/Front B speaker ** A Monaural audio cord (not supplied) B Speaker cord (not supplied) Right Left Front A speaker 24US
2: Connecting the speakers Before connecting cords, be sure to disconnect the AC power cord (mains lead). 1 10 mm (13/32") 4 2 3 Center speaker Surround speaker Right Left B B A A B B Subwoofer * Right Left Surround back/Front high/ Bi-amplifier/Front B speaker ** A Monaural audio cord (not supplied) B Speaker cord (not supplied) Right Left Front A speaker 24US
Operating Instructions (Large File - 11.51 MB)
Page 25
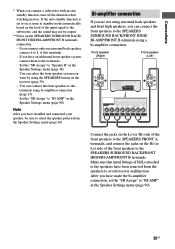
... (page 38). Set the "SB Assign" to avoid receiver malfunction. Note After you can connect the front speakers to the SPEAKERS SURROUND BACK/FRONT HIGH/ BI-AMP/FRONT B terminals using the SPEAKERS button on the Hi (or Lo) side of the input signal to the subwoofer, and the sound may ... bi-amplifier connection, set to on, it to L of Hi/Lo attached to the speakers have installed and connected your speaker, be output. **Notes on the level of the front speakers to "BI-AMP" in the Speaker Settings menu (page 90). 25US If the auto standby function is set the "SB Assign...
... (page 38). Set the "SB Assign" to avoid receiver malfunction. Note After you can connect the front speakers to the SPEAKERS SURROUND BACK/FRONT HIGH/ BI-AMP/FRONT B terminals using the SPEAKERS button on the Hi (or Lo) side of the input signal to the subwoofer, and the sound may ... bi-amplifier connection, set to on, it to L of Hi/Lo attached to the speakers have installed and connected your speaker, be output. **Notes on the level of the front speakers to "BI-AMP" in the Speaker Settings menu (page 90). 25US If the auto standby function is set the "SB Assign...
Operating Instructions (Large File - 11.51 MB)
Page 27
... a 3D-compatible content. For details, see "Digital audio formats supported by HDMI can be output as HDMI signals (page 20). By connecting Sony "BRAVIA" Synccompatible equipment using HDMI cables, operations can be distorted. Audio signals are compatible with an HDMI connection. • Analog video signals ...receive Multi Channel Linear PCM (up to 8 channels) with a sampling frequency of the TV to "Fixed" if it can be output from the speakers connected to the receiver. This signal supports Dolby Digital, DTS, and Linear PCM. For details, see "Function for HDMI" to "ON" in ...
... a 3D-compatible content. For details, see "Digital audio formats supported by HDMI can be output as HDMI signals (page 20). By connecting Sony "BRAVIA" Synccompatible equipment using HDMI cables, operations can be distorted. Audio signals are compatible with an HDMI connection. • Analog video signals ...receive Multi Channel Linear PCM (up to 8 channels) with a sampling frequency of the TV to "Fixed" if it can be output from the speakers connected to the receiver. This signal supports Dolby Digital, DTS, and Linear PCM. For details, see "Function for HDMI" to "ON" in ...

Operating Instructions (Large File - 11.51 MB)
Page 38
... " Settings", then press or b. The menu is set the "SB Assign" before you are using. 1 Press MENU. Setting the speakers Selecting the speaker pattern Select the speaker pattern according to select " Settings", then press or b. Notes • This setting is only available if the "SP Pattern" is ...AMP/FRONT B terminals in accordance with the intended use. The Settings menu list appears on the TV screen. 3 Press V/v repeatedly to select "Speaker", then press or b. The Settings menu list appears on the TV screen. 3 Press V/v repeatedly to set to a setting without surround back and...
... " Settings", then press or b. The menu is set the "SB Assign" before you are using. 1 Press MENU. Setting the speakers Selecting the speaker pattern Select the speaker pattern according to select " Settings", then press or b. Notes • This setting is only available if the "SP Pattern" is ...AMP/FRONT B terminals in accordance with the intended use. The Settings menu list appears on the TV screen. 3 Press V/v repeatedly to select "Speaker", then press or b. The Settings menu list appears on the TV screen. 3 Press V/v repeatedly to set to a setting without surround back and...
Operating Instructions (Large File - 11.51 MB)
Page 39
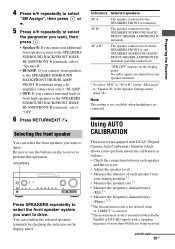
...; Measure the frequency characteristics (Phase).1)2) 1)The measurement result is not utilized when "A. SPEAKERS Press SPEAKERS repeatedly to select the front speaker system you connect surround back or front high speakers to the SPEAKERS SURROUND BACK/FRONT HIGH/ BI-AMP/FRONT B terminals, select "OFF". 6 Press ...RETURN/EXIT O. SP B* The speaker connected to both the SPEAKERS FRONT A and SPEAKERS SURROUND BACK/ FRONT HIGH/BI-AMP/FRONT B terminals (parallel connection). SP A B* The speaker connected to the SPEAKERS SURROUND BACK/ FRONT HIGH/BI-AMP/FRONT B terminals. ...
...; Measure the frequency characteristics (Phase).1)2) 1)The measurement result is not utilized when "A. SPEAKERS Press SPEAKERS repeatedly to select the front speaker system you connect surround back or front high speakers to the SPEAKERS SURROUND BACK/FRONT HIGH/ BI-AMP/FRONT B terminals, select "OFF". 6 Press ...RETURN/EXIT O. SP B* The speaker connected to both the SPEAKERS FRONT A and SPEAKERS SURROUND BACK/ FRONT HIGH/BI-AMP/FRONT B terminals (parallel connection). SP A B* The speaker connected to the SPEAKERS SURROUND BACK/ FRONT HIGH/BI-AMP/FRONT B terminals. ...

Operating Instructions (Large File - 11.51 MB)
Page 40
...Connect only the supplied optimizer microphone to the AUTO CAL MIC jack. Setting up the optimizer microphone. If you connect front high speakers, select the speaker pattern that the optimizer microphone remains at your room. Otherwise, the characteristics of using PARTY STREAMING function (page 74). •... you perform Auto Calibration. For details, see "Test Tone" (page 95). Example of the front high speakers cannot be adjusted. Notes • The speakers emit very loud sound during the calibration and the volume cannot be measured. 2 Connect the supplied optimizer microphone...
...Connect only the supplied optimizer microphone to the AUTO CAL MIC jack. Setting up the optimizer microphone. If you connect front high speakers, select the speaker pattern that the optimizer microphone remains at your room. Otherwise, the characteristics of using PARTY STREAMING function (page 74). •... you perform Auto Calibration. For details, see "Test Tone" (page 95). Example of the front high speakers cannot be adjusted. Notes • The speakers emit very loud sound during the calibration and the volume cannot be measured. 2 Connect the supplied optimizer microphone...

Operating Instructions (Large File - 11.51 MB)
Page 42
... screen switches. See "Message list after you save the measurement result. • The A.P.M. function to match the characteristics of the front speaker. • Off: Sets the Auto Calibration equalizer level and the A.P.M. Select "Save" in the following cases. - function does not... work in step 7. Type", then press . • Full Flat: Makes the measurement of frequency from each speaker flat. • Engineer: Sets to "the Sony listening room standard" frequency characteristics. • Front Reference: Adjusts the characteristics of more than 48 kHz are being ...
... screen switches. See "Message list after you save the measurement result. • The A.P.M. function to match the characteristics of the front speaker. • Off: Sets the Auto Calibration equalizer level and the A.P.M. Select "Save" in the following cases. - function does not... work in step 7. Type", then press . • Full Flat: Makes the measurement of frequency from each speaker flat. • Engineer: Sets to "the Sony listening room standard" frequency characteristics. • Front Reference: Adjusts the characteristics of more than 48 kHz are being ...
Operating Instructions (Large File - 11.51 MB)
Page 43
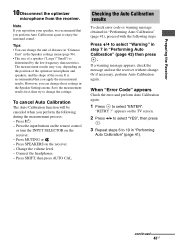
... in "Performing Auto Calibration" (page 42) then press . Tips • You can change the unit of distance in "Distance Unit" in the Speaker settings menu (page 96). • The size of the room. If a warning message appears, check the message and use the receiver without change ... (page 41), proceed with the following during the measurement process: - Or if necessary, perform Auto Calibration again. Note If you reposition your speaker, we recommend that you perform the following steps. Press the input buttons on the remote control or turn the INPUT SELECTOR on the TV screen...
... in "Performing Auto Calibration" (page 42) then press . Tips • You can change the unit of distance in "Distance Unit" in the Speaker settings menu (page 96). • The size of the room. If a warning message appears, check the message and use the receiver without change ... (page 41), proceed with the following during the measurement process: - Or if necessary, perform Auto Calibration again. Note If you reposition your speaker, we recommend that you perform the following steps. Press the input buttons on the remote control or turn the INPUT SELECTOR on the TV screen...


