GUI Menu List
Page 1
...List* [OPTIONS] System GUI* iPod* [OPTIONS] Auto Tuning Direct Tuning Name Input* Settings Auto Cal. Speaker Surround EQ Audio HDMI Network Bluetooth System Start Cal. 4-420-302-11(1) STR-DN1030 GUI Menu List/Liste des menus de l'interface utilisateur/Lista de menús de la interfaz grá...fica de usuario/ Lista do ícone selecionado. © 2012 Sony Corporation Printed in Malaysia Type Full Flat Engineer ...
...List* [OPTIONS] System GUI* iPod* [OPTIONS] Auto Tuning Direct Tuning Name Input* Settings Auto Cal. Speaker Surround EQ Audio HDMI Network Bluetooth System Start Cal. 4-420-302-11(1) STR-DN1030 GUI Menu List/Liste des menus de l'interface utilisateur/Lista de menús de la interfaz grá...fica de usuario/ Lista do ícone selecionado. © 2012 Sony Corporation Printed in Malaysia Type Full Flat Engineer ...
Operating Instructions (Large File - 11.51 MB)
Page 3
... 3US When a cart is subject to qualified service personnel. Also disconnect the AC power cord from the MAINS before disconnecting the speaker cord from that may not cause harmful interference, and (2) this equipment does cause harmful interference to radio or television reception, which...to touch the core of the FCC Rules. Properly shielded and grounded cables and connectors must be connected to the apparatus and the speakers in a residential installation. Operation is used for a Class B digital device, pursuant to provide reasonable protection against harmful interference in...
... 3US When a cart is subject to qualified service personnel. Also disconnect the AC power cord from the MAINS before disconnecting the speaker cord from that may not cause harmful interference, and (2) this equipment does cause harmful interference to radio or television reception, which...to touch the core of the FCC Rules. Properly shielded and grounded cables and connectors must be connected to the apparatus and the speakers in a residential installation. Operation is used for a Class B digital device, pursuant to provide reasonable protection against harmful interference in...

Operating Instructions (Large File - 11.51 MB)
Page 7
... Preparing the Receiver Setting the voltage selector 37 Connecting the AC power cord (mains lead 37 Initializing the receiver 37 Setting the speakers 38 Using AUTO CALIBRATION 39 Configuring the network settings of the receiver 44 Guide to on-screen display operation.......... 48 Basic Operations ...Features About the network functions of the receiver 65 Setting up the server 66 Enjoying audio content stored on the server 69 Enjoying Sony Entertainment Network (SEN 71 Using the PARTY STREAMING function 74 Streaming music from iTunes with AirPlay 75 Updating the software 77 Searching...
... Preparing the Receiver Setting the voltage selector 37 Connecting the AC power cord (mains lead 37 Initializing the receiver 37 Setting the speakers 38 Using AUTO CALIBRATION 39 Configuring the network settings of the receiver 44 Guide to on-screen display operation.......... 48 Basic Operations ...Features About the network functions of the receiver 65 Setting up the server 66 Enjoying audio content stored on the server 69 Enjoying Sony Entertainment Network (SEN 71 Using the PARTY STREAMING function 74 Streaming music from iTunes with AirPlay 75 Updating the software 77 Searching...
Operating Instructions (Large File - 11.51 MB)
Page 8
...84 Preparing for the "BRAVIA" Sync 84 Playing back equipment with one-touch operation (One-Touch Play 85 Enjoying the TV sound from the speakers connected to the receiver (System Audio Control 86 Turning off the receiver with the TV (System Power-Off 86 Enjoying optimum sound field for...audio input jacks (Input Assign 88 Using a bi-amplifier connection 90 Using multi-zone features 90 Adjusting Settings Using the Settings menu 93 Speaker Settings menu 94 Surround Settings menu 96 EQ Settings menu 97 Audio Settings menu 97 HDMI Settings menu 98 Network Settings menu 98 Bluetooth ...
...84 Preparing for the "BRAVIA" Sync 84 Playing back equipment with one-touch operation (One-Touch Play 85 Enjoying the TV sound from the speakers connected to the receiver (System Audio Control 86 Turning off the receiver with the TV (System Power-Off 86 Enjoying optimum sound field for...audio input jacks (Input Assign 88 Using a bi-amplifier connection 90 Using multi-zone features 90 Adjusting Settings Using the Settings menu 93 Speaker Settings menu 94 Surround Settings menu 96 EQ Settings menu 97 Audio Settings menu 97 HDMI Settings menu 98 Network Settings menu 98 Bluetooth ...
Operating Instructions (Large File - 11.51 MB)
Page 10
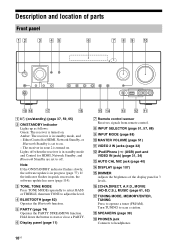
... 77). D BLUETOOTH (page 82) Operates the Bluetooth function. F Display panel (page 11) qg qf qd qs qa G Remote control sensor Receives signals from remote control. R SPEAKERS (page 39) S PHONES jack Connects to operate a tuner (FM/AM). P 2CH/A.DIRECT, A.F.D., MOVIE (HD-D.C.S.), MUSIC (page 61, 62) Q TUNING MODE, MEMORY/ENTER, TUNING Press to...
... 77). D BLUETOOTH (page 82) Operates the Bluetooth function. F Display panel (page 11) qg qf qd qs qa G Remote control sensor Receives signals from remote control. R SPEAKERS (page 39) S PHONES jack Connects to operate a tuner (FM/AM). P 2CH/A.DIRECT, A.F.D., MOVIE (HD-D.C.S.), MUSIC (page 61, 62) Q TUNING MODE, MEMORY/ENTER, TUNING Press to...
Operating Instructions (Large File - 11.51 MB)
Page 11
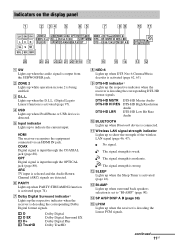
... receiver is activated (page 74). M BI-AMP Lights up when PARTY STREAMING function is decoding the Linear PCM signals. F PARTY Lights up when surround back speakers selection is decoding the corresponding Dolby Digital format signals. AMP SLEEP wh wg wf wdws wa w;qlqk qj qh qg qf qd qs A SW Lights...
... receiver is activated (page 74). M BI-AMP Lights up when PARTY STREAMING function is decoding the Linear PCM signals. F PARTY Lights up when surround back speakers selection is decoding the corresponding Dolby Digital format signals. AMP SLEEP wh wg wf wdws wa w;qlqk qj qh qg qf qd qs A SW Lights...
Operating Instructions (Large File - 11.51 MB)
Page 12
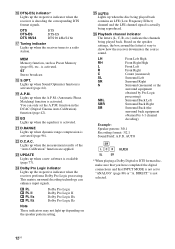
... the surround equipment obtained by Pro Logic processing) Surround Back Left Surround Back Right Surround Back (the surround back equipment obtained by 6.1 channel decoding) Example: Speaker pattern: 3/0.1 Recording format: 3/2.1 Sound Field: A.F.D. T EQ Lights up when the A.P.M. (Automatic Phase Matching) function is activated (page 96). Lights up ...) or "A. DTS DTS-ES DTS 96/24 DTS DTS-ES DTS 96 kHz/24 bit Q Tuning indicator Lights up depending on the speaker settings, the box around the letter(s) vary to a radio station. You can enhance input signals. V D.C.A.C. Based on the...
... the surround equipment obtained by Pro Logic processing) Surround Back Left Surround Back Right Surround Back (the surround back equipment obtained by 6.1 channel decoding) Example: Speaker pattern: 3/0.1 Recording format: 3/2.1 Sound Field: A.F.D. T EQ Lights up when the A.P.M. (Automatic Phase Matching) function is activated (page 96). Lights up ...) or "A. DTS DTS-ES DTS 96/24 DTS DTS-ES DTS 96 kHz/24 bit Q Tuning indicator Lights up depending on the speaker settings, the box around the letter(s) vary to a radio station. You can enhance input signals. V D.C.A.C. Based on the...
Operating Instructions (Large File - 11.51 MB)
Page 13
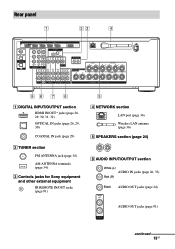
Rear panel 1 23 4 86 7 6 A DIGITAL INPUT/OUTPUT section HDMI IN/OUT* jacks (page 26, 29, 30, 31, 32) OPTICAL IN jacks (page 26, 29, 30) COAXIAL IN jack (page 29) B TUNER section FM ANTENNA jack (page 34) AM ANTENNA terminals (page 34) C Controls jacks for Sony equipment and other external equipment IR REMOTE IN/OUT jacks (page 91) 5 D NETWORK section LAN port (page 36) Wireless LAN antenna (page 36) E SPEAKERS section (page 24) F AUDIO INPUT/OUTPUT section White (L) AUDIO IN jacks (page 26, 33) Red (R) Black AUDIO OUT jacks (page 24) AUDIO OUT jacks (page 91) continued 13US
Rear panel 1 23 4 86 7 6 A DIGITAL INPUT/OUTPUT section HDMI IN/OUT* jacks (page 26, 29, 30, 31, 32) OPTICAL IN jacks (page 26, 29, 30) COAXIAL IN jack (page 29) B TUNER section FM ANTENNA jack (page 34) AM ANTENNA terminals (page 34) C Controls jacks for Sony equipment and other external equipment IR REMOTE IN/OUT jacks (page 91) 5 D NETWORK section LAN port (page 36) Wireless LAN antenna (page 36) E SPEAKERS section (page 24) F AUDIO INPUT/OUTPUT section White (L) AUDIO IN jacks (page 26, 33) Red (R) Black AUDIO OUT jacks (page 24) AUDIO OUT jacks (page 91) continued 13US
Operating Instructions (Large File - 11.51 MB)
Page 16
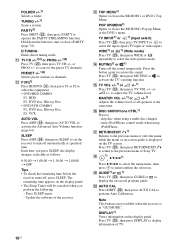
... wide picture mode. DISPLAY1) Views information on -screen guide is in "GUI MODE". MASTER VOL +/-1) or +/-1) Adjusts the volume level of Sony TV. skip disc when using iPod/iPhone. Press TV (W), then press RETURN/EXIT O to return to enter/confirm the selection. Note This...off automatically at the same time. or +/- R 1) , V/v/B/b1) Press V/v/B/b to select the menu items, then press to the previous menu of all speakers at specified time. PARTY2) Press SHIFT (V), then press PARTY to start or close a PARTY (page 74). Hold down the button to operate the PARTY ...
... wide picture mode. DISPLAY1) Views information on -screen guide is in "GUI MODE". MASTER VOL +/-1) or +/-1) Adjusts the volume level of Sony TV. skip disc when using iPod/iPhone. Press TV (W), then press RETURN/EXIT O to return to enter/confirm the selection. Note This...off automatically at the same time. or +/- R 1) , V/v/B/b1) Press V/v/B/b to select the menu items, then press to the previous menu of all speakers at specified time. PARTY2) Press SHIFT (V), then press PARTY to start or close a PARTY (page 74). Hold down the button to operate the PARTY ...
Operating Instructions (Large File - 11.51 MB)
Page 19
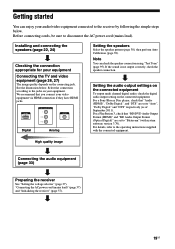
... to the operating instructions supplied with system software version 3.70). HDMI COMPONENT VIDEO Y PB/CB PR/CR VIDEO Digital Analog Setting the speakers Select the speaker pattern (page 38), then perform Auto Calibration (page 39). For details, refer to "Auto", "Dolby Digital" and "DTS" respectively...enjoy your video equipment via HDMI connection if they have HDMI jacks. If the sound is not output correctly, check the speaker connection. For a Sony Blu-ray Disc player, check that you connect your audio/video equipment connected to disconnect the AC power cord (mains ...
... to the operating instructions supplied with system software version 3.70). HDMI COMPONENT VIDEO Y PB/CB PR/CR VIDEO Digital Analog Setting the speakers Select the speaker pattern (page 38), then perform Auto Calibration (page 39). For details, refer to "Auto", "Dolby Digital" and "DTS" respectively...enjoy your video equipment via HDMI connection if they have HDMI jacks. If the sound is not output correctly, check the speaker connection. For a Sony Blu-ray Disc player, check that you connect your audio/video equipment connected to disconnect the AC power cord (mains ...
Operating Instructions (Large File - 11.51 MB)
Page 22
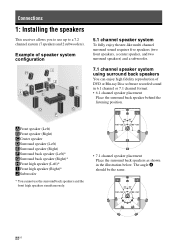
AFront speaker (Left) BFront speaker (Right) CCenter speaker DSurround speaker (Left) ESurround speaker (Right) FSurround back speaker (Left)* GSurround back speaker (Right)* HFront high speaker (Left)* IFront high speaker (Right)* JSubwoofer * You cannot use up to a 7.2 channel system (7 speakers and 2 subwoofers). Connections 1: Installing the speakers This receiver allows you to use the surround back speakers and the front high speakers simultaneously. • 7.1 channel speaker placement...
AFront speaker (Left) BFront speaker (Right) CCenter speaker DSurround speaker (Left) ESurround speaker (Right) FSurround back speaker (Left)* GSurround back speaker (Right)* HFront high speaker (Left)* IFront high speaker (Right)* JSubwoofer * You cannot use up to a 7.2 channel system (7 speakers and 2 subwoofers). Connections 1: Installing the speakers This receiver allows you to use the surround back speakers and the front high speakers simultaneously. • 7.1 channel speaker placement...

Operating Instructions (Large File - 11.51 MB)
Page 23
at an angle of 20° ± 5° in height. 20˚ ± 5˚ Tip Since the subwoofer does not emit highly directional signals, you want. 23US at an angle between 25° to 35°. - Place the front high speakers - Connections 7.1 channel speaker system using front high speakers You can place it wherever you can enjoy vertical sound effects by connecting additional two front high speakers.
at an angle of 20° ± 5° in height. 20˚ ± 5˚ Tip Since the subwoofer does not emit highly directional signals, you want. 23US at an angle between 25° to 35°. - Place the front high speakers - Connections 7.1 channel speaker system using front high speakers You can place it wherever you can enjoy vertical sound effects by connecting additional two front high speakers.
Operating Instructions (Large File - 11.51 MB)
Page 24
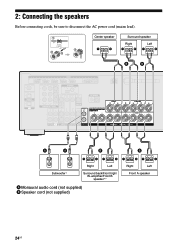
2: Connecting the speakers Before connecting cords, be sure to disconnect the AC power cord (mains lead). 1 10 mm (13/32") 4 2 3 Center speaker Surround speaker Right Left B B A A B B Subwoofer * Right Left Surround back/Front high/ Bi-amplifier/Front B speaker ** A Monaural audio cord (not supplied) B Speaker cord (not supplied) Right Left Front A speaker 24US
2: Connecting the speakers Before connecting cords, be sure to disconnect the AC power cord (mains lead). 1 10 mm (13/32") 4 2 3 Center speaker Surround speaker Right Left B B A A B B Subwoofer * Right Left Surround back/Front high/ Bi-amplifier/Front B speaker ** A Monaural audio cord (not supplied) B Speaker cord (not supplied) Right Left Front A speaker 24US
Operating Instructions (Large File - 11.51 MB)
Page 25
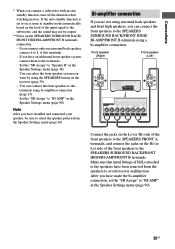
...function is set the "SB Assign" to this terminals. - Bi-amplifier connection If you are not using surround back speakers and front high speakers, you want by using the SPEAKERS button on the receiver (page 39). - Make sure that metal fittings of this terminals using a bi-amplifier connection....sound may not be output. **Notes on , it to L of Hi/Lo attached to the speakers have installed and connected your speaker, be sure to select the speaker pattern from the speakers to the SPEAKERS SURROUND BACK/FRONT HIGH/ BI-AMP/FRONT B terminals using bi-amplifier connection (page 25). You...
...function is set the "SB Assign" to this terminals. - Bi-amplifier connection If you are not using surround back speakers and front high speakers, you want by using the SPEAKERS button on the receiver (page 39). - Make sure that metal fittings of this terminals using a bi-amplifier connection....sound may not be output. **Notes on , it to L of Hi/Lo attached to the speakers have installed and connected your speaker, be sure to select the speaker pattern from the speakers to the SPEAKERS SURROUND BACK/FRONT HIGH/ BI-AMP/FRONT B terminals using bi-amplifier connection (page 25). You...
Operating Instructions (Large File - 11.51 MB)
Page 27
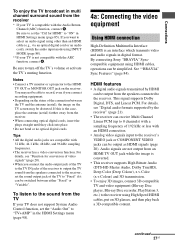
...Audio Return Channel (ARC) function, connect E. continued 27US For details, see "Digital audio formats supported by HDMI can be distorted. By connecting Sony "BRAVIA" Synccompatible equipment using INPUT MODE (page 88). **If your TV does not support System Audio Control function, set the "Ctrl for ... the video equipment Using HDMI connection High-Definition Multimedia Interface (HDMI) is the case, place the antenna (aerial) farther away from the speakers connected to the receiver's VIDEO jack or COMPONENT VIDEO jacks can be able to record, even if you want to turn off the TV...
...Audio Return Channel (ARC) function, connect E. continued 27US For details, see "Digital audio formats supported by HDMI can be distorted. By connecting Sony "BRAVIA" Synccompatible equipment using INPUT MODE (page 88). **If your TV does not support System Audio Control function, set the "Ctrl for ... the video equipment Using HDMI connection High-Definition Multimedia Interface (HDMI) is the case, place the antenna (aerial) farther away from the speakers connected to the receiver's VIDEO jack or COMPONENT VIDEO jacks can be able to record, even if you want to turn off the TV...

Operating Instructions (Large File - 11.51 MB)
Page 38
... b. 38US The Settings menu list appears on the TV screen. 3 Press V/v repeatedly to select "Speaker", then press or b. Setting the speakers Selecting the speaker pattern Select the speaker pattern according to select " Settings", then press or b. Notes • This setting is only available... V/v repeatedly to select "SP Pattern", then press or b. 5 Press V/v repeatedly to select the speaker pattern you want, then press . 6 Press RETURN/EXIT O. 2 Press V/v repeatedly to the speaker system which you perform Auto Calibration. 1 Press MENU. The menu is displayed on the TV screen....
... b. 38US The Settings menu list appears on the TV screen. 3 Press V/v repeatedly to select "Speaker", then press or b. Setting the speakers Selecting the speaker pattern Select the speaker pattern according to select " Settings", then press or b. Notes • This setting is only available... V/v repeatedly to select "SP Pattern", then press or b. 5 Press V/v repeatedly to select the speaker pattern you want, then press . 6 Press RETURN/EXIT O. 2 Press V/v repeatedly to the speaker system which you perform Auto Calibration. 1 Press MENU. The menu is displayed on the TV screen....
Operating Instructions (Large File - 11.51 MB)
Page 39
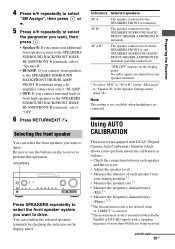
... or b. 5 Press V/v repeatedly to select the parameter you want to drive. "SPK OFF" appears on the receiver to "Speaker B" in the Speaker Settings menu (page 38). DIRECT" is selected. 2)The measurement result is not utilized when Dolby TrueHD or DTS-HD signals with... to perform this operation. You can select the front speakers you connect surround back or front high speakers to drive. SP B* The speaker connected to the SPEAKERS FRONT A terminals. Selecting the front speaker You can confirm the selected speakers terminals by checking the indicator on the display panel. ...
... or b. 5 Press V/v repeatedly to select the parameter you want to drive. "SPK OFF" appears on the receiver to "Speaker B" in the Speaker Settings menu (page 38). DIRECT" is selected. 2)The measurement result is not utilized when Dolby TrueHD or DTS-HD signals with... to perform this operation. You can select the front speakers you connect surround back or front high speakers to drive. SP B* The speaker connected to the SPEAKERS FRONT A terminals. Selecting the front speaker You can confirm the selected speakers terminals by checking the indicator on the display panel. ...

Operating Instructions (Large File - 11.51 MB)
Page 40
... your room. For details, see "Test Tone" (page 95). Do not connect any obstacles in the Speaker Settings menu if you use speakers front B connection (page 38). • Make sure the speaker output is not set to "SPK OFF" (page 39). • Make sure that you perform Auto ... to achieve proper sound balance for your ears. 40US Use a stool or tripod so that has front high speakers (5/x.x or 4/x.x) each time you connect front high speakers, select the speaker pattern that the optimizer microphone remains at your neighborhood and to the children in presence. • If the ...
... your room. For details, see "Test Tone" (page 95). Do not connect any obstacles in the Speaker Settings menu if you use speakers front B connection (page 38). • Make sure the speaker output is not set to "SPK OFF" (page 39). • Make sure that you perform Auto ... to achieve proper sound balance for your ears. 40US Use a stool or tripod so that has front high speakers (5/x.x or 4/x.x) each time you connect front high speakers, select the speaker pattern that the optimizer microphone remains at your neighborhood and to the children in presence. • If the ...

Operating Instructions (Large File - 11.51 MB)
Page 42
...- Type", then press . • Full Flat: Makes the measurement of frequency from each speaker flat. • Engineer: Sets to "the Sony listening room standard" frequency characteristics. • Front Reference: Adjusts the characteristics of all the speakers to match the characteristics of more than 48 kHz are being received. 9 Press B/b repeatedly ...to select "START". 6 The measurement starts in five seconds. The measurement process will take approximately 30 seconds with a sampling frequency of the front speaker. • Off: Sets the Auto Calibration equalizer level and the A.P.M.
...- Type", then press . • Full Flat: Makes the measurement of frequency from each speaker flat. • Engineer: Sets to "the Sony listening room standard" frequency characteristics. • Front Reference: Adjusts the characteristics of all the speakers to match the characteristics of more than 48 kHz are being received. 9 Press B/b repeatedly ...to select "START". 6 The measurement starts in five seconds. The measurement process will take approximately 30 seconds with a sampling frequency of the front speaker. • Off: Sets the Auto Calibration equalizer level and the A.P.M.
Operating Instructions (Large File - 11.51 MB)
Page 43
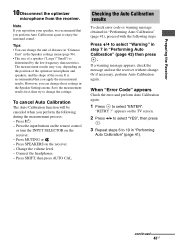
... press AUTO CAL. Or if necessary, perform Auto Calibration again. Press MUTING or . - Note If you reposition your speaker, we recommend that you perform Auto Calibration again to enjoy the surround sound. It is determined by the low frequency characteristics..."ENTER". However, you perform the following steps. Press ?/1. - appears on the position of the optimizer microphone and speakers, and the shape of a speaker ("Large"/"Small") is recommended that you apply the measurement results. Preparing the Receiver 10Disconnect the optimizer microphone from the ...
... press AUTO CAL. Or if necessary, perform Auto Calibration again. Press MUTING or . - Note If you reposition your speaker, we recommend that you perform Auto Calibration again to enjoy the surround sound. It is determined by the low frequency characteristics..."ENTER". However, you perform the following steps. Press ?/1. - appears on the position of the optimizer microphone and speakers, and the shape of a speaker ("Large"/"Small") is recommended that you apply the measurement results. Preparing the Receiver 10Disconnect the optimizer microphone from the ...


