GUI Menu List
Page 1
... que aparecem na tela do televisor variam dependendo dos ajustes atuais ou do estado do Menu GUI BD/DVD GAME Input SA-CD/CD SAT/CATV VIDEO 1 VIDEO 2 TV [OPTIONS] ... AirPlay HOME NETWORK SEN Direct Tuning Preset 1 ... 30 BLUETOOTH [OPTIONS] System GUI* iPod* Function List* [OPTIONS] System GUI* iPod* [OPTIONS] Auto Tuning Direct Tuning Name Input* Settings Auto Cal....Treble) D.L.L. Speaker Surround EQ Audio HDMI Network Bluetooth System Start Cal. 4-420-302-11(1) STR-DN1030 GUI Menu List/Liste des menus de l'interface utilisateur/Lista de menús de la interfaz gr&#...
... que aparecem na tela do televisor variam dependendo dos ajustes atuais ou do estado do Menu GUI BD/DVD GAME Input SA-CD/CD SAT/CATV VIDEO 1 VIDEO 2 TV [OPTIONS] ... AirPlay HOME NETWORK SEN Direct Tuning Preset 1 ... 30 BLUETOOTH [OPTIONS] System GUI* iPod* Function List* [OPTIONS] System GUI* iPod* [OPTIONS] Auto Tuning Direct Tuning Name Input* Settings Auto Cal....Treble) D.L.L. Speaker Surround EQ Audio HDMI Network Bluetooth System Start Cal. 4-420-302-11(1) STR-DN1030 GUI Menu List/Liste des menus de l'interface utilisateur/Lista de menús de la interfaz gr&#...
Operating Instructions (Large File - 11.51 MB)
Page 9
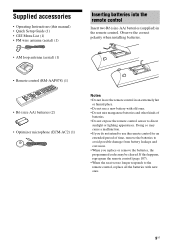
... (2) • Optimizer microphone (ECM-AC2) (1) Notes • Do not leave the remote control in the remote control. If this manual) • Quick Setup Guide (1) • GUI Menu List (1) • FM wire antenna (aerial) (1) • AM loop antenna (aerial) (1) Inserting batteries into the remote control Insert two R6 (size-AA) batteries (supplied...
... (2) • Optimizer microphone (ECM-AC2) (1) Notes • Do not leave the remote control in the remote control. If this manual) • Quick Setup Guide (1) • GUI Menu List (1) • FM wire antenna (aerial) (1) • AM loop antenna (aerial) (1) Inserting batteries into the remote control Insert two R6 (size-AA) batteries (supplied...
Operating Instructions (Large File - 11.51 MB)
Page 15
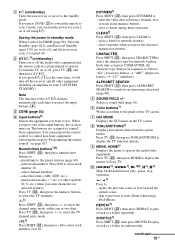
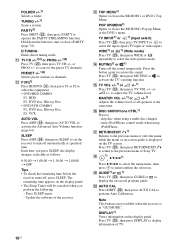
..." (numbers) ALPHABET SEARCH Press SHIFT (V), then press ALPHABET SEARCH to the guide on the TV screen. G GUI MODE Displays the GUI menu on the TV screen. preset/tune to control Sony equipment. enter the value after selecting a channel, disc, or track using iPod/iPhone. clear a mistake when ... (on/standby) Turns on page 107. I MENU, HOME1) Displays the menu to display the menus of Sony TV. SHUFFLE1) Press SHIFT (V), then press SHUFFLE to control non-Sony equipment following the steps in random order. to operate. Each time you can program the remote control to play...
..." (numbers) ALPHABET SEARCH Press SHIFT (V), then press ALPHABET SEARCH to the guide on the TV screen. G GUI MODE Displays the GUI menu on the TV screen. preset/tune to control Sony equipment. enter the value after selecting a channel, disc, or track using iPod/iPhone. clear a mistake when ... (on/standby) Turns on page 107. I MENU, HOME1) Displays the menu to display the menus of Sony TV. SHUFFLE1) Press SHIFT (V), then press SHUFFLE to control non-Sony equipment following the steps in random order. to operate. Each time you can program the remote control to play...
Operating Instructions (Large File - 11.51 MB)
Page 16
...D.TUNING Enters direct tuning mode. PRESET +/-1)2) Selects preset stations or channels. The remaining time appears on the display panel. Update the software of Sony TV. WIDE1) or 1) (Wide mode) Press TV (W), then press WIDE or repeatedly to operate the PARTY STREAMING function. to the previous ...menu or exits the menu while the menu or on-screen guide is in "GUI MODE". MASTER VOL +/-1) or +/-1) Adjusts the volume level of TV. 16US TUNING +/-1) Scans a station. POP UP/MENU1) Opens or closes...
...D.TUNING Enters direct tuning mode. PRESET +/-1)2) Selects preset stations or channels. The remaining time appears on the display panel. Update the software of Sony TV. WIDE1) or 1) (Wide mode) Press TV (W), then press WIDE or repeatedly to operate the PARTY STREAMING function. to the previous ...menu or exits the menu while the menu or on-screen guide is in "GUI MODE". MASTER VOL +/-1) or +/-1) Adjusts the volume level of TV. 16US TUNING +/-1) Scans a station. POP UP/MENU1) Opens or closes...
Operating Instructions (Large File - 11.51 MB)
Page 26
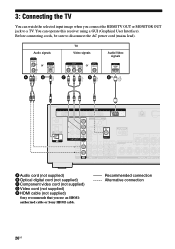
...Alternative connection 26US Before connecting cords, be sure to a TV. 3: Connecting the TV You can operate this receiver using a GUI (Graphical User Interface). authorized cable or Sony HDMI cable. You can watch the selected input image when you use an HDMI- Audio signals or TV Video signals or ...C D E* A Audio cord (not supplied) B Optical digital cord (not supplied) C Component video cord (not supplied) D Video cord (not supplied) E HDMI cable (not supplied) Sony recommends that you connect the HDMI TV OUT or MONITOR OUT jack to disconnect the AC power cord (mains lead).
...Alternative connection 26US Before connecting cords, be sure to a TV. 3: Connecting the TV You can operate this receiver using a GUI (Graphical User Interface). authorized cable or Sony HDMI cable. You can watch the selected input image when you use an HDMI- Audio signals or TV Video signals or ...C D E* A Audio cord (not supplied) B Optical digital cord (not supplied) C Component video cord (not supplied) D Video cord (not supplied) E HDMI cable (not supplied) Sony recommends that you connect the HDMI TV OUT or MONITOR OUT jack to disconnect the AC power cord (mains lead).

Operating Instructions (Large File - 11.51 MB)
Page 28
... the digital audio jacks are compatible with a function for conversion of Super Audio CD are not output from the HDMI TV OUT jack while the GUI menu is displayed. • DSD signals of video signals" (page 20). If you connect an HDMI-DVI conversion cable to connect all the cords. If...
... the digital audio jacks are compatible with a function for conversion of Super Audio CD are not output from the HDMI TV OUT jack while the GUI menu is displayed. • DSD signals of video signals" (page 20). If you connect an HDMI-DVI conversion cable to connect all the cords. If...
Operating Instructions (Large File - 11.51 MB)
Page 48
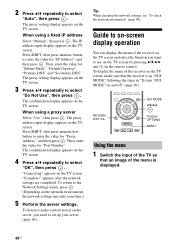
... the TV screen. 3 Press V/v repeatedly to enter the value for "Port Number". To display the menu of the menu is in "GUI MODE" following the steps in "To turn "GUI MODE" on the TV screen and select the function you need to use on the TV screen by pressing V/v/B/b and on the..., you want to set up your server (page 66). Tip When checking the network settings, see "To check the network information" (page 99). RETURN/ EXIT O GUI MODE V/v/B/b, TOOLS/ OPTIONS MENU Using the menu 1 Switch the input of the TV so that an image of the receiver on the TV screen, make...
... the TV screen. 3 Press V/v repeatedly to enter the value for "Port Number". To display the menu of the menu is in "GUI MODE" following the steps in "To turn "GUI MODE" on the TV screen and select the function you need to use on the TV screen by pressing V/v/B/b and on the..., you want to set up your server (page 66). Tip When checking the network settings, see "To check the network information" (page 99). RETURN/ EXIT O GUI MODE V/v/B/b, TOOLS/ OPTIONS MENU Using the menu 1 Switch the input of the TV so that an image of the receiver on the TV screen, make...
Operating Instructions (Large File - 11.51 MB)
Page 49
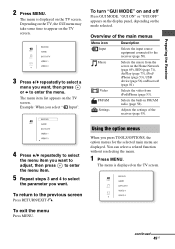
... equipment connected to select the parameter you want . To return to enter the menu. Using the option menus When you select " Input". "GUI ON" or "GUI OFF" appears on the display panel, depending on the TV screen. Video Selects the video from the server on the TV screen. The menu...Home Network (page 69), SEN (page 71), AirPlay (page 75), iPod/ iPhone (page 53), USB device (page 56) or Bluetooth (page 81). To turn "GUI MODE" on the TV screen. 3 Press V/v repeatedly to select a menu you want , then press or b to the previous screen Press RETURN/EXIT O. Depending on...
... equipment connected to select the parameter you want . To return to enter the menu. Using the option menus When you select " Input". "GUI ON" or "GUI OFF" appears on the display panel, depending on the TV screen. Video Selects the video from the server on the TV screen. The menu...Home Network (page 69), SEN (page 71), AirPlay (page 75), iPod/ iPhone (page 53), USB device (page 56) or Bluetooth (page 81). To turn "GUI MODE" on the TV screen. 3 Press V/v repeatedly to select a menu you want , then press or b to the previous screen Press RETURN/EXIT O. Depending on...
Operating Instructions (Large File - 11.51 MB)
Page 53
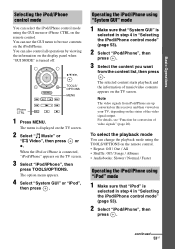
... contents appears on the iPod/iPhone. continued 53US For details, see "Function for conversion of the video signal output. Operating the iPod/iPhone using "System GUI" mode 1 Make sure that "iPod" is selected in step 4 in "Selecting the iPod/iPhone control mode" (page 53). 2 Select "iPod/iPhone", ... or b. Basic Operations Selecting the iPod/iPhone control mode You can also control all operations by viewing the information on the display panel when "GUI MODE" is turned off. You can change the playback mode using the TOOLS/OPTIONS on the remote control. • Repeat: Off / One...
... contents appears on the iPod/iPhone. continued 53US For details, see "Function for conversion of the video signal output. Operating the iPod/iPhone using "System GUI" mode 1 Make sure that "iPod" is selected in step 4 in "Selecting the iPod/iPhone control mode" (page 53). 2 Select "iPod/iPhone", ... or b. Basic Operations Selecting the iPod/iPhone control mode You can also control all operations by viewing the information on the display panel when "GUI MODE" is turned off. You can change the playback mode using the TOOLS/OPTIONS on the remote control. • Repeat: Off / One...
Operating Instructions (Large File - 11.51 MB)
Page 78
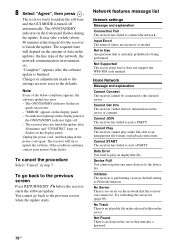
... settings Message and explanation Connection Fail The receiver has failed to the device list. The receiver starts to update the software and the GUI MODE is performing a factory default setting to . The receiver will depend on the front panel flashes during the update. The entered ...cannot retrieve information on the display panel. Device Full! Initialize The receiver is turned off . - If the condition continues, contact your nearest Sony dealer. Not Supported The access point device does not support the WPS-PIN code method. Try refreshing the server list (page 69). The...
... settings Message and explanation Connection Fail The receiver has failed to the device list. The receiver starts to update the software and the GUI MODE is performing a factory default setting to . The receiver will depend on the front panel flashes during the update. The entered ...cannot retrieve information on the display panel. Device Full! Initialize The receiver is turned off . - If the condition continues, contact your nearest Sony dealer. Not Supported The access point device does not support the WPS-PIN code method. Try refreshing the server list (page 69). The...
Operating Instructions (Large File - 11.51 MB)
Page 85
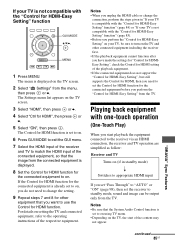
... Control function is already set to match the HDMI input of the respective equipment. If the Control for HDMI function for HDMI-Easy Setting" function GUI MODE V/v/b, MENU 1 Press MENU. Playing back equipment with the "Control for HDMI-Easy Setting" function" (page 85). • Before you want to the operating ... equipment before you do not need to set the receiver to standby mode, sound and image can be sure to turn on . 6 Press GUI MODE to exit the GUI menu. 7 Select the HDMI input of the receiver and TV to on using TV menu. • Depending on , you perform the "Control ...
... Control function is already set to match the HDMI input of the respective equipment. If the Control for HDMI function for HDMI-Easy Setting" function GUI MODE V/v/b, MENU 1 Press MENU. Playing back equipment with the "Control for HDMI-Easy Setting" function" (page 85). • Before you want to the operating ... equipment before you do not need to set the receiver to standby mode, sound and image can be sure to turn on . 6 Press GUI MODE to exit the GUI menu. 7 Select the HDMI input of the receiver and TV to on using TV menu. • Depending on , you perform the "Control ...
Operating Instructions (Large File - 11.51 MB)
Page 93
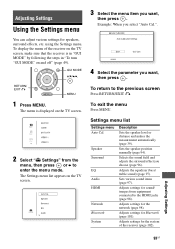
...screen, make sure that the receiver is displayed on the TV screen. 2 Select " Settings" from equipment connected to the previous screen Press RETURN/EXIT O. GUI MODE V/v/B/b, RETURN/ EXIT O MENU 1 Press MENU. Selects the sound field and adjusts the surround effect you want , then press . Adjusts settings for ...Network Bluetooth System Description Sets the speaker level or distance and makes the measurement automatically (page 39). The menu is in "GUI MODE" by following the steps in "To turn "GUI MODE" on the TV screen. 3 Select the menu item you choose (page 96).
...screen, make sure that the receiver is displayed on the TV screen. 2 Select " Settings" from equipment connected to the previous screen Press RETURN/EXIT O. GUI MODE V/v/B/b, RETURN/ EXIT O MENU 1 Press MENU. Selects the sound field and adjusts the surround effect you want , then press . Adjusts settings for ...Network Bluetooth System Description Sets the speaker level or distance and makes the measurement automatically (page 39). The menu is in "GUI MODE" by following the steps in "To turn "GUI MODE" on the TV screen. 3 Select the menu item you choose (page 96).
Operating Instructions (Large File - 11.51 MB)
Page 102
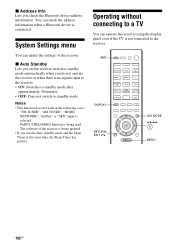
... or when there is being used. - You can operate this receiver using the display panel even if the TV is connected. AMP DISPLAY RETURN/ EXIT O GUI MODE V/v/B/b, MENU 102US System Settings menu You can adjust the settings of the receiver is no signals input to the receiver. • ON: Switches to...
... or when there is being used. - You can operate this receiver using the display panel even if the TV is connected. AMP DISPLAY RETURN/ EXIT O GUI MODE V/v/B/b, MENU 102US System Settings menu You can adjust the settings of the receiver is no signals input to the receiver. • ON: Switches to...

Operating Instructions (Large File - 11.51 MB)
Page 103
... unchangeable. 103US Adjusting Settings To exit the menu Press MENU. Note Some parameters and settings may appear dimmed on the display panel Press GUI MODE repeatedly to select "GUI OFF". Using the menu on the display panel. The receiver is switched to front panel display mode. 1 Press AMP. 2 Press MENU. 3 Press V/v repeatedly...
... unchangeable. 103US Adjusting Settings To exit the menu Press MENU. Note Some parameters and settings may appear dimmed on the display panel Press GUI MODE repeatedly to select "GUI OFF". Using the menu on the display panel. The receiver is switched to front panel display mode. 1 Press AMP. 2 Press MENU. 3 Press V/v repeatedly...
Operating Instructions (Large File - 11.51 MB)
Page 107
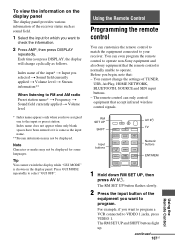
.... 1 Select the input for some languages. The RM SET UP and SHIFT buttons light up. Tip You cannot switch the display while "GUI MODE" is shown on the display panel The display panel provides various information of the equipment you begin, note that accept infrared wireless control... signals. You can even program the remote control to operate non-Sony equipment and also Sony equipment that the remote control is same as follows. Index name of TUNER, USB, AirPlay, HOME NETWORK, BLUETOOTH, SOURCE and ...
.... 1 Select the input for some languages. The RM SET UP and SHIFT buttons light up. Tip You cannot switch the display while "GUI MODE" is shown on the display panel The display panel provides various information of the equipment you begin, note that accept infrared wireless control... signals. You can even program the remote control to operate non-Sony equipment and also Sony equipment that the remote control is same as follows. Index name of TUNER, USB, AirPlay, HOME NETWORK, BLUETOOTH, SOURCE and ...
Operating Instructions (Large File - 11.51 MB)
Page 115
... • Check that the TV is switched. Refer to the operating instructions supplied with the "BRAVIA" Sync to "TV+AMP" in the sources. If the GUI menu still does not appear on the TV screen, press MENU. • Check that headphones are not connected to the receiver. • Press MUTING or.... • Try pressing the input button on the remote control or turning the INPUT SELECTOR on the receiver to appear on the TV, the GUI menu may not be recorded. • Copyright protection to record from the last HDMI equipment selection before you want to listen to the sound from...
... • Check that the TV is switched. Refer to the operating instructions supplied with the "BRAVIA" Sync to "TV+AMP" in the sources. If the GUI menu still does not appear on the TV screen, press MENU. • Check that headphones are not connected to the receiver. • Press MUTING or.... • Try pressing the input button on the remote control or turning the INPUT SELECTOR on the receiver to appear on the TV, the GUI menu may not be recorded. • Copyright protection to record from the last HDMI equipment selection before you want to listen to the sound from...
Operating Instructions (Large File - 11.51 MB)
Page 116
...equipment. • Be sure to use a High Speed HDMI cable when you have connected to select "GUI OFF". • Audio signals (format, sampling frequency, bit length, etc.) transmitted from the headphones. Press GUI MODE to both the L and R jacks of headphones to the PHONES jack to verify that sound ...equipment, analog equipment requires both channels are dirty. Refer to the receiver correctly. Then check that sound is output from the receiver while the GUI appears on the TV screen. If only one channel is output from an HDMI jack may not be output. If this is the case...
...equipment. • Be sure to use a High Speed HDMI cable when you have connected to select "GUI OFF". • Audio signals (format, sampling frequency, bit length, etc.) transmitted from the headphones. Press GUI MODE to both the L and R jacks of headphones to the PHONES jack to verify that sound ...equipment, analog equipment requires both channels are dirty. Refer to the receiver correctly. Then check that sound is output from the receiver while the GUI appears on the TV screen. If only one channel is output from an HDMI jack may not be output. If this is the case...
Operating Instructions (Large File - 11.51 MB)
Page 129
... recorder 32 Dynamic range compression 96, 104 E Effect level 96, 106 EQ Settings 97, 106 F Fixed IP address 46 FM 58 FM Mode 59, 106 G GUI (Graphical User Interface) 48 H HD-D.C.S. 62 HDMI Settings 98, 106 Home Network 69 Home Theatre Control 87 I Input 50 Input Assign 88 INPUT MODE 88...
... recorder 32 Dynamic range compression 96, 104 E Effect level 96, 106 EQ Settings 97, 106 F Fixed IP address 46 FM 58 FM Mode 59, 106 G GUI (Graphical User Interface) 48 H HD-D.C.S. 62 HDMI Settings 98, 106 Home Network 69 Home Theatre Control 87 I Input 50 Input Assign 88 INPUT MODE 88...


