GUI Menu List
Page 1
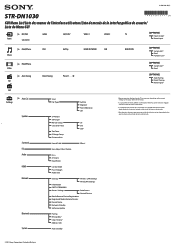
4-420-302-11(1) STR-DN1030 GUI Menu List/Liste des menus de l'interface utilisateur/Lista de menús de la interfaz gráfica de usuario/ Lista do ícone selecionado. © 2012 Sony Corporation Printed in Malaysia Speaker Surround EQ Audio HDMI Network Bluetooth System ...Start Cal. Type Full Flat Engineer Front Reference Off SP Pattern SB Assign* Manual Setup Crossover Freq* Test Tone D.Range Comp Distance Unit Lvl Dist Size* Sound Field Effect* Gain...
4-420-302-11(1) STR-DN1030 GUI Menu List/Liste des menus de l'interface utilisateur/Lista de menús de la interfaz gráfica de usuario/ Lista do ícone selecionado. © 2012 Sony Corporation Printed in Malaysia Speaker Surround EQ Audio HDMI Network Bluetooth System ...Start Cal. Type Full Flat Engineer Front Reference Off SP Pattern SB Assign* Manual Setup Crossover Freq* Test Tone D.Range Comp Distance Unit Lvl Dist Size* Sound Field Effect* Gain...
Operating Instructions (Large File - 11.51 MB)
Page 2
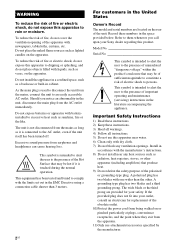
...risk of the apparatus with the limits set out in the unit, disconnect the main plug from being walked on the apparatus. Excessive sound pressure from the mains, connect the unit to them whenever you notice an abnormality in the EMC Directive using a connection cable shorter ... the third prong are located on the apparatus. If the provided plug does not fit into your outlet, consult an electrician for your Sony dealer regarding this apparatus near any ventilation openings. Should you call upon your safety. Install in the literature accompanying the appliance. Record these...
...risk of the apparatus with the limits set out in the unit, disconnect the main plug from being walked on the apparatus. Excessive sound pressure from the mains, connect the unit to them whenever you notice an abnormality in the EMC Directive using a connection cable shorter ... the third prong are located on the apparatus. If the provided plug does not fit into your outlet, consult an electrician for your Sony dealer regarding this apparatus near any ventilation openings. Should you call upon your safety. Install in the literature accompanying the appliance. Record these...

Operating Instructions (Large File - 11.51 MB)
Page 7
...iPhone 52 Playing a USB device 55 Recording using the receiver 57 Enjoying Sound Effects Selecting the sound field 61 Using the Sound Optimizer function...........64 Using the Advanced Auto Volume function 64 Resetting sound fields to the default settings 65 Using Network Features About the network functions... of the receiver 65 Setting up the server 66 Enjoying audio content stored on the server 69 Enjoying Sony Entertainment Network (SEN 71 Using the...
...iPhone 52 Playing a USB device 55 Recording using the receiver 57 Enjoying Sound Effects Selecting the sound field 61 Using the Sound Optimizer function...........64 Using the Advanced Auto Volume function 64 Resetting sound fields to the default settings 65 Using Network Features About the network functions... of the receiver 65 Setting up the server 66 Enjoying audio content stored on the server 69 Enjoying Sony Entertainment Network (SEN 71 Using the...
Operating Instructions (Large File - 11.51 MB)
Page 8
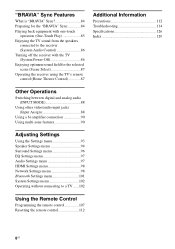
... "BRAVIA" Sync 84 Preparing for the "BRAVIA" Sync 84 Playing back equipment with one-touch operation (One-Touch Play 85 Enjoying the TV sound from the speakers connected to the receiver (System Audio Control 86 Turning off the receiver with the TV (System Power-Off 86 Enjoying optimum... sound field for the selected scene (Scene Select 87 Operating the receiver using the TV's remote control (Home Theatre Control 87 Additional Information Precautions...
... "BRAVIA" Sync 84 Preparing for the "BRAVIA" Sync 84 Playing back equipment with one-touch operation (One-Touch Play 85 Enjoying the TV sound from the speakers connected to the receiver (System Audio Control 86 Turning off the receiver with the TV (System Power-Off 86 Enjoying optimum... sound field for the selected scene (Scene Select 87 Operating the receiver using the TV's remote control (Home Theatre Control 87 Additional Information Precautions...
Operating Instructions (Large File - 11.51 MB)
Page 12
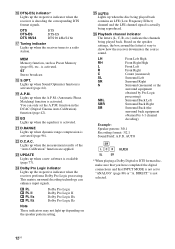
... Back Left Surround Back Right Surround Back (the surround back equipment obtained by 6.1 channel decoding) Example: Speaker pattern: 3/0.1 Recording format: 3/2.1 Sound Field: A.F.D. DIRECT" is activated. Lights up when the A.P.M. (Automatic Phase Matching) function is not selected. 12US function in the DCAC (...results of the "Auto Calibration" function are applied. Lights up when the receiver tunes to show how the receiver downmixes the source sound. This matrix surround decoding technology can only set to "ANALOG" (page 88) or "A. MEM Memory function, such as Preset ...
... Back Left Surround Back Right Surround Back (the surround back equipment obtained by 6.1 channel decoding) Example: Speaker pattern: 3/0.1 Recording format: 3/2.1 Sound Field: A.F.D. DIRECT" is activated. Lights up when the A.P.M. (Automatic Phase Matching) function is not selected. 12US function in the DCAC (...results of the "Auto Calibration" function are applied. Lights up when the receiver tunes to show how the receiver downmixes the source sound. This matrix surround decoding technology can only set to "ANALOG" (page 88) or "A. MEM Memory function, such as Preset ...
Operating Instructions (Large File - 11.51 MB)
Page 15
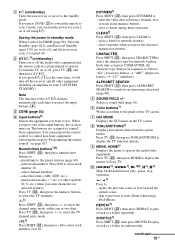
...sets it will turn off the receiver and all other symbols (#, %, etc.) when you press ?/1 (A) at the same time, it to control Sony equipment. B AV ?/11) (on/standby) Turns on . Note The function of the input buttons, the receiver turns on or off . The... (!, ?, etc.) or other equipment including an amplifier in zone 2 (SYSTEM STANDBY). erase a letter for network features. You can turn the TV on page 107. E SOUND FIELD +/- J ./>1), m/M1), N1)2), X1), x1) Skip, backward/forward, play, pause, stop operation. < / 1) Press to select track number 10. - enter the...
...sets it will turn off the receiver and all other symbols (#, %, etc.) when you press ?/1 (A) at the same time, it to control Sony equipment. B AV ?/11) (on/standby) Turns on . Note The function of the input buttons, the receiver turns on or off . The... (!, ?, etc.) or other equipment including an amplifier in zone 2 (SYSTEM STANDBY). erase a letter for network features. You can turn the TV on page 107. E SOUND FIELD +/- J ./>1), m/M1), N1)2), X1), x1) Skip, backward/forward, play, pause, stop operation. < / 1) Press to select track number 10. - enter the...
Operating Instructions (Large File - 11.51 MB)
Page 16
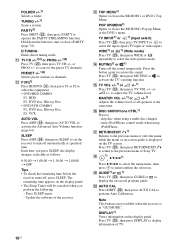
...DISPLAY1) Views information on -screen program guide. or PROG +/- SLEEP Press AMP (X), then press SLEEP to set the receiver to display information of Sony TV. TV INPUT1) or 1) (Input select) Press TV (W), then press TV INPUT or to perform Auto Calibration. Press the button again to ...: 0:30:00 t 1:00:00 t 1:30:00 t 2:00:00 t OFF Tips • To check the remaining time before the receiver turns off the sound temporarily. TUNING +/-1) Scans a station. D.TUNING Enters direct tuning mode. PRESET +/-1)2) Selects preset stations or channels. P DISC SKIP/iPhone CTRL1) Press to activate the...
...DISPLAY1) Views information on -screen program guide. or PROG +/- SLEEP Press AMP (X), then press SLEEP to set the receiver to display information of Sony TV. TV INPUT1) or 1) (Input select) Press TV (W), then press TV INPUT or to perform Auto Calibration. Press the button again to ...: 0:30:00 t 1:00:00 t 1:30:00 t 2:00:00 t OFF Tips • To check the remaining time before the receiver turns off the sound temporarily. TUNING +/-1) Scans a station. D.TUNING Enters direct tuning mode. PRESET +/-1)2) Selects preset stations or channels. P DISC SKIP/iPhone CTRL1) Press to activate the...

Operating Instructions (Large File - 11.51 MB)
Page 17
... yellow. Use the tactile dots as examples. • Depending on the buttons that you can use to serve as reference when operating the receiver. U SOUND OPTIMIZER Activates the Sound Optimizer function (page 64). Notes • The above explanation is intended to control each equipment. 2)The 5/JKL/VIDEO 2, N/PARTY and TV CH +/ PROG...
... yellow. Use the tactile dots as examples. • Depending on the buttons that you can use to serve as reference when operating the receiver. U SOUND OPTIMIZER Activates the Sound Optimizer function (page 64). Notes • The above explanation is intended to control each equipment. 2)The 5/JKL/VIDEO 2, N/PARTY and TV CH +/ PROG...
Operating Instructions (Large File - 11.51 MB)
Page 19
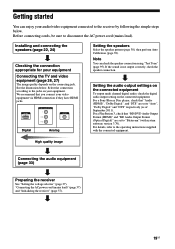
See the illustration below . If the sound is not output correctly, check the speaker connection. Setting the audio output settings on the connected equipment To output multi channel digital audio, check the ...). Select the connection according to the jacks on your audio/video equipment connected to "Auto", "Dolby Digital" and "DTS" respectively (as of September 2011). For a Sony Blu-ray Disc player, check that you connect your equipment Connecting the TV and video equipment (page 26, 27) The image quality depends on the...
See the illustration below . If the sound is not output correctly, check the speaker connection. Setting the audio output settings on the connected equipment To output multi channel digital audio, check the ...). Select the connection according to the jacks on your audio/video equipment connected to "Auto", "Dolby Digital" and "DTS" respectively (as of September 2011). For a Sony Blu-ray Disc player, check that you connect your equipment Connecting the TV and video equipment (page 26, 27) The image quality depends on the...
Operating Instructions (Large File - 11.51 MB)
Page 22
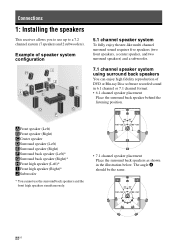
... channel system (7 speakers and 2 subwoofers). Example of speaker system configuration 5.1 channel speaker system To fully enjoy theater-like multi channel surround sound requires five speakers (two front speakers, a center speaker, and two surround speakers) and a subwoofer. 7.1 channel speaker system using surround... back speakers You can enjoy high fidelity reproduction of DVD or Blu-ray Disc software recorded sound in the illustration below. The angle A should be the same. 22US Connections 1: Installing the speakers This receiver allows you...
... channel system (7 speakers and 2 subwoofers). Example of speaker system configuration 5.1 channel speaker system To fully enjoy theater-like multi channel surround sound requires five speakers (two front speakers, a center speaker, and two surround speakers) and a subwoofer. 7.1 channel speaker system using surround... back speakers You can enjoy high fidelity reproduction of DVD or Blu-ray Disc software recorded sound in the illustration below. The angle A should be the same. 22US Connections 1: Installing the speakers This receiver allows you...

Operating Instructions (Large File - 11.51 MB)
Page 23
at an angle of 20° ± 5° in height. 20˚ ± 5˚ Tip Since the subwoofer does not emit highly directional signals, you want. 23US Connections 7.1 channel speaker system using front high speakers You can place it wherever you can enjoy vertical sound effects by connecting additional two front high speakers. at an angle between 25° to 35°. - Place the front high speakers -
at an angle of 20° ± 5° in height. 20˚ ± 5˚ Tip Since the subwoofer does not emit highly directional signals, you want. 23US Connections 7.1 channel speaker system using front high speakers You can place it wherever you can enjoy vertical sound effects by connecting additional two front high speakers. at an angle between 25° to 35°. - Place the front high speakers -
Operating Instructions (Large File - 11.51 MB)
Page 25
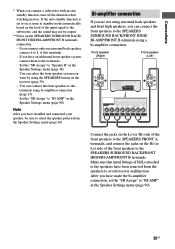
... connection (page 25). After you have made the bi-amplifier connection, set to on, it to L of the input signal to the subwoofer, and the sound may not be sure to select the speaker pattern from the speakers to avoid receiver malfunction. If you have an additional front speaker system, connect...
... connection (page 25). After you have made the bi-amplifier connection, set to on, it to L of the input signal to the subwoofer, and the sound may not be sure to select the speaker pattern from the speakers to avoid receiver malfunction. If you have an additional front speaker system, connect...
Operating Instructions (Large File - 11.51 MB)
Page 27
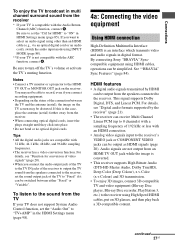
... audio signals transmitted by the receiver" (page 21). • The receiver can be distorted. Connections To enjoy the TV broadcast in multi channel surround sound from the receiver * If your TV is the case, place the antenna (aerial) farther away from the receiver. • When connecting optical digital... be able to the HDMI TV OUT or MONITOR OUT jack on 3D glasses, and then play back a 3D-compatible content. By connecting Sony "BRAVIA" Synccompatible equipment using HDMI cables, operations can be simplified. For details, see "Function for HDMI" to the receiver's VIDEO jack ...
... audio signals transmitted by the receiver" (page 21). • The receiver can be distorted. Connections To enjoy the TV broadcast in multi channel surround sound from the receiver * If your TV is the case, place the antenna (aerial) farther away from the receiver. • When connecting optical digital... be able to the HDMI TV OUT or MONITOR OUT jack on 3D glasses, and then play back a 3D-compatible content. By connecting Sony "BRAVIA" Synccompatible equipment using HDMI cables, operations can be simplified. For details, see "Function for HDMI" to the receiver's VIDEO jack ...

Operating Instructions (Large File - 11.51 MB)
Page 28
...3D images may not be displayed properly. • We do not recommend using an HDMI-DVI conversion cable. Connect according to a DVI-D equipment, the sound and/or the image may not be displayed. Converting video signals This receiver is equipped with 32 kHz, 44.1 kHz, 48 kHz, and 96 kHz...for details. Connect a separate audio cords or digital connecting cords, then set the "Input Assign" in the Input Option menu (page 88) when the sound is not output correctly. • When connecting optical digital cords, insert the plugs straight until they click into place. • Do not bend or ...
...3D images may not be displayed properly. • We do not recommend using an HDMI-DVI conversion cable. Connect according to a DVI-D equipment, the sound and/or the image may not be displayed. Converting video signals This receiver is equipped with 32 kHz, 44.1 kHz, 48 kHz, and 96 kHz...for details. Connect a separate audio cords or digital connecting cords, then set the "Input Assign" in the Input Option menu (page 88) when the sound is not output correctly. • When connecting optical digital cords, insert the plugs straight until they click into place. • Do not bend or ...
Operating Instructions (Large File - 11.51 MB)
Page 29
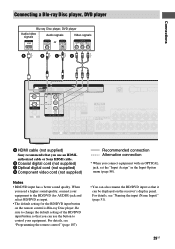
... digital cord (not supplied) D Component video cord (not supplied) Notes • BD/DVD input has a better sound quality. Be sure to the BD/DVD (for AUDIO) jack and select BD/DVD as input. • The... change the default setting of the BD/DVD input button so that it can use an HDMIauthorized cable or Sony HDMI cable. For details, see "Naming the input (Name Input)" (page 51). 29US Recommended connection Alternative.../video signals Audio signals Video signals or A B C* D A HDMI cable (not supplied) Sony recommends that you need a higher sound quality, connect your equipment.
... digital cord (not supplied) D Component video cord (not supplied) Notes • BD/DVD input has a better sound quality. Be sure to the BD/DVD (for AUDIO) jack and select BD/DVD as input. • The... change the default setting of the BD/DVD input button so that it can use an HDMIauthorized cable or Sony HDMI cable. For details, see "Naming the input (Name Input)" (page 51). 29US Recommended connection Alternative.../video signals Audio signals Video signals or A B C* D A HDMI cable (not supplied) Sony recommends that you need a higher sound quality, connect your equipment.

Operating Instructions (Large File - 11.51 MB)
Page 40
The DCAC is designed to achieve proper sound balance for your preference. Do not connect any obstacles in the path between the optimizer microphone and the speakers to avoid measurement errors. • Get ... up and connect the speakers (page 22, 24). • Connect only the supplied optimizer microphone to your room. Notes • The speakers emit very loud sound during the calibration and the volume cannot be performed when special speakers, such as your seating position. However, you perform Auto Calibration, check the following...
The DCAC is designed to achieve proper sound balance for your preference. Do not connect any obstacles in the path between the optimizer microphone and the speakers to avoid measurement errors. • Get ... up and connect the speakers (page 22, 24). • Connect only the supplied optimizer microphone to your room. Notes • The speakers emit very loud sound during the calibration and the volume cannot be performed when special speakers, such as your seating position. However, you perform Auto Calibration, check the following...

Operating Instructions (Large File - 11.51 MB)
Page 42
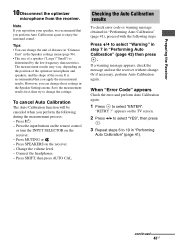
...being received. 9 Press B/b repeatedly to select the item you save the measurement result. • The A.P.M. When the measurement ends, a beep sounds and the screen switches. Note If an error code appears on the screen, see "Message list after you want, then press . • ...results. Type", then press . • Full Flat: Makes the measurement of frequency from each speaker flat. • Engineer: Sets to "the Sony listening room standard" frequency characteristics. • Front Reference: Adjusts the characteristics of all the speakers to select "START". 6 The measurement starts in ...
...being received. 9 Press B/b repeatedly to select the item you save the measurement result. • The A.P.M. When the measurement ends, a beep sounds and the screen switches. Note If an error code appears on the screen, see "Message list after you want, then press . • ...results. Type", then press . • Full Flat: Makes the measurement of frequency from each speaker flat. • Engineer: Sets to "the Sony listening room standard" frequency characteristics. • Front Reference: Adjusts the characteristics of all the speakers to select "START". 6 The measurement starts in ...
Operating Instructions (Large File - 11.51 MB)
Page 43
However, you perform Auto Calibration again to enjoy the surround sound. Press the input buttons on the remote control or turn the INPUT SELECTOR on the receiver. - Press SPEAKERS on the receiver. - Connect the headphones. - If a ...
However, you perform Auto Calibration again to enjoy the surround sound. Press the input buttons on the remote control or turn the INPUT SELECTOR on the receiver. - Press SPEAKERS on the receiver. - Connect the headphones. - If a ...

Operating Instructions (Large File - 11.51 MB)
Page 50
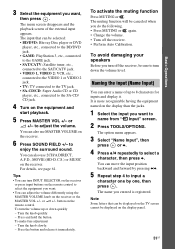
... displayed. The menu item list appears on the TV screen. 2 Select " Input", then press or b. V/v/B/b, TOOLS/ OPTIONS MENU MUTING/ MASTER VOL +/-/ 2 +/- 1 Press MENU. Input buttons SOUND FIELD +/- 4 Press V/v repeatedly to select the option menu item you want, then press or b. 5 Press V/v repeatedly to select the parameter you want , then press or...
... displayed. The menu item list appears on the TV screen. 2 Select " Input", then press or b. V/v/B/b, TOOLS/ OPTIONS MENU MUTING/ MASTER VOL +/-/ 2 +/- 1 Press MENU. Input buttons SOUND FIELD +/- 4 Press V/v repeatedly to select the option menu item you want, then press or b. 5 Press V/v repeatedly to select the parameter you want , then press or...
Operating Instructions (Large File - 11.51 MB)
Page 51
... volume differently using the MASTER VOLUME knob on the TV screen cannot be sure to the SA-CD/ CD jack. 4 Turn on the receiver. 6 Press SOUND FIELD +/- 3 Select the equipment you turn off the receiver. • Perform Auto Calibration. For details, see page 61. Naming the input (Name Input) You can... avoid damaging your speakers Before you want . • You can move the input position backward and forward by pressing B/b. 5 Repeat step 4 to enjoy the surround sound.
... volume differently using the MASTER VOLUME knob on the TV screen cannot be sure to the SA-CD/ CD jack. 4 Turn on the receiver. 6 Press SOUND FIELD +/- 3 Select the equipment you turn off the receiver. • Perform Auto Calibration. For details, see page 61. Naming the input (Name Input) You can... avoid damaging your speakers Before you want . • You can move the input position backward and forward by pressing B/b. 5 Repeat step 4 to enjoy the surround sound.

