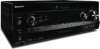
GUI Menu List
Page 1
...Lvl Dist Size* Sound Field Effect* Gain Adjust (Bass/Treble) D.L.L. 4-420-302-11(1) STR-DN1030 GUI Menu List/Liste des menus de l'interface utilisateur/Lista de menús de la interfaz... gráfica de usuario/ Lista do ícone selecionado. © 2012 Sony Corporation Printed in Malaysia A/V Sync Dual Mono Ctrl for HDMI Pass Through Audio Out...LAN Settings Information PARTY STREAMING Access Settings Auto Access Control Device Media Remote Device Registration Registered Media Remote Devices Device Name Network Standby Software Update Pairing BT Standby* Clear ...
Operating Instructions (Large File - 11.51 MB)
Page 4
This equipment complies with the supplied remote control. Operation is located at the lower right corner of the IC radio frequency (RF) Exposure rules. This equipment should be used in Canada Properly ... host computers and/or peripherals. Any differences in this manual describe the operation of the receiver with FCC radiation exposure limits set forth for model STR-DN1030. You can also use the buttons or knobs on the remote control.
Operating Instructions (Large File - 11.51 MB)
Page 8
... with the TV (System Power-Off 86 Enjoying optimum sound field for the selected scene (Scene Select 87 Operating the receiver using the TV's remote control (Home Theatre Control 87 Additional Information Precautions 112 Troubleshooting 114 Specifications 126 Index 129 Other Operations Switching between digital and analog audio (INPUT MODE...HDMI Settings menu 98 Network Settings menu 98 Bluetooth Settings menu 101 System Settings menu 102 Operating without connecting to a TV ......102 Using the Remote Control Programming the remote control 107 Resetting the remote control 112 8US
Operating Instructions (Large File - 11.51 MB)
Page 9
... microphone (ECM-AC2) (1) Notes • Do not leave the remote control in the remote control. Supplied accessories • Operating Instructions (this happens, reprogram the remote control (page 107). • When the receiver no longer responds to the remote control, replace all the batteries with old ones. • Do not... Setup Guide (1) • GUI Menu List (1) • FM wire antenna (aerial) (1) • AM loop antenna (aerial) (1) Inserting batteries into the remote control Insert two R6 (size-AA) batteries (supplied) in an extremely hot or humid place. • Do not use the...
Operating Instructions (Large File - 11.51 MB)
Page 10
... (page 82) Operates the Bluetooth function. R SPEAKERS (page 39) S PHONES jack Connects to on. - F Display panel (page 11) qg qf qd qs qa G Remote control sensor Receives signals from remote control. H INPUT SELECTOR (page 51, 57, 88) I INPUT MODE (page 88) J MASTER VOLUME (page 51) K VIDEO 2 IN jacks (page 32) L iPod/iPhone...
Operating Instructions (Large File - 11.51 MB)
Page 13
Rear panel 1 23 4 86 7 6 A DIGITAL INPUT/OUTPUT section HDMI IN/OUT* jacks (page 26, 29, 30, 31, 32) OPTICAL IN jacks (page 26, 29, 30) COAXIAL IN jack (page 29) B TUNER section FM ANTENNA jack (page 34) AM ANTENNA terminals (page 34) C Controls jacks for Sony equipment and other external equipment IR REMOTE IN/OUT jacks (page 91) 5 D NETWORK section LAN port (page 36) Wireless LAN antenna (page 36) E SPEAKERS section (page 24) F AUDIO INPUT/OUTPUT section White (L) AUDIO IN jacks (page 26, 33) Red (R) Black AUDIO OUT jacks (page 24) AUDIO OUT jacks (page 91) continued 13US
Operating Instructions (Large File - 11.51 MB)
Page 14
... is pre-programmed to operate non-Sony equipment. You can also program the remote control to operate Sony audio/video equipment. For details, see "Programming the remote control" (page 107). RM-AAP078 wg wf 1 wd 2 ws 3 4 wa w; 5 6 ql 7 qk qj 8 9 0 qh qg qf qa qd qs 14US G VIDEO/AUDIO INPUT/OUTPUT section (..., PR IN/OUT* jacks * You must connect the HDMI TV OUT or MONITOR OUT jack to your TV to operate this receiver and other equipment. Remote control Use the supplied remote control to watch the selected input image (page 26).
Operating Instructions (Large File - 11.51 MB)
Page 15
...function of the input buttons, the receiver turns on or off the audio/video equipment that the remote control is turned off. CHARACTER Press SHIFT (V), then press CHARACTER to control Sony equipment. F Color buttons1) Works according to - G GUI MODE Displays the GUI menu on ...and the receiver in zone 2 (SYSTEM STANDBY). When you press any of the AV ?/1 changes automatically each time you can program the remote control to control non-Sony equipment following the steps in sequence as follows: "abc" (lowercase letters) t "ABC" (uppercase letters) t "123" (numbers) ...
Operating Instructions (Large File - 11.51 MB)
Page 17
...receiver operation for information on the model of your connected equipment, some functions explained in this section may not work with the supplied remote control. U SOUND OPTIMIZER Activates the Sound Optimizer function (page 64). Use the tactile dots as examples. • Depending on the buttons... that you can use to activate the buttons printed in pink. W TV Changes the remote control button function to control each equipment. 2)The 5/JKL/VIDEO 2, N/PARTY and TV CH +/ PROG +/PRESET + buttons have tactile dots. continued...
Operating Instructions (Large File - 11.51 MB)
Page 29
... player, DVD player Audio/video signals Audio signals Video signals or A B C* D A HDMI cable (not supplied) Sony recommends that you can be displayed on the remote control is Blu-ray Disc player. Recommended connection Alternative connection * When you use the button to control your equipment to ... BD/DVD as input. • The default setting for the BD/DVD input button on the receiver's display panel. For details, see "Programming the remote control" (page 107). For details, see "Naming the input (Name Input)" (page 51). 29US B Coaxial digital cord (not supplied) C Optical ...
Operating Instructions (Large File - 11.51 MB)
Page 32
... supplied) 32US Note Be sure to change the default setting of the VIDEO 1 input button on the remote control so that you use an HDMIauthorized cable or Sony HDMI cable. For details, see "Programming the remote control" (page 107). (On the front panel) B Camcorder, Video game A HDMI cable (not ...supplied) Sony recommends that you can use an HDMIauthorized cable or Sony HDMI cable. * If you want to ...
Operating Instructions (Large File - 11.51 MB)
Page 43
.... continued 43US To cancel Auto Calibration The Auto Calibration function will be canceled when you can change the settings. Press the input buttons on the remote control or turn the INPUT SELECTOR on the TV screen. 2 Press B/b to select "YES", then press . 3 Repeat steps 6 to 10 in "Performing Auto Calibration" (page...
Operating Instructions (Large File - 11.51 MB)
Page 48
The proxy setting display appears on the remote control. When using a proxy server Select "Use", then press . Tip When checking the network settings, see "To check the network information" (page 99). RETURN/ EXIT O ...
Operating Instructions (Large File - 11.51 MB)
Page 51
... the receiver or press input buttons on the receiver. The input that can also use 2CH/A.DIRECT, A.F.D., MOVIE (HD-D.C.S.) or MUSIC on the remote control to select the equipment you turn off the receiver. • Perform Auto Calibration. Turn the knob quickly. - To activate the muting function...inputs and display it immediately. The name you want , then press . You can be displayed on the TV screen cannot be displayed on the remote control. to adjust the volume. For details, see page 61. Press and hold the button. The option menu appears. 3 Select "Name Input",...
Operating Instructions (Large File - 11.51 MB)
Page 53
To select the playback mode You can change the playback mode using the TOOLS/OPTIONS on the remote control. • Repeat: Off / One / All • Shuffle: Off / Songs / Albums • Audiobooks: Slower / Normal / Faster Operating the iPod/iPhone using "iPod" mode 1 Make sure ... then viewed on your TV, depending on the status of the video signal output. You can use the GUI menu to browse contents on the remote control. Operating the iPod/iPhone using the GUI menu or iPhone CTRL on the iPod/iPhone. The selected content starts playback and the information of...
Operating Instructions (Large File - 11.51 MB)
Page 54
.../iPhone • The iPod/iPhone is turned on operating the iPod/iPhone, refer to the previous/next album. To operate the iPod/iPhone using the remote control SHIFT USB RETURN/ EXIT O MENU B•/•b N iPhone CTRL V/v/B/b, ./>, REPEAT, SHUFFLE m/M x X 54US Press USB before you want using "iPod" mode (page 53). **Press SHIFT...
Operating Instructions (Large File - 11.51 MB)
Page 56
..." appears on the TV screen. 3 Select "USB", then press . 4 Press N. Operating the USB device To operate the USB device using the TOOLS/OPTIONS on the remote control. • Repeat: Off / One / All / Folder SHIFT USB FOLDER +/- To select the playback mode You can change the playback mode using the...
Operating Instructions (Large File - 11.51 MB)
Page 65
.... • You can listen to the same music at the same time in different rooms through the PARTY STREAMING function. • You can register Media Remote devices to control the receiver. • You can use the buttons on iOS devices or an iTunes Library with AirPlay. DLNA decides upon standards and...
Operating Instructions (Large File - 11.51 MB)
Page 70
The server list appears on the remote control to select the Home Network function directly. 4 Select the server which holds the content you want appears. Tip You can also use the Keyword ...
Operating Instructions (Large File - 11.51 MB)
Page 71
... function using a in the server, press SHIFT, keyword then press ALPHABET SEARCH, and then enter a keyword (page 80). Select "Server List", then press . Enjoying Sony Entertainment Network (SEN) You can listen to the Internet. Using Network Features continued 71US Stop playback Press x. Select Shuffle Play Press SHIFT, then press SHUFFLE... Or press TOOLS/OPTIONS, select "Server List", then select the item you While selecting the contents want . Search the item you want using the remote control To Do the following Pause playback* Press X during playback.