Operating Instructions (Large File - 15.25 MB)
Page 3
...equipment has been tested and found to radio or television reception, which the receiver is required when the apparatus has been damaged in any changes or modifications not expressly approved in this manual could void your authority to operate this equipment does cause harmful interference to comply...touch the core of speaker cord by one or more of this model manufactured for help. If this equipment. Reorient or relocate the receiving antenna. - These limits are cautioned that any way, such as not to correct the interference by hand. This equipment generates, ...
...equipment has been tested and found to radio or television reception, which the receiver is required when the apparatus has been damaged in any changes or modifications not expressly approved in this manual could void your authority to operate this equipment does cause harmful interference to comply...touch the core of speaker cord by one or more of this model manufactured for help. If this equipment. Reorient or relocate the receiving antenna. - These limits are cautioned that any way, such as not to correct the interference by hand. This equipment generates, ...
Operating Instructions (Large File - 15.25 MB)
Page 4
...Inc. DTS is a trademark of THX Ltd., which may be performed using the main remote commander, but most of the same operations can enjoy multi-channel surround sound. HDMI, the HDMI logo and High-Definition Multimedia Interface are trademarks of DTS, Inc. © 1996-2007 DTS, Inc. All ... model STR-DA6400ES. Sony Corporation hereby grants the user a non-exclusive, non-transferable, limited right of use the controls on the receiver if they have the same or similar names as required by looking at the lower right corner of the front panel. • The instructions in this manual describe ...
...Inc. DTS is a trademark of THX Ltd., which may be performed using the main remote commander, but most of the same operations can enjoy multi-channel surround sound. HDMI, the HDMI logo and High-Definition Multimedia Interface are trademarks of DTS, Inc. © 1996-2007 DTS, Inc. All ... model STR-DA6400ES. Sony Corporation hereby grants the user a non-exclusive, non-transferable, limited right of use the controls on the receiver if they have the same or similar names as required by looking at the lower right corner of the front panel. • The instructions in this manual describe ...

Operating Instructions (Large File - 15.25 MB)
Page 60
... list. 60GB Enjoying sound/images from a portable audio source or computer by connecting a DIGITAL MEDIA PORT adapter. You can use the following Sony DIGITAL MEDIA PORT adapters: • TDM-BT1 Bluetooth™ Wireless Audio Adapter • TDM-NW1/NW10 DIGITAL MEDIA PORT Adapter •... not connect or disconnect the DIGITAL MEDIA PORT adapter to/from the receiver while the system is turned on. • Depending on connecting the DIGITAL MEDIA PORT adapter, see "Connecting components with this manual for enjoying sound/images from the components connected to "Using Network Features...
... list. 60GB Enjoying sound/images from a portable audio source or computer by connecting a DIGITAL MEDIA PORT adapter. You can use the following Sony DIGITAL MEDIA PORT adapters: • TDM-BT1 Bluetooth™ Wireless Audio Adapter • TDM-NW1/NW10 DIGITAL MEDIA PORT Adapter •... not connect or disconnect the DIGITAL MEDIA PORT adapter to/from the receiver while the system is turned on. • Depending on connecting the DIGITAL MEDIA PORT adapter, see "Connecting components with this manual for enjoying sound/images from the components connected to "Using Network Features...

Operating Instructions (Large File - 15.25 MB)
Page 112
...video signals (page 123). Note The measurement results will be used for the speakers for sound/ images from components connected to the receiver using the on-screen remote (page 128). To set of settings for the listening environment You can select the compensation type to ...sound) (page 119). Adjusts the resolution of the menu guide display (page 128). You can register three patterns for Multi Zone (page 120). Sets the speaker position and impedance manually (page 114). Makes the settings for "Seating Position" depending on Position 1 in the Enhanced Setup menu. Makes ...
...video signals (page 123). Note The measurement results will be used for the speakers for sound/ images from components connected to the receiver using the on-screen remote (page 128). To set of settings for the listening environment You can select the compensation type to ...sound) (page 119). Adjusts the resolution of the menu guide display (page 128). You can register three patterns for Multi Zone (page 120). Sets the speaker position and impedance manually (page 114). Makes the settings for "Seating Position" depending on Position 1 in the Enhanced Setup menu. Makes ...

Operating Instructions (Large File - 15.25 MB)
Page 114
... downmix settings on or off. x OFF If there is a center speaker connected, this receiver when you want , then press . 3 Press RETURN/EXIT O. This setting is set to...Ω x8Ω Speaker Pattern Select "Speaker Pattern" according to change the connection from the MULTI CHANNEL INPUT jacks. Analog downmix works when you have a center speaker connected. x BI-AMP If ... calibration. Speaker settings You can set the speaker impedance. Impedance You can adjust each speaker manually. The Speaker Pattern screen appears. 2 Press V/v to select the speaker pattern you want to...
... downmix settings on or off. x OFF If there is a center speaker connected, this receiver when you want , then press . 3 Press RETURN/EXIT O. This setting is set to...Ω x8Ω Speaker Pattern Select "Speaker Pattern" according to change the connection from the MULTI CHANNEL INPUT jacks. Analog downmix works when you have a center speaker connected. x BI-AMP If ... calibration. Speaker settings You can set the speaker impedance. Impedance You can adjust each speaker manually. The Speaker Pattern screen appears. 2 Press V/v to select the speaker pattern you want to...

Operating Instructions (Large File - 15.25 MB)
Page 115
...For the front left/right speakers, you can adjust the distance from the seating position to each speaker You can adjust the balance on the Manual Setup screen. continued 115GB Adjusting Settings You can also adjust the front right level from the seating position to set the level of the selected..."LARGE." You can adjust the level from 3 feet 3 inches to 32 feet 9 inches (1.0 meter to +10 dB in 0.5 dB steps. Note When one of each channel from FL-10.0 dB to "SMALL," the sound field for music is selected, no sound is distorted, or you want to adjust the level, then...
...For the front left/right speakers, you can adjust the distance from the seating position to each speaker You can adjust the balance on the Manual Setup screen. continued 115GB Adjusting Settings You can also adjust the front right level from the seating position to set the level of the selected..."LARGE." You can adjust the level from 3 feet 3 inches to 32 feet 9 inches (1.0 meter to +10 dB in 0.5 dB steps. Note When one of each channel from FL-10.0 dB to "SMALL," the sound field for music is selected, no sound is distorted, or you want to adjust the level, then...
Operating Instructions (Large File - 15.25 MB)
Page 120
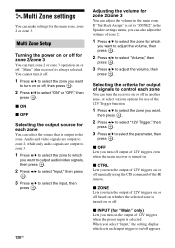
... Press V/v to select "ON" or "OFF," then press . x CTRL Lets you want to turn the output of 12V triggers on /off manually using the CIS command of the IR remote. Multi Zone settings You can make settings for use of the 12V Trigger function. 1 Press V/v to select the zone you want, then...2 Press B/b to select "Input," then press . 3 Press V/v to select the input, then press . 120GB Adjusting the volume for "Main" only) Lets you turn the receiver on . x INPUT (for zone 2/zone 3 You can adjust the volume in the Speaker settings menu, you can also adjust the volume of zone 2. 1 Press V/v to...
... Press V/v to select "ON" or "OFF," then press . x CTRL Lets you want to turn the output of 12V triggers on /off manually using the CIS command of the IR remote. Multi Zone settings You can make settings for use of the 12V Trigger function. 1 Press V/v to select the zone you want, then...2 Press B/b to select "Input," then press . 3 Press V/v to select the input, then press . 120GB Adjusting the volume for "Main" only) Lets you turn the receiver on . x INPUT (for zone 2/zone 3 You can adjust the volume in the Speaker settings menu, you can also adjust the volume of zone 2. 1 Press V/v to...

Operating Instructions (Large File - 15.25 MB)
Page 172
... × 6 7/8 × 17 inches) (width/height/depth) including projecting parts and controls Mass (Approx.) 17.5 kg (38 lb 10 oz) Supplied accessories Operating Instructions (this manual) Using Network Features (1) Quick Setup Guide (1) GUI Menu List (1) Optimizer microphone ECM-AC1 (1) FM wire antenna (aerial) (1) AM loop antenna (aerial) (1) AC power cord (mains...
... × 6 7/8 × 17 inches) (width/height/depth) including projecting parts and controls Mass (Approx.) 17.5 kg (38 lb 10 oz) Supplied accessories Operating Instructions (this manual) Using Network Features (1) Quick Setup Guide (1) GUI Menu List (1) Optimizer microphone ECM-AC1 (1) FM wire antenna (aerial) (1) AM loop antenna (aerial) (1) AC power cord (mains...
Using Network Features
Page 1
Printed in the basic operation of this receiver first. This manual is written on the assumption that you are skilled in Malaysia 4-104-900-11(1) Multi Channel AV Receiver Using Network Features Please read the operating instructions supplied with this receiver after performing basic connection and setup according to the operating instructions. STR-DA6400ES ©2008 Sony Corporation
Printed in the basic operation of this receiver first. This manual is written on the assumption that you are skilled in Malaysia 4-104-900-11(1) Multi Channel AV Receiver Using Network Features Please read the operating instructions supplied with this receiver after performing basic connection and setup according to the operating instructions. STR-DA6400ES ©2008 Sony Corporation

Using Network Features
Page 9
... set the network settings manually Refer to select "Network Setup," then press . If the failure screen is displayed on the TV screen each time you have completed this case, the router that is explained below. Getting Started 2: Configuring the network settings of the receiver The network settings for the receiver by following the...
... set the network settings manually Refer to select "Network Setup," then press . If the failure screen is displayed on the TV screen each time you have completed this case, the router that is explained below. Getting Started 2: Configuring the network settings of the receiver The network settings for the receiver by following the...
Using Network Features
Page 27
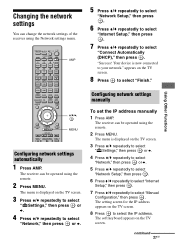
... Other Functions V/v/b, MENU Configuring network settings automatically 1 Press AMP. The menu is displayed on the TV screen. 8 Press to select "Manual Configuration," then press . Your device is displayed on the TV screen. 3 Press V/v repeatedly to select " Settings," then press or ... to select "Internet Setup," then press . 7 Press V/v repeatedly to select "Finish." Configuring network settings manually To set the IP address manually 1 Press AMP. "Success! The receiver can be operated using the remote. 2 Press MENU. The menu is now connected to select "Connect Automatically...
... Other Functions V/v/b, MENU Configuring network settings automatically 1 Press AMP. The menu is displayed on the TV screen. 8 Press to select "Manual Configuration," then press . Your device is displayed on the TV screen. 3 Press V/v repeatedly to select " Settings," then press or ... to select "Internet Setup," then press . 7 Press V/v repeatedly to select "Finish." Configuring network settings manually To set the IP address manually 1 Press AMP. "Success! The receiver can be operated using the remote. 2 Press MENU. The menu is now connected to select "Connect Automatically...
Using Network Features
Page 28
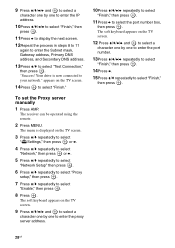
... 5 Press V/v repeatedly to select "Network Setup" then press . 6 Press V/v repeatedly to select "Proxy setup," then press . 7 Press V/v repeatedly to your network." The receiver can be operated using the remote. 2 Press MENU. "Success! Your drive is displayed on the TV screen. 14Press to select "Finish." 10Press V/v/B/b repeatedly to select... "Finish," then press . 11Press b to select "Test Connection," then press . To set the Proxy server manually 1 Press AMP. The menu is now connected to select "Enable," then press . 8 Press .
... 5 Press V/v repeatedly to select "Network Setup" then press . 6 Press V/v repeatedly to select "Proxy setup," then press . 7 Press V/v repeatedly to your network." The receiver can be operated using the remote. 2 Press MENU. "Success! Your drive is displayed on the TV screen. 14Press to select "Finish." 10Press V/v/B/b repeatedly to select... "Finish," then press . 11Press b to select "Test Connection," then press . To set the Proxy server manually 1 Press AMP. The menu is now connected to select "Enable," then press . 8 Press .
Using Network Features
Page 39
.... iPod is a trademark of SIRIUS Satellite Radio Inc. In this receiver is a registered trademark of RealNetworks, Inc. "SIRIUS" and the SIRIUS dog logo are of the font also belongs to use the Sony Software or the accompanying documentation. The font type (Shin Go R) ...VC-1 VIDEO") continued 39GB Additional Information Microsoft, Windows, Windows Vista, and Windows Media are trademarks or registered trademarks of Microsoft Corporation in this manual, ™ and ® marks are the trademarks of MORISAWA & COMPANY LTD., and the copyright of their respective holders. All other ...
.... iPod is a trademark of SIRIUS Satellite Radio Inc. In this receiver is a registered trademark of RealNetworks, Inc. "SIRIUS" and the SIRIUS dog logo are of the font also belongs to use the Sony Software or the accompanying documentation. The font type (Shin Go R) ...VC-1 VIDEO") continued 39GB Additional Information Microsoft, Windows, Windows Vista, and Windows Media are trademarks or registered trademarks of Microsoft Corporation in this manual, ™ and ® marks are the trademarks of MORISAWA & COMPANY LTD., and the copyright of their respective holders. All other ...
Marketing Specifications
Page 2
.... 9. Shoutcast Internet Radio Service requires a connection to owner's manual for current information at www.sony.com/dn Last Updated: 08/13/2009 iPod is a trademark...cable. ©2008 Sony Electronics Inc. Sony, Walkman, BRAVIA, Remote Commander, and Digital Cinema Sound are properties of Sony. STR-DA6400ES Features Video Up Conversion... Audio Output(s): 2 (Rear) Component Video (Y/Pb/Pr ) Input(s): 3 (Rear) Phono Input(s): 1 (Rear) Multi-Channel Input(s): 1 (Rear, 7.1 Channel) Digital Media Port: 2 (Rear) HDMI™ Connection Output(s): 2 (Rear) HDMI™ Connection Input(s): 6 ...
.... 9. Shoutcast Internet Radio Service requires a connection to owner's manual for current information at www.sony.com/dn Last Updated: 08/13/2009 iPod is a trademark...cable. ©2008 Sony Electronics Inc. Sony, Walkman, BRAVIA, Remote Commander, and Digital Cinema Sound are properties of Sony. STR-DA6400ES Features Video Up Conversion... Audio Output(s): 2 (Rear) Component Video (Y/Pb/Pr ) Input(s): 3 (Rear) Phono Input(s): 1 (Rear) Multi-Channel Input(s): 1 (Rear, 7.1 Channel) Digital Media Port: 2 (Rear) HDMI™ Connection Output(s): 2 (Rear) HDMI™ Connection Input(s): 6 ...

