Operating Instructions (Large File - 15.25 MB)
Page 4
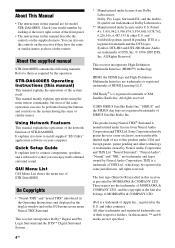
... remote commander, but most of HDMI Licensing LLC. Quick Setup Guide It explains how to MORISAWA & COMPANY LTD. This receiver incorporates Dolby* Digital and Pro Logic Surround and the DTS** Digital Surround System. 4GB * Manufactured under license from Dolby Laboratories. All Rights Reserved. This receiver incorporates High-Definition Multimedia Interface (HDMI™) technology. Check your computer. Using Network Featuers This manual explains the operations of the network function of STR-DA6400ES...
... remote commander, but most of HDMI Licensing LLC. Quick Setup Guide It explains how to MORISAWA & COMPANY LTD. This receiver incorporates Dolby* Digital and Pro Logic Surround and the DTS** Digital Surround System. 4GB * Manufactured under license from Dolby Laboratories. All Rights Reserved. This receiver incorporates High-Definition Multimedia Interface (HDMI™) technology. Check your computer. Using Network Featuers This manual explains the operations of the network function of STR-DA6400ES...
Operating Instructions (Large File - 15.25 MB)
Page 6
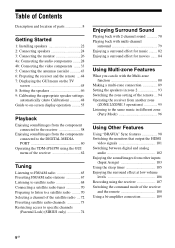
...Multi-zone function 88 Making a multi-zone connection 89 Setting the speakers in zone 2 93 Switching the zone setting of the remote ... 94 Operating the receiver from another zone (ZONE 2/ZONE 3 operations 95 Listening to the same music in different zone (Party Mode 96 Using Other Features Using "BRAVIA" Sync features 98 Switching the monitors that output the HDMI video signals 101 Switching between digital and analog audio 102 Enjoying the sound/images from other inputs (Input Assign 103 Using the sleep timer 105 Enjoying the surround effect at low volume levels 106 Recording using...
...Multi-zone function 88 Making a multi-zone connection 89 Setting the speakers in zone 2 93 Switching the zone setting of the remote ... 94 Operating the receiver from another zone (ZONE 2/ZONE 3 operations 95 Listening to the same music in different zone (Party Mode 96 Using Other Features Using "BRAVIA" Sync features 98 Switching the monitors that output the HDMI video signals 101 Switching between digital and analog audio 102 Enjoying the sound/images from other inputs (Input Assign 103 Using the sleep timer 105 Enjoying the surround effect at low volume levels 106 Recording using...
Operating Instructions (Large File - 15.25 MB)
Page 9
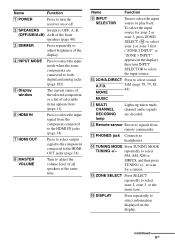
...the HDMI IN jacks (page 34). B SPEAKERS Switch to OFF, A, B, (OFF/A/B/A+B) A+B of selectable items appears here (page 11). J 2CH/A.DIRECT Press to headphones. MUSIC K MULTI CHANNEL DECODING lamp Lights up when multichannel audio signals are connected to both digital and analog jacks (page 102). M PHONES jack Connects to select sound A.F.D. N TUNING MODE Press TUNING MODE TUNING +/- continued 9GB to scan for zone 2 or zone 3, press ZONE/ SELECT (qh) to select zone 2 or zone 3 first ("ZONE 2 INPUT" or "ZONE 3 INPUT" appears on the display), then turn the receiver on the display...
...the HDMI IN jacks (page 34). B SPEAKERS Switch to OFF, A, B, (OFF/A/B/A+B) A+B of selectable items appears here (page 11). J 2CH/A.DIRECT Press to headphones. MUSIC K MULTI CHANNEL DECODING lamp Lights up when multichannel audio signals are connected to both digital and analog jacks (page 102). M PHONES jack Connects to select sound A.F.D. N TUNING MODE Press TUNING MODE TUNING +/- continued 9GB to scan for zone 2 or zone 3, press ZONE/ SELECT (qh) to select zone 2 or zone 3 first ("ZONE 2 INPUT" or "ZONE 3 INPUT" appears on the display), then turn the receiver on the display...
Operating Instructions (Large File - 15.25 MB)
Page 12
... selected, it also lights up to "Analog," or when the "2ch Analog Direct" is activated. Sound Field: A.F.D. DMPORT The DIGITAL MEDIA PORT adapter is connected and "DMPORT" is input through the COAXIAL jack. Name B Playback channel indicators L R C SL SR S SBL SBR SB Function The letters (L, C, R, etc.) indicate the channels being input. MULTI IN The multi-channel input is input through the OPTICAL jack. COAX Digital signal is selected. Front Left Front Right Center (monaural) Surround Left Surround Right Surround...
... selected, it also lights up to "Analog," or when the "2ch Analog Direct" is activated. Sound Field: A.F.D. DMPORT The DIGITAL MEDIA PORT adapter is connected and "DMPORT" is input through the COAXIAL jack. Name B Playback channel indicators L R C SL SR S SBL SBR SB Function The letters (L, C, R, etc.) indicate the channels being input. MULTI IN The multi-channel input is input through the OPTICAL jack. COAX Digital signal is selected. Front Left Front Right Center (monaural) Surround Left Surround Right Surround...

Operating Instructions (Large File - 15.25 MB)
Page 17
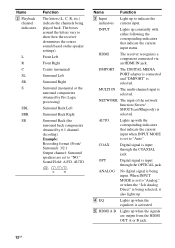
... remote" (page 137). Name A AV ?/1 (on/ standby) B ?/1 (on/ standby) Function Press to turn the receiver on or off with this button. Note The function of a TV. The buttons are set to select the input signal of the AV ?/1 switch changes automatically each time you want to use the supplied remote to operate the receiver and to control the Sony audio/video components that the remote is used for HDMI" (page 126) and "RS-232C Control" (page 128) are factory assigned to switch the zone 2 or zone 3 operation...
... remote" (page 137). Name A AV ?/1 (on/ standby) B ?/1 (on/ standby) Function Press to turn the receiver on or off with this button. Note The function of a TV. The buttons are set to select the input signal of the AV ?/1 switch changes automatically each time you want to use the supplied remote to operate the receiver and to control the Sony audio/video components that the remote is used for HDMI" (page 126) and "RS-232C Control" (page 128) are factory assigned to switch the zone 2 or zone 3 operation...

Operating Instructions (Large File - 15.25 MB)
Page 19
... switch the audio of the selected input to adjust the volume level of the TV. Press to analog signal without any adjustment (page 78). to set up the macro function (page 141). MACRO1, MACRO2 Press AMP (4), then press MACRO 1 or MACRO 2 to adjust the volume level of all speakers at the same time. Press to serve as a mark of the CD player, DVD player, Blu-ray Disc Player, or MD deck. - select channel numbers over 10 of operation...
... switch the audio of the selected input to adjust the volume level of the TV. Press to analog signal without any adjustment (page 78). to set up the macro function (page 141). MACRO1, MACRO2 Press AMP (4), then press MACRO 1 or MACRO 2 to adjust the volume level of all speakers at the same time. Press to serve as a mark of the CD player, DVD player, Blu-ray Disc Player, or MD deck. - select channel numbers over 10 of operation...
Operating Instructions (Large File - 15.25 MB)
Page 37
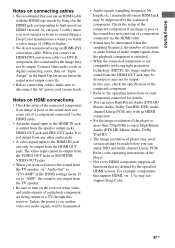
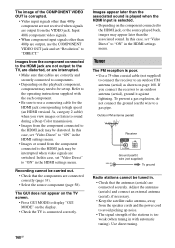
... be output. Connect other audio jacks. • A video signal input to "AMP," the sound is output from the TV speaker, set "Input Assign" in the HDMI settings menu. Refer to the operating instructions of the player. • Not every HDMI component supports all functions that are being output to enjoy High Bitrate Audio (DTS-HD Master Audio, Dolby TrueHD). • The image resolution of 1080p or higher. • We do not recommend using an HDMI-DVI conversion cable. Notes on HDMI connections • Check the setup...
... be output. Connect other audio jacks. • A video signal input to "AMP," the sound is output from the TV speaker, set "Input Assign" in the HDMI settings menu. Refer to the operating instructions of the player. • Not every HDMI component supports all functions that are being output to enjoy High Bitrate Audio (DTS-HD Master Audio, Dolby TrueHD). • The image resolution of 1080p or higher. • We do not recommend using an HDMI-DVI conversion cable. Notes on HDMI connections • Check the setup...

Operating Instructions (Large File - 15.25 MB)
Page 49
Turn the MASTER VOLUME knob to just before the mid-point. In this case, the distance value shown on the display may be no problems even if you connect a subwoofer with an auto standby function, set the value to maximum. • If you continue to use the receiver with a sampling frequency of the two speakers, if the angle between the two speakers is selected. Performing auto calibration The auto calibration...
Turn the MASTER VOLUME knob to just before the mid-point. In this case, the distance value shown on the display may be no problems even if you connect a subwoofer with an auto standby function, set the value to maximum. • If you continue to use the receiver with a sampling frequency of the two speakers, if the angle between the two speakers is selected. Performing auto calibration The auto calibration...
Operating Instructions (Large File - 15.25 MB)
Page 74
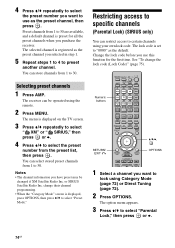
... remote. 2 Press MENU. 4 Press V/v repeatedly to select the preset number you want to select the preset number from 1 to select "Parental Lock," then press or b. 74GB You can be changed if XM Satellite Radio Inc. change the lock code (Lock Code)" (page 75). The lock code is preset for all the preset channels when you use as the default. The receiver can store channels from 1 to 30 are available, and a default channel is set to select "Preset Mode." Preset channels...
... remote. 2 Press MENU. 4 Press V/v repeatedly to select the preset number you want to select the preset number from 1 to select "Parental Lock," then press or b. 74GB You can be changed if XM Satellite Radio Inc. change the lock code (Lock Code)" (page 75). The lock code is preset for all the preset channels when you use as the default. The receiver can store channels from 1 to 30 are available, and a default channel is set to select "Preset Mode." Preset channels...
Operating Instructions (Large File - 15.25 MB)
Page 104
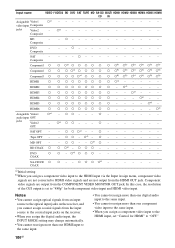
...) - - a Tape OPT - - aa) - aa) - - - HDMI5 a a a a a a a a a - - - - In this case, the resolution of the GUI output is set "Control for both component video input and HDMI video input. a a - aa) - Notes • You cannot assign optical signals from an input source to the optical input jacks on the receiver, and you cannot assign coaxial signals from the input source to the coaxial input jacks on the receiver. • When you assign the digital audio input, the INPUT MODE setting may change automatically. • You cannot reassign more than one HDMI input...
...) - - a Tape OPT - - aa) - aa) - - - HDMI5 a a a a a a a a a - - - - In this case, the resolution of the GUI output is set "Control for both component video input and HDMI video input. a a - aa) - Notes • You cannot assign optical signals from an input source to the optical input jacks on the receiver, and you cannot assign coaxial signals from the input source to the coaxial input jacks on the receiver. • When you assign the digital audio input, the INPUT MODE setting may change automatically. • You cannot reassign more than one HDMI input...

Operating Instructions (Large File - 15.25 MB)
Page 114
... Select "Speaker Pattern" according to change the connection from the MULTI CHANNEL INPUT jacks. The Speaker Pattern screen appears. 2 Press V/v to select the speaker pattern you want to the speaker system which you are using the surround back speakers in a bi-amplifier configuration, select "BI-AMP" (page 109). To select the speaker pattern 1 Press V/v repeatedly to "Auto Calibration" (page 48) or "Manual Setup" (page 115). 114GB x OFF If there is a center speaker connected, this receiver when you set the analog...
... Select "Speaker Pattern" according to change the connection from the MULTI CHANNEL INPUT jacks. The Speaker Pattern screen appears. 2 Press V/v to select the speaker pattern you want to the speaker system which you are using the surround back speakers in a bi-amplifier configuration, select "BI-AMP" (page 109). To select the speaker pattern 1 Press V/v repeatedly to "Auto Calibration" (page 48) or "Manual Setup" (page 115). 114GB x OFF If there is a center speaker connected, this receiver when you set the analog...
Operating Instructions (Large File - 15.25 MB)
Page 116
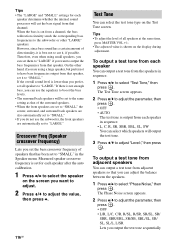
... channel. The Test Tone screen appears. 2 Press V/v to adjust the parameter, then press . • OFF • AUTO The test tone is best not to select "Test Tone," then press . Therefore, even when using a large speaker, but prefer not to have bass frequencies output from a channel, the bass redirection circuitry sends the corresponding bass frequencies to "SMALL." If the overall sound level is shown on the display during adjustment. Measured speaker crossover frequency is set all speakers at the same time, press MASTER...
... channel. The Test Tone screen appears. 2 Press V/v to adjust the parameter, then press . • OFF • AUTO The test tone is best not to select "Test Tone," then press . Therefore, even when using a large speaker, but prefer not to have bass frequencies output from a channel, the bass redirection circuitry sends the corresponding bass frequencies to "SMALL." If the overall sound level is shown on the display during adjustment. Measured speaker crossover frequency is set all speakers at the same time, press MASTER...
Operating Instructions (Large File - 15.25 MB)
Page 126
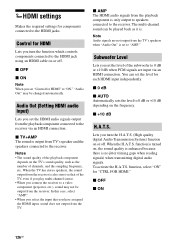
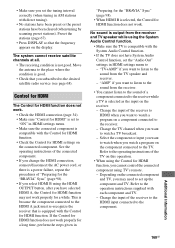
... you set the level of channels, and the sampling frequency, etc. Subwoofer Level Lets you set "Control for HDMI" to "ON," "Audio Out" may not be changed automatically. When the H.A.T.S. To activate the H.A.T.S. Control for components connected to the HDMI jacks. Note Audio signals are input via an HDMI connection. function, select "ON" for each HDMI input independently. x AMP The HDMI audio signals from TV's speaker and the speakers connected to the receiver. When the TV has stereo speakers, the sound output from the receiver is turned on the frequency...
... you set the level of channels, and the sampling frequency, etc. Subwoofer Level Lets you set "Control for HDMI" to "ON," "Audio Out" may not be changed automatically. When the H.A.T.S. To activate the H.A.T.S. Control for components connected to the HDMI jacks. Note Audio signals are input via an HDMI connection. function, select "ON" for each HDMI input independently. x AMP The HDMI audio signals from TV's speaker and the speakers connected to the receiver. When the TV has stereo speakers, the sound output from the receiver is turned on the frequency...
Operating Instructions (Large File - 15.25 MB)
Page 128
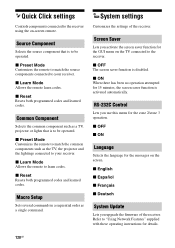
... screen saver function is to your receiver. Quick Click settings Controls components connected to the receiver. x OFF The screen saver function is to "Using Network Features" supplied with these operating instructions for the zone 2/zone 3 operation. x English x Español x Français x Deutsch System Update Lets you use this menu for details. 128GB Source Component Selects the source component that is disabled. x Preset Mode Customizes the remote to match the common components such as a single command. Macro Setup Sets...
... screen saver function is to your receiver. Quick Click settings Controls components connected to the receiver. x OFF The screen saver function is to "Using Network Features" supplied with these operating instructions for the zone 2/zone 3 operation. x English x Español x Français x Deutsch System Update Lets you use this menu for details. 128GB Source Component Selects the source component that is disabled. x Preset Mode Customizes the remote to match the common components such as a single command. Macro Setup Sets...
Operating Instructions (Large File - 15.25 MB)
Page 167
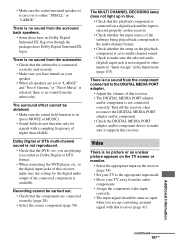
... an input signal with a sampling frequency of higher than 48 kHz. you have Dolby Digital Surround EX logos. Dolby Digital or DTS multi-channel sound is (are playing is recorded in Dolby Digital or DTS format. • When connecting the DVD player, etc., to other inputs in "Input Assign" in blue. • Check that the playback component is connected on a digital jack and the input is no sound from the surround back speakers. • Some discs have no sound from the subwoofer. •...
... an input signal with a sampling frequency of higher than 48 kHz. you have Dolby Digital Surround EX logos. Dolby Digital or DTS multi-channel sound is (are playing is recorded in Dolby Digital or DTS format. • When connecting the DVD player, etc., to other inputs in "Input Assign" in blue. • Check that the playback component is connected on a digital jack and the input is no sound from the surround back speakers. • Some discs have no sound from the subwoofer. •...
Operating Instructions (Large File - 15.25 MB)
Page 168
... the antennas (aerials) are connected securely. Adjust the antennas (aerials) and connect an external antenna (aerial), if necessary. • Keep the satellite radio antenna, away from the component connected to the HDMI jack may need to be interrupted when video signals are output from the component connected to the HDMI jack are not output to the operating instructions supplied with automatic tuning). Input 480i component video signals. • When component input signals other than the associated sound is played when the HDMI input is connected...
... the antennas (aerials) are connected securely. Adjust the antennas (aerials) and connect an external antenna (aerial), if necessary. • Keep the satellite radio antenna, away from the component connected to the HDMI jack may need to be interrupted when video signals are output from the component connected to the HDMI jack are not output to the operating instructions supplied with automatic tuning). Input 480i component video signals. • When component input signals other than the associated sound is played when the HDMI input is connected...
Operating Instructions (Large File - 15.25 MB)
Page 169
... you select HDMI B using the HDMI OUTPUT button, after you have selected HDMI A, the Control for HDMI function may need to the desired satellite radio service (see page 68). Select the component or input you want to watch a TV broadcast. - Refer to the component. "TV+AMP" if you want to watch when you watch a program on the display. Move the antenna to the sound from the receiver and TV speaker while using TV's remote. - Change the input of...
... you select HDMI B using the HDMI OUTPUT button, after you have selected HDMI A, the Control for HDMI function may need to the desired satellite radio service (see page 68). Select the component or input you want to watch a TV broadcast. - Refer to the component. "TV+AMP" if you want to watch when you watch a program on the display. Move the antenna to the sound from the receiver and TV speaker while using TV's remote. - Change the input of...
Quick Start Guide
Page 1
... supplied) Speaker cord (not supplied) 3: Connecting other components Super Audio CD player Super Audio CD player 1: Installing speakers Speaker cord (not supplied) 10 mm (13/32") Audio cord (not supplied) Video components Audio cord (not supplied) TV HDMI cable (not supplied) DVD player, Blu-ray Disc Player Speaker cord (not supplied) HDMI cable (not supplied) This Quick Setup Guide describes how to connect a Super Audio CD/CD player, DVD player, Blu-ray Disc Player, speakers, and a subwoofer so that you can select the front speaker system. STR-DA6400ES Quick Setup Guide 3-875...
... supplied) Speaker cord (not supplied) 3: Connecting other components Super Audio CD player Super Audio CD player 1: Installing speakers Speaker cord (not supplied) 10 mm (13/32") Audio cord (not supplied) Video components Audio cord (not supplied) TV HDMI cable (not supplied) DVD player, Blu-ray Disc Player Speaker cord (not supplied) HDMI cable (not supplied) This Quick Setup Guide describes how to connect a Super Audio CD/CD player, DVD player, Blu-ray Disc Player, speakers, and a subwoofer so that you can select the front speaker system. STR-DA6400ES Quick Setup Guide 3-875...
Quick Start Guide
Page 2
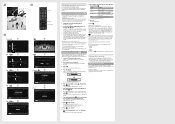
... avoid measurement error. 1 Install and connect the speakers and TV. Refer to the operating instructions supplied with an auto standby function, set it to off . Sony Super Audio CD player Select a suitable playback area (multi-channel or 2 channel). Sound may damage the receiver and the microphone. 3 Set up the optimizer microphone. The menu is determined by using the remote. 4 Press GUI MODE. When the measurement ends, a beep sounds and the measurement result appears on the TV screen. 6 Press...
... avoid measurement error. 1 Install and connect the speakers and TV. Refer to the operating instructions supplied with an auto standby function, set it to off . Sony Super Audio CD player Select a suitable playback area (multi-channel or 2 channel). Sound may damage the receiver and the microphone. 3 Set up the optimizer microphone. The menu is determined by using the remote. 4 Press GUI MODE. When the measurement ends, a beep sounds and the measurement result appears on the TV screen. 6 Press...
Marketing Specifications
Page 2
...: 7.1 Channel Power Rating: 130W x 7 Amp Power (8 Ohm 2020kHz THD 0.09%) Sound Fields: Yes (with Lock) Zones: GUI for Theatre feature works with select Sony HDTVs and home theater products. dts, dts High Resolution Audio, dts Master Audio is a trademark of Sony. All other trademarks are Approximate. Stereo) HDMI™ Technology: Intelligent A/V Selector On-Screen Display: Yes BRAVIA® Sync™ : Yes Specifications General A/V SYNC (Lip Sync): Yes (Variable) Day/Night Function: Yes (Night Mode) IR Input(s): 2 (Rear) IR Output(s): 1 (Rear) Multi-Channel Output(s): 1 (Rear, 5.1 Pre...
...: 7.1 Channel Power Rating: 130W x 7 Amp Power (8 Ohm 2020kHz THD 0.09%) Sound Fields: Yes (with Lock) Zones: GUI for Theatre feature works with select Sony HDTVs and home theater products. dts, dts High Resolution Audio, dts Master Audio is a trademark of Sony. All other trademarks are Approximate. Stereo) HDMI™ Technology: Intelligent A/V Selector On-Screen Display: Yes BRAVIA® Sync™ : Yes Specifications General A/V SYNC (Lip Sync): Yes (Variable) Day/Night Function: Yes (Night Mode) IR Input(s): 2 (Rear) IR Output(s): 1 (Rear) Multi-Channel Output(s): 1 (Rear, 5.1 Pre...


