
HDMI Control Guide
Page 2
are also turned off simultaneously. See the operating instructions of Sony Corporation. By connecting Sony components that you can select to output the sound from the TV speaker or the speakers connected to a component which offers the 'BRAVIA' Theatre Sync function. HDMI CONTROL is a mutual ...with the HDMI CONTROL function with a HDMI cable (not supplied), operation is not correspond with Sony's HDMI CONTROL function. • When you turn off the TV, the receiver and connected components are trademarks Note Depending on automatically and switch to the appropriate HDMI input....
are also turned off simultaneously. See the operating instructions of Sony Corporation. By connecting Sony components that you can select to output the sound from the TV speaker or the speakers connected to a component which offers the 'BRAVIA' Theatre Sync function. HDMI CONTROL is a mutual ...with the HDMI CONTROL function with a HDMI cable (not supplied), operation is not correspond with Sony's HDMI CONTROL function. • When you turn off the TV, the receiver and connected components are trademarks Note Depending on automatically and switch to the appropriate HDMI input....
HDMI Control Guide
Page 4
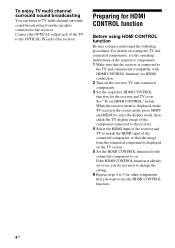
...the OPTICAL output jack of the TV to the OPTICAL IN jack of the connected component, so that the image from the speakers connected to the receiver. See "To set to on, you have performed the following procedures. Preparing for HDMI CONTROL function Before using HDMI CONTROL ... TV display image of the component connected to the receiver. 4 Select the HDMI input of the receiver and TV to match the HDMI input of the receiver. To enjoy TV multi channel surround sound broadcasting You can listen to TV multi channel surround sound broadcasting from the connected component is displayed on...
...the OPTICAL output jack of the TV to the OPTICAL IN jack of the connected component, so that the image from the speakers connected to the receiver. See "To set to on, you have performed the following procedures. Preparing for HDMI CONTROL function Before using HDMI CONTROL ... TV display image of the component connected to the receiver. 4 Select the HDMI input of the receiver and TV to match the HDMI input of the receiver. To enjoy TV multi channel surround sound broadcasting You can listen to TV multi channel surround sound broadcasting from the connected component is displayed on...
HDMI Control Guide
Page 6
...such as follows. • The sound of the TV is output from the speakers connected to the receiver when you are output from the TV speaker. • You can enjoy the TV sound from the speakers connected to the receiver, and the volume of the TV is turned on before turning on the...content may not be output for a moment. 6GB Play back a connected component. Enjoying the TV sound from the speakers connected to the receiver (System Audio Control) You can adjust the receiver's volume when you connect a TV that does not have System Audio Control function, the System Audio Control function ...
...such as follows. • The sound of the TV is output from the speakers connected to the receiver when you are output from the TV speaker. • You can enjoy the TV sound from the speakers connected to the receiver, and the volume of the TV is turned on before turning on the...content may not be output for a moment. 6GB Play back a connected component. Enjoying the TV sound from the speakers connected to the receiver (System Audio Control) You can adjust the receiver's volume when you connect a TV that does not have System Audio Control function, the System Audio Control function ...

HDMI Control Guide
Page 7
...AV ?/1 Press TV, then press AV ?/1. No sound is selected as the input on before using the System Power Off function. Notes • Set the TV power supply interlock function to on the receiver. - continued 7GB Troubleshooting If you experience any of the following difficulties while using the HDMI CONTROL function, use the receiver... or there is a power failure, repeat the procedures of a component connected to the receiver while a TV is output from the TV speaker and receiver. - For details, see the operating instructions of the connected components. • The location,...
...AV ?/1 Press TV, then press AV ?/1. No sound is selected as the input on before using the System Power Off function. Notes • Set the TV power supply interlock function to on the receiver. - continued 7GB Troubleshooting If you experience any of the following difficulties while using the HDMI CONTROL function, use the receiver... or there is a power failure, repeat the procedures of a component connected to the receiver while a TV is output from the TV speaker and receiver. - For details, see the operating instructions of the connected components. • The location,...
Operating Instructions (Large File - 19.55 MB)
Page 4
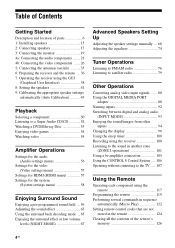
... components ........21 4b: Connecting the video components .......26 5: Connecting the antennas (aerials 35 6: Preparing the receiver and the remote ....36 7: Operating the receiver using the GUI (Graphical User Interface 38 8: Setting the speakers 41 9: Calibrating the appropriate speaker settings automatically (Auto Calibration 43 Playback Selecting a component 50 Listening to a Super Audio CD/CD 52...
... components ........21 4b: Connecting the video components .......26 5: Connecting the antennas (aerials 35 6: Preparing the receiver and the remote ....36 7: Operating the receiver using the GUI (Graphical User Interface 38 8: Setting the speakers 41 9: Calibrating the appropriate speaker settings automatically (Auto Calibration 43 Playback Selecting a component 50 Listening to a Super Audio CD/CD 52...
Operating Instructions (Large File - 19.55 MB)
Page 7
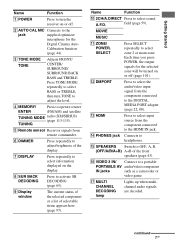
...speakers (page 43). N PHONES jack Connects to activate SB DECODING (page 65). H SUR BACK DECODING Press to headphones. L DMPORT Press to select the audio/video input signal from remote commander. Q MULTI CHANNEL DECODING lamp Lights up when multichannel audio signals are decoded. D MEMORY/ Press to select zone 2 or main zone. TUNING E Remote sensor Receives... be turned on or off . field (page 59). B AUTO CAL MIC Connects to a portable PORTABLE AV audio/video component IN jacks such as a camcorder or video game. C TONE MODE TONE Adjusts FRONT/ CENTER/ SURROUND/...
...speakers (page 43). N PHONES jack Connects to activate SB DECODING (page 65). H SUR BACK DECODING Press to headphones. L DMPORT Press to select the audio/video input signal from remote commander. Q MULTI CHANNEL DECODING lamp Lights up when multichannel audio signals are decoded. D MEMORY/ Press to select zone 2 or main zone. TUNING E Remote sensor Receives... be turned on or off . field (page 59). B AUTO CAL MIC Connects to a portable PORTABLE AV audio/video component IN jacks such as a camcorder or video game. C TONE MODE TONE Adjusts FRONT/ CENTER/ SURROUND/...

Operating Instructions (Large File - 19.55 MB)
Page 8
Turn to play back. Name R INPUT SELECTOR S MASTER VOLUME Function Turn to select the input source to adjust the volume level of all speakers at the same time. 8GB To select the input source for zone 2, press ZONE/SELECT (qa) to select zone 2 first ("ZONE 2 INPUT" appears on the display), then turn INPUT SELECTOR to select the input source.
Turn to play back. Name R INPUT SELECTOR S MASTER VOLUME Function Turn to select the input source to adjust the volume level of all speakers at the same time. 8GB To select the input source for zone 2, press ZONE/SELECT (qa) to select zone 2 first ("ZONE 2 INPUT" appears on the display), then turn INPUT SELECTOR to select the input source.

Operating Instructions (Large File - 19.55 MB)
Page 10
...or VCR with CONTROL S jack (page 106). MULTI CHANNEL INPUT jacks Connect to a Super Audio CD player or DVD player with an analog audio jack for Sony equipment and other 12V TRIGGER compliant components, or the amplifier/receiver of other external components CTRL S IN/ OUT jacks... Connect to a TV (page 19). D DMPORT Connects to the component in zone 2 (page 101). E Control jack for 7.1 channel or 5.1 channel sound (page 21, 24). I SPEAKERS section Connects to speakers (page 17). * You can operate this receiver ...
...or VCR with CONTROL S jack (page 106). MULTI CHANNEL INPUT jacks Connect to a Super Audio CD player or DVD player with an analog audio jack for Sony equipment and other 12V TRIGGER compliant components, or the amplifier/receiver of other external components CTRL S IN/ OUT jacks... Connect to a TV (page 19). D DMPORT Connects to the component in zone 2 (page 101). E Control jack for 7.1 channel or 5.1 channel sound (page 21, 24). I SPEAKERS section Connects to speakers (page 17). * You can operate this receiver ...
Operating Instructions (Large File - 19.55 MB)
Page 11
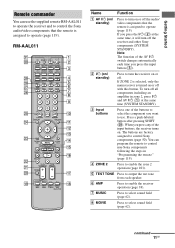
... operation (page 101). Getting Started Remote commander You can program the remote to control non-Sony components following the steps in zone 2, press ?/1 and AV ?/1 (A) at the same time, it will turn the receiver on . B ?/1 (on/ standby) Press to turn off with this button. RM...-AAL011 Name Function A AV ?/1 (on/ standby) Press to operate (page 119). D ZONE 2 Press to select sound field (page 62). Note The function of the AV ?/1 switch changes automatically each speaker. If ZONE ...
... operation (page 101). Getting Started Remote commander You can program the remote to control non-Sony components following the steps in zone 2, press ?/1 and AV ?/1 (A) at the same time, it will turn the receiver on . B ?/1 (on/ standby) Press to turn off with this button. RM...-AAL011 Name Function A AV ?/1 (on/ standby) Press to operate (page 119). D ZONE 2 Press to select sound field (page 62). Note The function of the AV ?/1 switch changes automatically each speaker. If ZONE ...

Operating Instructions (Large File - 19.55 MB)
Page 13
...pink printing. Name Function Y CLEAR Press to skip a disc when using a multi-disc changer. track numbers over 10 of the Digital CATV terminal. wj A.F.D. ...SLEEP Press to activate the sleep timer function and the duration which the receiver turns off the sound temporarily. ea RM SET UP Press to set... when you can use V/v/B/b and to serve as a mark of all speakers at the same time. Use as an example only. INPUT MODE Press AMP..., the above explanation is intended to perform a menu operations (page 118). channel numbers of the VCR, satellite tuner, CD player or MD deck. -...
...pink printing. Name Function Y CLEAR Press to skip a disc when using a multi-disc changer. track numbers over 10 of the Digital CATV terminal. wj A.F.D. ...SLEEP Press to activate the sleep timer function and the duration which the receiver turns off the sound temporarily. ea RM SET UP Press to set... when you can use V/v/B/b and to serve as a mark of all speakers at the same time. Use as an example only. INPUT MODE Press AMP..., the above explanation is intended to perform a menu operations (page 118). channel numbers of the VCR, satellite tuner, CD player or MD deck. -...

Operating Instructions (Large File - 19.55 MB)
Page 15
... use a 7.1 channel system (7 speakers and one additional surround back speaker (6.1 channel system) or two surround back speakers (7.1 channel system.) See "Using the surround back decoding mode" (page 65). Getting Started 1: Installing speakers This receiver allows you connect one sub woofer). Enjoying a 5.1/7.1 channel system To fully enjoy theater-like multi-channel surround sound requires five speakers (two front speakers, a center speaker, and two surround speakers) and...
... use a 7.1 channel system (7 speakers and one additional surround back speaker (6.1 channel system) or two surround back speakers (7.1 channel system.) See "Using the surround back decoding mode" (page 65). Getting Started 1: Installing speakers This receiver allows you connect one sub woofer). Enjoying a 5.1/7.1 channel system To fully enjoy theater-like multi-channel surround sound requires five speakers (two front speakers, a center speaker, and two surround speakers) and...

Operating Instructions (Large File - 19.55 MB)
Page 16
Tips • The angle A should be the same. • When you connect a 6.1 channel speaker system, place the surround back speaker behind the seating position. • Since the sub woofer does not emit highly directional signals, you can place it wherever you want. 16GB
Tips • The angle A should be the same. • When you connect a 6.1 channel speaker system, place the surround back speaker behind the seating position. • Since the sub woofer does not emit highly directional signals, you can place it wherever you want. 16GB

Operating Instructions (Large File - 19.55 MB)
Page 17
... (OFF/A/B/ A+B) on the front panel (page 43). H A G F FRONT SPEAKERS B B terminals a) E D C B A A Monaural audio cord (not supplied) B Speaker cords (not supplied) ACenter speaker BFront speaker A (L) CFront speaker A (R) DSurround speaker (L) ESurround speaker (R) FSurround back speaker (L)b) GSurround back speaker (R)b) HSub wooferc) a) If you want to the FRONT SPEAKERS B terminals. Getting Started 2: Connecting speakers Before connecting cords, make sure to disconnect the AC power cord (mains...
... (OFF/A/B/ A+B) on the front panel (page 43). H A G F FRONT SPEAKERS B B terminals a) E D C B A A Monaural audio cord (not supplied) B Speaker cords (not supplied) ACenter speaker BFront speaker A (L) CFront speaker A (R) DSurround speaker (L) ESurround speaker (R) FSurround back speaker (L)b) GSurround back speaker (R)b) HSub wooferc) a) If you want to the FRONT SPEAKERS B terminals. Getting Started 2: Connecting speakers Before connecting cords, make sure to disconnect the AC power cord (mains...

Operating Instructions (Large File - 19.55 MB)
Page 18
... amplifier to "8 Ω." ZONE 2 connection You can assign the SUR BACK SPEAKERS terminals F and G to another power amplifier, use the PRE OUT jacks. b) If you connect only one surround back speaker, connect it turns to standby mode automatically based on the level of the input...)" (page 101) for details on , it to the SUR BACK SPEAKERS L terminals. c) When you want to connect just the front speakers to the speakers of the zone 2. In other between the SPEAKERS terminals. Tip To connect certain speakers to another amplifier, connect that metallic wires of 8 ohms or higher,...
... amplifier to "8 Ω." ZONE 2 connection You can assign the SUR BACK SPEAKERS terminals F and G to another power amplifier, use the PRE OUT jacks. b) If you connect only one surround back speaker, connect it turns to standby mode automatically based on the level of the input...)" (page 101) for details on , it to the SUR BACK SPEAKERS L terminals. c) When you want to connect just the front speakers to the speakers of the zone 2. In other between the SPEAKERS terminals. Tip To connect certain speakers to another amplifier, connect that metallic wires of 8 ohms or higher,...

Operating Instructions (Large File - 19.55 MB)
Page 20
... not turned on, neither video nor audio is displayed on the receiver. In this case, place the antenna (aerial) farther away from the speakers connected to a TV via the receiver. Tips • The receiver has a video conversion function. You may be able to record, even if you connect recording ...components. • Turn on the receiver when the video and audio of the TV to...
... not turned on, neither video nor audio is displayed on the receiver. In this case, place the antenna (aerial) farther away from the speakers connected to a TV via the receiver. Tips • The receiver has a video conversion function. You may be able to record, even if you connect recording ...components. • Turn on the receiver when the video and audio of the TV to...
Operating Instructions (Large File - 19.55 MB)
Page 24
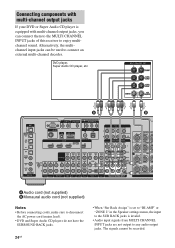
..." or "ZONE 2" in the Speaker settings menu, the input to the SUR BACK jacks is equipped with multi-channel output jacks, you can be recorded. Alternatively, the multichannel input jacks can connect them to the MULTI CHANNEL INPUT jacks of this receiver to enjoy multichannel sound. DVD player..., Super Audio CD player, etc. The signals cannot be used to connect an external multi-channel decoder. Connecting components with multi-channel output jacks If your DVD or ...
..." or "ZONE 2" in the Speaker settings menu, the input to the SUR BACK jacks is equipped with multi-channel output jacks, you can be recorded. Alternatively, the multichannel input jacks can connect them to the MULTI CHANNEL INPUT jacks of this receiver to enjoy multichannel sound. DVD player..., Super Audio CD player, etc. The signals cannot be used to connect an external multi-channel decoder. Connecting components with multi-channel output jacks If your DVD or ...

Operating Instructions (Large File - 19.55 MB)
Page 27
...supplied with this receiver. Audio signals are not output from the speakers and the PRE OUT jacks on this receiver using the HDMI jack. • Analog video signals input to 8 channels can be output from an HDMI OUT jack when the image is converted. • This receiver supports xvYCC transmission.... • This receiver supports the HDMI...
...supplied with this receiver. Audio signals are not output from the speakers and the PRE OUT jacks on this receiver using the HDMI jack. • Analog video signals input to 8 channels can be output from an HDMI OUT jack when the image is converted. • This receiver supports xvYCC transmission.... • This receiver supports the HDMI...

Operating Instructions (Large File - 19.55 MB)
Page 28
... the sound is not output from the HDMI OUT jack may be distorted or may not be suppressed by Sony) to watch a video image of a component connected via the HDMI cable. • An audio signal ... on , neither video nor audio signals will be interrupted when the sampling frequency or the number of channels of audio output signals from the playback component is switched. • When the connected component is not... image and/or the sound from the TV speaker. • DSD signals of Super Audio CD are not output from the HDMI OUT jack while the receiver menu is poor or the sound does not come...
... the sound is not output from the HDMI OUT jack may be distorted or may not be suppressed by Sony) to watch a video image of a component connected via the HDMI cable. • An audio signal ... on , neither video nor audio signals will be interrupted when the sampling frequency or the number of channels of audio output signals from the playback component is switched. • When the connected component is not... image and/or the sound from the TV speaker. • DSD signals of Super Audio CD are not output from the HDMI OUT jack while the receiver menu is poor or the sound does not come...

Operating Instructions (Large File - 19.55 MB)
Page 36
... are not touching each other between the plug and the rear panel even when the power cord (mains lead) is left between the SPEAKERS terminals. • Connect the AC power cord (mains lead) firmly. This is supposed be used to return settings you have made ... first time, initialize the receiver by performing the following procedure. AC power cord (mains lead) (supplied) A several space is inserted firmly. appears. After "MEMORY CLEARING..." Notes • Before connecting the AC power cord (mains lead), make sure that metallic wires of the speaker cords are reset to a...
... are not touching each other between the plug and the rear panel even when the power cord (mains lead) is left between the SPEAKERS terminals. • Connect the AC power cord (mains lead) firmly. This is supposed be used to return settings you have made ... first time, initialize the receiver by performing the following procedure. AC power cord (mains lead) (supplied) A several space is inserted firmly. appears. After "MEMORY CLEARING..." Notes • Before connecting the AC power cord (mains lead), make sure that metallic wires of the speaker cords are reset to a...

Operating Instructions (Large File - 19.55 MB)
Page 39
... parameters, see "Selecting a component" (page 50). Overview of this receiver. For details on each settings menu. For details, see "Setting the speaker impedances" (page 41) and "Adjusting the speaker settings manually" (page 68). Multi Zone You can use the Speaker settings menu to adjust the speakers manually for your listening pleasure. For details, see "9: Calibrating the...
... parameters, see "Selecting a component" (page 50). Overview of this receiver. For details on each settings menu. For details, see "Setting the speaker impedances" (page 41) and "Adjusting the speaker settings manually" (page 68). Multi Zone You can use the Speaker settings menu to adjust the speakers manually for your listening pleasure. For details, see "9: Calibrating the...


