Operating Instructions
Page 3
...up the remote commander 7 Step 3 : Hookups 22 Selecting a language 23 Setting the clock 30 Presetting channels 37 Setting up the VCR Plus+ system (SLV-N60/AX20 only) Basic Operations 41 Playing a tape 44 Recording TV programs 47 Recording TV programs using the Dial Timer (SLV-N60/AX20 only) 52 Recording TV programs... to parts and controls 82 Index Back Cover Quick reference to the provisions of this recorder with cable television transmission may be copyrighted. Caution Television programs, films, video tapes and other materials may be contrary to using the VCR VCR Plus+ and PlusCode...
...up the remote commander 7 Step 3 : Hookups 22 Selecting a language 23 Setting the clock 30 Presetting channels 37 Setting up the VCR Plus+ system (SLV-N60/AX20 only) Basic Operations 41 Playing a tape 44 Recording TV programs 47 Recording TV programs using the Dial Timer (SLV-N60/AX20 only) 52 Recording TV programs... to parts and controls 82 Index Back Cover Quick reference to the provisions of this recorder with cable television transmission may be copyrighted. Caution Television programs, films, video tapes and other materials may be contrary to using the VCR VCR Plus+ and PlusCode...
Operating Instructions
Page 4
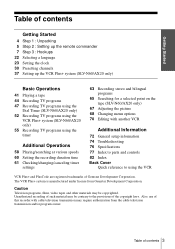
Getting Started Step 1 : Unpacking Check that you have received the following items with the VCR: • Remote commander • 75-ohm coaxial cable with F-type connectors • Size AA (R6) batteries Check your VCR. SLV-N60 is clearly indicated in this manual are for illustration purposes. Check your model number by looking at the rear panel of your model name The instructions in the text, for example, "SLV-N50 only." 4 Unpacking Any difference in operation is the model used for the 4 models: SLV-N60, AX20, N50, and AX10.
Getting Started Step 1 : Unpacking Check that you have received the following items with the VCR: • Remote commander • 75-ohm coaxial cable with F-type connectors • Size AA (R6) batteries Check your VCR. SLV-N60 is clearly indicated in this manual are for illustration purposes. Check your model number by looking at the rear panel of your model name The instructions in the text, for example, "SLV-N50 only." 4 Unpacking Any difference in operation is the model used for the 4 models: SLV-N60, AX20, N50, and AX10.
Operating Instructions
Page 5
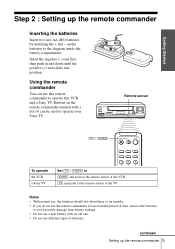
Using the remote commander You can be used to the diagram inside the battery compartment. Remote sensor [TV] / [VIDEO] To operate the VCR a Sony TV 123 Set [TV] / [VIDEO] to [VIDEO] and point at the remote sensor at the VCR [TV] and point at the remote sensor at the TV Notes • With normal use, the batteries should last about...
Using the remote commander You can be used to the diagram inside the battery compartment. Remote sensor [TV] / [VIDEO] To operate the VCR a Sony TV 123 Set [TV] / [VIDEO] to [VIDEO] and point at the remote sensor at the VCR [TV] and point at the remote sensor at the TV Notes • With normal use, the batteries should last about...
Operating Instructions
Page 6
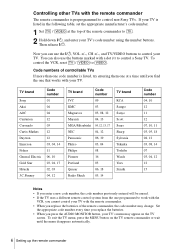
... listed, try entering them one that works with a dot (•) to control a Sony TV. Controlling other TVs with the remote commander. • When you find the one at the top of the remote commander to [TV]. 2 Hold down ?/1, and enter your TV's menu may change. If...cannot control your TV with the remote commander The remote commander is listed in the following table, set the appropriate manufacturer's code number. 1 Set [TV] / [VIDEO] at a time until you replace the batteries of the remote commander, the code number may appear on the TV remote commander or wait until the menu ...
... listed, try entering them one that works with a dot (•) to control a Sony TV. Controlling other TVs with the remote commander. • When you find the one at the top of the remote commander to [TV]. 2 Hold down ?/1, and enter your TV's menu may change. If...cannot control your TV with the remote commander The remote commander is listed in the following table, set the appropriate manufacturer's code number. 1 Set [TV] / [VIDEO] at a time until you replace the batteries of the remote commander, the code number may appear on the TV remote commander or wait until the menu ...
Operating Instructions
Page 46
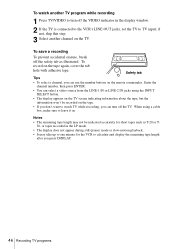
... for the VCR to calculate and display the remaining tape length after you can use the number buttons on the remote commander. Enter the channel number, then press ENTER. • You can select a video source from the LINE-1 IN or LINE-2 IN jacks using a cable box, make sure to leave it on the... display window. 2 If the TV is connected to the VCR's LINE OUT jacks, set the TV to TV input; To watch TV while recording, you can turn off the VIDEO indicator in the LP mode. • The display does not appear during still (pause) mode or slow-motion playback. • It may...
... for the VCR to calculate and display the remaining tape length after you can use the number buttons on the remote commander. Enter the channel number, then press ENTER. • You can select a video source from the LINE-1 IN or LINE-2 IN jacks using a cable box, make sure to leave it on the... display window. 2 If the TV is connected to the VCR's LINE OUT jacks, set the TV to TV input; To watch TV while recording, you can turn off the VIDEO indicator in the LP mode. • The display does not appear during still (pause) mode or slow-motion playback. • It may...
Operating Instructions
Page 49
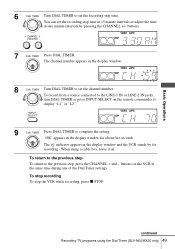
...Dial Timer (SLV-N60/AX20 only) 49 To return to the previous step To return to set the recording stop time. INPUT SELECT VIDEO APC EP 9 DIAL TIMER Press DIAL TIMER to set the recording stop the VCR while recording, press x STOP. buttons on . To stop recording To stop time... CHANNEL TRACKING VIDEO APC EP 7 DIAL TIMER Press DIAL TIMER. You can set the channel number. To record from a source connected to the LINE-1 IN or LINE-2 IN jacks, turn DIAL TIMER or press INPUT SELECT on the remote commander to display "L1" or "L2". continued Recording TV programs using...
...Dial Timer (SLV-N60/AX20 only) 49 To return to the previous step To return to set the recording stop time. INPUT SELECT VIDEO APC EP 9 DIAL TIMER Press DIAL TIMER to set the recording stop the VCR while recording, press x STOP. buttons on . To stop recording To stop time... CHANNEL TRACKING VIDEO APC EP 7 DIAL TIMER Press DIAL TIMER. You can set the channel number. To record from a source connected to the LINE-1 IN or LINE-2 IN jacks, turn DIAL TIMER or press INPUT SELECT on the remote commander to display "L1" or "L2". continued Recording TV programs using...
Operating Instructions
Page 58
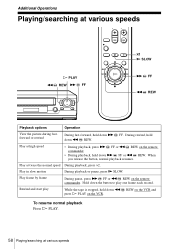
... y SLOW. During rewind, hold down the button to play While the tape is stopped, hold down m REW on the VCR and press H PLAY on the remote commander. • During playback, hold down M FF. Rewind and start play one frame each second. Play at various speeds Hold down m REW. To resume normal playback... picture during fastforward or rewind During fast-forward, hold down M FF or m REW. Play frame by frame During pause, press M FF or m REW on the remote commander.
... y SLOW. During rewind, hold down the button to play While the tape is stopped, hold down m REW on the VCR and press H PLAY on the remote commander. • During playback, hold down M FF. Rewind and start play one frame each second. Play at various speeds Hold down m REW. To resume normal playback... picture during fastforward or rewind During fast-forward, hold down M FF or m REW. Play frame by frame During pause, press M FF or m REW on the remote commander.

Operating Instructions
Page 66
2 Press
2 Press
Operating Instructions
Page 75
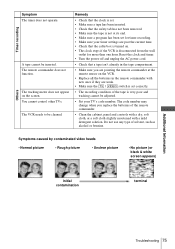
... end. • Make sure a program has been set correctly. • The recording condition of the tape is set for more than one hour. Do not use any type of the remote commander. • Clean the cabinet, panel and controls with a dry, soft cloth, .... Timer recording Others Symptom The timer does not operate. Symptoms caused by contaminated video heads • Normal picture • Rough picture • Unclear picture • No picture (or black & white screen appears) initial contamination terminal Additional Information Troubleshooting 75 The remote commander does not...
... end. • Make sure a program has been set correctly. • The recording condition of the tape is set for more than one hour. Do not use any type of the remote commander. • Clean the cabinet, panel and controls with a dry, soft cloth, .... Timer recording Others Symptom The timer does not operate. Symptoms caused by contaminated video heads • Normal picture • Rough picture • Unclear picture • No picture (or black & white screen appears) initial contamination terminal Additional Information Troubleshooting 75 The remote commander does not...
Operating Instructions
Page 76
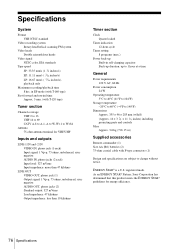
.../s), playback only Maximum recording/playback time 8 hrs. ENERGY STAR® is a U.S. registered mark. As an ENERGY STAR® Partner, Sony Corporation has determined that this product meets the ENERGY STAR® guidelines for VHF/UHF Inputs and outputs LINE-1 IN and -2 IN VIDEO IN, phono jack... (Approx. 14 × 3 78 × 11 1 4 inches) including projecting parts and controls Mass Approx. 3.6 kg (7 lb 15 oz) Supplied accessories Remote commander (1) Size AA (R6) batteries (2) 75-ohm coaxial cable with T-120 tape) Tuner section Channel coverage VHF 2 to 13 UHF 14 to 69 CATV A-8 to ...
.../s), playback only Maximum recording/playback time 8 hrs. ENERGY STAR® is a U.S. registered mark. As an ENERGY STAR® Partner, Sony Corporation has determined that this product meets the ENERGY STAR® guidelines for VHF/UHF Inputs and outputs LINE-1 IN and -2 IN VIDEO IN, phono jack... (Approx. 14 × 3 78 × 11 1 4 inches) including projecting parts and controls Mass Approx. 3.6 kg (7 lb 15 oz) Supplied accessories Remote commander (1) Size AA (R6) batteries (2) 75-ohm coaxial cable with T-120 tape) Tuner section Channel coverage VHF 2 to 13 UHF 14 to 69 CATV A-8 to ...
Operating Instructions
Page 80
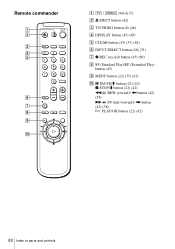
Remote commander 123 456 789 0 A [TV] / [VIDEO] switch (5) B Z EJECT button (42) C TV/VIDEO button (6) (46) D DISPLAY button (45) (65) E CLEAR button (43) (53) (62) F INPUT SELECT button (46) (71) G z REC (record) button (45) (60) H SP (Standard Play)/EP (Extended Play) button (45) I MENU button (22) (55) (61) J X PAUSE/M button (22) (42) x STOP/m button (22) (42) m REW (rewind)/ < button (42) (58) M FF (fast-forward)/ , button (42) (58) H PLAY/OK button (22) (42) 80 Index to parts and controls
Remote commander 123 456 789 0 A [TV] / [VIDEO] switch (5) B Z EJECT button (42) C TV/VIDEO button (6) (46) D DISPLAY button (45) (65) E CLEAR button (43) (53) (62) F INPUT SELECT button (46) (71) G z REC (record) button (45) (60) H SP (Standard Play)/EP (Extended Play) button (45) I MENU button (22) (55) (61) J X PAUSE/M button (22) (42) x STOP/m button (22) (42) m REW (rewind)/ < button (42) (58) M FF (fast-forward)/ , button (42) (58) H PLAY/OK button (22) (42) 80 Index to parts and controls
Operating Instructions
Page 84
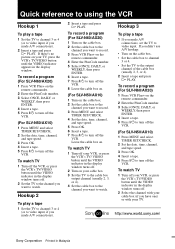
...Sony Corporation Printed in the display window turns off. 2 Select the channel with your cable box (if you want to record. 3 Press VCR Plus+ on the remote commander. 4 Enter the PlusCode number. 5 Select ONCE, DAILY, or WEEKLY, then press ENTER. 6 Insert a tape. 7 Press ?/1 to turn off the VCR. 8 Leave the cable box on. (For SLV-N50...3, or 4). 2 Insert a tape and press H PLAY. To watch TV 1 Turn off the VCR, or press the VCR's TV/VIDEO button until the VIDEO indicator in Malaysia If you made A/V connections). 2 Insert a tape and press H PLAY. Quick reference to using the VCR Hookup 1...
...Sony Corporation Printed in the display window turns off. 2 Select the channel with your cable box (if you want to record. 3 Press VCR Plus+ on the remote commander. 4 Enter the PlusCode number. 5 Select ONCE, DAILY, or WEEKLY, then press ENTER. 6 Insert a tape. 7 Press ?/1 to turn off the VCR. 8 Leave the cable box on. (For SLV-N50...3, or 4). 2 Insert a tape and press H PLAY. To watch TV 1 Turn off the VCR, or press the VCR's TV/VIDEO button until the VIDEO indicator in Malaysia If you made A/V connections). 2 Insert a tape and press H PLAY. Quick reference to using the VCR Hookup 1...


