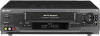
Operating Instructions
Page 2
... three hours before operating it any changes or modifications not expressly approved in this manual could void your Sony dealer regarding this polarized AC plug with an extension cord, receptacle or other for... the purpose of safety and will not occur in a horizontal position only. • Keep the unit and cassettes...below. These limits are located at the rear of the unit. Record these numbers in a place subject to the video head and tape. If you call upon your authority to prevent blade...
... three hours before operating it any changes or modifications not expressly approved in this manual could void your Sony dealer regarding this polarized AC plug with an extension cord, receptacle or other for... the purpose of safety and will not occur in a horizontal position only. • Keep the unit and cassettes...below. These limits are located at the rear of the unit. Record these numbers in a place subject to the video head and tape. If you call upon your authority to prevent blade...
Operating Instructions
Page 4
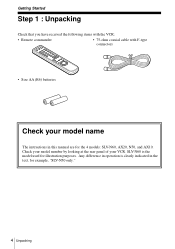
Any difference in operation is the model used for example, "SLV-N50 only." 4 Unpacking SLV-N60 is clearly indicated in this manual are for the 4 models: SLV-N60, AX20, N50, and AX10. Check your model number by looking at the rear panel of your model name The instructions in the text, for illustration purposes. Getting Started Step 1 : Unpacking Check that you have received the following items with the VCR: • Remote commander • 75-ohm coaxial cable with F-type connectors • Size AA (R6) batteries Check your VCR.
Any difference in operation is the model used for example, "SLV-N50 only." 4 Unpacking SLV-N60 is clearly indicated in this manual are for the 4 models: SLV-N60, AX20, N50, and AX10. Check your model number by looking at the rear panel of your model name The instructions in the text, for illustration purposes. Getting Started Step 1 : Unpacking Check that you have received the following items with the VCR: • Remote commander • 75-ohm coaxial cable with F-type connectors • Size AA (R6) batteries Check your VCR.
Operating Instructions
Page 11
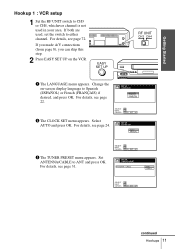
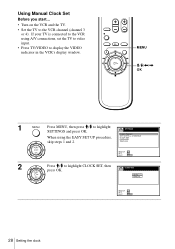
... appears. Select AUTO and press OK. For details, see page 24. SET UP TUNER PRESET For details, see page 22. SET UP CLOCK SET AUTO MANUAL SELECT : NEXT : OK CANCEL : EASY SET UP 3 The TUNER PRESET menu appears. Set ANTENNA/CABLE to Spanish (ESPAÑOL) or French (FRANÇAIS...
... appears. Select AUTO and press OK. For details, see page 24. SET UP TUNER PRESET For details, see page 22. SET UP CLOCK SET AUTO MANUAL SELECT : NEXT : OK CANCEL : EASY SET UP 3 The TUNER PRESET menu appears. Set ANTENNA/CABLE to Spanish (ESPAÑOL) or French (FRANÇAIS...
Operating Instructions
Page 12
For details, see page 28. If you want to use the timer to page 37 (SLV-N60/AX20 only). "ACS" (Auto Clock Set) will flash in the display window whenever the VCR is turned off the VCR, it automatically sets the ... is not set up the VCR, it checks the time and adjusts the clock, even for recording, go to record right away, or if the channels in your area do not carry time signals, set the clock manually. 4 The AUTO PRESET starts. During this time, the VCR will flash in the display window...
For details, see page 28. If you want to use the timer to page 37 (SLV-N60/AX20 only). "ACS" (Auto Clock Set) will flash in the display window whenever the VCR is turned off the VCR, it automatically sets the ... is not set up the VCR, it checks the time and adjusts the clock, even for recording, go to record right away, or if the channels in your area do not carry time signals, set the clock manually. 4 The AUTO PRESET starts. During this time, the VCR will flash in the display window...
Operating Instructions
Page 14
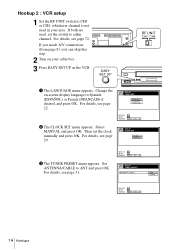
.... ANTENNA / CABLE ANT CABLE SELECT : NEXT : OK CANCEL : EASY SET UP 14 Hookups Then set the switch to either channel. SET UP CLOCK SET AUTO MANUAL SELECT : NEXT : OK CANCEL : EASY SET UP 3 The TUNER PRESET menu appears. If you made A/V connections (from page 8), you can skip this step. 2 Turn on... your area. Hookup 2 : VCR setup 1 Set the RF UNIT switch to CH3 or CH4, whichever channel is not used , set the clock manually and press OK. For details, see page 29. If both are used in your cable box. 3 Press EASY SET UP on -screen display language to...
.... ANTENNA / CABLE ANT CABLE SELECT : NEXT : OK CANCEL : EASY SET UP 14 Hookups Then set the switch to either channel. SET UP CLOCK SET AUTO MANUAL SELECT : NEXT : OK CANCEL : EASY SET UP 3 The TUNER PRESET menu appears. If you made A/V connections (from page 8), you can skip this step. 2 Turn on... your area. Hookup 2 : VCR setup 1 Set the RF UNIT switch to CH3 or CH4, whichever channel is not used , set the clock manually and press OK. For details, see page 29. If both are used in your cable box. 3 Press EASY SET UP on -screen display language to...
Operating Instructions
Page 15
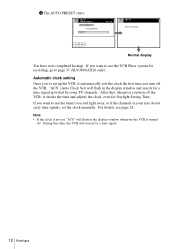
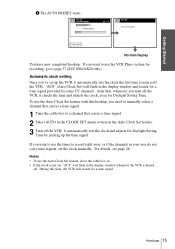
..., see page 28. To use the Auto Clock Set feature with this time, the VCR will flash in the display window and search for recording, go to record right away, or if the channels in the display window whenever the VCR is turned off the VCR. Notes • To use the VCR... provided by picking up the time signal. If you 've set the clock manually. It automatically sets the clock and adjusts for Daylight Saving Time. Automatic clock setting Once you want to use the timer to page 37 (SLV-N60/AX20 only). Hookups 15 SET UP TUNER PRESET AUTO PRESET PROCESSING CH...
..., see page 28. To use the Auto Clock Set feature with this time, the VCR will flash in the display window and search for recording, go to record right away, or if the channels in the display window whenever the VCR is turned off the VCR. Notes • To use the VCR... provided by picking up the time signal. If you 've set the clock manually. It automatically sets the clock and adjusts for Daylight Saving Time. Automatic clock setting Once you want to use the timer to page 37 (SLV-N60/AX20 only). Hookups 15 SET UP TUNER PRESET AUTO PRESET PROCESSING CH...
Operating Instructions
Page 17
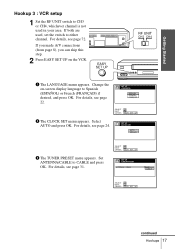
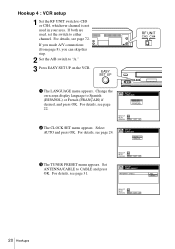
EASY SET UP RF UNIT CH3 CH4 1 The LANGUAGE menu appears. Change the on the VCR. SET UP CLOCK SET AUTO MANUAL 3 The TUNER PRESET menu appears. SELECT : NEXT : OK CANCEL : EASY SET UP SET UP TUNER PRESET ANTENNA / CABLE ANT CABLE SELECT : NEXT : OK CANCEL : EASY ...
EASY SET UP RF UNIT CH3 CH4 1 The LANGUAGE menu appears. Change the on the VCR. SET UP CLOCK SET AUTO MANUAL 3 The TUNER PRESET menu appears. SELECT : NEXT : OK CANCEL : EASY SET UP SET UP TUNER PRESET ANTENNA / CABLE ANT CABLE SELECT : NEXT : OK CANCEL : EASY ...

Operating Instructions
Page 18
... VCR, it automatically sets the clock the first time you want to use the timer to page 37 (SLV-N60/AX20 only). If you turn off . During this time, the VCR will search for Daylight Saving ...PRESET starts. If you 've set , "ACS" will flash in the display window and search for recording, go to record right away, or if the channels in the display window whenever the VCR is turned off the VCR... "ACS" (Auto Clock Set) will flash in your area do not carry time signals, set the clock manually. SET UP TUNER PRESET AUTO PRESET PROCESSING CH 2 4 SET UP SET UP IS DONE PLEASE WAIT Normal ...
... VCR, it automatically sets the clock the first time you want to use the timer to page 37 (SLV-N60/AX20 only). If you turn off . During this time, the VCR will search for Daylight Saving ...PRESET starts. If you 've set , "ACS" will flash in the display window and search for recording, go to record right away, or if the channels in the display window whenever the VCR is turned off the VCR... "ACS" (Auto Clock Set) will flash in your area do not carry time signals, set the clock manually. SET UP TUNER PRESET AUTO PRESET PROCESSING CH 2 4 SET UP SET UP IS DONE PLEASE WAIT Normal ...
Operating Instructions
Page 20
... not used , set the switch to CABLE and press OK. For details, see page 31. Select AUTO and press OK. SET UP CLOCK SET AUTO MANUAL 3 The TUNER PRESET menu appears.
... not used , set the switch to CABLE and press OK. For details, see page 31. Select AUTO and press OK. SET UP CLOCK SET AUTO MANUAL 3 The TUNER PRESET menu appears.
Operating Instructions
Page 21
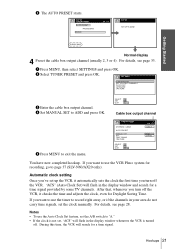
... and press OK. SETTINGS TUNER PRESET SET VCR Plus+ CHANNELS CLOCK SET LANGUAGE RETURN 3 Enter the cable box output channel. 4 Set MANUAL SET to exit the menu. If you want to record right away, or if the channels in your area do not carry time signals, set the A/B switch to page 37... (SLV-N60/AX20 only). If you want to use the timer to use the Auto Clock Set feature, set the clock manually. Automatic clock setting Once you...
... and press OK. SETTINGS TUNER PRESET SET VCR Plus+ CHANNELS CLOCK SET LANGUAGE RETURN 3 Enter the cable box output channel. 4 Set MANUAL SET to exit the menu. If you want to record right away, or if the channels in your area do not carry time signals, set the A/B switch to page 37... (SLV-N60/AX20 only). If you want to use the timer to use the Auto Clock Set feature, set the clock manually. Automatic clock setting Once you...
Operating Instructions
Page 23
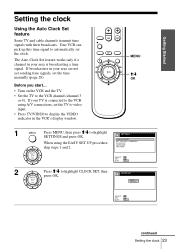
... pick up this time signal to highlight SETTINGS and press OK. SETTINGS When using A/V connections, set the TV to video input. • Press TV/VIDEO to display the VIDEO indicator in the VCR's display window. If broadcasters in your area is connected to the VCR using the EASY SET UP... procedure, skip steps 1 and 2. MENU M/m OK 1 MENU Press MENU, then press M/m to automatically set the time manually (page 28). The Auto...
... pick up this time signal to highlight SETTINGS and press OK. SETTINGS When using A/V connections, set the TV to video input. • Press TV/VIDEO to display the VIDEO indicator in the VCR's display window. If broadcasters in your area is connected to the VCR using the EASY SET UP... procedure, skip steps 1 and 2. MENU M/m OK 1 MENU Press MENU, then press M/m to automatically set the time manually (page 28). The Auto...
Operating Instructions
Page 25
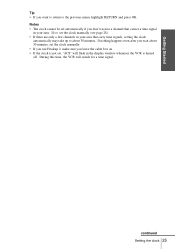
Getting Started Tip • If you want to return to about 30 minutes, set the clock manually. • If you use Hookup 2, make sure you leave the cable box on. • If the clock is not set, "ACS" will search for a time ... menu, highlight RETURN and press OK. If so, set automatically if you wait about 30 minutes. Notes • The clock cannot be set the clock manually (see page 28). • If there are only a few channels in your area that carries a time signal in the display window whenever the VCR is...
Getting Started Tip • If you want to return to about 30 minutes, set the clock manually. • If you use Hookup 2, make sure you leave the cable box on. • If the clock is not set, "ACS" will search for a time ... menu, highlight RETURN and press OK. If so, set automatically if you wait about 30 minutes. Notes • The clock cannot be set the clock manually (see page 28). • If there are only a few channels in your area that carries a time signal in the display window whenever the VCR is...
Operating Instructions
Page 28
Using Manual Clock Set Before you start... • Turn on the VCR and the TV. • Set the TV to display the VIDEO indicator in the VCR's display window. If your TV is connected to the VCR using A/V connections, set the TV to video input. • Press TV/VIDEO to the VCR channel (channel 3 or 4). MENU M/m/
Using Manual Clock Set Before you start... • Turn on the VCR and the TV. • Set the TV to display the VIDEO indicator in the VCR's display window. If your TV is connected to the VCR using A/V connections, set the TV to video input. • Press TV/VIDEO to the VCR channel (channel 3 or 4). MENU M/m/
Operating Instructions
Page 29
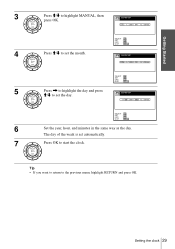
... : SET : END : OK QUIT : MENU CLOCK SET 9 / 1 / 2 0 0 0 FRI 1 2 : 0 0 AM SELECT : SET : END : OK QUIT : MENU 5 Press , to highlight the day and press PLAY M/m to highlight MANUAL, then press OK. OK CLOCK SET 9 / 2 8 / 2 0 0 0 THU 1 2 : 0 0 AM SELECT : SET : END : OK QUIT : MENU 6 Set the year, hour, and minutes in the same way as...
... : SET : END : OK QUIT : MENU CLOCK SET 9 / 1 / 2 0 0 0 FRI 1 2 : 0 0 AM SELECT : SET : END : OK QUIT : MENU 5 Press , to highlight the day and press PLAY M/m to highlight MANUAL, then press OK. OK CLOCK SET 9 / 2 8 / 2 0 0 0 THU 1 2 : 0 0 AM SELECT : SET : END : OK QUIT : MENU 6 Set the year, hour, and minutes in the same way as...
Operating Instructions
Page 30
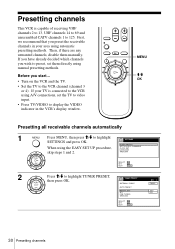
... VHF channels 2 to 13, UHF channels 14 to 69 and unscrambled CATV channels 1 to display the VIDEO indicator in your area using automatic presetting methods. PLAY ANTENNA / CABLE OK AUTO PRESET MANUAL SET AFT FINE TUNING RETURN SELECT : SET : OK QUIT : MENU CH 1 CABLE ADD ON 30... Presetting channels MENU M/m OK Presetting all receivable channels automatically 1 MENU Press MENU, then press M/m to preset, set the TV to video input. • Press TV/VIDEO to 125. Then,...
... VHF channels 2 to 13, UHF channels 14 to 69 and unscrambled CATV channels 1 to display the VIDEO indicator in your area using automatic presetting methods. PLAY ANTENNA / CABLE OK AUTO PRESET MANUAL SET AFT FINE TUNING RETURN SELECT : SET : OK QUIT : MENU CH 1 CABLE ADD ON 30... Presetting channels MENU M/m OK Presetting all receivable channels automatically 1 MENU Press MENU, then press M/m to preset, set the TV to video input. • Press TV/VIDEO to 125. Then,...
Operating Instructions
Page 31
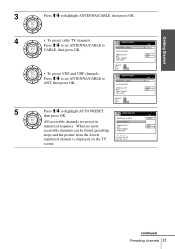
... TUNING RETURN CH 2 ANT ADD ON SELECT : SET : OK QUIT : MENU 5 Press M/m to highlight ANTENNA/CABLE, then press OK. OK AUTO PRESET MANUAL SET AFT FINE TUNING RETURN ADD ON PLAY • To preset VHF and UHF channels: OK Press M/m to set ANTENNA/CABLE to ANT, then press ...OK. continued Presetting channels 31 When no more MANUAL SET AFT ADD ON receivable channels can be found, presetting FINE TUNING RETURN stops and the picture from the lowest numbered channel is displayed on...
... TUNING RETURN CH 2 ANT ADD ON SELECT : SET : OK QUIT : MENU 5 Press M/m to highlight ANTENNA/CABLE, then press OK. OK AUTO PRESET MANUAL SET AFT FINE TUNING RETURN ADD ON PLAY • To preset VHF and UHF channels: OK Press M/m to set ANTENNA/CABLE to ANT, then press ...OK. continued Presetting channels 31 When no more MANUAL SET AFT ADD ON receivable channels can be found, presetting FINE TUNING RETURN stops and the picture from the lowest numbered channel is displayed on...

Operating Instructions
Page 33
MENU M/m OK 1 MENU Press MENU, then press M/m to highlight SETTINGS and press OK. SETTINGS TUNER PRESET SET VCR Plus+ CHANNELS CLOCK SET LANGUAGE RETURN PLAY OK SELECT : SET : OK QUIT : MENU continued Presetting channels 33 Presetting/disabling channels manually Getting Started 123 456 789 0 Number buttons, ENTER CH +/-
MENU M/m OK 1 MENU Press MENU, then press M/m to highlight SETTINGS and press OK. SETTINGS TUNER PRESET SET VCR Plus+ CHANNELS CLOCK SET LANGUAGE RETURN PLAY OK SELECT : SET : OK QUIT : MENU continued Presetting channels 33 Presetting/disabling channels manually Getting Started 123 456 789 0 Number buttons, ENTER CH +/-
Operating Instructions
Page 34
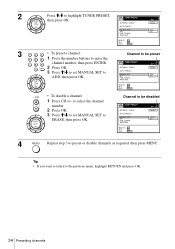
...1 2 3 • To preset a channel: 4 5 6 1 Press the number buttons to enter the 789 channel number, then press ENTER. 2 Press OK. 0 3 Press M/m to set MANUAL SET to ERASE, then press OK. PLAY OK • CH • To disable a channel: 1 Press CH +/- to select the channel number. 2 Press OK. 3 Press M/m to... FINE TUNING RETURN SELECT : SET : OK QUIT : MENU CH 5 CABLE ADD ON Channel to be disabled TUNER PRESET ANTENNA / CABLE AUTO PRESET MANUAL SET AFT FINE TUNING RETURN SELECT : SET : OK QUIT : MENU CH 5 CABLE ERASE ON 4 MENU Repeat step 3 to the previous menu,...
...1 2 3 • To preset a channel: 4 5 6 1 Press the number buttons to enter the 789 channel number, then press ENTER. 2 Press OK. 0 3 Press M/m to set MANUAL SET to ERASE, then press OK. PLAY OK • CH • To disable a channel: 1 Press CH +/- to select the channel number. 2 Press OK. 3 Press M/m to... FINE TUNING RETURN SELECT : SET : OK QUIT : MENU CH 5 CABLE ADD ON Channel to be disabled TUNER PRESET ANTENNA / CABLE AUTO PRESET MANUAL SET AFT FINE TUNING RETURN SELECT : SET : OK QUIT : MENU CH 5 CABLE ERASE ON 4 MENU Repeat step 3 to the previous menu,...

Operating Instructions
Page 35
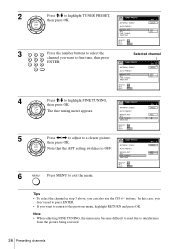
If, however, the picture of a channel is not clear Normally, the Auto Fine Tuning (AFT) function automatically tunes in channels clearly. Getting Started If the picture is not clear, you can also use the manual tuning function. 123 456 789 0 Number buttons, ENTER MENU M/m/
If, however, the picture of a channel is not clear Normally, the Auto Fine Tuning (AFT) function automatically tunes in channels clearly. Getting Started If the picture is not clear, you can also use the manual tuning function. 123 456 789 0 Number buttons, ENTER MENU M/m/
Operating Instructions
Page 36
... the number buttons to select the channel you want to fine-tune, then press 456 ENTER. 789 0 TUNER PRESET ANTENNA / CABLE AUTO PRESET MANUAL SET AFT FINE TUNING RETURN SELECT : SET : OK QUIT : MENU CH 1 CABLE ADD ON Selected channel TUNER PRESET ANTENNA / CABLE AUTO PRESET... MANUAL SET AFT FINE TUNING RETURN SELECT : SET : OK QUIT : MENU CH 5 CABLE ADD ON 4 Press M/m to highlight TUNER PRESET, then press OK. TUNER PRESET ANTENNA / CABLE AUTO PRESET MANUAL SET AFT FINE TUNING RETURN SELECT : SET : OK QUIT...
... the number buttons to select the channel you want to fine-tune, then press 456 ENTER. 789 0 TUNER PRESET ANTENNA / CABLE AUTO PRESET MANUAL SET AFT FINE TUNING RETURN SELECT : SET : OK QUIT : MENU CH 1 CABLE ADD ON Selected channel TUNER PRESET ANTENNA / CABLE AUTO PRESET... MANUAL SET AFT FINE TUNING RETURN SELECT : SET : OK QUIT : MENU CH 5 CABLE ADD ON 4 Press M/m to highlight TUNER PRESET, then press OK. TUNER PRESET ANTENNA / CABLE AUTO PRESET MANUAL SET AFT FINE TUNING RETURN SELECT : SET : OK QUIT...