Hookup and Setup Instructions
Page 3
Table of contents 4 Step 1: Unpacking 5 Step 2: Setting up the remote commander 8 Step 3: Hookups 9 Audio/video (A/V) hookup 11 Hookup 1: Using cable box control 15 Hookup 2: No cable box, or incompatible cable box with only a few scrambled channels 19 Hookup 3: Antenna hookup ...
Table of contents 4 Step 1: Unpacking 5 Step 2: Setting up the remote commander 8 Step 3: Hookups 9 Audio/video (A/V) hookup 11 Hookup 1: Using cable box control 15 Hookup 2: No cable box, or incompatible cable box with only a few scrambled channels 19 Hookup 3: Antenna hookup ...

Hookup and Setup Instructions
Page 4
Step 1 Unpacking Check that you have received the following items with the VCR: • Remote commander • Cable Mouse (cable box controller) • Size AA (R6) batteries • 75-ohm coaxial cable with F-type connectors • Audio/video cable (3-phono, 1-mini to 3-phono, 1-mini) • SmartFile labels • Monaural cable (1-mini to 1-mini) 4
Step 1 Unpacking Check that you have received the following items with the VCR: • Remote commander • Cable Mouse (cable box controller) • Size AA (R6) batteries • 75-ohm coaxial cable with F-type connectors • Audio/video cable (3-phono, 1-mini to 3-phono, 1-mini) • SmartFile labels • Monaural cable (1-mini to 1-mini) 4

Hookup and Setup Instructions
Page 5
...positive (+) end clicks into position. MUTING To operate the VCR a Sony TV Set TV / VIDEO to VIDEO and point at the remote sensor on the VCR TV and point at the remote sensor on the batteries to operate your Sony AV receiver. The RECEIVER VOL +/- on the TV continued 5 Buttons... battery compartment. Step 2 Setting up the remote commander Inserting the batteries Insert two size AA (R6) batteries by matching the + and - TV / VIDEO RECEIVER VOL +/- Using the remote commander Remote sensor You can be used to operate this VCR and a Sony TV or AV receiver. and MUTING buttons ...
...positive (+) end clicks into position. MUTING To operate the VCR a Sony TV Set TV / VIDEO to VIDEO and point at the remote sensor on the VCR TV and point at the remote sensor on the batteries to operate your Sony AV receiver. The RECEIVER VOL +/- on the TV continued 5 Buttons... battery compartment. Step 2 Setting up the remote commander Inserting the batteries Insert two size AA (R6) batteries by matching the + and - TV / VIDEO RECEIVER VOL +/- Using the remote commander Remote sensor You can be used to operate this VCR and a Sony TV or AV receiver. and MUTING buttons ...
Hookup and Setup Instructions
Page 6
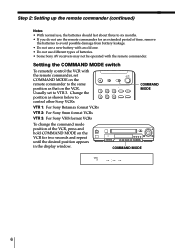
... VIDEO LP SP EP APC EDIT BLANK AV INSERT VTR 123 6 Usually set COMMAND MODE on the remote commander to the same position as shown below to control other Sony VCRs: 123 456 COMMAND MODE VTR 1: For Sony Betamax format VCRs VTR 2: For Sony 8mm format VCRs VTR 3: For Sony VHS...change the command mode position of batteries. • Some Sony AV receivers may not be operated with the remote commander, set to VTR 3. Setting the COMMAND MODE switch To remotely control the VCR with the remote commander. Step 2: Setting up the remote commander (continued) Notes • With normal use, ...
... VIDEO LP SP EP APC EDIT BLANK AV INSERT VTR 123 6 Usually set COMMAND MODE on the remote commander to the same position as shown below to control other Sony VCRs: 123 456 COMMAND MODE VTR 1: For Sony Betamax format VCRs VTR 2: For Sony 8mm format VCRs VTR 3: For Sony VHS...change the command mode position of batteries. • Some Sony AV receivers may not be operated with the remote commander, set to VTR 3. Setting the COMMAND MODE switch To remotely control the VCR with the remote commander. Step 2: Setting up the remote commander (continued) Notes • With normal use, ...
Hookup and Setup Instructions
Page 7
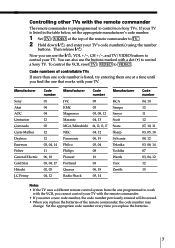
... can use the buttons marked with a dot (•) to control a Sony TV. To control the VCR, reset TV / VIDEO to control non-Sony TVs. Set the appropriate code number every time you replace the batteries of the remote commander to control your TV's code number(s) using the number buttons. Now... you find the one that works with your TV with the remote commander. • ...
... can use the buttons marked with a dot (•) to control a Sony TV. To control the VCR, reset TV / VIDEO to control non-Sony TVs. Set the appropriate code number every time you replace the batteries of the remote commander to control your TV's code number(s) using the number buttons. Now... you find the one that works with your TV with the remote commander. • ...

Hookup and Setup Instructions
Page 39
3 • CURSOR PUSH OK 123 456 789 0 4 • CURSOR Move the cursor stick M/m to select the item you want to set, then move the cursor stick
3 • CURSOR PUSH OK 123 456 789 0 4 • CURSOR Move the cursor stick M/m to select the item you want to set, then move the cursor stick
Hookup and Setup Instructions
Page 42
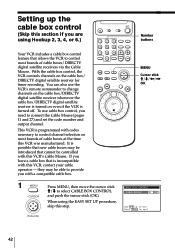
... is incompatible with this VCR, contact your cable operator -- This VCR is turned on the cable box/ DIRECTV digital satellite receiver for timer recording. To use the VCR's remote commander to change channels on the cable box/DIRECTV digital satellite receiver whenever the cable box/DIRECTV digital satellite receiver is programmed with...
... is incompatible with this VCR, contact your cable operator -- This VCR is turned on the cable box/ DIRECTV digital satellite receiver for timer recording. To use the VCR's remote commander to change channels on the cable box/DIRECTV digital satellite receiver whenever the cable box/DIRECTV digital satellite receiver is programmed with...
Hookup and Setup Instructions
Page 45
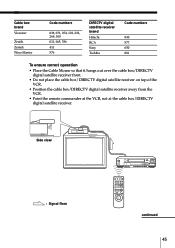
... Zenith Zentek Wave Master Code numbers 038, 071, 074, 122, 222, 269, 300 011, 065, 536 411 576 DIRECTV digital satellite receiver brand Hitachi RCA Sony Toshiba Code numbers 830 577 650 801 To ensure correct operation • Place the Cable Mouse so that it hangs out over the cable box.../DIRECTV digital satellite receiver on top of the VCR. • Position the cable box/DIRECTV digital satellite receiver away from the VCR. • Point the remote commander at the VCR, not at the cable box/DIRECTV digital satellite receiver.
... Zenith Zentek Wave Master Code numbers 038, 071, 074, 122, 222, 269, 300 011, 065, 536 411 576 DIRECTV digital satellite receiver brand Hitachi RCA Sony Toshiba Code numbers 830 577 650 801 To ensure correct operation • Place the Cable Mouse so that it hangs out over the cable box.../DIRECTV digital satellite receiver on top of the VCR. • Position the cable box/DIRECTV digital satellite receiver away from the VCR. • Point the remote commander at the VCR, not at the cable box/DIRECTV digital satellite receiver.
Hookup and Setup Instructions
Page 46
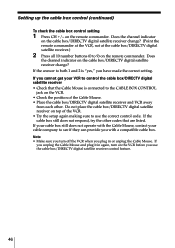
...satellite receiver change ? If you unplug the Cable Mouse and plug it in or unplug the Cable Mouse. on the remote commander. If you cannot get your cable company to 9) on the remote commander. Setting up the cable box control (continued) To check the cable box control setting 1 Press CH +/- ... before you have made the correct setting. Note • Make sure you turn on the cable box/DIRECTV digital satellite receiver change ? (Point the remote commander at the VCR, not at the cable box/DIRECTV digital satellite receiver.) 2 Press all 10 number buttons (0 to see if they can provide ...
...satellite receiver change ? If you unplug the Cable Mouse and plug it in or unplug the Cable Mouse. on the remote commander. If you cannot get your cable company to 9) on the remote commander. Setting up the cable box control (continued) To check the cable box control setting 1 Press CH +/- ... before you have made the correct setting. Note • Make sure you turn on the cable box/DIRECTV digital satellite receiver change ? (Point the remote commander at the VCR, not at the cable box/DIRECTV digital satellite receiver.) 2 Press all 10 number buttons (0 to see if they can provide ...

Hookup and Setup Instructions
Page 60
... 20, 24, 28, 31) wd COMMAND MODE button (6) wf SMARTFILE GENERATOR button wg INPUT SELECT button (36) wh LINE-2 IN VIDEO/AUDIO L/R jacks wj LASER LINK IR receiver 60 Index to parts and controls Refer to the pages indicated in parentheses ( ) for details.... buttons (58) w; Front panel 1 `/1 POWER switch/indicator (58) 2 Remote sensor (5) 3 SmartFile sensor 4 SMARTFILE indicator 5 REALITY REGENERATOR indicator 6 Tape compartment 7 SMARTFILE button 8 CURSOR m/M buttons 9 A EJECT button 0 m REW (rewind) ...
... 20, 24, 28, 31) wd COMMAND MODE button (6) wf SMARTFILE GENERATOR button wg INPUT SELECT button (36) wh LINE-2 IN VIDEO/AUDIO L/R jacks wj LASER LINK IR receiver 60 Index to parts and controls Refer to the pages indicated in parentheses ( ) for details.... buttons (58) w; Front panel 1 `/1 POWER switch/indicator (58) 2 Remote sensor (5) 3 SmartFile sensor 4 SMARTFILE indicator 5 REALITY REGENERATOR indicator 6 Tape compartment 7 SMARTFILE button 8 CURSOR m/M buttons 9 A EJECT button 0 m REW (rewind) ...

Hookup and Setup Instructions
Page 63
Remote commander 123 456 789 0 1 Z EJECT button 2 Number buttons (43) 3 VCR Plus+ button 4 ENTER button (50) 5 SMARTFILE button 6 z REC (record) button 7 ./> INDEX SEARCH buttons 8 m REW (rewind) button 9 M FF (fast-forward) button 0 H PLAY button qa x STOP button qs Shuttle ring continued 63
Remote commander 123 456 789 0 1 Z EJECT button 2 Number buttons (43) 3 VCR Plus+ button 4 ENTER button (50) 5 SMARTFILE button 6 z REC (record) button 7 ./> INDEX SEARCH buttons 8 m REW (rewind) button 9 M FF (fast-forward) button 0 H PLAY button qa x STOP button qs Shuttle ring continued 63


