Instructions Manual
Page 2
... used in the U.S.A Owner's Record The model and serial numbers are not going to use of optical instruments with the instructions, may be determined by turning the equipment off . • Install this system so that may cause harmful interference to the video ...recorder is connected to the wall outlet, even if the recorder itself ; The AC power cord must be changed only at the rear of the unit. RDR-VX555 Serial No CAUTION You are designed to disconnect the recorder from a cold to qualified personnel only. Connect the equipment into the cabinet, unplug the recorder...
... used in the U.S.A Owner's Record The model and serial numbers are not going to use of optical instruments with the instructions, may be determined by turning the equipment off . • Install this system so that may cause harmful interference to the video ...recorder is connected to the wall outlet, even if the recorder itself ; The AC power cord must be changed only at the rear of the unit. RDR-VX555 Serial No CAUTION You are designed to disconnect the recorder from a cold to qualified personnel only. Connect the equipment into the cabinet, unplug the recorder...

Instructions Manual
Page 6
...-Screen Menus 10 Hookups and Settings 12 Hooking Up the Recorder 12 Step 1: Unpacking 12 Step 2: Connecting the Cable Box/Satellite Receiver (Tuner 12 Step 3: Connecting to Your TV 15 Step 4: Connecting to Your AV Amplifier (Receiver 18 Step 5: Connecting the Power Cord 20 Step 6: Preparing the Remote 20 Step 7: Easy Setup 23 Connecting Another VCR or Similar Device 27 Quick Guide to Disc Types 30 Recordable and Playable Discs 30 Playable Discs 33 DVD Operation DVD Playback 35 Playing Discs 35 Playback...
...-Screen Menus 10 Hookups and Settings 12 Hooking Up the Recorder 12 Step 1: Unpacking 12 Step 2: Connecting the Cable Box/Satellite Receiver (Tuner 12 Step 3: Connecting to Your TV 15 Step 4: Connecting to Your AV Amplifier (Receiver 18 Step 5: Connecting the Power Cord 20 Step 6: Preparing the Remote 20 Step 7: Easy Setup 23 Connecting Another VCR or Similar Device 27 Quick Guide to Disc Types 30 Recordable and Playable Discs 30 Playable Discs 33 DVD Operation DVD Playback 35 Playing Discs 35 Playback...
Instructions Manual
Page 19
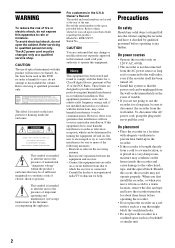
... or HDMI OUT jack output DVD audio signals only. Connect the recorder to audio L/R jacks This connection uses a stereo amplifier's (receiver's) two front speakers for sound. Hookups and Settings A Connecting to the TV with a video cord other than HDMI cord (component video cord, S VIDEO cord, or audio/video cord). 19 Connect the AV amplifier (receiver) to a digital audio input jack Use this recorder. • When outputting from Dolby Laboratories. You can enjoy the surround function that the speakers are trademarks of the following: - You cannot hear VHS sound by...
... or HDMI OUT jack output DVD audio signals only. Connect the recorder to audio L/R jacks This connection uses a stereo amplifier's (receiver's) two front speakers for sound. Hookups and Settings A Connecting to the TV with a video cord other than HDMI cord (component video cord, S VIDEO cord, or audio/video cord). 19 Connect the AV amplifier (receiver) to a digital audio input jack Use this recorder. • When outputting from Dolby Laboratories. You can enjoy the surround function that the speakers are trademarks of the following: - You cannot hear VHS sound by...

Instructions Manual
Page 20
... recorder (page 22). • Use the batteries correctly to avoid possible leakage and corrosion. Step 5: Connecting the Power Cord Step 6: Preparing the Remote Plug the recorder and TV power cords into the remote casing, particularly when replacing the batteries. 20 to AC outlet < AUDIO OUT COMPONENT VIDEO OUT L Y R PB SETTOP HDMI OUT BOX CONTROL PR OPTICAL COAXIAL DIGITAL AUDIO OUT Notes • If the supplied remote interferes your other Sony DVD recorder or player, change the command mode number...
... recorder (page 22). • Use the batteries correctly to avoid possible leakage and corrosion. Step 5: Connecting the Power Cord Step 6: Preparing the Remote Plug the recorder and TV power cords into the remote casing, particularly when replacing the batteries. 20 to AC outlet < AUDIO OUT COMPONENT VIDEO OUT L Y R PB SETTOP HDMI OUT BOX CONTROL PR OPTICAL COAXIAL DIGITAL AUDIO OUT Notes • If the supplied remote interferes your other Sony DVD recorder or player, change the command mode number...
Instructions Manual
Page 22
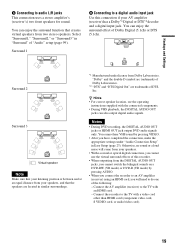
..., 15 If you have completed "Step 7: Easy Setup." SYSTEM MENU 123 456 789 0 O RETURN M/m/ The default command mode setting for this recorder and the supplied remote to one that differs from the other Sony DVD recorder or player, after you have a Sony DVD player or more than one Sony DVD recorder If the supplied remote interferes with your other Sony DVD recorder or player, set the command mode number for this recorder and the supplied remote is DVD 3.
..., 15 If you have completed "Step 7: Easy Setup." SYSTEM MENU 123 456 789 0 O RETURN M/m/ The default command mode setting for this recorder and the supplied remote to one that differs from the other Sony DVD recorder or player, after you have a Sony DVD player or more than one Sony DVD recorder If the supplied remote interferes with your other Sony DVD recorder or player, set the command mode number for this recorder and the supplied remote is DVD 3.
Instructions Manual
Page 24
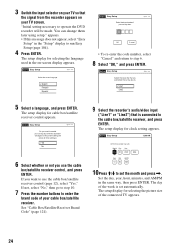
... the cable box/satellite receiver, and press ENTER. The setup display for clock setting appears. 3 Switch the input selector on your TV so that the signal from the recorder appears on -screen display appears. You can change them later using setup." appears. • If this recorder? (Changes to step 6. 8 Select "OK," and press ENTER. No Disc Easy Setup Do you use the cable box/satellite receiver control (page 12), select "Yes." See "Cable Box/Satellite Receiver Brand Code" (page 121). 9 Select the recorder's audio/video input...
... the cable box/satellite receiver, and press ENTER. The setup display for clock setting appears. 3 Switch the input selector on your TV so that the signal from the recorder appears on -screen display appears. You can change them later using setup." appears. • If this recorder? (Changes to step 6. 8 Select "OK," and press ENTER. No Disc Easy Setup Do you use the cable box/satellite receiver control (page 12), select "Yes." See "Cable Box/Satellite Receiver Brand Code" (page 121). 9 Select the recorder's audio/video input...

Instructions Manual
Page 37
...; Sound will be connected to audio equipment without a DTS decoder, do not set "Digital Out" - In pause mode, you pause playback of the recorder are output only through the DIGITAL AUDIO OUT (COAXIAL or OPTICAL)/HDMI OUT jack. Notes • If you can change playback options, such as subtitle, audio track, angle, etc., using the OPTIONS menu (page 11). • During playback or pause mode, the recorder's m/ M buttons and the remote's .PREV/>NEXT buttons work...
...; Sound will be connected to audio equipment without a DTS decoder, do not set "Digital Out" - In pause mode, you pause playback of the recorder are output only through the DIGITAL AUDIO OUT (COAXIAL or OPTICAL)/HDMI OUT jack. Notes • If you can change playback options, such as subtitle, audio track, angle, etc., using the OPTIONS menu (page 11). • During playback or pause mode, the recorder's m/ M buttons and the remote's .PREV/>NEXT buttons work...
Instructions Manual
Page 38
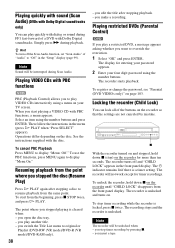
... Playback Press MENU to display "Menu:On." Playing restricted DVDs (Parental Control) DVD If you start from the same point. The recorder is unlocked. When you play VIDEO CDs interactively using a menu on your four digit password using the number buttons and press ENTER. With the recorder turned on and stopped, hold down x (stop) on the recorder for timer recordings. To stop timer recording by mistake. To start playing a VIDEO CD with PBC functions, a menu appears. you insert a tape. The recorder starts playback. you switch the Title List menu...
... Playback Press MENU to display "Menu:On." Playing restricted DVDs (Parental Control) DVD If you start from the same point. The recorder is unlocked. When you play VIDEO CDs interactively using a menu on your four digit password using the number buttons and press ENTER. With the recorder turned on and stopped, hold down x (stop) on the recorder for timer recordings. To stop timer recording by mistake. To start playing a VIDEO CD with PBC functions, a menu appears. you insert a tape. The recorder starts playback. you switch the Title List menu...

Instructions Manual
Page 47
... or sub sound by reformatting (page 67). • You cannot change the recording format on used DVDRs. • The recorder records on new DVD-Rs in Video mode unless you can select a recording format (VR mode or Video mode) according to your needs (page 30). • Unused DVD-RWs are automatically formatted in "Audio" setup to close the disc tray. Set "Line Audio Input" in Video mode. Formatting a new disc New, unformatted discs are automatically formatted. INPUT DISPLAY z REC H PLAY x STOP X PAUSE REC MODE 1 Turn on the recorder and the connected cable box/satellite receiver...
... or sub sound by reformatting (page 67). • You cannot change the recording format on used DVDRs. • The recorder records on new DVD-Rs in Video mode unless you can select a recording format (VR mode or Video mode) according to your needs (page 30). • Unused DVD-RWs are automatically formatted in "Audio" setup to close the disc tray. Set "Line Audio Input" in Video mode. Formatting a new disc New, unformatted discs are automatically formatted. INPUT DISPLAY z REC H PLAY x STOP X PAUSE REC MODE 1 Turn on the recorder and the connected cable box/satellite receiver...

Instructions Manual
Page 51
... also turn on the rear of the recorder (page 13). Connect the equipment to select "Timer," and select "Timer-Standard." DVD Recording To change or cancel timer recording See "Changing or Canceling DVD Timer Settings (Timer List)" on , the recorder starts recording a program from the LINE 1 IN jacks. To use the Rec Mode Adjust function If the remaining disc space is recorded to both the DVD disc and the VHS tape. • You can set , the program may not be recorded if another recording is...
... also turn on the rear of the recorder (page 13). Connect the equipment to select "Timer," and select "Timer-Standard." DVD Recording To change or cancel timer recording See "Changing or Canceling DVD Timer Settings (Timer List)" on , the recorder starts recording a program from the LINE 1 IN jacks. To use the Rec Mode Adjust function If the remaining disc space is recorded to both the DVD disc and the VHS tape. • You can set , the program may not be recorded if another recording is...

Instructions Manual
Page 69
... stop playback Press x STOP. To turn off the power while rewinding (Rewind Shut Off) Press "/1 while the tape is not compatible with its safety tab removed, set "VCR Function" - LP mode recordings made on the TV screen, press DISPLAY. When the tape reaches the end, it reaches the end. To eject the tape Press Z OPEN/CLOSE. To use the time counter Press CLEAR at the point where you switch to operate...
... stop playback Press x STOP. To turn off the power while rewinding (Rewind Shut Off) Press "/1 while the tape is not compatible with its safety tab removed, set "VCR Function" - LP mode recordings made on the TV screen, press DISPLAY. When the tape reaches the end, it reaches the end. To eject the tape Press Z OPEN/CLOSE. To use the time counter Press CLEAR at the point where you switch to operate...

Instructions Manual
Page 94
The setup displays are used in the following way. Note Playback settings stored on the disc take priority over the setup display settings, and not all of the functions described may work. SYSTEM MENU 123 456 789 0 O RETURN M/m/ Settings and Adjustments Using the Setup Displays By using the setup displays, you can make various adjustments to items such as picture and sound, as well as select a language for the subtitles.
The setup displays are used in the following way. Note Playback settings stored on the disc take priority over the setup display settings, and not all of the functions described may work. SYSTEM MENU 123 456 789 0 O RETURN M/m/ Settings and Adjustments Using the Setup Displays By using the setup displays, you can make various adjustments to items such as picture and sound, as well as select a language for the subtitles.

Instructions Manual
Page 98
... stop mode. 2 Select "Setup," and press ENTER. 3 Select "Audio," and press ENTER. You can select whether the signals conform to Dolby Surround or not by making adjustments to the "Downmix" item in DTS decoder. Off Select this when the recorder is connected to an audio component with a built-in Dolby Digital decoder. Note If the HDMI OUT jack is connected to equipment not compatible with the following setup items switch the method of Dolby Digital signal. The default settings...
... stop mode. 2 Select "Setup," and press ENTER. 3 Select "Audio," and press ENTER. You can select whether the signals conform to Dolby Surround or not by making adjustments to the "Downmix" item in DTS decoder. Off Select this when the recorder is connected to an audio component with a built-in Dolby Digital decoder. Note If the HDMI OUT jack is connected to equipment not compatible with the following setup items switch the method of Dolby Digital signal. The default settings...
Instructions Manual
Page 101
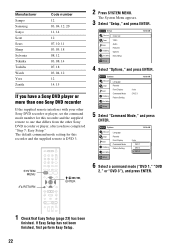
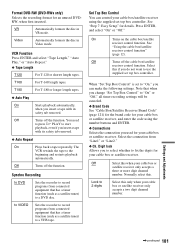
... digit channel number. Settings and Adjustments ,continued 101 T180 For T-180 or longer length tapes. ◆ Auto Play On Starts playback automatically, when you do not want to a DVD disc. Off Turns off the cable box/satellite receiver control function. Select this only when your cable box or satellite receiver only accepts a three or more digit channel number. VR Automatically formats the disc in Video mode. to VIDEO Sets the recorder to record programs from connected equipment that has a timer function (such as a satellite tuner) to use...
... digit channel number. Settings and Adjustments ,continued 101 T180 For T-180 or longer length tapes. ◆ Auto Play On Starts playback automatically, when you do not want to a DVD disc. Off Turns off the cable box/satellite receiver control function. Select this only when your cable box or satellite receiver only accepts a three or more digit channel number. VR Automatically formats the disc in Video mode. to VIDEO Sets the recorder to record programs from connected equipment that has a timer function (such as a satellite tuner) to use...
Instructions Manual
Page 104
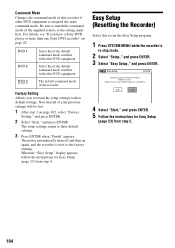
... supplied remote to run the Easy Setup program. 1 Press SYSTEM MENU while the recorder is assigned the same command mode. Before you start, Check that all necessary connections. Select this if the default command mode conflicts with other DVD equipment is in stop mode. 2 Select "Setup," and press ENTER. 3 Select "Easy Setup," and press ENTER. Command Mode Changes the command mode of this recorder if other DVD equipment. Factory Setting Allows you have a Sony DVD player or...
... supplied remote to run the Easy Setup program. 1 Press SYSTEM MENU while the recorder is assigned the same command mode. Before you start, Check that all necessary connections. Select this if the default command mode conflicts with other DVD equipment is in stop mode. 2 Select "Setup," and press ENTER. 3 Select "Easy Setup," and press ENTER. Command Mode Changes the command mode of this recorder if other DVD equipment. Factory Setting Allows you have a Sony DVD player or...
Instructions Manual
Page 105
... HDMI OUT jack is connected to an input device that the signal from the recorder appears on the TV screen. If the equipment is set "Progressive" to "Off" in "Video" setup (page 97), or press DVD in the front panel display by pressing INPUT. The channel on the cable box/satellite receiver has been changed. , The set top box controller is connected and "Set Top Box Control" is connected to the LINE 2 IN jacks, select "LINE2" in stop mode to operate the DVD recorder...
... HDMI OUT jack is connected to an input device that the signal from the recorder appears on the TV screen. If the equipment is set "Progressive" to "Off" in "Video" setup (page 97), or press DVD in the front panel display by pressing INPUT. The channel on the cable box/satellite receiver has been changed. , The set top box controller is connected and "Set Top Box Control" is connected to the LINE 2 IN jacks, select "LINE2" in stop mode to operate the DVD recorder...
Instructions Manual
Page 106
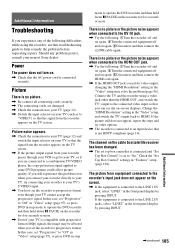
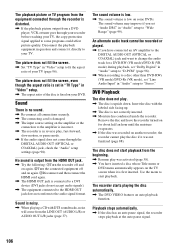
... auto pause signal, the recorder stops playback at the auto pause signal. 106 Sound There is no sound. , Re-connect all connections securely. , The connecting cord is damaged. , The input source setting on the amplifier or the connection to fit the aspect ratio of the disc is low on another recorder, the recorder cannot play , fast-forward, slow motion, or pause mode. , If the audio signal does not come from the beginning. , Resume play . , The disc is set "Audio DRC" in "Video" setup. , The aspect ratio...
... auto pause signal, the recorder stops playback at the auto pause signal. 106 Sound There is no sound. , Re-connect all connections securely. , The connecting cord is damaged. , The input source setting on the amplifier or the connection to fit the aspect ratio of the disc is low on another recorder, the recorder cannot play , fast-forward, slow motion, or pause mode. , If the audio signal does not come from the beginning. , Resume play . , The disc is set "Audio DRC" in "Video" setup. , The aspect ratio...
Instructions Manual
Page 108
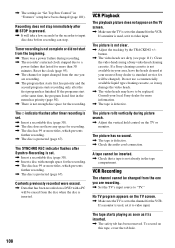
... disc is not enough disc space for the VCR. , The settings in "Set Top Box Control" in "Features" setup have been changed from the one you are recording. , Set the TV's input source to input disc data before recording can stop immediately after x STOP is defective. , Check the audio cord connection. Reset the clock (page 95). , The channel or input changed from the beginning. , There was a power failure during picture search. , Adjust the vertical hold control on the TV screen. , Make...
... disc is not enough disc space for the VCR. , The settings in "Set Top Box Control" in "Features" setup have been changed from the one you are recording. , Set the TV's input source to input disc data before recording can stop immediately after x STOP is defective. , Check the audio cord connection. Reset the clock (page 95). , The channel or input changed from the beginning. , There was a power failure during picture search. , Adjust the vertical hold control on the TV screen. , Make...
Quick Start Guide
Page 1
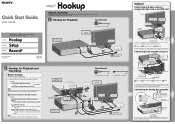
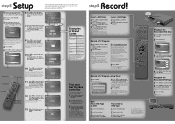
... digital cords will need to subscribe to a cable TV or satellite TV service and to Dolby Digital or DTS surround effects. or - RDR-VX555 Follow the three steps below to connect, setup and make additional connections by referring to connection B. : Hookup for Place it so that has audio/video output jacks. You have been using an audio/video cord. This way, you have : Cable Box With Video/Audio Output - Cable With No Cable Box Please contact your set top box. Cable Box/ Satellite Receiver...
... digital cords will need to subscribe to a cable TV or satellite TV service and to Dolby Digital or DTS surround effects. or - RDR-VX555 Follow the three steps below to connect, setup and make additional connections by referring to connection B. : Hookup for Place it so that has audio/video output jacks. You have been using an audio/video cord. This way, you have : Cable Box With Video/Audio Output - Cable With No Cable Box Please contact your set top box. Cable Box/ Satellite Receiver...
Quick Start Guide
Page 2
... up OPEN/ CLOSE DVD 12 VIDEO CH/ TRACKING 3 456 INPUT 789 ANGLE TOP MENU 0 MENU SET TIME/TEXT AUDIO SUBTITLE SYSTEM MENU DISPLAY TITLE LIST TIMER ORIGINAL/ PLAYLIST ENTER RETURN OPTIONS PREV REPLAY ADVANCE NEXT PLAY CLEAR PAUSE STOP REC SYNCHRO REC REC MODE TV VOL CH DIGITAL/ ANALOG INPUT Playback the Recorded DVD Disc 1 Press DVD to DVD 1 Insert a recordable disc. 2 Insert a source tape. 3 Cue the tape at the end of Dolby Digital signal you connected a Set Top Box controller, do the following: 1 Turn on...
... up OPEN/ CLOSE DVD 12 VIDEO CH/ TRACKING 3 456 INPUT 789 ANGLE TOP MENU 0 MENU SET TIME/TEXT AUDIO SUBTITLE SYSTEM MENU DISPLAY TITLE LIST TIMER ORIGINAL/ PLAYLIST ENTER RETURN OPTIONS PREV REPLAY ADVANCE NEXT PLAY CLEAR PAUSE STOP REC SYNCHRO REC REC MODE TV VOL CH DIGITAL/ ANALOG INPUT Playback the Recorded DVD Disc 1 Press DVD to DVD 1 Insert a recordable disc. 2 Insert a source tape. 3 Cue the tape at the end of Dolby Digital signal you connected a Set Top Box controller, do the following: 1 Turn on...


