
Camera Operations Guide
Page 3
... for a Class B digital device, pursuant to Part 15 of the FCC Rules. Note on the type of mini DV cassettes with Handycam Station Model DCRA-C111 and AC Power Adaptor Model AC-L25A/L25B. The supplied interface cable must accept any changes or modifications not expressly approved in a particular installation. You can radiate radio frequency energy and, if not installed and used with the limits...
... for a Class B digital device, pursuant to Part 15 of the FCC Rules. Note on the type of mini DV cassettes with Handycam Station Model DCRA-C111 and AC Power Adaptor Model AC-L25A/L25B. The supplied interface cable must accept any changes or modifications not expressly approved in a particular installation. You can radiate radio frequency energy and, if not installed and used with the limits...
Camera Operations Guide
Page 4
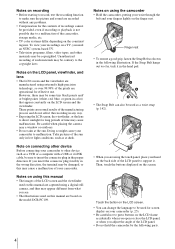
... other device Before connecting your fingers lightly on the finger rest. Notes on using this manual • The images of the LCD screen and the viewfinder used on this manual are captured using the camcorder • Hold the camcorder, putting your wrist through the belt and your camcorder to other device such as a VCR or a computer with a USB or i.LINK cable, be damaged, or this manual are based on the model DCR-PC109...
... other device Before connecting your fingers lightly on the finger rest. Notes on using this manual • The images of the LCD screen and the viewfinder used on this manual are captured using the camcorder • Hold the camcorder, putting your wrist through the belt and your camcorder to other device such as a VCR or a computer with a USB or i.LINK cable, be damaged, or this manual are based on the model DCR-PC109...
Camera Operations Guide
Page 8
... precautions ..........133 Specification 136 Quick Reference Identifying parts and controls ...........139 Index 147 Refer also to a tape 97 Dubbing selected scenes from a "Memory Stick Duo" to other operating instructions supplied with your camcorder: • Editing images with specific information - TITLE/ TAPE TITLE, etc 80 Using the (STANDARD SET) menu - REC MODE/MULTI-SOUND/ AUDIO MIX/USB-CAMERA, etc 84 Using the (TIME/LANGU.) menu - Digital program editing 98 Dubbing sound to a recorded tape 105 Deleting recorded pictures .........107 Marking recorded images with your...
... precautions ..........133 Specification 136 Quick Reference Identifying parts and controls ...........139 Index 147 Refer also to a tape 97 Dubbing selected scenes from a "Memory Stick Duo" to other operating instructions supplied with your camcorder: • Editing images with specific information - TITLE/ TAPE TITLE, etc 80 Using the (STANDARD SET) menu - REC MODE/MULTI-SOUND/ AUDIO MIX/USB-CAMERA, etc 84 Using the (TIME/LANGU.) menu - Digital program editing 98 Dubbing sound to a recorded tape 105 Deleting recorded pictures .........107 Marking recorded images with your...
Camera Operations Guide
Page 18
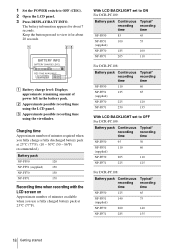
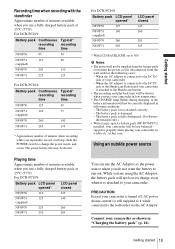
... appears for about 7 seconds. B Approximate possible recording time using the viewfinder. BATTERY INFO BATTERY CHARGE LEVEL 0% 50% 100% REC TIME AVAILABLE LCD SCREEN: 90 min VIEWFINDER: 99 min A Battery charge level: Displays approximate remaining amount of minutes available when you use a fully charged battery pack at 25°C (77°F). C Approximate possible recording time using the LCD panel. With LCD BACKLIGHT set to ON For DCR-PC109: Battery pack Continuous Typical* recording recording time time NP-FF50 85 45 NP-FF51...
... appears for about 7 seconds. B Approximate possible recording time using the viewfinder. BATTERY INFO BATTERY CHARGE LEVEL 0% 50% 100% REC TIME AVAILABLE LCD SCREEN: 90 min VIEWFINDER: 99 min A Battery charge level: Displays approximate remaining amount of minutes available when you use a fully charged battery pack at 25°C (77°F). C Approximate possible recording time using the LCD panel. With LCD BACKLIGHT set to ON For DCR-PC109: Battery pack Continuous Typical* recording recording time time NP-FF50 85 45 NP-FF51...
Camera Operations Guide
Page 19
... set to run out. Using an outside power source You can use a fully charged battery pack at 25°C (77°F). The battery pack is disconnected from the wall outlet in this case. Getting started Recording time when recording with the viewfinder Approximate number of minutes when recording while you repeatedly record, start/stop, slide the POWER switch to change the power mode, and zoom. When the AC adaptor is connected...
... set to run out. Using an outside power source You can use a fully charged battery pack at 25°C (77°F). The battery pack is disconnected from the wall outlet in this case. Getting started Recording time when recording with the viewfinder Approximate number of minutes when recording while you repeatedly record, start/stop, slide the POWER switch to change the power mode, and zoom. When the AC adaptor is connected...

Camera Operations Guide
Page 25
... not insert anything other than a "Memory Stick Duo" into the "Memory Stick Duo" slot. Otherwise, image data may cause a malfunction of your camcorder. • When the access lamp is reading/writing data from the (TIME/LANGU.) menu (p. 89). 60min LANGUAGE: STBY 0:00:00 ENGLISH ENG L I SH 1/2 FRAN ÇAIS ENG [SIMP] ESPA ÑOL ,continued Getting started POWER switch 1 Turn on the screen, touch / . b Notes • If...
... not insert anything other than a "Memory Stick Duo" into the "Memory Stick Duo" slot. Otherwise, image data may cause a malfunction of your camcorder. • When the access lamp is reading/writing data from the (TIME/LANGU.) menu (p. 89). 60min LANGUAGE: STBY 0:00:00 ENGLISH ENG L I SH 1/2 FRAN ÇAIS ENG [SIMP] ESPA ÑOL ,continued Getting started POWER switch 1 Turn on the screen, touch / . b Notes • If...
Camera Operations Guide
Page 27
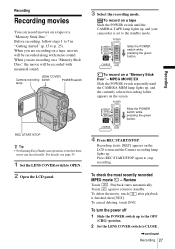
... button. To turn the power off 1 Slide the POWER switch up , and your camcorder is finished, then [YES]. When you are recording on a tape, movies will be recorded along with monaural sound. To record on the LCD screen and the Camera recording lamp lights up , and the currently selected recording folder appears on a tape or a "Memory Stick Duo." Recording REC START/STOP z Tip • Performing Easy Handycam operation, even first time users can record movies on the screen. Playback starts automatically. Recording starts. [REC...
... button. To turn the power off 1 Slide the POWER switch up , and your camcorder is finished, then [YES]. When you are recording on a tape, movies will be recorded along with monaural sound. To record on the LCD screen and the Camera recording lamp lights up , and the currently selected recording folder appears on a tape or a "Memory Stick Duo." Recording REC START/STOP z Tip • Performing Easy Handycam operation, even first time users can record movies on the screen. Playback starts automatically. Recording starts. [REC...

Camera Operations Guide
Page 29
... of time you can record movies on a "Memory Stick Duo" formatted on your camcorder for a long time, remove the cassette and store it. • You can also use REC START/STOP of the LCD panel to prevent charging noise being displayed on the screen. You can record on a "Memory Stick Duo" varies depending on the image size and the recording environment. Occasional use of the external flash to record moving pictures. • When you are recorded automatically on the recording media...
... of time you can record movies on a "Memory Stick Duo" formatted on your camcorder for a long time, remove the cassette and store it. • You can also use REC START/STOP of the LCD panel to prevent charging noise being displayed on the screen. You can record on a "Memory Stick Duo" varies depending on the image size and the recording environment. Occasional use of the external flash to record moving pictures. • When you are recorded automatically on the recording media...

Camera Operations Guide
Page 36
... and hold PHOTO lightly. Easy Handycam operation ON Slide the POWER switch while pressing the green button. 5 Press REC START/STOP. To cancel Easy Handycam operation Press EASY again. A shutter sound is recorded on the LCD screen and the Camera recording lamp lights up to the OFF (CHG) position. 2 Set the LENS COVER switch to OPEN. 2 Open the LCD panel. 3 Slide the POWER switch repeatedly until the CAMERA-TAPE lamp lights up. LCD BACKLIGHT (p. 21) - Previously made settings are not displayed on or...
... and hold PHOTO lightly. Easy Handycam operation ON Slide the POWER switch while pressing the green button. 5 Press REC START/STOP. To cancel Easy Handycam operation Press EASY again. A shutter sound is recorded on the LCD screen and the Camera recording lamp lights up to the OFF (CHG) position. 2 Set the LENS COVER switch to OPEN. 2 Open the LCD panel. 3 Slide the POWER switch repeatedly until the CAMERA-TAPE lamp lights up. LCD BACKLIGHT (p. 21) - Previously made settings are not displayed on or...

Camera Operations Guide
Page 71
... 1152 FINE 30 MEMORY SET STILL SET MOVIE SET FORMAT OK STILL SET BURST For DCR-PC109: You can record several still images one after another. The settings you can adjust vary depending on the "Memory Stick Duo" you can currently operate. The number of your TV or a computer. ,continued Using the Menu 71 b Notes • The flash (optional) will be recorded in the best exposure. 2 Touch . 3 Press PHOTO fully. You can...
... 1152 FINE 30 MEMORY SET STILL SET MOVIE SET FORMAT OK STILL SET BURST For DCR-PC109: You can record several still images one after another. The settings you can adjust vary depending on the "Memory Stick Duo" you can currently operate. The number of your TV or a computer. ,continued Using the Menu 71 b Notes • The flash (optional) will be recorded in the best exposure. 2 Touch . 3 Press PHOTO fully. You can...
Camera Operations Guide
Page 79
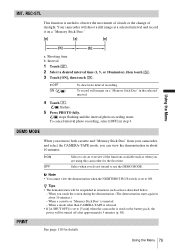
.... REC-STL This function is used on a "Memory Stick Duo." [a] [a] [a] [b] [b] a: Shooting time b: Interval 1 Touch . 2 Select a desired interval time (1, 5, or 10 minutes), then touch . 3 Touch [ON], then touch . GON OFF Select to [5 min] when the camcorder is useful to use the DEMO MODE. Using the Menu 79 When a cassette or "Memory Stick Duo" is set to see an overview of daylight. To cancel interval photo recording, select [OFF] in about 10 minutes. stops flashing...
.... REC-STL This function is used on a "Memory Stick Duo." [a] [a] [a] [b] [b] a: Shooting time b: Interval 1 Touch . 2 Select a desired interval time (1, 5, or 10 minutes), then touch . 3 Touch [ON], then touch . GON OFF Select to [5 min] when the camcorder is useful to use the DEMO MODE. Using the Menu 79 When a cassette or "Memory Stick Duo" is set to see an overview of daylight. To cancel interval photo recording, select [OFF] in about 10 minutes. stops flashing...
Camera Operations Guide
Page 94
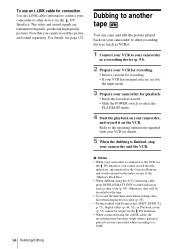
... connected using the A/V connecting cable, press DISPLAY/BATT INFO to a VCR. 94 Dubbing/Editing The video and sound signals are transmitted digitally, producing high quality pictures. For details, see page 132. b Notes • When your camcorder is connected to the VCR via the DV Interface. EFFECT] p. 75), Digital effect (p. 44, 52), or Playback zoom (p. 57) cannot be recorded on the tape. • To record the date/time and camera settings data, have them displayed on screen...
... connected using the A/V connecting cable, press DISPLAY/BATT INFO to a VCR. 94 Dubbing/Editing The video and sound signals are transmitted digitally, producing high quality pictures. For details, see page 132. b Notes • When your camcorder is connected to the VCR via the DV Interface. EFFECT] p. 75), Digital effect (p. 44, 52), or Playback zoom (p. 57) cannot be recorded on the tape. • To record the date/time and camera settings data, have them displayed on screen...
Camera Operations Guide
Page 111
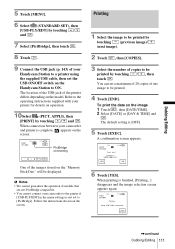
... menu settings is finished, [Printing...] disappears and the image selection screen appears again. Follow the instructions shown on operation. 10Select (PICT. The location of the USB jack of the printer differs depending on the "Memory Stick Duo" will be displayed. PRINT 101-0001 1 / 10 101 END PictBridge connecting - + SET EXEC One of the images stored on the model. COPIES 1 DATE/TIME OFF 6 Touch [YES]. When connection between your camcorder...
... menu settings is finished, [Printing...] disappears and the image selection screen appears again. Follow the instructions shown on operation. 10Select (PICT. The location of the USB jack of the printer differs depending on the "Memory Stick Duo" will be displayed. PRINT 101-0001 1 / 10 101 END PictBridge connecting - + SET EXEC One of the images stored on the model. COPIES 1 DATE/TIME OFF 6 Touch [YES]. When connection between your camcorder...

Camera Operations Guide
Page 117
... volume. (p. 50) cOn the (STANDARD SET) menu, adjust [AUDIO MIX] from the [ST2] (additional sound) side until the sound is heard appropriately. (p. 85) cWhen you are using the cleaning cassette (optional). (p. 134) No sound or only a low sound is heard. This is not a malfunction. cClean the head using an S VIDEO plug, make sure the red and white plugs of the flash is not turned on the screen. The flash level cannot be changed. • The flash level...
... volume. (p. 50) cOn the (STANDARD SET) menu, adjust [AUDIO MIX] from the [ST2] (additional sound) side until the sound is heard appropriately. (p. 85) cWhen you are using the cleaning cassette (optional). (p. 134) No sound or only a low sound is heard. This is not a malfunction. cClean the head using an S VIDEO plug, make sure the red and white plugs of the flash is not turned on the screen. The flash level cannot be changed. • The flash level...

Camera Operations Guide
Page 119
.... • The file format is not supported on your camcorder. (p. 128) • The file is damaged. • The file format is not supported on your camcorder. The title cannot be deleted. cSet the write-protect tab to a recorded tape cIn the (STANDARD SET) menu, adjust [AUDIO MIX] from , or to the input jack of the tape. The data file icon flashes. Cannot mark pictures for print. New sound added to REC. (p. 127) ,continued Troubleshooting 119
.... • The file format is not supported on your camcorder. (p. 128) • The file is damaged. • The file format is not supported on your camcorder. The title cannot be deleted. cSet the write-protect tab to a recorded tape cIn the (STANDARD SET) menu, adjust [AUDIO MIX] from , or to the input jack of the tape. The data file icon flashes. Cannot mark pictures for print. New sound added to REC. (p. 127) ,continued Troubleshooting 119

Camera Operations Guide
Page 129
.... If you use Image data may cause a malfunction. If you eject the "Memory Stick Duo," turn the power off on a computer: A "Memory Stick Duo" formatted by mistake. It may be careful not to edit or delete data by the Windows OS or using a "Memory Stick Duo" with a small tapered object, to come into contact with your camcorder is reading or writing image files on the "Memory Stick Duo" (while the access lamp is...
.... If you use Image data may cause a malfunction. If you eject the "Memory Stick Duo," turn the power off on a computer: A "Memory Stick Duo" formatted by mistake. It may be careful not to edit or delete data by the Windows OS or using a "Memory Stick Duo" with a small tapered object, to come into contact with your camcorder is reading or writing image files on the "Memory Stick Duo" (while the access lamp is...

Camera Operations Guide
Page 134
... camcorder, on the surface of the functions except cassette ejection will not appear when the moisture condenses on the lens. If there is opened. If this state, the tape may stick to build up by playing back tapes for a long time Occasionally turn off . - [x Dirty video head. How to condense, your skin. - If moisture condensation has occurred None of the tape, or on the lens. Eject the cassette, turn...
... camcorder, on the surface of the functions except cassette ejection will not appear when the moisture condenses on the lens. If there is opened. If this state, the tape may stick to build up by playing back tapes for a long time Occasionally turn off . - [x Dirty video head. How to condense, your skin. - If moisture condensation has occurred None of the tape, or on the lens. Eject the cassette, turn...
Camera Operations Guide
Page 136
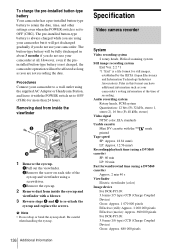
... using a DVM60 cassette) Approx. 2 min 40 s Viewfinder Electric viewfinder (color) Image device For DCR-PC109: 3.6 mm (1/5 type) CCD (Charge Coupled Device) Gross: Approx. 1 070 000 pixels Effective (still): Approx. 1 000 000 pixels Effective (movie): Approx. 690 000 pixels For DCR-PC108: 3.0 mm (1/6 type) CCD (Charge Coupled Device) Gross: Approx. 680 000 pixels To charge the pre-installed button-type battery Your camcorder has a pre-installed button-type battery to retain the date, time, and other settings even when the POWER switch is set...
... using a DVM60 cassette) Approx. 2 min 40 s Viewfinder Electric viewfinder (color) Image device For DCR-PC109: 3.6 mm (1/5 type) CCD (Charge Coupled Device) Gross: Approx. 1 070 000 pixels Effective (still): Approx. 1 000 000 pixels Effective (movie): Approx. 690 000 pixels For DCR-PC108: 3.0 mm (1/6 type) CCD (Charge Coupled Device) Gross: Approx. 680 000 pixels To charge the pre-installed button-type battery Your camcorder has a pre-installed button-type battery to retain the date, time, and other settings even when the POWER switch is set...

Camera Operations Guide
Page 147
...BLACK FADER 43 BURN DVD 80 BURN VCD 81 Burst (BURST 32, 71 Button-type battery Camcorder 136 Remote Commander 144 C CALIBRATION 135 Camera Chroma key (CAM T M CHROMA 46 Camera settings data display 58 Cassette 23 Cassette Memory .........3, 127 Cassette Memory Search (SEARCH 48, 61, 62, 81 Charging the battery Battery pack 16 Pre-installed button-type battery 136 Clock set (CLOCK SET) ...... 22, 89 Color Slow Shutter (COLOR SLOW S)..... 40 Customizing Personal Menu 90 D Data code (DATA CODE)..... 58, 86 Date search 62 Date/time 58 Delete Deleting pictures....... 107 DEMO MODE...
...BLACK FADER 43 BURN DVD 80 BURN VCD 81 Burst (BURST 32, 71 Button-type battery Camcorder 136 Remote Commander 144 C CALIBRATION 135 Camera Chroma key (CAM T M CHROMA 46 Camera settings data display 58 Cassette 23 Cassette Memory .........3, 127 Cassette Memory Search (SEARCH 48, 61, 62, 81 Charging the battery Battery pack 16 Pre-installed button-type battery 136 Clock set (CLOCK SET) ...... 22, 89 Color Slow Shutter (COLOR SLOW S)..... 40 Customizing Personal Menu 90 D Data code (DATA CODE)..... 58, 86 Date search 62 Date/time 58 Delete Deleting pictures....... 107 DEMO MODE...
Camera Operations Guide
Page 148
... Reverse 51 Slow 51 Playback Zoom (PB ZOOM 57 Playing time 19 Power mode 20 PRINT See PictBridge Print mark 109 PROGRAM AE 65 Program edit (PROG. EDIT 80 R REC FOLDER 74 Rec review 49 REC START/STOP..... 27, 51 Recording capacity Display 28 REMAINING ....... 72, 87 Recording lamp (REC LED 87 Recording mode (REC MODE) ....... 28, 84 Recording time 18, 29 Remote Commander........ 144 REMOTE CTRL......... 87 Remote sensor 140 RESET 141 Review 27, 32 S S video 93 Self...
... Reverse 51 Slow 51 Playback Zoom (PB ZOOM 57 Playing time 19 Power mode 20 PRINT See PictBridge Print mark 109 PROGRAM AE 65 Program edit (PROG. EDIT 80 R REC FOLDER 74 Rec review 49 REC START/STOP..... 27, 51 Recording capacity Display 28 REMAINING ....... 72, 87 Recording lamp (REC LED 87 Recording mode (REC MODE) ....... 28, 84 Recording time 18, 29 Remote Commander........ 144 REMOTE CTRL......... 87 Remote sensor 140 RESET 141 Review 27, 32 S S video 93 Self...


