
Installations/Connexions
Page 9
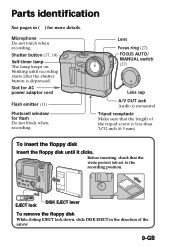
Tripod receptacle Make sure that the write protect tab set to the recording position. Microphone Do not touch when recording. To insert the floppy disk Insert the floppy disk until recording starts after the shutter button is depressed. Before inserting, check that the length of the arrow. 9-GB ...AUTO/ MANUAL switch (27) Lens cap A/V OUT Jack Audio is less than 7/32 inch (6.5 mm). DISK EJECT lever EJECT lock To remove the floppy disk While sliding EJECT lock down, slide DISK EJECT in ( ) for flash Do not block when recording. Parts identification See pages in the direction of...
Tripod receptacle Make sure that the write protect tab set to the recording position. Microphone Do not touch when recording. To insert the floppy disk Insert the floppy disk until recording starts after the shutter button is depressed. Before inserting, check that the length of the arrow. 9-GB ...AUTO/ MANUAL switch (27) Lens cap A/V OUT Jack Audio is less than 7/32 inch (6.5 mm). DISK EJECT lever EJECT lock To remove the floppy disk While sliding EJECT lock down, slide DISK EJECT in ( ) for flash Do not block when recording. Parts identification See pages in the direction of...
Installations/Connexions
Page 22
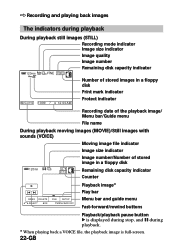
... playing back images The indicators during playback During playback still images (STILL) Recording mode indicator Image size indicator Image quality Image number 120min 1280 FINE 11/12 Remaining disk capacity indicator Number of stored images in a floppy disk Print mark indicator MVC-011S 1999 7 4 12:00AM Protect indicator Recording date of the playback image/ Menu bar...
... playing back images The indicators during playback During playback still images (STILL) Recording mode indicator Image size indicator Image quality Image number 120min 1280 FINE 11/12 Remaining disk capacity indicator Number of stored images in a floppy disk Print mark indicator MVC-011S 1999 7 4 12:00AM Protect indicator Recording date of the playback image/ Menu bar...
Installations/Connexions
Page 39
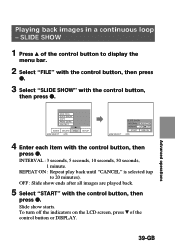
SLIDE SHOW 1 Press v of the control button or DISPLAY. Advanced operations 39-GB DISK TOOL SLIDE SHOW COPY PRINT MARK PROTECT INDEX DELETE SELECT OK FILE SETUP SELECT SLIDE SHOW INTERVAL 30 SEC REPEAT ON OFF START CANCEL OK 4 Enter each item with the control button, ...
SLIDE SHOW 1 Press v of the control button or DISPLAY. Advanced operations 39-GB DISK TOOL SLIDE SHOW COPY PRINT MARK PROTECT INDEX DELETE SELECT OK FILE SETUP SELECT SLIDE SHOW INTERVAL 30 SEC REPEAT ON OFF START CANCEL OK 4 Enter each item with the control button, ...
Installations/Connexions
Page 48
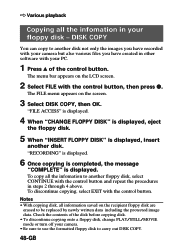
Check the contents of the disk before copying disk. • To discontinue copying onto a floppy disk, change PLAY/STILL/MOVIE mode or turn off your PC. 1 Press v of the control button. "RECORDING" is displayed. 6 Once copying is completed, the message "COMPLETE" is displayed, insert another floppy disk, select CONTINUE with your camera. • Be sure to use...
Check the contents of the disk before copying disk. • To discontinue copying onto a floppy disk, change PLAY/STILL/MOVIE mode or turn off your PC. 1 Press v of the control button. "RECORDING" is displayed. 6 Once copying is completed, the message "COMPLETE" is displayed, insert another floppy disk, select CONTINUE with your camera. • Be sure to use...

Installations/Connexions
Page 49
...Formatting takes about 30 seconds. 49-GB Advanced operations To cancel formatting Select CANCEL with the control button in the floppy disk will be deleted. Note that even protected images will be deleted. • Make sure if the battery pack is charged enough before formatting. The FILE menu ...appears. 3 Select FORMAT in the DISK TOOL with the control button, then press z. 4 Select OK with the control button, then press ...
...Formatting takes about 30 seconds. 49-GB Advanced operations To cancel formatting Select CANCEL with the control button in the floppy disk will be deleted. Note that even protected images will be deleted. • Make sure if the battery pack is charged enough before formatting. The FILE menu ...appears. 3 Select FORMAT in the DISK TOOL with the control button, then press z. 4 Select OK with the control button, then press ...
Installations/Connexions
Page 57
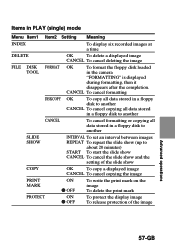
...copying the image PRINT MARK ON z OFF To write the print mark on the image To delete the print mark PROTECT ON z OFF To protect the display image To release protection of the image Advanced operations 57-GB Items in PLAY (single) mode Menu Item1 Item2 Setting Meaning INDEX To ...cancel deleting the image FILE DISK FORMAT TOOL OK To format the floppy disk loaded in a floppy disk to another SLIDE SHOW INTERVAL To set an interval between images REPEAT To repeat the slide show (up to another CANCEL To cancel copying all data stored in the camera "FORMATTING" is displayed ...
...copying the image PRINT MARK ON z OFF To write the print mark on the image To delete the print mark PROTECT ON z OFF To protect the display image To release protection of the image Advanced operations 57-GB Items in PLAY (single) mode Menu Item1 Item2 Setting Meaning INDEX To ...cancel deleting the image FILE DISK FORMAT TOOL OK To format the floppy disk loaded in a floppy disk to another SLIDE SHOW INTERVAL To set an interval between images REPEAT To repeat the slide show (up to another CANCEL To cancel copying all data stored in the camera "FORMATTING" is displayed ...

Installations/Connexions
Page 60
... or sources of high temperature, such as a heating device. Using the camera on the using environment. Concerning floppy disks To protect data recorded on the floppy disk. • Be sure to use a floppy disk case to malfunction, and sometimes this case, use other brand disks. 60-GB Floppy disk warping or damage may mar the finish of...
... or sources of high temperature, such as a heating device. Using the camera on the using environment. Concerning floppy disks To protect data recorded on the floppy disk. • Be sure to use a floppy disk case to malfunction, and sometimes this case, use other brand disks. 60-GB Floppy disk warping or damage may mar the finish of...
Installations/Connexions
Page 63
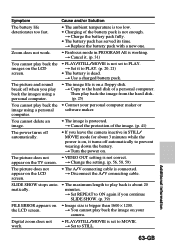
... a charged battery pack. computer. t Set REPEAT to MOVIE. Digital zoom does not work . • Panfocus mode in STILL/ MOVIE mode for about 20 matically. Zoom does not work . • PLAY/STILL/MOVIE is connected. The picture does not • VIDEO OUT setting... is not enough. appear on a floppy disk. t Charge the battery pack fully. • The battery pack has served its time. The picture and sound break off automatically. • If you leave the camera inactive in PROGRAM AE is protected...
... a charged battery pack. computer. t Set REPEAT to MOVIE. Digital zoom does not work . • Panfocus mode in STILL/ MOVIE mode for about 20 matically. Zoom does not work . • PLAY/STILL/MOVIE is connected. The picture does not • VIDEO OUT setting... is not enough. appear on a floppy disk. t Charge the battery pack fully. • The battery pack has served its time. The picture and sound break off automatically. • If you leave the camera inactive in PROGRAM AE is protected...
Installations/Connexions
Page 66
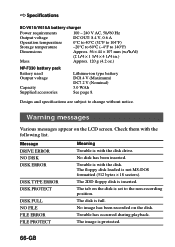
...DISK DISK ERROR DISK TYPE ERROR DISK PROTECT DISK FULL NO FILE FILE ERROR FILE PROTECT Meaning Trouble is not MS-DOS formatted (512 bytes × 18 sectors). No image has been recorded on the LCD screen. Check them with the disk. The floppy disk loaded is with the disk drive. The tab on the disk...Capacity Supplied accessories Lithium-ion type battery DC8.4 V (Maximum) DC7.2 V (Nominal) 5.0 WAh See page 8. The image is full. The disk is protected. 66-GB k Specifications BC-V615/V615A battery charger Power requirements 100 - 240 V AC, 50/60 Hz Output voltage DC OUT: 8.4 V,...
...DISK DISK ERROR DISK TYPE ERROR DISK PROTECT DISK FULL NO FILE FILE ERROR FILE PROTECT Meaning Trouble is not MS-DOS formatted (512 bytes × 18 sectors). No image has been recorded on the LCD screen. Check them with the disk. The floppy disk loaded is with the disk drive. The tab on the disk...Capacity Supplied accessories Lithium-ion type battery DC8.4 V (Maximum) DC7.2 V (Nominal) 5.0 WAh See page 8. The image is full. The disk is protected. 66-GB k Specifications BC-V615/V615A battery charger Power requirements 100 - 240 V AC, 50/60 Hz Output voltage DC OUT: 8.4 V,...

Installations/Connexions
Page 67
... Cleaning 60 CLOCK SET 15 Control button 11 COPY 46 D, E DELETE 44 DEMO MODE 56 DIGITAL ZOOM 18, 55 DISK TOOL 54, 57, 58 DPOF 50 E-MAIL 35 F FILE NUMBER 54 FLASH LEVEL 56 Floppy disk 9, 60 FORMAT 49 Full charge 12 I, J INDEX screen 38 Indicators on the LCD screen 19...25, 34, 36 N, P Normal charge 12 Photocell window 11 PICTURE EFFECT 30 Playing back Moving image 21 Still image 20 PROGRAM AE 31 PROTECT 41 Q, R QUALITY 33 REC MODE 35 Recording Moving image 18 Still image 17 Remaining battery indicator ... 19, 22 S, T Self-diagnosis display 64 Self timer 11 Setting the...
... Cleaning 60 CLOCK SET 15 Control button 11 COPY 46 D, E DELETE 44 DEMO MODE 56 DIGITAL ZOOM 18, 55 DISK TOOL 54, 57, 58 DPOF 50 E-MAIL 35 F FILE NUMBER 54 FLASH LEVEL 56 Floppy disk 9, 60 FORMAT 49 Full charge 12 I, J INDEX screen 38 Indicators on the LCD screen 19...25, 34, 36 N, P Normal charge 12 Photocell window 11 PICTURE EFFECT 30 Playing back Moving image 21 Still image 20 PROGRAM AE 31 PROTECT 41 Q, R QUALITY 33 REC MODE 35 Recording Moving image 18 Still image 17 Remaining battery indicator ... 19, 22 S, T Self-diagnosis display 64 Self timer 11 Setting the...


