

Installations/Connexions
Page 2
... of important operating and maintenance (servicing) instructions in the text, for future reference. The instructions in this manual are shown in the illustrations. As you start reading this manual and operating the unit, check the model number. Press FLASH. Otherwise, the model name is the model used for the two models: MVC-FD83, MVC-FD88 The MVC-FD88 is indicated in capital letters. e.g. English Operating instructions Before operating the unit, please read through this manual, buttons and settings...
... of important operating and maintenance (servicing) instructions in the text, for future reference. The instructions in this manual are shown in the illustrations. As you start reading this manual and operating the unit, check the model number. Press FLASH. Otherwise, the model name is the model used for the two models: MVC-FD83, MVC-FD88 The MVC-FD88 is indicated in capital letters. e.g. English Operating instructions Before operating the unit, please read through this manual, buttons and settings...
Installations/Connexions
Page 3
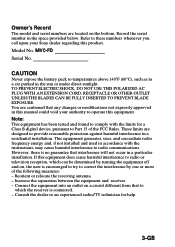
... comply with the instructions, may cause harmful interference to provide reasonable protection against harmful interference in the space provided below. If this equipment does cause harmful interference to radio or television reception, which the receiver is connected. - These limits are designed to radio communications. Owner's Record The model and serial numbers are located on , the user is encouraged...
... comply with the instructions, may cause harmful interference to provide reasonable protection against harmful interference in the space provided below. If this equipment does cause harmful interference to radio or television reception, which the receiver is connected. - These limits are designed to radio communications. Owner's Record The model and serial numbers are located on , the user is encouraged...

Installations/Connexions
Page 5
... black spots and/or bright spots (red, blue or green in any way. Unauthorized recording of such materials may be contrary to a malfunction of the LCD screen may want to make sure that constantly appear on camera care The LCD screen is manufactured using high- These spots occur normally in the manufacturing process and do not affect the recorded picture in color) that the camera...
... black spots and/or bright spots (red, blue or green in any way. Unauthorized recording of such materials may be contrary to a malfunction of the LCD screen may want to make sure that constantly appear on camera care The LCD screen is manufactured using high- These spots occur normally in the manufacturing process and do not affect the recorded picture in color) that the camera...
Installations/Connexions
Page 6
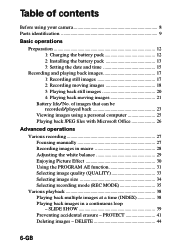
...Focusing manually 27 Recording images in macro 28 Adjusting the white balance 29 Enjoying Picture Effect 30 Using the PROGRAM AE function 31 Selecting image quality (QUALITY 33 Selecting image size 34 Selecting recording mode (REC MODE 35 Various playback 38 Playing back multiple images at a time (INDEX 38 Playing back images in a continuous loop - Table of images that can be recorded/played back 23 Viewing images using your camera 8 Parts identification 9 Basic operations Preparation 12 1: Charging the battery pack 12 2: Installing the battery pack 13 3: Setting the date...
...Focusing manually 27 Recording images in macro 28 Adjusting the white balance 29 Enjoying Picture Effect 30 Using the PROGRAM AE function 31 Selecting image quality (QUALITY 33 Selecting image size 34 Selecting recording mode (REC MODE 35 Various playback 38 Playing back multiple images at a time (INDEX 38 Playing back images in a continuous loop - Table of images that can be recorded/played back 23 Viewing images using your camera 8 Parts identification 9 Basic operations Preparation 12 1: Charging the battery pack 12 2: Installing the battery pack 13 3: Setting the date...
Installations/Connexions
Page 8
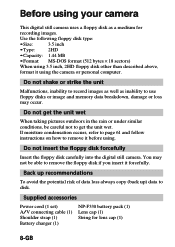
... Power cord (1 set) A/V connecting cable (1) Shoulder strap (1) Battery charger (1) NP-F330 battery pack (1) Lens cap (1) String for recording images. If moisture condensation occurs, refer to page 61 and follow instructions on how to remove it before using the camera or personal computer. Back up recommendations To avoid the potential risk of data loss always copy (back up) data to record images as well as a medium for lens cap (1) 8-GB Before using your camera...
... Power cord (1 set) A/V connecting cable (1) Shoulder strap (1) Battery charger (1) NP-F330 battery pack (1) Lens cap (1) String for recording images. If moisture condensation occurs, refer to page 61 and follow instructions on how to remove it before using the camera or personal computer. Back up recommendations To avoid the potential risk of data loss always copy (back up) data to record images as well as a medium for lens cap (1) 8-GB Before using your camera...
Installations/Connexions
Page 11
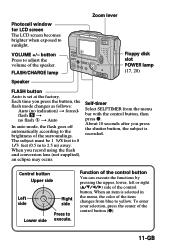
... (v/V/b/B) side of the item changes from the menu bar with the control button, then press z. FLASH/CHARGE lamp Speaker Zoom lever Floppy disk slot POWER lamp (17, 20) FLASH button Auto is selected in the menu, the color of the control button. About 10 seconds after you record using the flash and conversion lens (not supplied), an eclipse may occur. When an item is set at the factory. Control button Upper side Left Right...
... (v/V/b/B) side of the item changes from the menu bar with the control button, then press z. FLASH/CHARGE lamp Speaker Zoom lever Floppy disk slot POWER lamp (17, 20) FLASH button Auto is selected in the menu, the color of the control button. About 10 seconds after you record using the flash and conversion lens (not supplied), an eclipse may occur. When an item is set at the factory. Control button Upper side Left Right...
Installations/Connexions
Page 15
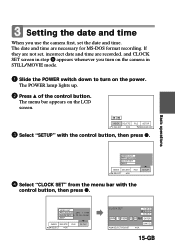
... power. INDEX DELETE SELECT OK FILE SETUP MENU BAR OFF 3 Select "SETUP" with the control button, then press z. The POWER lamp lights up. 2 Press v of the control button. Basic operations VIDEO OUT /LANGUAGE CLOCK SET BEEP INDEX DELETE SELECT OK FILE SETUP 4 Select "CLOCK SET" from the menu bar with the control button, then press z. Setting the date and time When you turn on the camera in STILL/MOVIE mode. 1 Slide the POWER switch down to turn on the LCD screen. The date and time are recorded, and CLOCK SET screen...
... power. INDEX DELETE SELECT OK FILE SETUP MENU BAR OFF 3 Select "SETUP" with the control button, then press z. The POWER lamp lights up. 2 Press v of the control button. Basic operations VIDEO OUT /LANGUAGE CLOCK SET BEEP INDEX DELETE SELECT OK FILE SETUP 4 Select "CLOCK SET" from the menu bar with the control button, then press z. Setting the date and time When you turn on the camera in STILL/MOVIE mode. 1 Slide the POWER switch down to turn on the LCD screen. The date and time are recorded, and CLOCK SET screen...
Installations/Connexions
Page 18
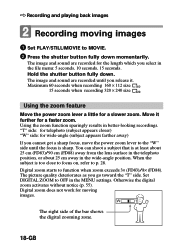
... position. W T The right side of the bar shows the digital zooming zone. 18-GB Hold the shutter button fully down momentarily. The image and sound are recorded for moving images 1 Set PLAY/STILL/MOVIE to p. 28. "T" side: for telephoto (subject appears closer) "W" side: for a slower zoom. The picture quality deteriorates as you cannot get a sharp focus, move the power zoom lever to function when zoom exceeds 3× (FD83)/8× (FD88).
... position. W T The right side of the bar shows the digital zooming zone. 18-GB Hold the shutter button fully down momentarily. The image and sound are recorded for moving images 1 Set PLAY/STILL/MOVIE to p. 28. "T" side: for telephoto (subject appears closer) "W" side: for a slower zoom. The picture quality deteriorates as you cannot get a sharp focus, move the power zoom lever to function when zoom exceeds 3× (FD83)/8× (FD88).
Installations/Connexions
Page 19
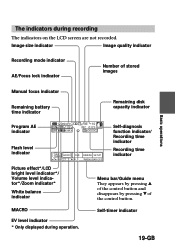
... LCD screen are not recorded. Image size indicator Image quality indicator Recording mode indicator AE/Focus lock indicator Number of stored images Basic operations Manual focus indicator Remaining battery time indicator Remaining disk capacity indicator Program AE indicator Flash level indicator 120min +1.0EV BRT 1280FINE 10 REC 0:03 15s SELF TIMER MACRO FILE CAMERA SETUP SELECT OK MENU BAR OFF Self-diagnosis function indicator/ Recording time indicator Recording time indicator Picture effect*/LCD bright level indicator*/ Volume level indicator*/Zoom indicator* White balance...
... LCD screen are not recorded. Image size indicator Image quality indicator Recording mode indicator AE/Focus lock indicator Number of stored images Basic operations Manual focus indicator Remaining battery time indicator Remaining disk capacity indicator Program AE indicator Flash level indicator 120min +1.0EV BRT 1280FINE 10 REC 0:03 15s SELF TIMER MACRO FILE CAMERA SETUP SELECT OK MENU BAR OFF Self-diagnosis function indicator/ Recording time indicator Recording time indicator Picture effect*/LCD bright level indicator*/ Volume level indicator*/Zoom indicator* White balance...

Installations/Connexions
Page 25
... Explorer 4.0. Basic operations Viewing images using a personal computer which installed JPEG and MPEG browsing software as Microsoft Internet Explorer. 25-GB These data can be viewed using a personal computer With this camera, the still image data is compressed in JPEG format and move image data is installed with Windows 95/98 installed 1 Start up personal computer and insert the floppy disk into the disk drive of the floppy disk recorded with this camera if your...
... Explorer 4.0. Basic operations Viewing images using a personal computer which installed JPEG and MPEG browsing software as Microsoft Internet Explorer. 25-GB These data can be viewed using a personal computer With this camera, the still image data is compressed in JPEG format and move image data is installed with Windows 95/98 installed 1 Start up personal computer and insert the floppy disk into the disk drive of the floppy disk recorded with this camera if your...
Installations/Connexions
Page 37
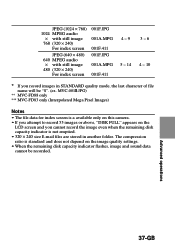
... *** MVC-FD83 only (Interpolated Mega Pixel Images) Notes • The file data for index screen is a available only on this camera. • If you attempt to record 55 images or above, "DISK FULL" appears on the image quality settings. • When the remaining disk capacity indicator flashes, image and sound data cannot be "S". (ex. The compression ratio is standard and does not depend on the LCD screen and you record images in...
... *** MVC-FD83 only (Interpolated Mega Pixel Images) Notes • The file data for index screen is a available only on this camera. • If you attempt to record 55 images or above, "DISK FULL" appears on the image quality settings. • When the remaining disk capacity indicator flashes, image and sound data cannot be "S". (ex. The compression ratio is standard and does not depend on the LCD screen and you record images in...
Installations/Connexions
Page 48
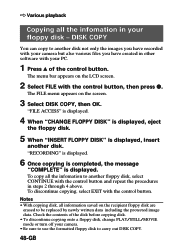
... the protected image data. "RECORDING" is displayed. 6 Once copying is completed, the message "COMPLETE" is displayed, insert another floppy disk, select CONTINUE with the control button and repeat the procedures in other software with your camera but also various files you have recorded with your PC. 1 Press v of the disk before copying disk. • To discontinue copying onto a floppy disk, change PLAY/STILL/MOVIE mode or turn off your floppy disk - The FILE menu appears on the LCD screen. 2 Select FILE with the control button...
... the protected image data. "RECORDING" is displayed. 6 Once copying is completed, the message "COMPLETE" is displayed, insert another floppy disk, select CONTINUE with the control button and repeat the procedures in other software with your camera but also various files you have recorded with your PC. 1 Press v of the disk before copying disk. • To discontinue copying onto a floppy disk, change PLAY/STILL/MOVIE mode or turn off your floppy disk - The FILE menu appears on the LCD screen. 2 Select FILE with the control button...

Installations/Connexions
Page 52
... sound is stereo type, connect the audio plug of the A/V connecting cable to a audio input jack (white) of TV. • When you record images connecting your camera turns off each equipment. • When you connect the A/V connecting cable to TV, the display of the TV. 2 Set the TV/VIDEO input select on the TV to VIDEO. 3 Start playback on the TV screen. k Various playback Using image data with other equipment for a long time, use the AC power...
... sound is stereo type, connect the audio plug of the A/V connecting cable to a audio input jack (white) of TV. • When you record images connecting your camera turns off each equipment. • When you connect the A/V connecting cable to TV, the display of the TV. 2 Set the TV/VIDEO input select on the TV to VIDEO. 3 Start playback on the TV screen. k Various playback Using image data with other equipment for a long time, use the AC power...

Installations/Connexions
Page 54
Items in STILL or MOVIE mode Menu Item1 Item2 Setting Meaning SELF TIMER To record with self-timer. (p. 11) MACRO ON To record in macro OFF To record normally FILE DISK TOOL FORMAT OK To format the floppy disk loaded in sequence even if the floppy disk is displayed during formatting, then it disappears after the completion. Menu items that can operate at the factory. The LCD screen shows only the items you can be modified differ depending...
Items in STILL or MOVIE mode Menu Item1 Item2 Setting Meaning SELF TIMER To record with self-timer. (p. 11) MACRO ON To record in macro OFF To record normally FILE DISK TOOL FORMAT OK To format the floppy disk loaded in sequence even if the floppy disk is displayed during formatting, then it disappears after the completion. Menu items that can operate at the factory. The LCD screen shows only the items you can be modified differ depending...
Installations/Connexions
Page 55
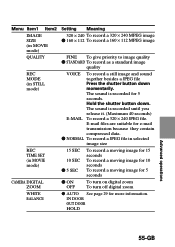
... To record a JPEG file in MOVIE mode) CAMERA DIGITAL ZOOM WHITE BALANCE Setting Meaning 320 × 240 To record a 320 × 240 MPEG image z 160 × 112 To record a 160 × 112 MPEG image FINE To give priority to image quality z STANDARD To record as a standard image quality VOICE To record a still image and sound together besides a JPEG file Press the shutter button down . Menu Item1 Item2 IMAGE SIZE (in MOVIE mode) QUALITY REC MODE (in STILL mode) REC TIME SET (in selected image size 15...
... To record a JPEG file in MOVIE mode) CAMERA DIGITAL ZOOM WHITE BALANCE Setting Meaning 320 × 240 To record a 320 × 240 MPEG image z 160 × 112 To record a 160 × 112 MPEG image FINE To give priority to image quality z STANDARD To record as a standard image quality VOICE To record a still image and sound together besides a JPEG file Press the shutter button down . Menu Item1 Item2 IMAGE SIZE (in MOVIE mode) QUALITY REC MODE (in STILL mode) REC TIME SET (in selected image size 15...
Installations/Connexions
Page 56
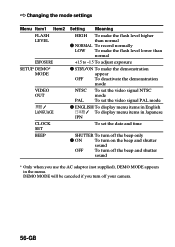
... turn off the beep and shutter sound * Only when you use the AC adaptor (not supplied), DEMO MODE appears in Japanese JPN To set the video signal PAL mode z ENGLISH To display menu items in English / To display menu items in the menu. k Changing the mode settings Menu Item1 Item2 FLASH LEVEL EXPOSURE SETUP DEMO* MODE VIDEO OUT / LANGUAGE CLOCK SET BEEP Setting Meaning HIGH To make the flash level higher than normal z NORMAL To record normally LOW To make the flash...
... turn off the beep and shutter sound * Only when you use the AC adaptor (not supplied), DEMO MODE appears in Japanese JPN To set the video signal PAL mode z ENGLISH To display menu items in English / To display menu items in the menu. k Changing the mode settings Menu Item1 Item2 FLASH LEVEL EXPOSURE SETUP DEMO* MODE VIDEO OUT / LANGUAGE CLOCK SET BEEP Setting Meaning HIGH To make the flash level higher than normal z NORMAL To record normally LOW To make the flash...
Installations/Connexions
Page 58
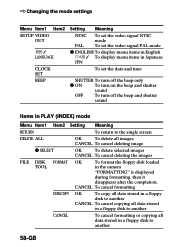
k Changing the mode settings Menu Item1 Item2 SETUP VIDEO OUT / LANGUAGE CLOCK SET BEEP Setting Meaning NTSC PAL To set the video signal NTSC mode To set the video signal PAL mode z ENGLISH To display menu items in English / To display menu items in Japanese JPN To set the date and time SHUTTER To turn off the beep only z ON To turn on the beep and shutter sound OFF To turn off the beep and shutter sound Items in PLAY (INDEX) mode Menu Item1 Item2 Setting Meaning...
k Changing the mode settings Menu Item1 Item2 SETUP VIDEO OUT / LANGUAGE CLOCK SET BEEP Setting Meaning NTSC PAL To set the video signal NTSC mode To set the video signal PAL mode z ENGLISH To display menu items in English / To display menu items in Japanese JPN To set the date and time SHUTTER To turn off the beep only z ON To turn on the beep and shutter sound OFF To turn off the beep and shutter sound Items in PLAY (INDEX) mode Menu Item1 Item2 Setting Meaning...

Installations/Connexions
Page 62
... disk is insufficient. t Set it . (p. 9) • PLAY/STILL/MOVIE is set to the non-recording position. See page 64. t Adjust brightness. (p. 10) • The no flash mode is not set . Vertical streaks appear when shooting a very bright subject. Incorrect date and time are shooting a subject with the light source behind the subject or light is not installed properly. Cause and/or Solution • The camera does not operate when using a battery pack that uses...
... disk is insufficient. t Set it . (p. 9) • PLAY/STILL/MOVIE is set to the non-recording position. See page 64. t Adjust brightness. (p. 10) • The no flash mode is not set . Vertical streaks appear when shooting a very bright subject. Incorrect date and time are shooting a subject with the light source behind the subject or light is not installed properly. Cause and/or Solution • The camera does not operate when using a battery pack that uses...
Installations/Connexions
Page 63
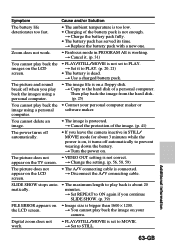
... cannot play back the • Contact your camera. The picture and sound break off when you leave the camera inactive in PROGRAM AE is not correct. t Change the setting. (p. 56, 58, 59) The picture does not appear on a floppy disk. Digital zoom does not work . • Panfocus mode in STILL/ MOVIE mode for about 20 matically. t Copy to STILL. t Disconnect the A/V connecting cable. You cannot delete an image. • The image is on...
... cannot play back the • Contact your camera. The picture and sound break off when you leave the camera inactive in PROGRAM AE is not correct. t Change the setting. (p. 56, 58, 59) The picture does not appear on a floppy disk. Digital zoom does not work . • Panfocus mode in STILL/ MOVIE mode for about 20 matically. t Copy to STILL. t Disconnect the A/V connecting cable. You cannot delete an image. • The image is on...

Installations/Connexions
Page 67
... L, M Manual focusing 27 Menu 53 Moisture condensation .......... 61 MPEG 25, 34, 36 N, P Normal charge 12 Photocell window 11 PICTURE EFFECT 30 Playing back Moving image 21 Still image 20 PROGRAM AE 31 PROTECT 41 Q, R QUALITY 33 REC MODE 35 Recording Moving image 18 Still image 17 Remaining battery indicator ... 19, 22 S, T Self-diagnosis display 64 Self timer 11 Setting the date and time ....... 15 SLIDE SHOW 39 Troubleshooting 62 U, V Using flash 11 Viewing images using a personal computer 25 VOICE 35 W, Z Warning messages...
... L, M Manual focusing 27 Menu 53 Moisture condensation .......... 61 MPEG 25, 34, 36 N, P Normal charge 12 Photocell window 11 PICTURE EFFECT 30 Playing back Moving image 21 Still image 20 PROGRAM AE 31 PROTECT 41 Q, R QUALITY 33 REC MODE 35 Recording Moving image 18 Still image 17 Remaining battery indicator ... 19, 22 S, T Self-diagnosis display 64 Self timer 11 Setting the date and time ....... 15 SLIDE SHOW 39 Troubleshooting 62 U, V Using flash 11 Viewing images using a personal computer 25 VOICE 35 W, Z Warning messages...


