Operating Instructions
Page 4
... not shake or strike the camera. ∗ The Mavica disc is not possible due to the disc, the ACCESS lamp flashes (red). When a distinction between CD-Rs and CD-RWs is necessary, "disc" is being read from or written to a malfunction of your camera This digital still camera uses 8 cm CD-Rs/CDRWs as recording media. When this camera, and page 108 for precautions...
... not shake or strike the camera. ∗ The Mavica disc is not possible due to the disc, the ACCESS lamp flashes (red). When a distinction between CD-Rs and CD-RWs is necessary, "disc" is being read from or written to a malfunction of your camera This digital still camera uses 8 cm CD-Rs/CDRWs as recording media. When this camera, and page 108 for precautions...

Operating Instructions
Page 6
...still images Deleting images 35 Formatting a CD-RW 38 Before advanced operations How to setup and operate your camera 15 How to the subject - EV adjustment 46 Selecting the metering mode 47 Adjusting color tones - Multi Burst 51 Shooting two images continuously - Voice 54 Shooting according to record... button 15 Setting the date and time 16 Shooting still images Inserting and removing a disc 18 Initializing a disc 19 What is initialization 19 Setting the still image size 20 Image size and quality 21 Basic still image shooting - Clip Motion 50 Shooting in TIFF mode...
...still images Deleting images 35 Formatting a CD-RW 38 Before advanced operations How to setup and operate your camera 15 How to the subject - EV adjustment 46 Selecting the metering mode 47 Adjusting color tones - Multi Burst 51 Shooting two images continuously - Voice 54 Shooting according to record... button 15 Setting the date and time 16 Shooting still images Inserting and removing a disc 18 Initializing a disc 19 What is initialization 19 Setting the still image size 20 Image size and quality 21 Basic still image shooting - Clip Motion 50 Shooting in TIFF mode...

Operating Instructions
Page 7
... 107 On discs 108 On "InfoLITHIUM" battery pack .........109 Specifications 111 The LCD screen 113 Index Index 116 7 Playback zoom 60 Recording an enlarged image - Jog playback 63 Still image editing ...through a USB connection 81 Installing the PTP Manager 81 Installing "ImageMixer 83 Connecting the camera to print - Rotate 62 Playing back images shot in Multi Burst mode 63 Playing...images using CD-ROM drive .. 75 Finalizing a disc 75 What is finalization 75 Canceling finalization (Unfinalize) (CD-RW only 76 Using the supplied 8cm CD adapter... 77 Viewing images through a CD-ROM ...
... 107 On discs 108 On "InfoLITHIUM" battery pack .........109 Specifications 111 The LCD screen 113 Index Index 116 7 Playback zoom 60 Recording an enlarged image - Jog playback 63 Still image editing ...through a USB connection 81 Installing the PTP Manager 81 Installing "ImageMixer 83 Connecting the camera to print - Rotate 62 Playing back images shot in Multi Burst mode 63 Playing...images using CD-ROM drive .. 75 Finalizing a disc 75 What is finalization 75 Canceling finalization (Unfinalize) (CD-RW only 76 Using the supplied 8cm CD adapter... 77 Viewing images through a CD-ROM ...
Operating Instructions
Page 8
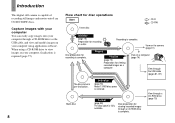
...) View through a CD-ROM drive is pre-finalization. Finalize (page 75) Preparation for recording on the camera (page 31) Record Disc preparation for viewing recorded images through the USB cable (pages 81, 87) The disc status is complete. View on a disc Recording is complete. Introduction This digital still camera is complete. Disc preparation for recording is capable of recording still images and movies onto 8 cm CD-R/CD-RW discs.
...) View through a CD-ROM drive is pre-finalization. Finalize (page 75) Preparation for recording on the camera (page 31) Record Disc preparation for viewing recorded images through the USB cable (pages 81, 87) The disc status is complete. View on a disc Recording is complete. Introduction This digital still camera is complete. Disc preparation for recording is capable of recording still images and movies onto 8 cm CD-R/CD-RW discs.

Operating Instructions
Page 9
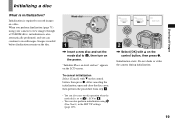
... receptacle (bottom surface) H Flash emitter (27) I Self-timer lamp (26)/ AF illuminator (28, 105) qa qs qd qf qg J Hook for lens cap/shoulder strap K Disc cover OPEN lever (18) L Lens cap M A/V OUT (MONO) jack (33) N (USB) jack (84) O DC IN jack (11, 14) • Use a ...tripod with a screw length of actually recorded pixels is determined according to tripods having longer screws, and may damage the camera. • Do not touch the microphone while recording. • The "3.2 MEGA PIXELS" indicated on the camera shows the number of the JCIA (Japan...
... receptacle (bottom surface) H Flash emitter (27) I Self-timer lamp (26)/ AF illuminator (28, 105) qa qs qd qf qg J Hook for lens cap/shoulder strap K Disc cover OPEN lever (18) L Lens cap M A/V OUT (MONO) jack (33) N (USB) jack (84) O DC IN jack (11, 14) • Use a ...tripod with a screw length of actually recorded pixels is determined according to tripods having longer screws, and may damage the camera. • Do not touch the microphone while recording. • The "3.2 MEGA PIXELS" indicated on the camera shows the number of the JCIA (Japan...

Operating Instructions
Page 13
... images and battery life that can be recorded/ viewed The tables show the approximate number of images and the battery life that can be recorded or viewed take into account changing the supplied disc as time passes (page 110). -...2000 Approx. 170 2) Viewing single images in the SET UP settings Viewing still images2) Image size 3.1M VGA NP-FM50 (supplied) No. The zoom is used - Shooting still images Under the average conditions1) NP-FM50 (supplied) Image size No.... times - [AF Mode] is set to [Fine] - The camera has been turned on the conditions of 25°C (77°F).
... images and battery life that can be recorded/ viewed The tables show the approximate number of images and the battery life that can be recorded or viewed take into account changing the supplied disc as time passes (page 110). -...2000 Approx. 170 2) Viewing single images in the SET UP settings Viewing still images2) Image size 3.1M VGA NP-FM50 (supplied) No. The zoom is used - Shooting still images Under the average conditions1) NP-FM50 (supplied) Image size No.... times - [AF Mode] is set to [Fine] - The camera has been turned on the conditions of 25°C (77°F).

Operating Instructions
Page 18
... clicks. • Do not forcibly push on disc, see page 108. Removing the disc Open the disc cover. Disc 2 Push here , Place a disc in the disc tray. Check to prepare the disc for recording depending on the LCD screen and it may appear on the disc condition. 18 Shooting still images Inserting and removing a disc Disc cover OPEN lever Pickup lens 1 , Open...
... clicks. • Do not forcibly push on disc, see page 108. Removing the disc Open the disc cover. Disc 2 Push here , Place a disc in the disc tray. Check to prepare the disc for recording depending on the LCD screen and it may appear on the disc condition. 18 Shooting still images Inserting and removing a disc Disc cover OPEN lever Pickup lens 1 , Open...
Operating Instructions
Page 19
... also perform initialization using your camera to view images through a CD-ROM drive, initialization is set the mode dial to , then turn on the control button, then press z. To cancel initialization Select [Cancel] with v on the LCD screen. Shooting still images Initializing a disc What is required to record images on a disc. Initialization starts. Initialization is initialization...
... also perform initialization using your camera to view images through a CD-ROM drive, initialization is set the mode dial to , then turn on the control button, then press z. To cancel initialization Select [Cancel] with v on the LCD screen. Shooting still images Initializing a disc What is required to record images on a disc. Initialization starts. Initialization is initialization...

Operating Instructions
Page 21
...the larger the amount of data needed to preserve your disc. You can choose image size from these values according to...images VGA 640×480 Creating home pages 1) This option records images in a supplied CD-R2) (Units: images) Quality3) Image size Fine Standard 3.... maximum 3.1 MEGA pixels. • When images recorded using earlier Sony models are played back on this camera, the display may differ from the actual image...camera, they all look the same size. • Number of shooting images can differ from among the five options in your image. Image size and quality Shooting still...
...the larger the amount of data needed to preserve your disc. You can choose image size from these values according to...images VGA 640×480 Creating home pages 1) This option records images in a supplied CD-R2) (Units: images) Quality3) Image size Fine Standard 3.... maximum 3.1 MEGA pixels. • When images recorded using earlier Sony models are played back on this camera, the display may differ from the actual image...camera, they all look the same size. • Number of shooting images can differ from among the five options in your image. Image size and quality Shooting still...

Operating Instructions
Page 22
... • If you release the shutter button, the recording will be recorded appears on the LCD screen for approximately five seconds. • This camera can continue to shoot, but the AF is not complete...in the center of the folder where the image will be stored in the disc (page 41). 2 , Hold the camera steadily with your fingers. • The minimum focal distance to , and turn... on the AF range finder frame, see page 43.) 22 Basic still image shooting - AE/AF lock indicator...
... • If you release the shutter button, the recording will be recorded appears on the LCD screen for approximately five seconds. • This camera can continue to shoot, but the AF is not complete...in the center of the folder where the image will be stored in the disc (page 41). 2 , Hold the camera steadily with your fingers. • The minimum focal distance to , and turn... on the AF range finder frame, see page 43.) 22 Basic still image shooting - AE/AF lock indicator...

Operating Instructions
Page 23
...AF 4 , Press the shutter button fully down the battery (page 15). • While the image is being recorded on , the AE/AF lock indicator changes to flashing slowly. Do not shake or strike the camera while this time, as a mirror or a luminous body. • A flashing subject. • A backlit ... "AF mode" which sets the focus operation according to prevent wearing down . See page 43 for details. 23 Shooting still images The Auto Focus function may be recorded in the disc. SCN (Scene Selection) You can set to [Fine] (page 41). (Program auto shooting) You can select from ...
...AF 4 , Press the shutter button fully down the battery (page 15). • While the image is being recorded on , the AE/AF lock indicator changes to flashing slowly. Do not shake or strike the camera while this time, as a mirror or a luminous body. • A flashing subject. • A backlit ... "AF mode" which sets the focus operation according to prevent wearing down . See page 43 for details. 23 Shooting still images The Auto Focus function may be recorded in the disc. SCN (Scene Selection) You can set to [Fine] (page 41). (Program auto shooting) You can select from ...

Operating Instructions
Page 35
...To cancel deleting Select [Exit] with b/B on the control button. Deleting still images Deleting still images Deleting images 60min VGA 101 2/9 60min VGA 101 2/9 60min VGA 101... image you want to delete. • When using a CD-R, the disc remaining space does not increase even if you delete images. • When using a CD-RW, the disc remaining space increases only if you delete the last image you...; You cannot delete the protected image (page 65). • If the disc remaining space is indicated on the camera. When the message "Disc access" disappears, the image has been deleted.
...To cancel deleting Select [Exit] with b/B on the control button. Deleting still images Deleting still images Deleting images 60min VGA 101 2/9 60min VGA 101 2/9 60min VGA 101... image you want to delete. • When using a CD-R, the disc remaining space does not increase even if you delete images. • When using a CD-RW, the disc remaining space increases only if you delete the last image you...; You cannot delete the protected image (page 65). • If the disc remaining space is indicated on the camera. When the message "Disc access" disappears, the image has been deleted.

Operating Instructions
Page 37
Deleting still images Deleting images in index (triple-image) mode Delete Exit OK Aperture Value: F3.8 Shutter Speed: 1/30 Exposure Value: 0.0 ISO: 100 101-0002 2003 7 4 10:...) screen (page 32) is displayed, set the image you want to delete to the center with B on the control button. 2 , Press (Delete). When the message "Disc access" disappears, the images have been deleted. The image has not yet been deleted at this point. 37
Deleting still images Deleting images in index (triple-image) mode Delete Exit OK Aperture Value: F3.8 Shutter Speed: 1/30 Exposure Value: 0.0 ISO: 100 101-0002 2003 7 4 10:...) screen (page 32) is displayed, set the image you want to delete to the center with B on the control button. 2 , Press (Delete). When the message "Disc access" disappears, the images have been deleted. The image has not yet been deleted at this point. 37

Operating Instructions
Page 38
... V on the control button, then press z. 1 , Place the CD-RW you want to use a CD-RW formatted with other equipment than this camera. • When you format a CD-RW, all the images on the disc including protected images will be formatted. • Formatting is also automatically ...initialized after formatting. 2 , Select 1 (Disc Tool 1) with v/ V on the control button, then press z. Set the mode dial to SET UP, and turn on the camera. • A CD-R cannot be deleted. Select [Format] with v/V, then press B. • We ...
... V on the control button, then press z. 1 , Place the CD-RW you want to use a CD-RW formatted with other equipment than this camera. • When you format a CD-RW, all the images on the disc including protected images will be formatted. • Formatting is also automatically ...initialized after formatting. 2 , Select 1 (Disc Tool 1) with v/ V on the control button, then press z. Set the mode dial to SET UP, and turn on the camera. • A CD-R cannot be deleted. Select [Format] with v/V, then press B. • We ...

Operating Instructions
Page 39
..., formatting has been completed. • It may take some time to format a CD-RW. • A CD-RW can be formatted about 300 times. • A CD-RW formatted using other equipment than this camera cannot be erased Ready? To cancel formatting Select [Cancel] with V on the control...on the control button, then press z. When the message "Format in progress 3 , Select [OK] with v, then press z. Format the disc again with this camera. 39 "Format Place on level surface" appears on the LCD screen. Deleting still images Format Place on level surface All data will be used with this...
..., formatting has been completed. • It may take some time to format a CD-RW. • A CD-RW can be formatted about 300 times. • A CD-RW formatted using other equipment than this camera cannot be erased Ready? To cancel formatting Select [Cancel] with V on the control...on the control button, then press z. When the message "Format in progress 3 , Select [OK] with v, then press z. Format the disc again with this camera. 39 "Format Place on level surface" appears on the LCD screen. Deleting still images Format Place on level surface All data will be used with this...

Operating Instructions
Page 41
The menu appears. Creating or selecting a folder Mode dial: SET UP Your camera can select the still image quality from [Fine] or [Standard]. Deciding the still image quality Mode dial: /SCN You can create multiple folders within a disc. b Press MENU. Control button Mode dial MENU a Set the mode dial to (Multi Burst only) (page 51... button Mode dial c Select (P. Quality) with b/B, then select the desired image quality with v/V. When the folder capacity is exceeded, a new folder is selected as the recording folder.
The menu appears. Creating or selecting a folder Mode dial: SET UP Your camera can select the still image quality from [Fine] or [Standard]. Deciding the still image quality Mode dial: /SCN You can create multiple folders within a disc. b Press MENU. Control button Mode dial MENU a Set the mode dial to (Multi Burst only) (page 51... button Mode dial c Select (P. Quality) with b/B, then select the desired image quality with v/V. When the folder capacity is exceeded, a new folder is selected as the recording folder.

Operating Instructions
Page 42
... a number one higher than the largest number in the disc, and the folder becomes the recording folder. Select REC. You cannot move images to SET UP. Creating a new folder a Set the mode dial to a different folder with this camera. b Select 2 (Disc Tool 2) with B/v, then press z. Folder 2/2 102 Folder... creation Select [Cancel] in step 2 or 3. • Once you create a new folder, you cannot delete the new folder with the camera. • Images are recorded in the newly selected folder. b Select 2 (Disc Tool 2) with v, then press z. The recording folder selection screen appears.
... a number one higher than the largest number in the disc, and the folder becomes the recording folder. Select REC. You cannot move images to SET UP. Creating a new folder a Set the mode dial to a different folder with this camera. b Select 2 (Disc Tool 2) with B/v, then press z. Folder 2/2 102 Folder... creation Select [Cancel] in step 2 or 3. • Once you create a new folder, you cannot delete the new folder with the camera. • Images are recorded in the newly selected folder. b Select 2 (Disc Tool 2) with v, then press z. The recording folder selection screen appears.

Operating Instructions
Page 50
... Motion images is reduced to the limitations of the GIF format, the number of the frame images while making it convenient for use on the disc. The Image Size setup appears. Making "Clip Motion" e Shoot the image for the first frame. To delete some images. This is reduced ... Last], or [Delete All] with v/V. Clip Motion Mode dial: You can shoot a number of up to two frames can be recorded. Mobile (120×108) Clip Motion of consecutive still images (GIF animation). b Press (Image Size). c Select the desired mode with b/B, then press z. 50 All the frame images are...
... Motion images is reduced to the limitations of the GIF format, the number of the frame images while making it convenient for use on the disc. The Image Size setup appears. Making "Clip Motion" e Shoot the image for the first frame. To delete some images. This is reduced ... Last], or [Delete All] with v/V. Clip Motion Mode dial: You can shoot a number of up to two frames can be recorded. Mobile (120×108) Clip Motion of consecutive still images (GIF animation). b Press (Image Size). c Select the desired mode with b/B, then press z. 50 All the frame images are...

Operating Instructions
Page 51
... frames in the SET UP settings (pages 40 and 105). You can be recorded in Clip Motion, see page 100. • The date and time are not recorded on the disc until you carry out step 6. • For the number of images that can choose the frame interval from the actual ...images are not superimposed onto Clip Motion images. • When viewing an image recorded in Clip Motion on this camera may appear different from the menu settings (pages 40 and 103). 1/30 1/7.5 1/15 1/30 WB Interval Advanced still image shooting 51 Shooting in sports, for checking your form in Multi Burst ...
... frames in the SET UP settings (pages 40 and 105). You can be recorded in Clip Motion, see page 100. • The date and time are not recorded on the disc until you carry out step 6. • For the number of images that can choose the frame interval from the actual ...images are not superimposed onto Clip Motion images. • When viewing an image recorded in Clip Motion on this camera may appear different from the menu settings (pages 40 and 103). 1/30 1/7.5 1/15 1/30 WB Interval Advanced still image shooting 51 Shooting in sports, for checking your form in Multi Burst ...

Operating Instructions
Page 57
... Mode dial: /SCN/ You can digitally process images to , or SCN. 57 Advanced still image shooting The color and brightness of the picture are temporarily stored in the camera memory, letting you confirm whether or not to record images - Confirming whether to save the images you have recorded on a disc. b Select (Disc Tool 2) with B/v, then press z. Sepia...
... Mode dial: /SCN/ You can digitally process images to , or SCN. 57 Advanced still image shooting The color and brightness of the picture are temporarily stored in the camera memory, letting you confirm whether or not to record images - Confirming whether to save the images you have recorded on a disc. b Select (Disc Tool 2) with B/v, then press z. Sepia...


